By: John Miner | Updated: 2023-07-20 | Comments | Related: More > Import and Export
Problem
Today, many companies have multiple information systems that may reside on premises and in cloud. For mid to high level IT managers, it is important to collate this information into a single source of truth for corporate reporting. How can we work with multiple information systems using SQL Server Integration Services to automate the business processes?
Solution
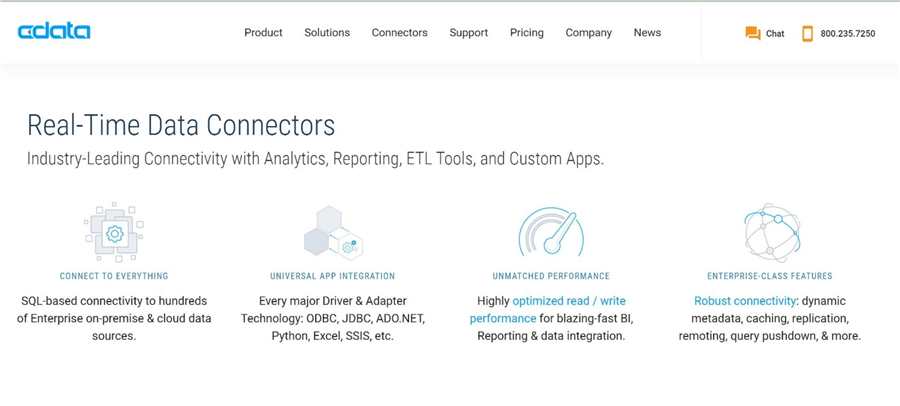
CData has built up a massive collection of data connectors that can be used with many different developer tools. Please see the image below taken from http://www.cdata.com/ detailing their offerings. Today, we are going to focus on the data connectors that can be used with SSIS.
Business Problem
The "Power Up Generators Inc." business is using Salesforce CRM online to keep track of accounts, contacts, and opportunities. Once a sale is won, that opportunity is turned into a customer, an invoice and a payment within QuickBooks online accounting platform from Intuit. Right now, reporting can be done from either Salesforce or QuickBooks online. However, a holistic picture of what is happening with the business can't be seen. The IT manager has asked you to develop a dimensional model in the Snowflake cloud data platform that will be used for corporate reporting.
All development of the solution will be done on a virtual machine in the Azure Cloud named vm4win10. It is assumed that the latest version of Visual Studio 2019 has been installed with the extensions for SSIS projects. I will be skipping over some simple steps such the installation process for the adapters. Otherwise, the length of this article would end up being a small book. However, I will be focusing on the ETL solution and the dimensional model which are key components of the solution.
System Architecture
The overall goal of this project is to create a unified cloud reporting system given two cloud applications. A dashboard that represents data from multiple systems is sometimes called a "single pane of glass". At the center of this architecture is an installation of Microsoft SQL Server Integration Services with the CData connectors for the two data sources and the one target destination. This same architecture can be used during development by replacing SSIS with Visual Studio.
One might look at the diagram and ask why are the tables from Salesforce and QuickBooks being saved to delimited files on the ETL server?
There are two reasons why I choose to use an intermediate step instead of reading for the source and writing to the target. First reason is that the source tables have too many custom fields. This is typical of these commercial off the self (COTS) packages. During data discovery, I had to trim down the number of columns to a minimum required to build a good dimensional model based on the business needs. The second reason is that both applications supply sample test data. However, the data is not correlated and would be useless for reporting. Therefore, I used information from the account and contacts tables in Salesforce to create import files for the customer and invoice tables in QuickBooks. In real life, the "Power Up Generators Inc." company would have sales and accounting employees who would manually enter the data.
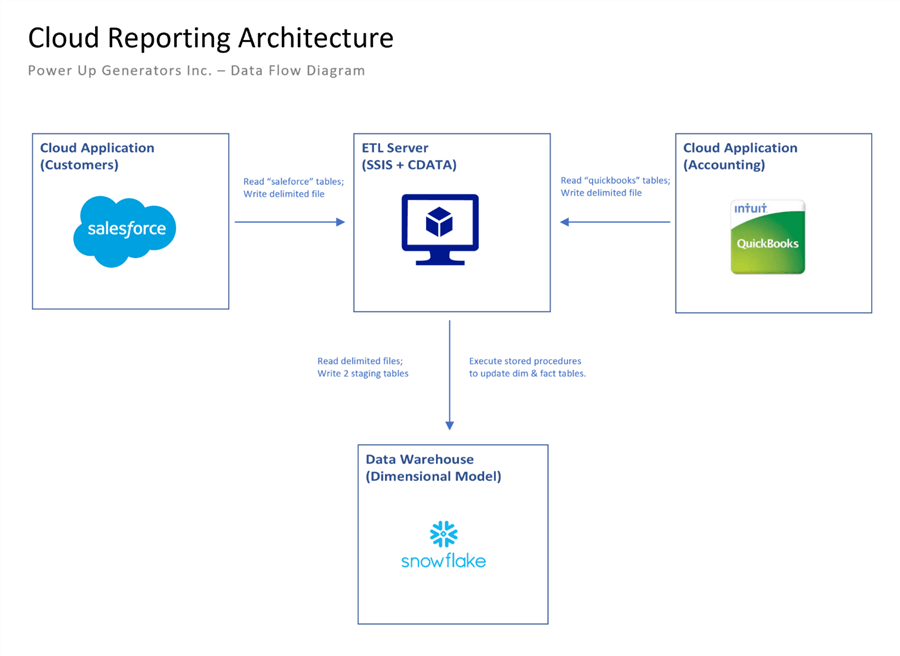
To recap, the above architecture investigates how to read from different sources and write to a single destination. Also, we will be using an execute procedure task in the control flow to run custom stored procedures in the Snowflake data warehouse to update the dimensional model. The next few sections will focus on how to install and configure the required CData connections.
Salesforce Integration
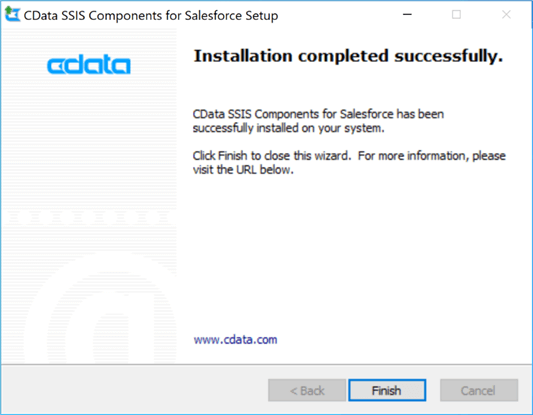
Like most companies, contacts and opportunities drive the sales pipeline. The first step is to install and configure the connection for salesforce.com. Just purchase the component from CDATA. You will be supplied with a download link as well as a product license. Follow the simple instructions which include accepting the license agreement, filling in the product registration, supplying the given license key, selecting the destination folder, choosing the components and naming the program file group. At the end of the installation, you should end up with a successful completion message as seen below.
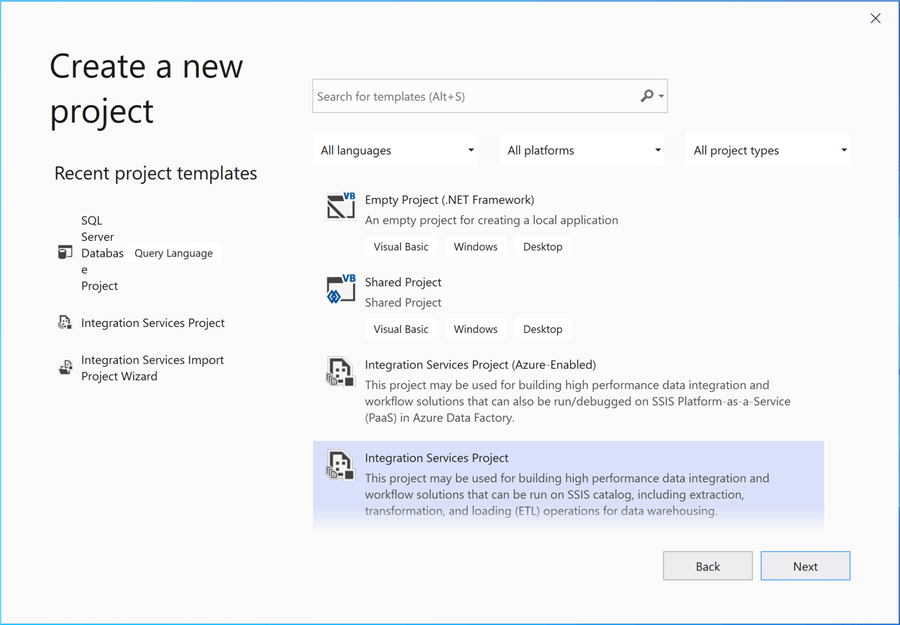
To start working with any new SSIS data connector, we need to create a new Visual Studio 2019 project. At this point, we need to decide if we are going deploy the project to Azure using Data Factory or deploy the project to a machine with SQL Server Integration Services installed. Please choose the typical integration services project.
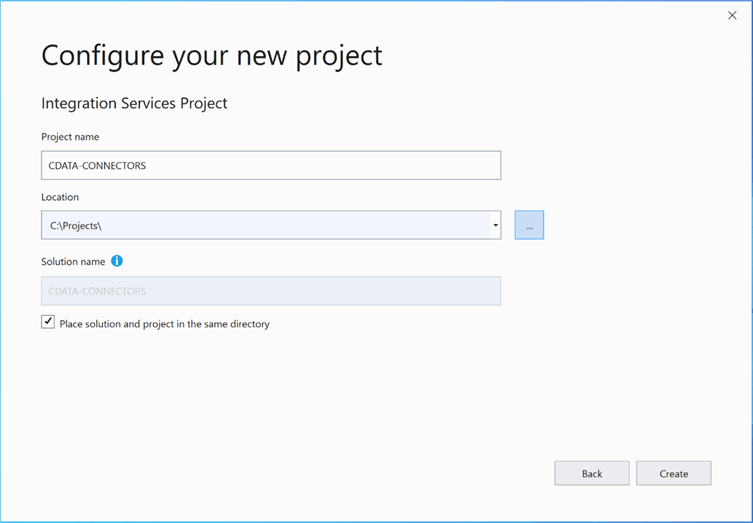
As a developer, the next choice is to select the name of the project and the location to create the files. Please choose to place the solution and project in the same directory. The only time I choose to uncheck this button is when multiple project types are place together in one solution directory. For instance, if we had a database project and an integration project, then bundling these two objects as one code base makes sense.
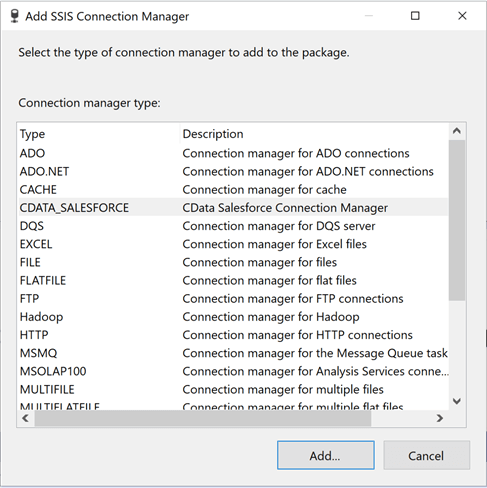
On the control flow pane, please choose to add a new connection manager. If you are unfamiliar with this process, please check out the MSDN documentation. The newly installed connector for SALEFORCE shows up in our list. Please choose that type and click the add button to continue.
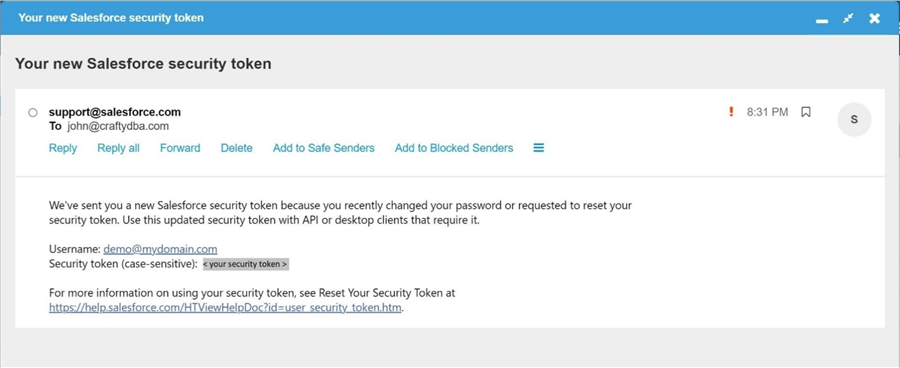
To configure the Salesforce connection, we need to request a security token. I am not an expert with this CRM product; however, I can Google the instructions like the best of them. Here are the instructions to create a new security token. The token was emailed to the account associated with the CRM product, [email protected].
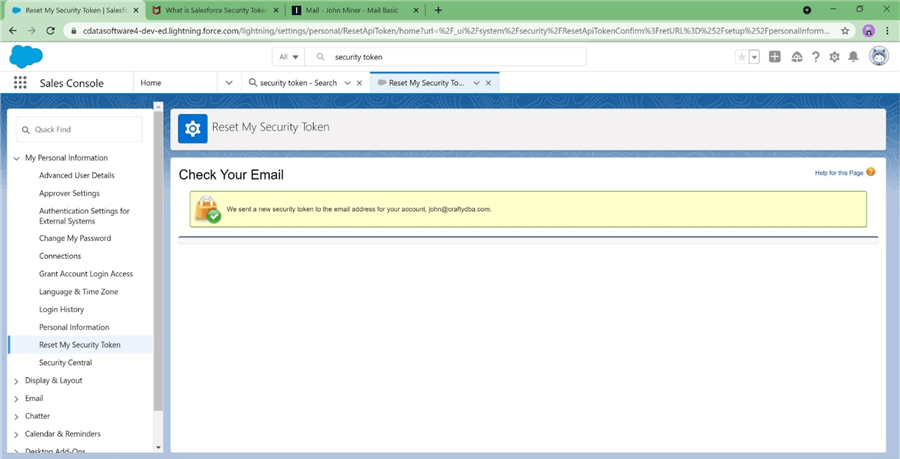
I use the email interface of my web service provider to bring up the email that was sent from salesforce.com. I took the liberty to replace the real token with a place holder. Please copy this information to notepad.exe. You will need this token to set up the connection manager.
The connection manager for Salesforce needs the following three pieces of information to make a successful connection: user name, unique password and security token. The image below shows the successful connection to CRM system.
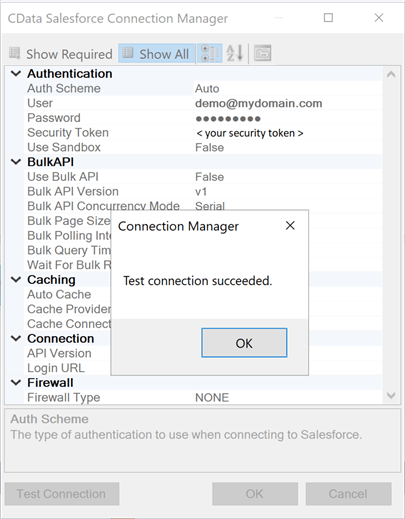
In this section, we configured a connection manager for our first source system which contains sales data.
QuickBooks Integration
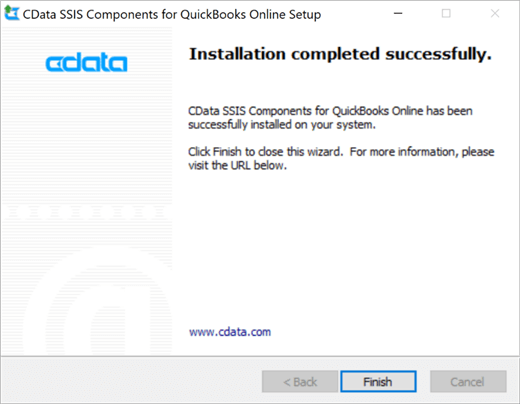
Sales opportunities that are closed and marked as a "win" eventually turn into invoices in the accounting system. That is where quickbooks.com comes in. The online service takes care of all the accounting needs required by a company. The next step is to install and configure the connection for quickbooks.com. Just purchase the component from CData. You will be supplied with a download link as well as a product license. Launch the installation program and follow the instructions. After all required information is supplied, the installation will start. Once the installation is complete, you should end up with a successful message as seen below to start integrating the data.
I have chosen to manually setup the connection using OAUTH, an industry standard protocol for web applications. Again, go to the connection manager and add a new connection. Select the CData connector for "QuickBooksOnline" accounting software. The image below shows the typical dialog box to set the properties of the connection. Make sure you choose GETANDREFRESH from the drop-down menu.
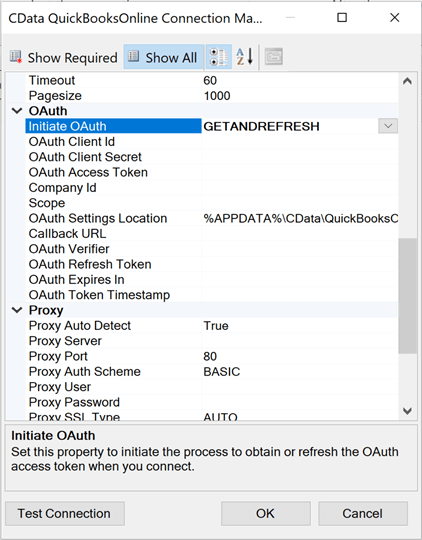
The connection protocol opens a web connection to the web service. I am entering in the correct user name and password to connect to the service.

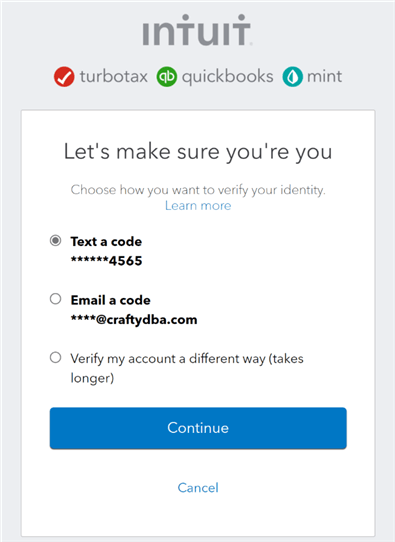
It is nice to see that the web service uses to two factor authentication. This makes sure that the confidential financial information is keep secure. As you can see in the image below, a text message with a security code has been sent to my phone. Once the code is verified, we can complete the process.
The pop-up window from the CData connector shows our authorization setup was successful.
This section focused on configuring the connection manager for our second source system which contains accounting data.
Snowflake Connection
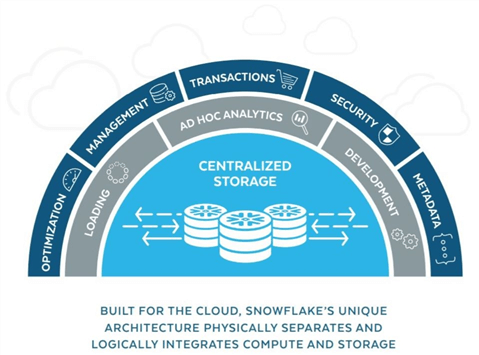
Why use Snowflake as the elastic data warehouse for this dimensional model? The whole purpose of this article is to teach an old dog (SSIS) new tricks (cloud sources). If you are curious, I am enclosing a little marketing image stating the features of this online "Platform as a Service" (PaaS) offering.
The next step is to install and configure the connection for snowflake.com. Work with CData to purchase the connector, download the install program and grab the product license. Like the two previous installs, just follow the prompts to select the options you want to use when installing the software. The image below shows the successful installation of the connector.
On the control flow pane, please choose to add a new connection manager. If you are unfamiliar with this process, please check out the MSDN documentation. The newly installed connector for SNOWFLAKE shows up in our list. Please choose that type and click the add button to continue.
Many systems have different ways to authorize the login into the service. I am choosing the simplest method which is a user name and password. Paste the URL of the web service located in Azure into the correct property setting. Snowflake has a logical grouping of objects. Warehouses may have multiple databases and each database may have multiple schemas. The following tuple represents our nested objects (DEMO_WH, MSSQLTIPS, DEMO). Additionally, a security role will be setup to allow access to the schema. I am using the MSSQLTIPS role when I work with the database. More details on how Snowflake works later on in the article.
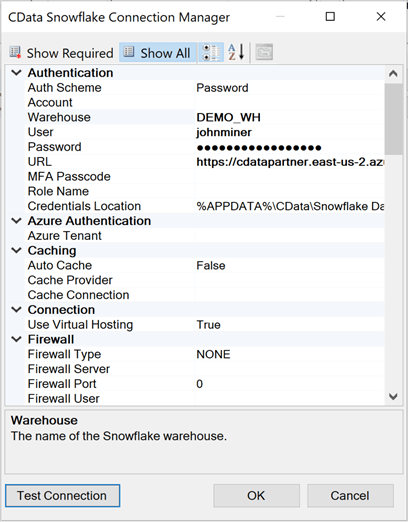
Last, click the "test connection" button to validate that the required information is correctly entered. The image below shows the results from a successful connection.

This section focused on configuring the connection manager for our first destination system which is a data warehouse with a blank schema named DEMO. We will be creating staging, dimensional and fact tables later in the article.
Salesforce Discovery
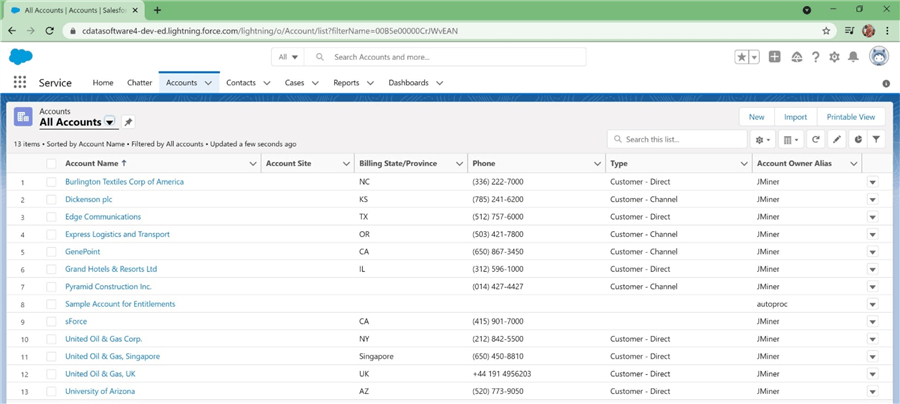
I am not an expert at Customer Relationship Management (CRM) packages such as salesforce.com. Therefore, it is prudent to get familiar with the application interface and learn how the data is logically related. The accounts screen/table contains all the companies that our salespeople have been actively pursuing opportunities with. The sample data from the CRM is focused on generator sales. Please see image below for details.
Out of the 13 accounts below, two accounts are samples and can be optionally tossed. This is a data governance problem. Do you fix the data at the source, or do you write code to fix it in the data warehouse? If possible, fix the data upstream so that downstream consumers have correct data.
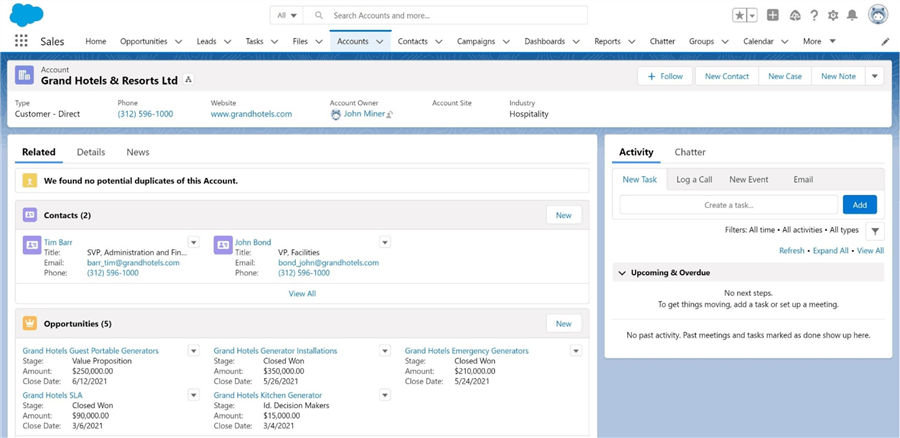
If we double click an account record, the following screen appears. There seems to be a 1-to-N relationship between accounts and contacts as well as accounts and opportunities. Both of these screens/tables will be needed for our data model.
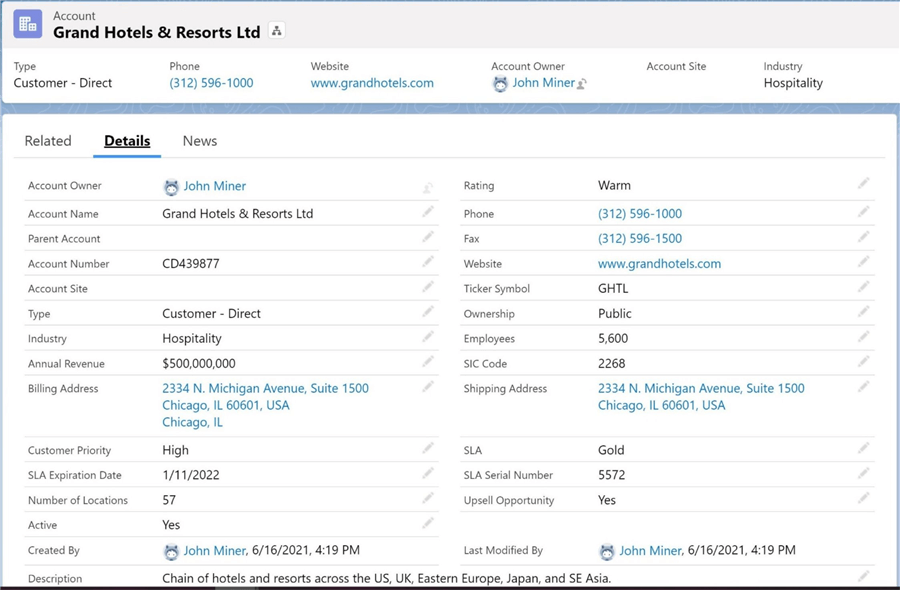
If you move from the related to details tab for this account, we can see information that pertains to this current account.
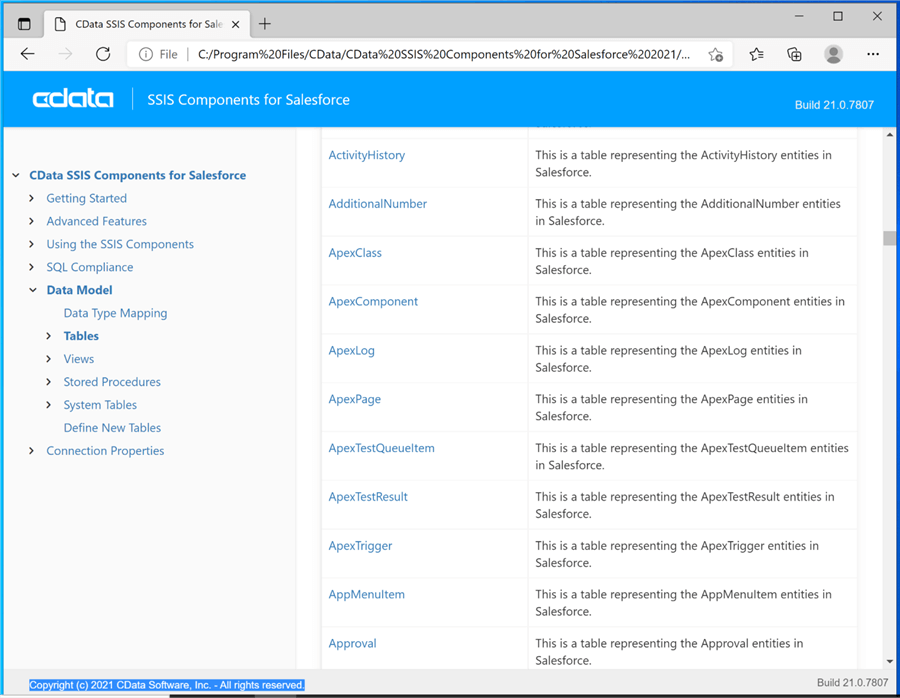
Now that we have identified the three tables we want to save as delimited files, how do we get details about the tables and columns. For pre-packaged applications, CData Software has provided the developer with a help file for the data connector. If we look at the data model section for Salesforce, there is a wealth of information about tables, views and stored procedures. A lot more can be done than just pulling data from the base tables in the system.
Now that we have identified our first set of source tables, we can start designing the SSIS packages for the final solution.
Export Salesforce Data
In software design, there are two methodologies that can be used. Top-down design is focused on looking at the system as a whole and defining black boxes. For example, the pull of Salesforce data, the pull of QuickBooks data, and the push data into Snowflake could be considered three components of the main solution. Then we take each component and stepwise refine each component until we have a working solution. Bottom-up design is focused on writing module components. For instance, a generic dataflow to read from Salesforce and write to a delimited file is a good example. Without using C# scripting, this design is difficult to implement with SSIS.
Today, we are going to use top-down design to create our solution. The main (parent) package will call several (child) packages in order to solve our business problem. The image below shows the control flow of the PULL_SALESFORCE_DATA (child) package.

The package has 4 connections defined. One connection is used to read from the Salesforce application. The other three connectors define the files associated with each table. I am choosing to use a pipe delimited file format that has column headers on the first line.
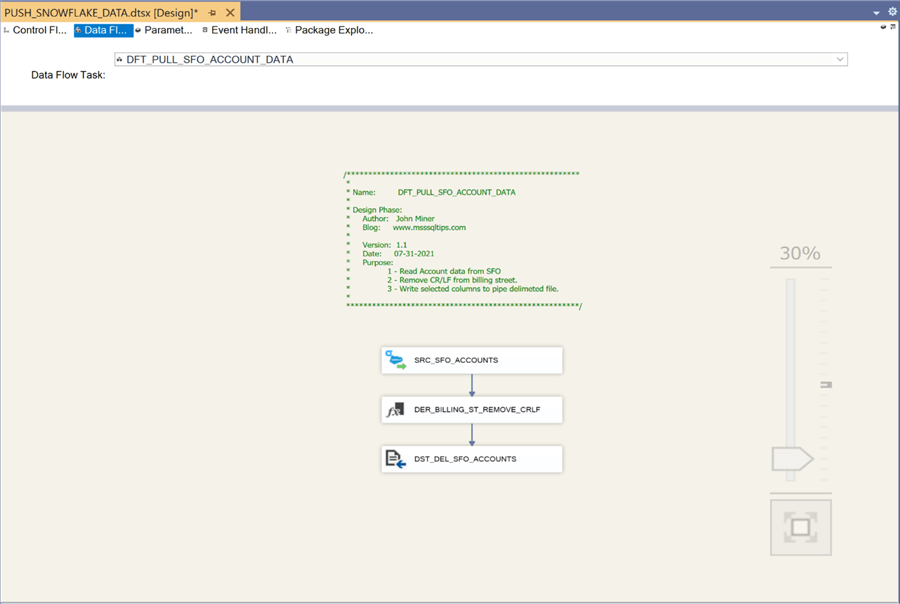
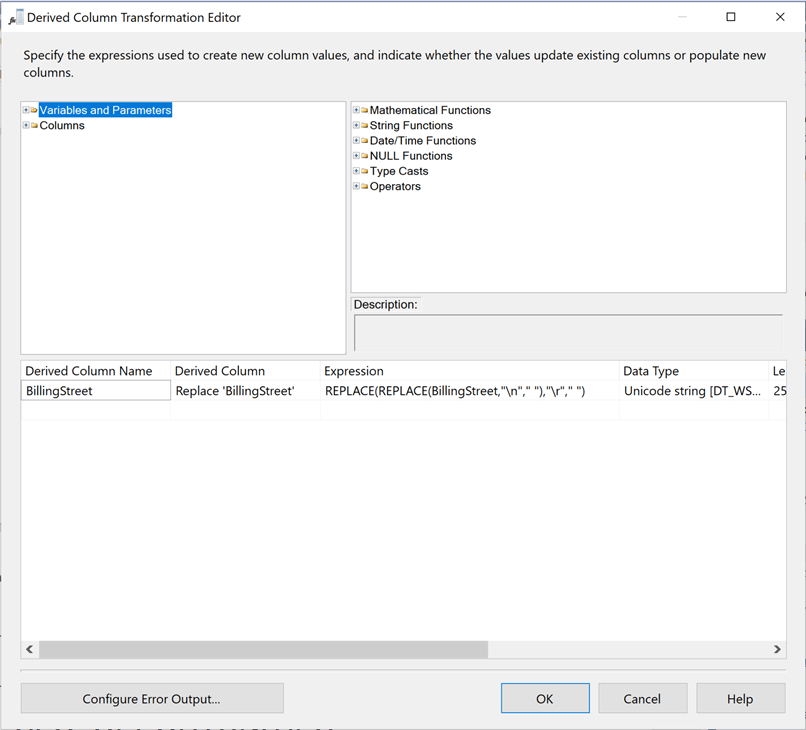
The above image shows the data flow named DFT_PULL_SFO_ACCOUNT_DATA. In a delimited format, a carriage return and line feed mark the end of the row. However, there are embedded control characters in the billing street. Therefore, a derived transformation is need to remove these unwanted characters. The following expression can be used to remove unwanted characters such as tabs, carriage returns and line feeds from string. Just replace the column place holder with the actual column.
replace((replace((replace(column,"\t","")),"\r","")),"\n","")
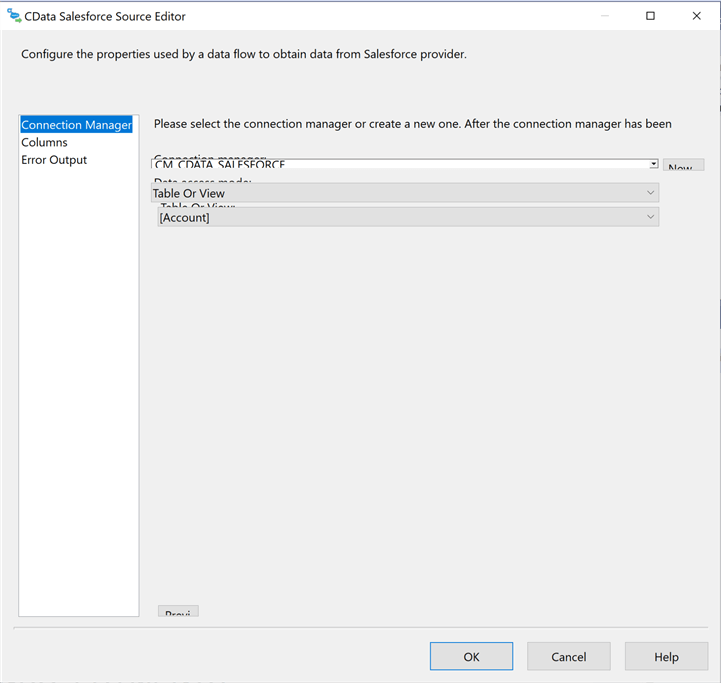
Let us take an in-depth look at the design of this data flow for account data. Other than the source and target connections changing, the design principles are the same for all of the data flows created in this visual studio project. The first step is to drag over the CData Salesforce Source onto the data flow. Please rename the object to follow naming standards. Double clicking the source will allow the designer to change the properties. We need to choose the connection manager that we previously defined, choose table as the type of connection, and choose table name. In our case, we want to start with the account table.
Typically, commercial off the shelf packages contain more fields than a typical company might use. The reasoning behind this fact is to allow for many different business cases to be solved by complex data entry panels. However, most companies will not use all the fields. The second step in our data flow development is to eliminate fields that we do not need. In our case, the business line does not want to have shipping address in the final dimensional model.

The derived column transformation allows the developer to create new or replace existing columns. The third step in our journey is to remove unwanted control characters from the billing address.
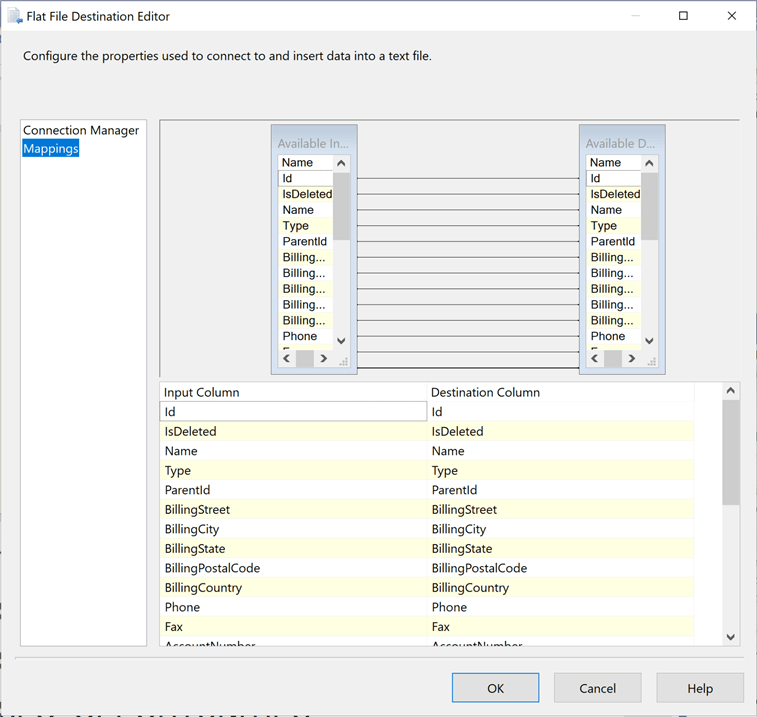
The fourth step is to create a flat file destination. Please make sure no existing files exist. Otherwise, the editor will try to guess at the column names and columns types / sizes. The image below shows the mapping from the Salesforce table to the pipe delimited file. There is a one to one mapping of the columns. This same set of tasks will have to be repeated for the other two source tables from Salesforce.
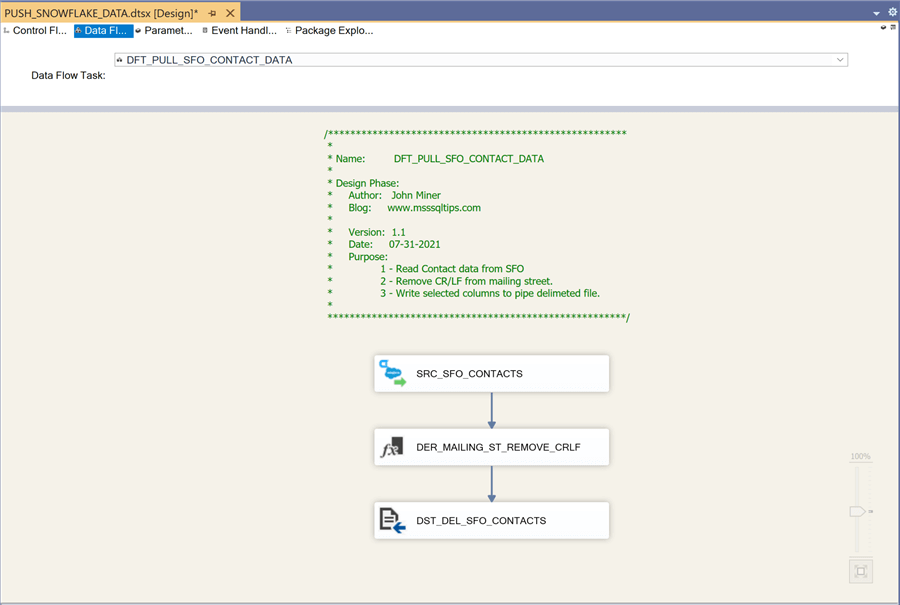
The image below shows the data flow named DFT_PULL_SFO_CONTACT_DATA. Again, we have a data issue in which unwanted characters are in the mailing street. We can used the derived transformation to solve this issue.
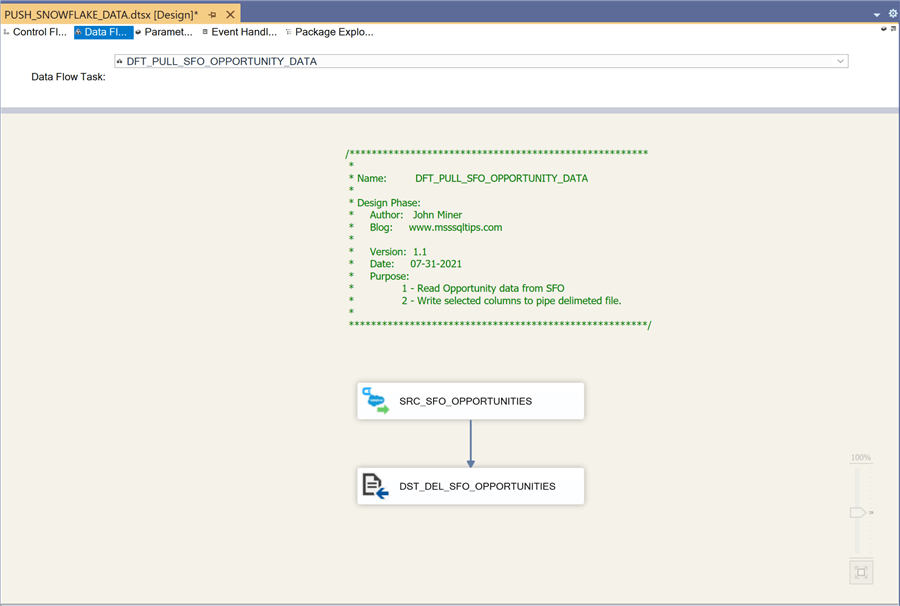
The last image shows a data flow named DFT_PULL_SFO_OPPORTUNITY_DATA that will export the table to a delimited format. There are no data issues with the columns in the source table.
It is always prudent to use the following best practices when developing software. You end up with a consistent look and feel if the developers are diligent in their work.
| No | Practice | Description |
|---|---|---|
| 1 | Internal Naming Conventions | How to name the control flow and data flow tasks? |
| 2 | External Naming Conventions | How to name both the package and output files? |
| 3 | Program Comments | Package header with who, when & why created. |
| 4 | Version Control | Very important if more than one developer. |
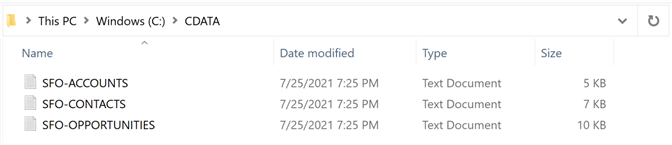
If we execute the package in debug mode in Visual Studio, we will end up with three delimited files. I choose to use the prefix of SFO to identify data from Salesforce Online.
In the next section, we will focus on converting this data into import files that can be ingested by QuickBooks Online.
Create matching QuickBooks data
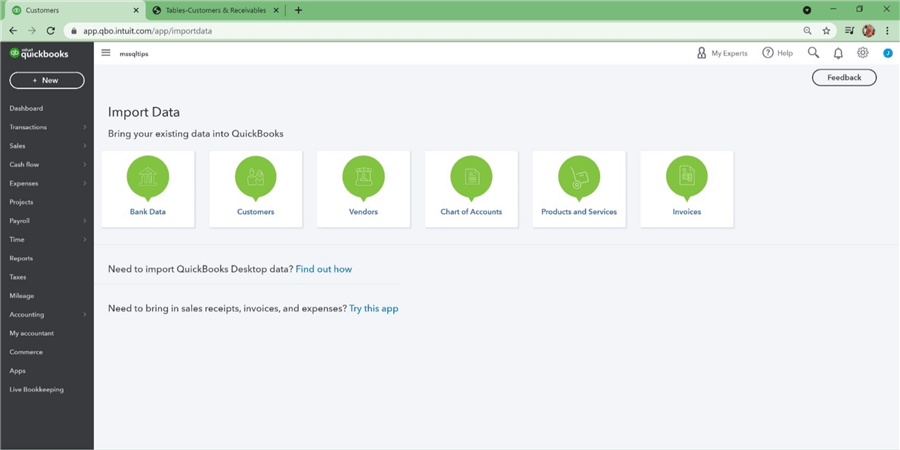
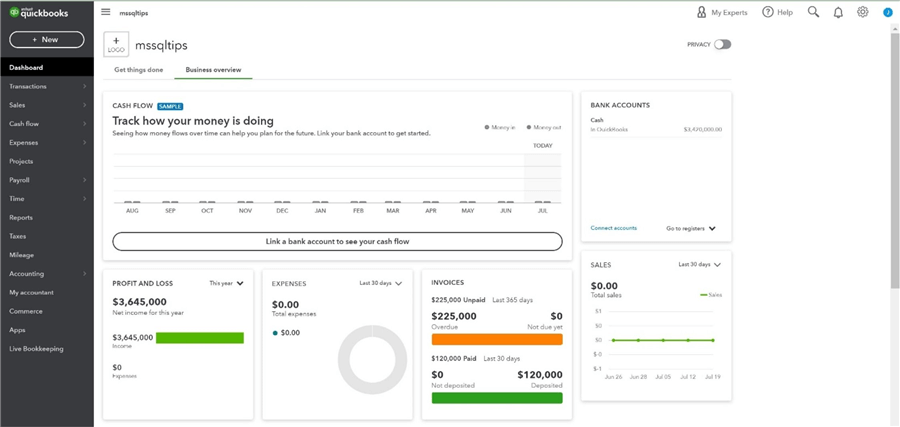
The online accounting system named "QuickBooks" can ingest delimited files for the following tables as shown in the image below. First, we need to add customers to the system.
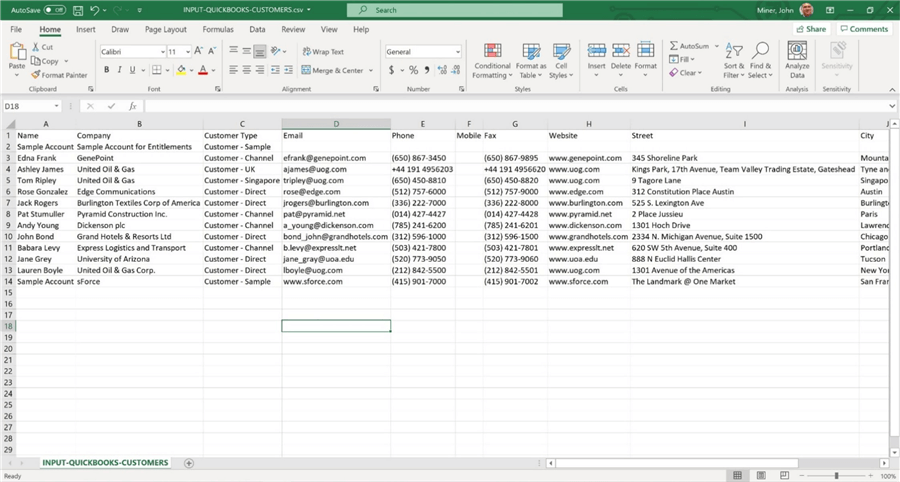
I am going to assign one contact from Salesforce as the primary billing contact in QuickBooks. The image below shows a comma separated file prepared for the customer's table.
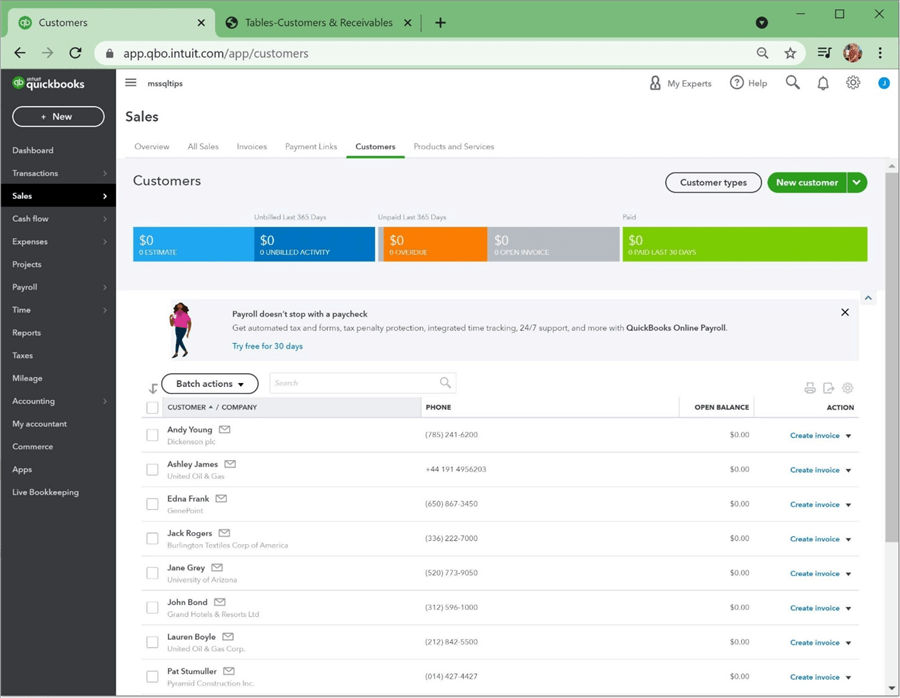
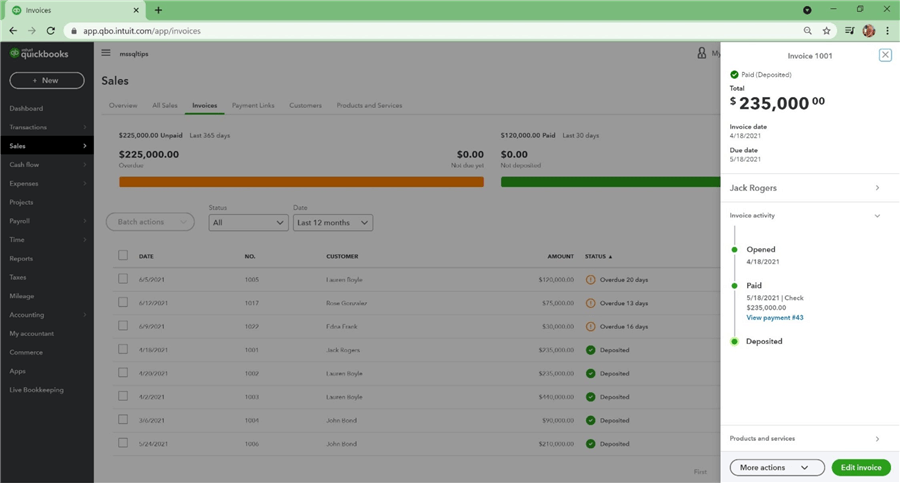
Please use the import process to add the 13 customers to the accounting system. After importing, we can look at our customers under the sales section of QuickBooks.
Before we can convert closed/won opportunities to invoices, we need to manually add products/services to the accounting system.
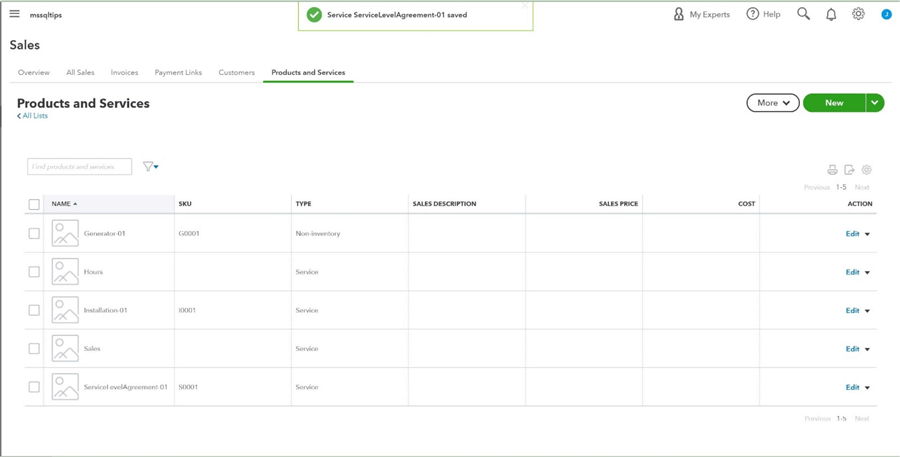
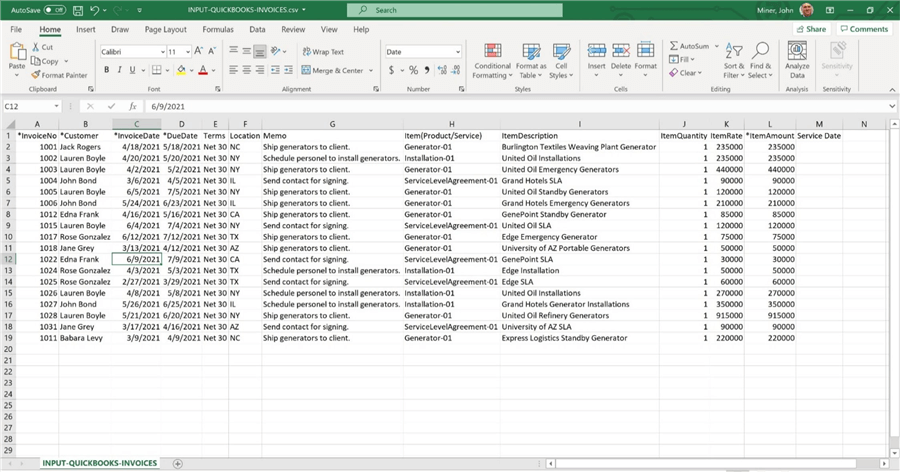
The Power Up Generators company has three main offerings: selling generators, installing generators and servicing generators. The csv file below uses the format suggested by the import process. It links an invoice to both a customer and a product. Please use the import process to add the 18 invoices to the accounting system.
I decided to manually enter payments for all invoices except for three. There is a 1-to-N relationship between payments and invoices. The customer might pay two invoices with one check.
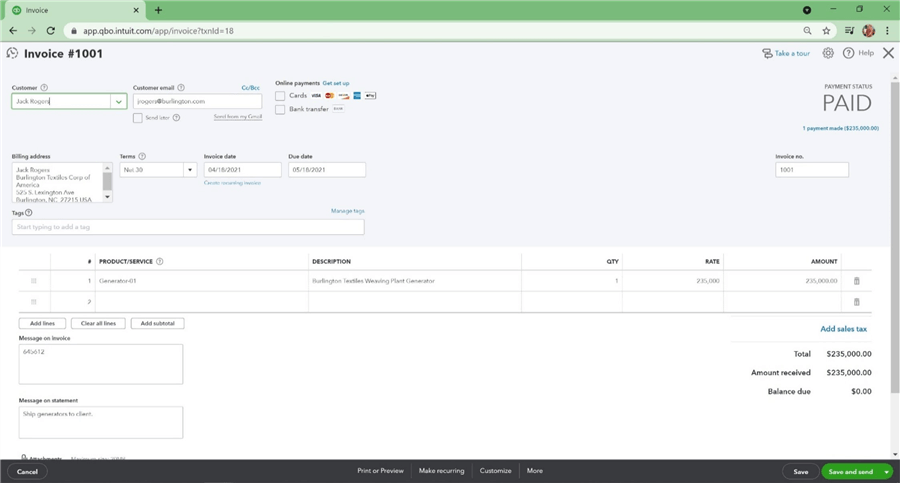
There needs to be some way to tie invoices in QuickBooks back to opportunities in Salesforce. I am choosing to manually enter the order number from Salesforce as a message on the QuickBooks invoice.
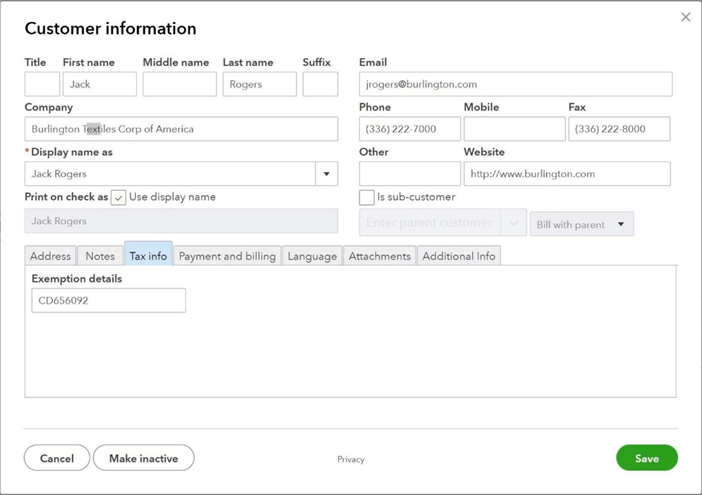
How do we tie customers in QuickBooks back to accounts in Salesforce? The re-sale number on the customer import file was set to the account number. The image below shows this information is showing up under the customer information, tax info, and exemption details text box.
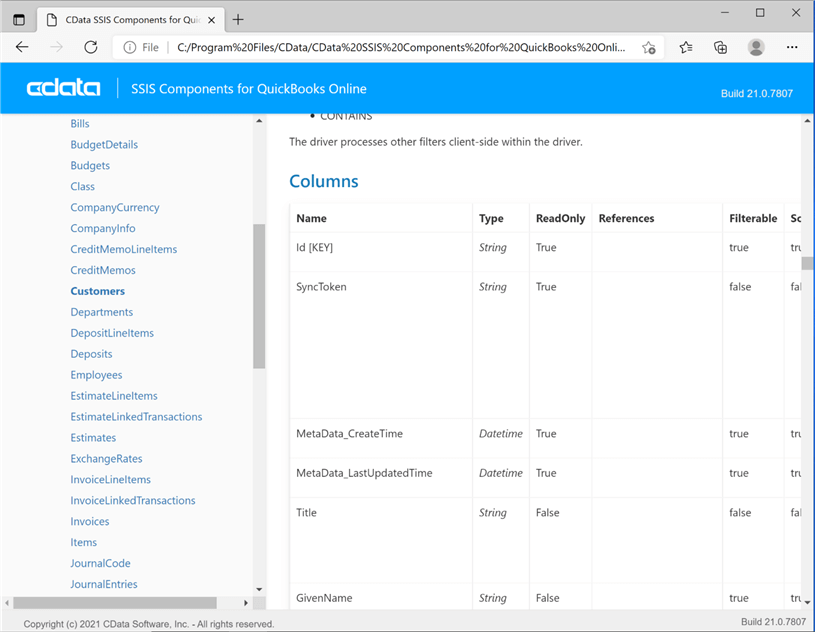
We were able to either import or manually create data for the accounting system without any major research. However, there might be times in the future where we will need more detailed information about entities in the data model for QuickBooks. Please use the help file provided by CData Software to find additional information.
Now that we have the data in QuickBooks in synch with the data in Salesforce, we can export the three key tables to delimited files.
Export QuickBooks Data
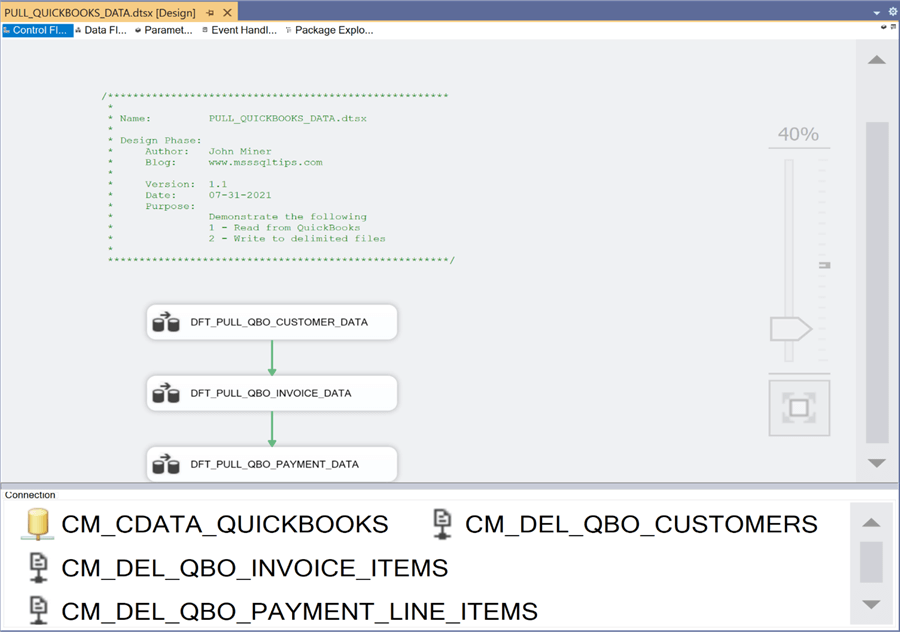
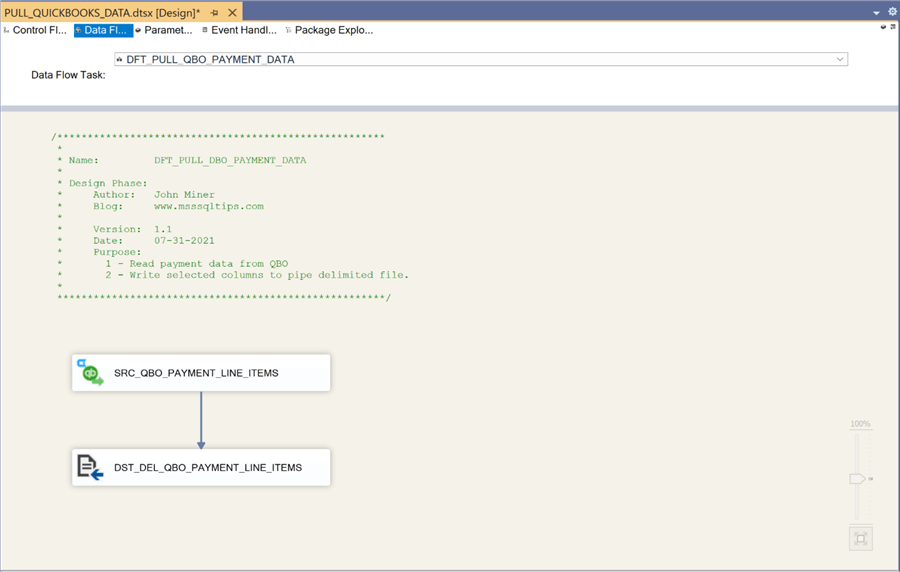
The design of the SSIS package named PULL_QUICKBOOKS_DATA closely resembles the work we did for Salesforce. There is one control flow and three data flows. Also, there is one source connection manager and three destination managers. Please see the image below for details.
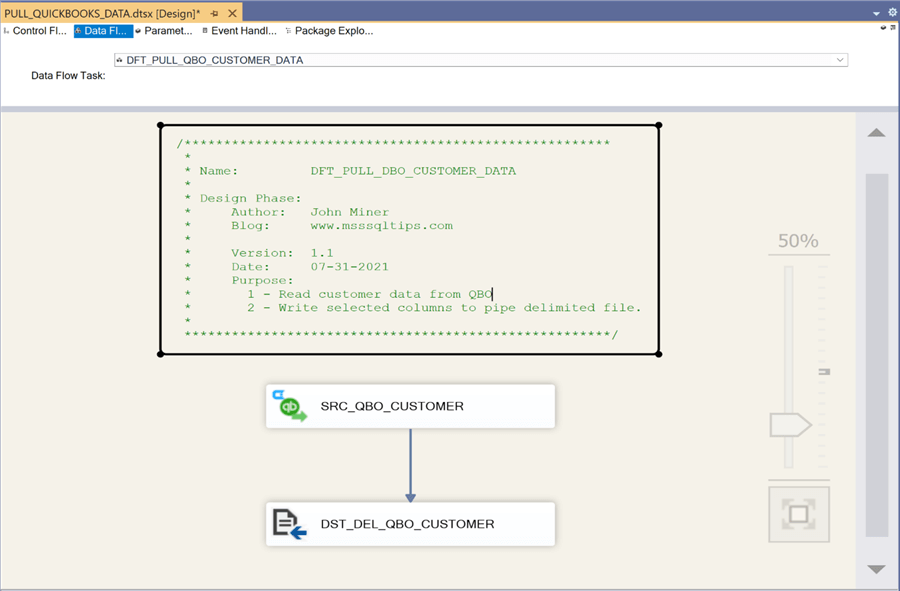
The image below shows the data flow named DFT_PULL_BO_CUSTOMER_DATA. Each customer has an account number that can be used to link the QuickBooks customer table to the Salesforce account table.
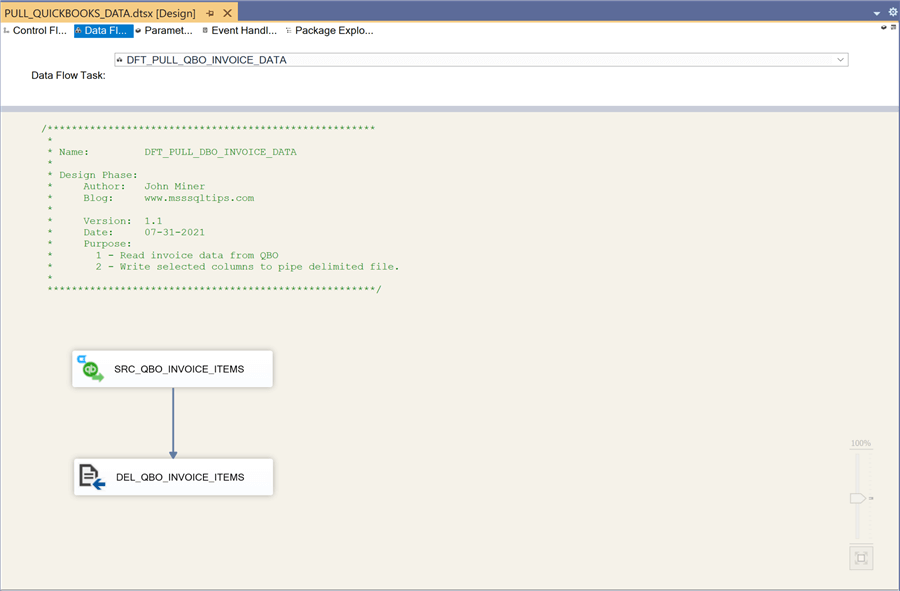
The image below shows the data flow named DFT_PULL_QBO_INVOICE_DATA. Each invoice has an order number that can be used to link the QuickBooks invoice table to the Salesforce opportunity table.
The image below shows the data flow named DFT_PULL_QBO_PAYMENT_DATA. Other than filtering out source columns, data is read from QuickBooks and written to a pipe delimited file.
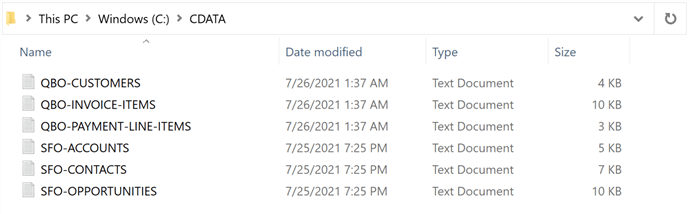
After executing this new package in debug mode within Visual Studio, we can see that six delimited files reside in the CDATA subdirectory.
In a nutshell, the design of the QuickBooks SSIS package is very simplistic in nature.
Create Snowflake Staging Tables
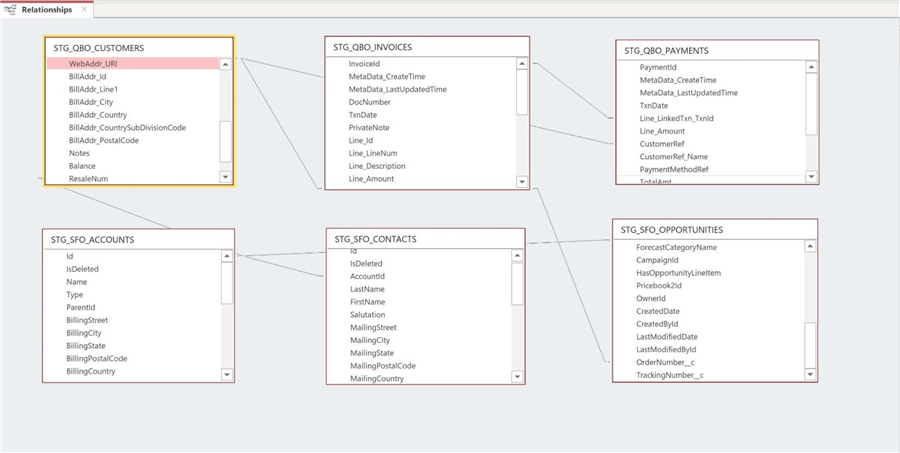
Six staging tables in the Snowflake database will be used to hold the data from the pipe delimited files. The image below shows an Entity Relationship Diagram (ERD) of the STAGING tables and relationships between them.
The table below describes each table in the data warehouse.
| No | Table | Description |
|---|---|---|
| 1 | STG_QBO_CUSTOMERS | Business name, address and billing contact. |
| 2 | STG_QBO_INVOICES | Line and sub-total details about a given invoice |
| 3 | STG_QBO_PAYMENTS | Payments made to the invoices. |
| 4 | STG_SFO_ACCOUNTS | Business leads that sales team are working with. |
| 5 | STG_SFO_CONTACTS | Each account has one to many business contacts. |
| 6 | STG_SFO_OPPORTUNITIES | Only closed/won opportunities are converted to invoices. |
The following relationships exist between the tables.
| Table 1 | Table 2 | Description |
|---|---|---|
| STG_QBO_CUSTOMERS | STG_QBO_INVOICES | Each customer can have multiple invoices. |
| STG_QBO_PAYMENTS | STG_QBO_INVOICES | Multiple invoices can be paid in one transaction. |
| STG_QBO_CUSTOMERS | STG_SFO_ACCOUNTS | Resale number can equal account number. |
| STG_QBO_INVOICES | STG_SFO_OPPORTUNITIES | Customer memo can equal order id. |
| STG_SFO_ACCOUNTS | STG_SFO_CONTACTS | Each account can have multiple customers. |
| STG_SFO_ACCOUNTS | STG_SFO_OPPORTUNITIES | Each account can have multiple opportunities. |
When transferring data from flat files to staging tables, it is best to represent each column as a variable length string. That way, the data load process will never fail. However, casting of the string column to another format might be necessary if an implicit conversion does not work. During data flow development, the column size within the source connection manager must equal the column size of the target connection manager. Otherwise, warnings will occur during a build and errors might occur during an execution.
The development of this article took some time and I ended up taking the suggested table format from the CData connector. In short, I did not follow my best practice. However, I leave it up to you to make the change in the staging tables and retest the ETL packages. I am not showing any create table code currently since it is not that important. However, at the end of the article, I will provide a download with all the details and files zipped up.
Import Salesforce Data
The CData connector(s) that we have been working with have three different functionalities. First, the connector can be used as a source. Second, the connector can be used as a target. Third, the connector can execute some code on the host system. We explored the first two by reading from both Salesforce and QuickBooks and writing to a delimited flat file.
In this section, we are going to write data into tables and execute code in the database. The design pattern for data warehousing typically uses staging tables to hold either a full or incremental load of the data. We are only concerned with full loads due to the tiny size of our dataset. The staging table should be wiped clean before inserting new data into the table. Otherwise, multiple copies of the data will be created.
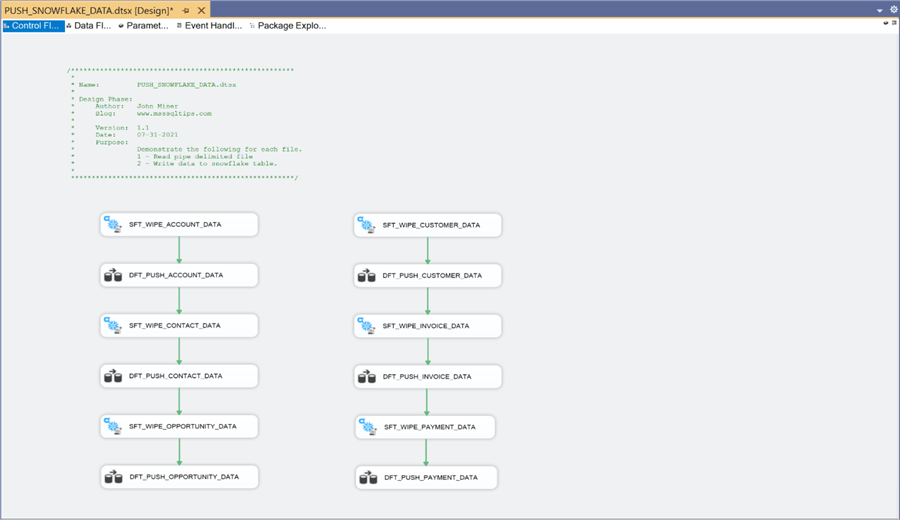
The above image is the control flow for the PUSH_SNOWFLAKE_DATA package. I decided to break the work into two parallel streams. If I wanted to optionally test one stream over another, I would add two sequence containers to group the data flow processes for Salesforce and QuickBooks into separate objects. This way, the container can be enabled and/or disabled during debugging.
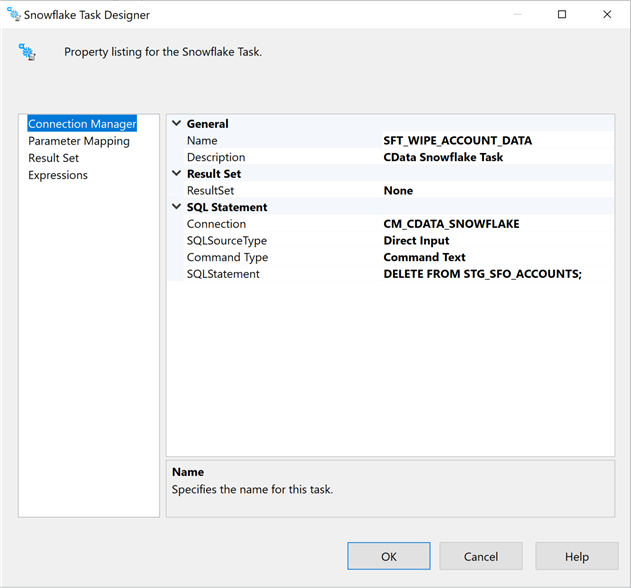
The Snowflake task object allows us to execute action statements such as DELETE, INSERT or UPDATE. Unfortunately, it does not support the TRUNCATE table syntax. This is an interface limitation. The work around for this issue is to create a generic stored procedure that takes table name as an input parameter and executes the SQL command on the data warehouse. The above image shows a task to wipe all data from the staging table for Salesforce Accounts.
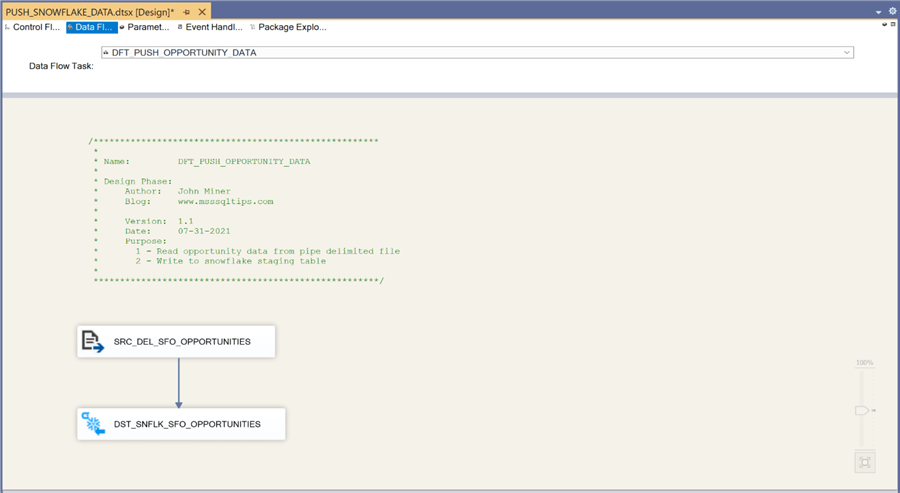
The next six screens are enclosed to fully show the design of the SSIS package. However, they do not add any more technical value or insight. There is one destination connection manager for the Snowflake data warehouse and six source connection managers for the delimited files. The image below shows the data flow named DFT_PUSH_ACCOUNT_DATA. It reads data from the corresponding delimited file with Salesforce account data and writes to the correct staging table.

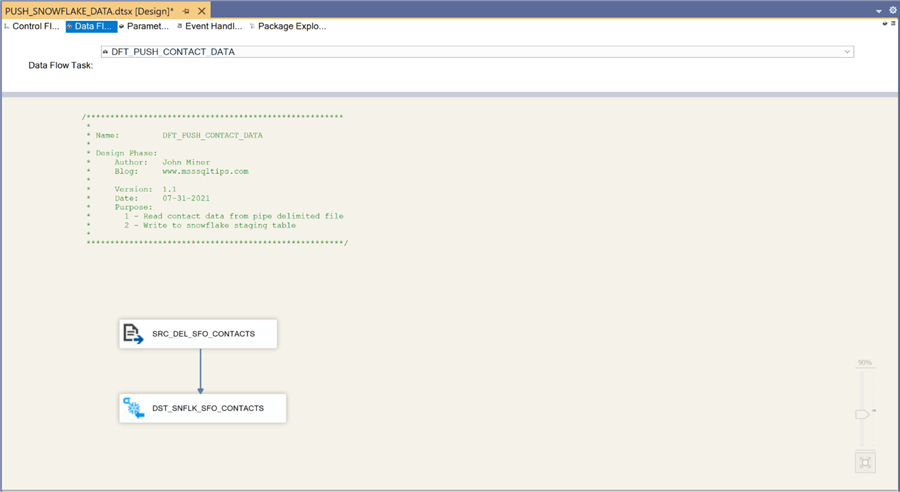
The image below shows the data flow named DFT_PUSH_CONTACT_DATA. It reads data from the corresponding delimited file with Salesforce contact data and writes to the correct staging table.
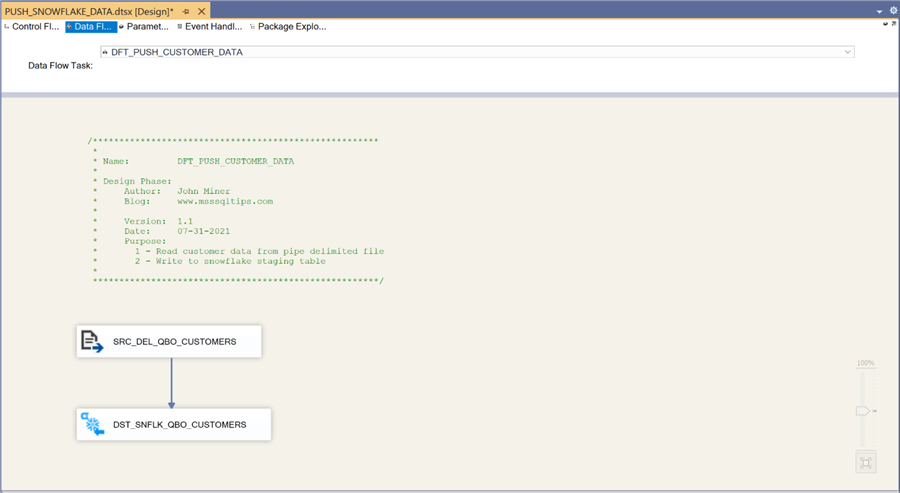
The image below shows the data flow named DFT_PUSH_CUSTOMER_DATA. It reads data from the corresponding delimited file with QuickBooks customer data and writes to the correct staging table.
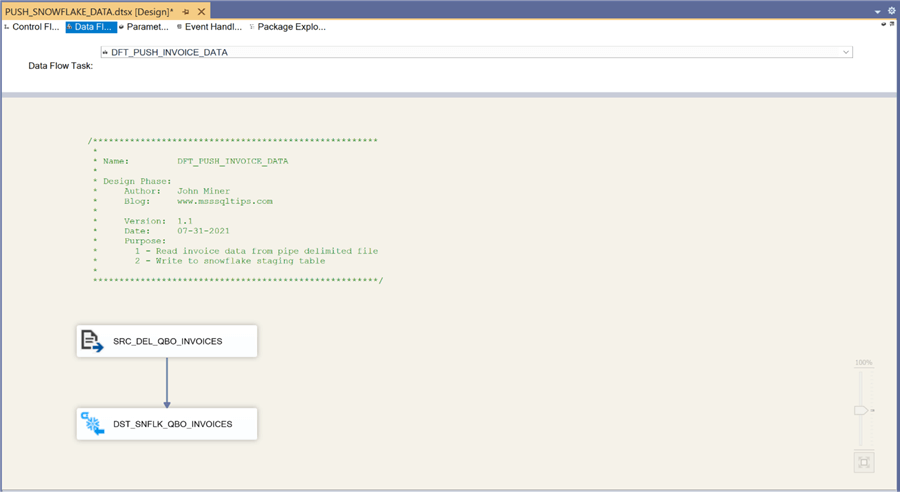
The image below shows the data flow named DFT_PUSH_INVOICE_DATA. It reads data from the corresponding delimited file with QuickBooks invoice data and writes to the correct staging table.
The image below shows the data flow named DFT_PUSH_OPPORTUNITY_DATA. It reads data from the corresponding delimited file with Salesforce opportunity data and writes to the correct staging table.
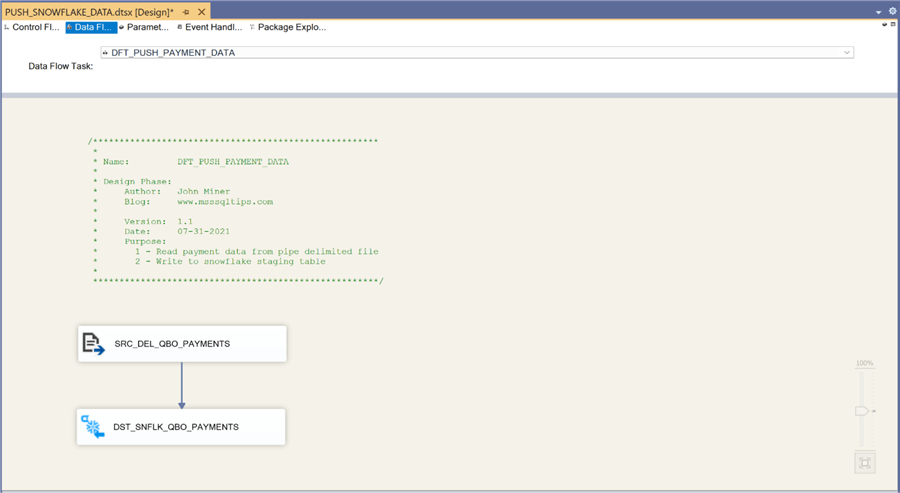
The image below shows the data flow named DFT_PUSH_PAYMENT_DATA. It reads data from the corresponding delimited file with QuickBooks payment data and writes to the correct staging table.
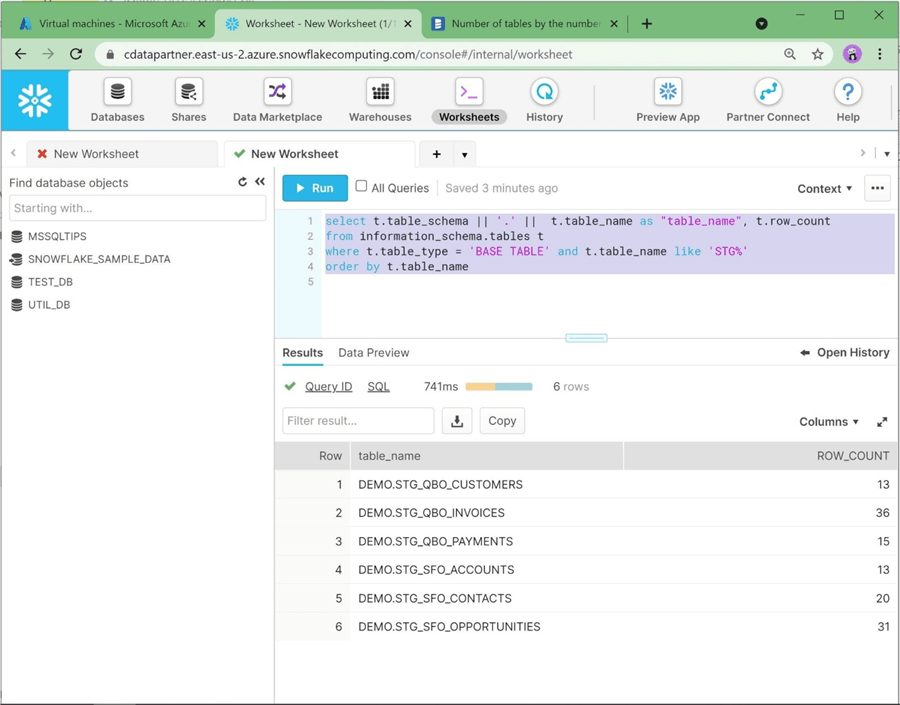
The best extract, translate and load systems have built in quality checks to ensure that the data from the source systems is correct. The quickest check is to validate the number of rows between the source and target. The code below uses the information_schema tables to pull row counts by table. If you are following along with this article, the following counts match the source systems data.
To recap, the package uses six execute SQL tasks to clear the staging tables and six data flows to load the tables with data from the delimited files.
Create Dimension Model
Dimensional modeling always uses the concepts of facts (measures) and dimensions (context). The fact tables are composed of numeric values that can be aggregated and foreign keys that relate the table to various dimensions. The dimension tables are descriptors that define the facts. There have been two major leaders in this area of modeling: Ralph Kimball proposed a bottom-up method to create the model and William Inmon suggested a top-down method to create the model. Regardless of method, a dimensional model is a very efficient reporting structure since all table joins are based upon integer keys. Because the fact table is typically in the middle of the ERD diagram and surrounded by the dimensional tables, this design is often referred as a STAR schema.
The image below shows an Entity Relationship Diagram (ERD) of the FACT & DIMENSION tables for the Power Up Generator Inc. company.
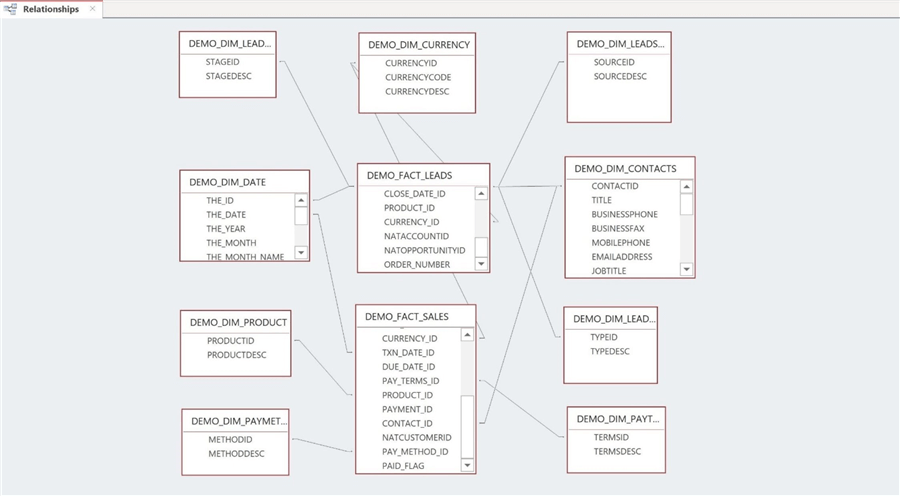
The table below describes each table in the data warehouse. The prefix DIM is used to represent dimensional tables in the model.
| No | Table | Description |
|---|---|---|
| 1 | DEMO.DIM_CONTACTS | Contacts related to leads and sales. |
| 2 | DEMO.DIM_CURRENCY | Describe the currency in use. |
| 3 | DEMO.DIM_DATE | Describe current date in hierarchical order. |
| 4 | DEMO.DIM_LEADSOURCE | Describe how the lead came in. |
| 5 | DEMO.DIM_LEADSTAGE | Describe the stage of the lead. |
| 6 | DEMO.DIM_LEADTYPE | Describe the type of lead. |
| 7 | DEMO.DIM_PAYMETHOD | Describe how the contact paid for the sale (invoice). |
| 8 | DEMO.DIM_PAYTERMS | Describe the payments terms of the sale (invoice). |
| 9 | DEMO.DIM_PRODUCTS | Describe the products that the company sells. |
| 10 | DEMO.FACT_LEADS | This table has information about leads. |
| 11 | DEMO.FACT_SALES | This table has information about sales. |
The following relationships exist between the LEAD FACT table and various dimension tables.
| Table 1 | Table 2 | Description |
|---|---|---|
| FACT_LEADS | DIM_CONTACTS | Each lead has one main contact. |
| FACT_LEADS | DIM_CURRENCY | What currency is the lead quoted in? |
| FACT_LEADS | DIM_DATE | Both created and closed date represented as numeric keys. |
| FACT_LEADS | DIM_LEADSOURCE | How did the lead come into the sales department? |
| FACT_LEADS | DIM_LEADSTAGE | What stage of the sales process is the lead? |
| FACT_LEADS | DIM_LEADTYPE | Is this a new or existing customer? |
The following relationships exist between the SALES FACT table and various dimension tables.
| Table 1 | Table 2 | Description |
|---|---|---|
| FACT_SALES | DIM_CONTACTS | Each sale has one main billing contact. |
| FACT_ SALES | DIM_CURRENCY | What currency is the sale quoted in? |
| FACT_ SALES | DIM_DATE | Both transaction and due date represented as numeric keys. |
| FACT_ SALES | DIM_PAYMETHOD | How did the contact pay for the sale? |
| FACT_ SALES | DIM_PAYTERMS | Typical payment terms are 30, 60 and 90 days. |
| FACT_ SALES | DIM_PRODUCT | What product is on the sales lines? |
There are many ways to create and populate a dimensional table. In our system, we are considering everything except for contacts, leads and sales as static data. Therefore, we can manually create the table with a DDL statement and insert static data into the table using the values clause. This would be the design pattern if SQL Server was the target database. However, the Snowflake Data Warehouse supports the CREATE TABLE AS syntax.
The currency, pay method, and pay terms dimensions are based on static data. The example below shows dropping an existing table and creating a new table using a table value constructor, derived table.
--
-- Pay method dimension
--

-- drop existing
DROP TABLE IF EXISTS DIM_PAYMETHOD CASCADE
;

-- create new
CREATE TABLE DIM_PAYMETHOD
AS
SELECT *
FROM
( VALUES (1, 'CASH'), (2, 'CHECK'), (3, 'CREDIT') ) AS D (MethodId, MethodDesc)
;

-- Show the data
SELECT * FROM DIM_PAYMETHOD LIMIT 5;
Other tables are based upon data that exits in the staging tables. For instance, we can use the information in the STG_QBO_INVOICES table to figure out the products that the company is selling. The currency, lead source, lead stage, lead type, and product dimensions use this technique to create the dimensional tables.
--
-- Product dimension
--

-- drop existing
DROP TABLE IF EXISTS DIM_PRODUCT CASCADE
;

-- create new
CREATE TABLE DIM_PRODUCT
AS
SELECT DISTINCT
LINE_SALESITEMLINEDETAIL_ITEMREF AS PRODUCTID,
LINE_SALESITEMLINEDETAIL_ITEMREF_NAME AS PRODUCTDESC
FROM STG_QBO_INVOICES
WHERE
LINE_SALESITEMLINEDETAIL_ITEMREF IS NOT NULL
;

-- Show the data
SELECT * FROM DIM_PRODUCT LIMIT 5;
The date dimension is usually populated from a common table expression (CTE). In SQL Server, a CTE can be used within an INSERT, UPDATE or DELETE statement. Currently, Snowflake does not support this syntax. However, it does support the use of the CTE in a SELECT statement. That SELECT statement can be the input to a CREATE TABLE AS statement. The SQL code below creates a date table with 10K entries.
--
-- Date dimension
--

-- drop existing
DROP TABLE IF EXISTS DIM_DATE CASCADE
;

-- create new
CREATE TABLE DIM_DATE
AS
WITH CTE_MY_DATE AS
(
SELECT
SEQ4() AS MY_ID,
DATEADD(DAY, SEQ4(), '2000-01-01') AS MY_DATE
FROM TABLE(GENERATOR(ROWCOUNT=>10000))
)
SELECT
MY_ID AS THE_ID,
MY_DATE AS THE_DATE,
YEAR(MY_DATE) AS THE_YEAR,
MONTH(MY_DATE) AS THE_MONTH,
UPPER(MONTHNAME(MY_DATE)) AS THE_MONTH_NAME,
DAY(MY_DATE) AS THE_DAY,
UPPER(DAYNAME(MY_DATE)) AS THE_DAY_NAME,
DAYOFWEEK(MY_DATE) AS THE_DAY_OF_WEEK,
WEEKOFYEAR(MY_DATE) AS THE_WEEK_OF_YEAR,
DAYOFYEAR(MY_DATE) THE_DAY_OF_YEAR
FROM CTE_MY_DATE"TEST_DB"
;

-- Show the data
SELECT * FROM DIM_DATE LIMIT 5;
The two FACT tables and the CONTACTS dimension fall into the category of data that is not static. In real life, a design pattern that uses an UPSERT statement might be a great way to keep the staging and dimensional model in synch. Currently, the code uses a drop table and create table as syntax. Again, this is a proof of concept and I took the liberty to make life easy. I will talk more about the SQL that populates these three tables later.
Rebuilding Standard Reports
It is very important to make sure that reports in the Cloud Applications can be reproduced in our cloud reporting architecture for data analytics. Therefore, I am going to write some SQL statements to make sure that sample reports can be recreated. The image below was taken from Salesforce application, and it shows the pipeline (leads) by account.
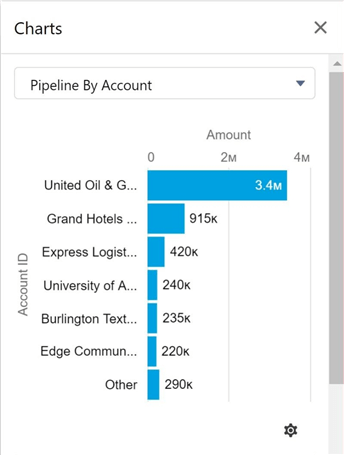
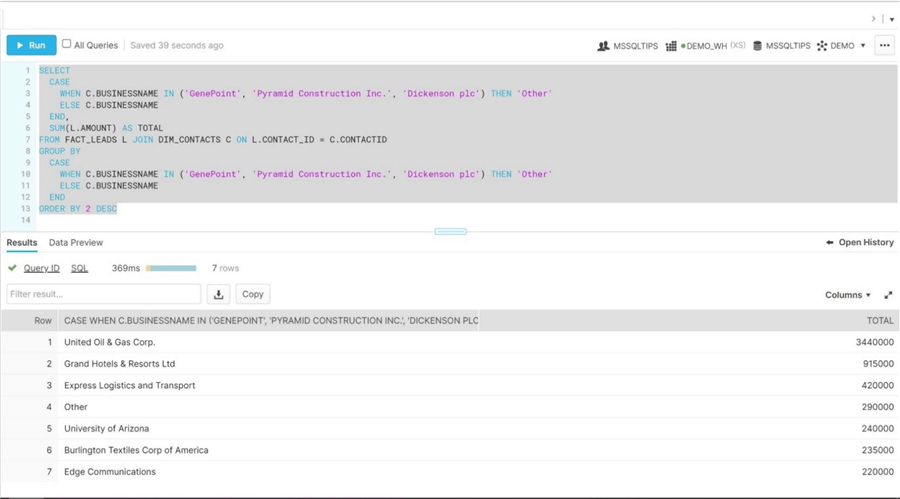
To recreate the report, we have to use a case statement to group three companies into a label named "other". We just need to join the LEADS FACT table to the CONTACTS DIM table and aggregate the opportunity amount.
The image below was taken from Salesforce application, and it shows the pipeline (leads) by stage.
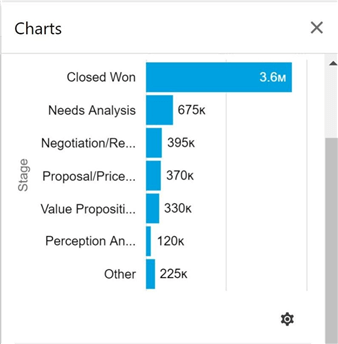
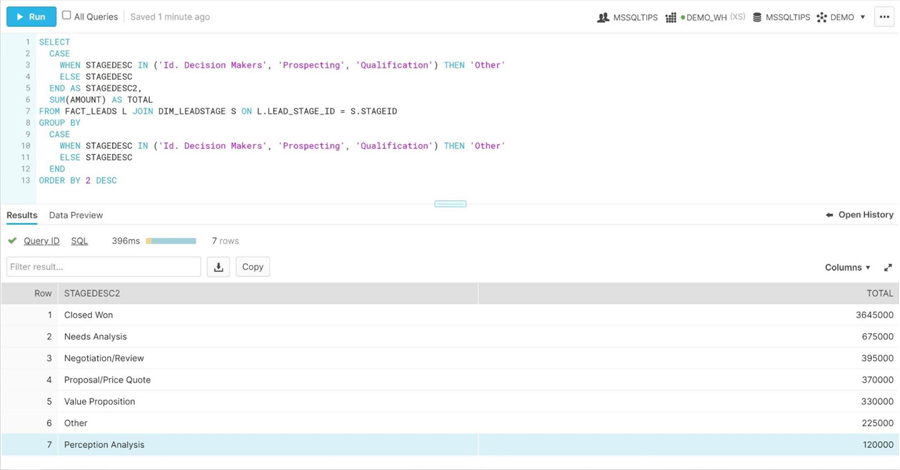
To recreate the report, we have to use a case statement to group three stages into a label named "other". We just need to join the LEADS FACT table to the LEADSTAGE DIM table and aggregate the opportunity amount.
One last report is from the QuickBooks application. It shows total revenue (profit) versus outstanding invoices that are overdue.
To regenerate the report using our dimensional model, we must union the results of two queries against the SALES FACT. The first query calculates the total amount of sales year to date. The second query calculates the total amount of sales that have not been paid. The union of the results reproduces the report with QuickBooks.

Right now, our cloud reporting architecture is able to correctly reproduce reports in both source applications. However, the contacts dimension, the leads fact, and the sales fact are dynamic in nature. How can we write code to update these tables every time we update the staging tables?
Updating - Dimensional Model
The execute Snowflake task supplied by CData allows the developer to call a stored procedure. We are going to leverage this feature to call data code to update the contacts, leads and sales table. Stored procedures written in Snowflake use JavaScript as the implementation language. The procedure named PRC_MAKE_CONTACT_DIM clears and re-loads the DIM_CONTACTS table from various staging tables.
--
-- Make contact dimension
--

CREATE OR REPLACE PROCEDURE PRC_MAKE_CONTACT_DIM ()
RETURNS VARCHAR
LANGUAGE javascript
AS
$$

// Clear table
var rs1 = snowflake.execute( { sqlText:
`DELETE FROM DIM_CONTACTS;`
} );

// Fill table
var rs2 = snowflake.execute( { sqlText:
`INSERT INTO DIM_CONTACTS
SELECT
ROW_NUMBER() OVER(ORDER BY (SELECT NULL)) ContactId,
CON.Salutation as Title,
CON.Phone as BusinessPhone,
CON.Fax as BusinessFax,
CON.MobilePhone as MobilePhone,
CON.Email as EmailAddress,
CON.Title as JobTitle,
CON.Department as Department,
CON.BirthDate as BirthDate,
COALESCE(ACC.Name,CUS.CompanyName,'') as BusinessName,
CUS.BillAddr_Line1 as BusinessAddress1,
CUS.BillAddr_City as BusinessCity,
CUS.BillAddr_CountrySubDivisionCode as BusinessState,
CUS.BillAddr_PostalCode as BusinessZip,
CUS.BillAddr_Country as BusinessCountry,
CON.FirstName, CON.LastName, CUS.GivenName, CUS.FamilyName,
CASE
WHEN TRIM(CON.FirstName) = TRIM(CUS.GivenName) AND TRIM(CON.LastName) = TRIM(CUS.FamilyName) THEN 1 ELSE 0
END as BillingContact,
ACC.ID AS NatAccountId,
CUS.ID AS NatCustomerId
FROM STG_SFO_ACCOUNTS AS ACC
LEFT JOIN STG_SFO_CONTACTS AS CON ON ACC.ID = CON.ACCOUNTID
LEFT JOIN STG_QBO_CUSTOMERS AS CUS ON CUS.COMPANYNAME = ACC.NAME
WHERE
ACC.ISDELETED = 'FALSE' AND
CON.ISDELETED = 'FALSE' AND
(CUS.ACTIVE = 'True' OR CUS.ACTIVE IS NULL) AND
CUS.GivenName != 'Sample'
ORDER BY CUS.CompanyName
;`
} );

return 'Done.';
$$;


-- Test procedure
CALL PRC_MAKE_CONTACT_DIM ();
The procedure named PRC_MAKE_LEADS_FACT clears and re-loads the FACT_LEADS table from various staging tables.
--
-- Make leads fact
--

CREATE OR REPLACE PROCEDURE PRC_MAKE_LEADS_FACT ()
RETURNS VARCHAR
LANGUAGE javascript
AS
$$

// Clear table
var rs1 = snowflake.execute( { sqlText:
`DELETE FROM FACT_LEADS;`
} );

// Fill table
var rs2 = snowflake.execute( { sqlText:
`INSERT INTO FACT_LEADS
SELECT
ROW_NUMBER() OVER(ORDER BY (SELECT NULL)) AS LEAD_ID,
LT.TypeId as TYPE_ID,
SRC.SOURCEID as LEAD_SOURCE_ID,
STG.STAGEID as LEAD_STAGE_ID,
OPP.IsClosed as LEAD_CLOSED,
OPP.IsWon as LEAD_WON,
OPP.Amount as AMOUNT,
OPP.Probability AS LEAD_PROBABILITY,
OPP.ExpectedRevenue AS EXPECTED_REVENUE,
CON.CONTACTID as CONTACT_ID,
DAT2.THE_ID AS CREATE_DATE_ID,
DAT1.THE_ID as CLOSE_DATE_ID,
CASE
WHEN OPP.NAME like '%Generator%' THEN 9
WHEN OPP.NAME like '%SLA%' THEN 11
WHEN OPP.NAME like '%Installations%' Then 10
END AS PRODUCT_ID,
1 AS CURRENCY_ID,
OPP.ACCOUNTID AS NATACCOUNTID,
OPP.ID AS NATOPPORTUNITYID,
OPP.OrderNumber__c as ORDER_NUMBER
FROM STG_SFO_OPPORTUNITIES OPP
LEFT JOIN DIM_DATE AS DAT1 ON DATEDIFF(DAY, DAT1.THE_DATE, OPP.CLOSEDATE) = 0
LEFT JOIN DIM_DATE AS DAT2 ON DATEDIFF(DAY, DAT2.THE_DATE, OPP.CREATEDDATE) = 0
LEFT JOIN DIM_CONTACTS CON ON CON.NATACCOUNTID = OPP.ACCOUNTID AND BILLINGCONTACT = 1
LEFT JOIN DIM_LEADSTAGE STG ON STG.STAGEDESC = OPP.STAGENAME
LEFT JOIN DIM_LEADSOURCE SRC ON SRC.SOURCEDESC = OPP.LEADSOURCE
LEFT JOIN DIM_LEADTYPE LT ON LT.TYPEDESC = OPP.TYPE
;`
} );

return 'Done.';
$$;


-- Test procedure
CALL PRC_MAKE_LEADS_FACT ();
The procedure named PRC_MAKE_SALES_FACT clears and re-loads the FACT_SALES table from various staging tables.
--
-- Make sales fact
--

CREATE OR REPLACE PROCEDURE PRC_MAKE_SALES_FACT ()
RETURNS VARCHAR
LANGUAGE javascript
AS
$$

// Clear table
var rs1 = snowflake.execute( { sqlText:
`DELETE FROM FACT_SALES;`
} );

// Fill table
var rs2 = snowflake.execute( { sqlText:
`INSERT INTO FACT_SALES
SELECT
INV.INVOICEID AS INVOICE_NO,
INV.LINE_LINENUM AS LINE_NUM,
INV.LINE_DESCRIPTION AS LINE_DESC,
INV.LINE_SALESITEMLINEDETAIL_UNITPRICE AS UNIT_PRICE,
INV.LINE_SALESITEMLINEDETAIL_QTY AS LINE_QTY,
INV.LINE_AMOUNT AS LINE_AMOUNT,
INV.PRIVATENOTE AS PRIVATE_NOTE,
INV.CUSTOMERMEMO AS ORDER_NO,
INV.DOCNUMBER AS DOC_NUMBER,
CUR.CURRENCYID AS CURRENCY_ID,
DAT1.THE_ID AS TXN_DATE_ID,
DAT2.THE_ID AS DUE_DATE_ID,
PAY1.TERMSID AS PAY_TERMS_ID,
PRD1.PRODUCTID AS PRODUCT_ID,
PAY2.PAYMENTID AS PAYMENT_ID,
CON.CONTACTID AS CONTACT_ID,
INV.CUSTOMERREF AS NATCUSTOMERID,
PAY2.PAYMENTMETHODREF AS PAY_METHOD_ID,
CASE WHEN PAY2.LINE_AMOUNT = INV.LINE_AMOUNT THEN 1 ELSE 0 END AS PAID_FLAG
FROM STG_QBO_INVOICES AS INV
LEFT JOIN DIM_CURRENCY AS CUR ON CUR.CURRENCYCODE = INV.CURRENCYREF
LEFT JOIN DIM_PAYTERMS AS PAY1 ON UPPER(PAY1.TERMSDESC) = UPPER(INV.SALESTERMREF_NAME)
LEFT JOIN DIM_PRODUCT AS PRD1 ON PRD1.PRODUCTDESC = INV.LINE_SALESITEMLINEDETAIL_ITEMREF_NAME
LEFT JOIN DIM_DATE AS DAT1 ON DATEDIFF(DAY, DAT1.THE_DATE, INV.TXNDATE) = 0
LEFT JOIN DIM_DATE AS DAT2 ON DATEDIFF(DAY, DAT2.THE_DATE, INV.DUEDATE) = 0
LEFT JOIN STG_QBO_PAYMENTS PAY2 ON INV.INVOICEID = PAY2.LINE_LINKEDTXN_TXNID
LEFT JOIN DIM_CONTACTS CON ON CON.NATCUSTOMERID = INV.CUSTOMERREF AND CON.BILLINGCONTACT = 1
WHERE INV.LINE_LINENUM IS NOT NULL
;`
} );

return 'Done.';
$$;

-- Test procedure
CALL PRC_MAKE_SALES_FACT ();
You might not have noticed a sample call to the stored procedure at the end of each SQL snippet. One can modularly test the code by manually truncating the table in question and executing the store procedure to load the table with up-to-date data. At this point, we are almost done. We just need to wrap up these three stored procedures in a control flow and finish writing the main program.
Wrapping up the SSIS solution
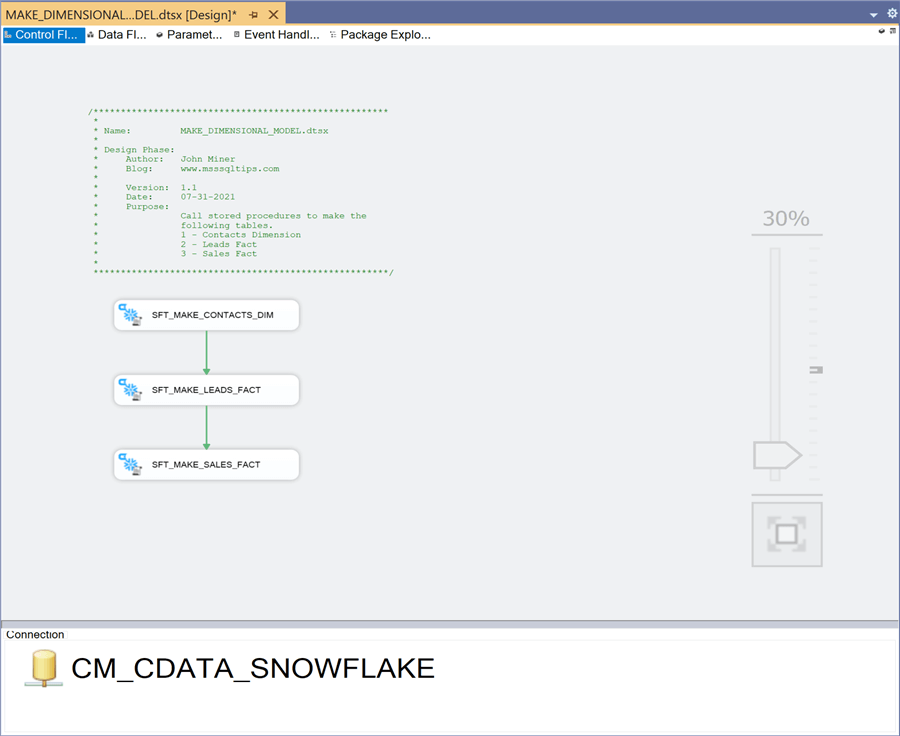
The MAKE_DIMENSIONAL_MODEL package use the execute Snowflake task to update the following tables: DIM_CONTACTS, FACT_LEADS and FACT_SALES. Only one connection manager is needed to access the Snowflake data warehouse. The image below shows the completed package.
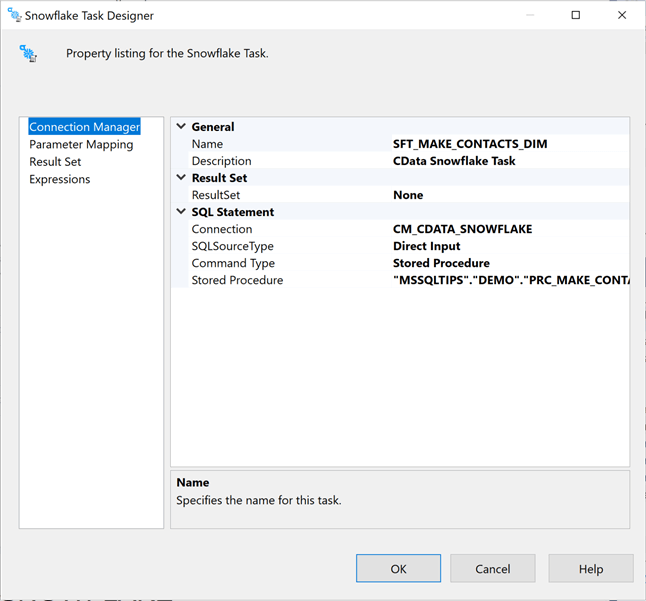
Let us take a detailed look at the Snowflake task designer. To start the configuration, please choose the correct connection manager. Next, select the stored procedure command type. Last, use the drop-down box to find the stored procedure. A three-dot notation (database, schema, table) is used to describe the stored procedure.
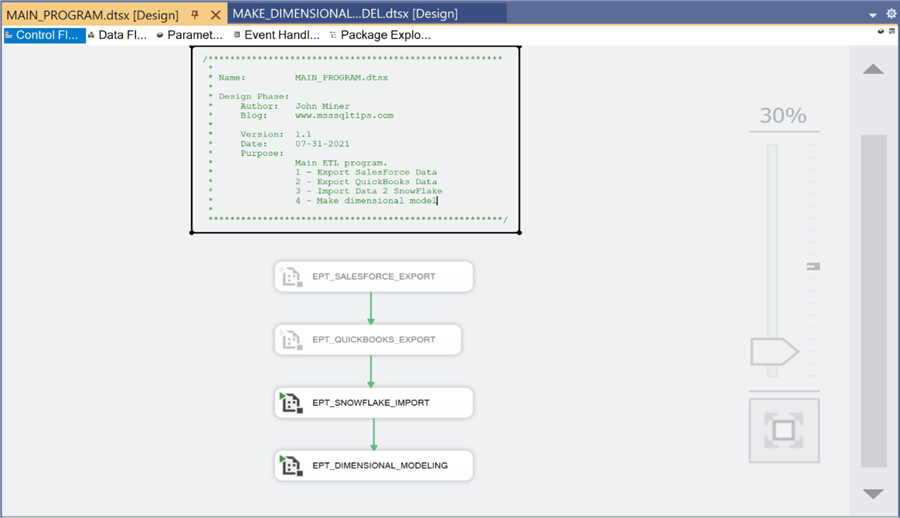
The package named MAIN_PROGRAM uses the execute package task to run the child packages in the correct order to solve our business problem. The image below shows the package in debug mode in which two of the four package calls are disabled for the current modular test.
This article has truly been a journey. We started with a logical architecture and ended up with a complete ETL package to load our dimensional reporting model.
Summary
Today, many companies have both new and old technology. As seasoned data engineers, how can we leverage automation via SQL Server Integration Services to read, write and execute code on these new cloud database systems? CData developed a massive collection of data connectors that can be used with many different developer tools. In our business problem, we focused on the data connectors that can be use with the SSIS ecosystem.
As a data architect, a system diagram is worth a thousand words. The hypothetical company named "Power Up Generator Inc." wanted to take data from both Salesforce and QuickBooks and create a dimensional model in a Snowflake cloud data warehouse. A conscious decision was made to use local storage and delimited files as an intermediate step in the ETL process. The idea of using cheap storage such as Azure Data Lake is central to many current day solutions. In our case, I wanted to re-use the Salesforce export to create import files for QuickBooks. A real company would have both sales and accounting employees keeping these systems in sync.
The use of staging tables in a data warehouse allows the designer to import and transform the data within the relational database system. Typically, the dimensional model might have both type-1 and type-2 slowly changing dimensions. Due to the size of this article, it was decided that all tables were type-1 except for the contacts, leads and sales tables. I bet you did not realize we used Ralph Kimball's bottom-up methodology to create the dimensional model. Stored procedures in Snowflake were designed to clear and re-load these tables each time the ETL process executes. Finally, the four modularly tested (child packages) were called from the main package to complete the solution.
Here is an honest review of the CData connectors. It was very easy to obtain and install the connectors for SSIS. The hardest part is the fact that the connectors are well designed and have many ways to connect to the target system. I really like the fact that a detailed help file is located on your hard drive after the install. I suggest you consult this documentation on how to configure the connectors as well as the data model details of the source system. In summary, I would not hesitate to recommend the use of CData connectors in any of my future SSIS projects.
Enclosed is an extremely large zip file that contains all screen shots, notes, QuickBooks integration, Salesforce integration, SQL code, diagrams and SSIS packages used in the article. I hope you enjoy the details as much as I did!
Next Steps
- More information about CData:
- Download a Free 30 Day CData Trial for SSIS
- CData Home Page - www.cdata.com
MSSQLTips.com Product Spotlight sponsored by CData.
About the author
 John Miner is a Data Architect at Insight Digital Innovation helping corporations solve their business needs with various data platform solutions.
This author pledges the content of this article is based on professional experience and not AI generated.
View all my tips
Article Last Updated: 2023-07-20