By: Edwin Sarmiento | Comments (7) | Related: > Clustering
Problem
You need to provision additional disk subsystem on your SQL Server 2008 Failover Cluster running on Windows Server 2008. However, you are limited by the number of drive letters available to assign to the new disks. How do you do it? Check out this tip to learn more.
Solution
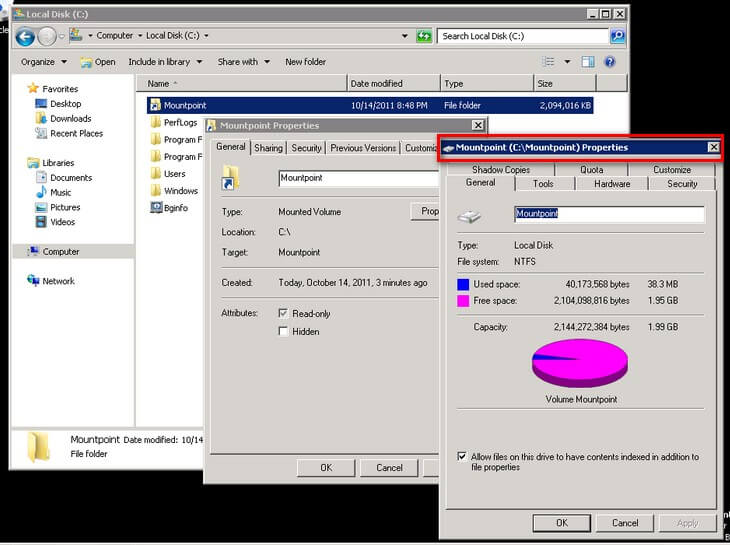
One of the biggest challenges when dealing with a Windows Failover Cluster is the limited number of letters available for clustered disk resources. If you have deployment standards such as having a C:\ drive for your operating system and a D:\ drive for applications, you are left with only 23 letters to assign to your disk drives (or maybe we can recommend adding the Greek alphabet in the mix.) While this may seem more than enough drive letters for a SQL Server instance, it becomes challenging when you start distributing your tempdb files, data and log files across multiple disks, not to mention having multiple instances running in a cluster. Volume mountpoints address that limitation. Volume mountpoints are objects in an NTFS file system that point to other volumes. They are implemented as folders within an existing drive that actually points to another drive. The C:\Mountpoints folder properties shown below display the type as a MountedVolume. You can also click on the Properties button of the folder to see the disk properties.
Using mountpoints in SQL Server Failover Cluster is pretty straightforward. However, most of these tasks are done on the Windows operating system. If a different team is responsible for this task, you need not worry about mountpoints because they are transparent to SQL Server. But if you are responsible for the server operating system in addition to being a SQL Server DBA, this tip is for you.
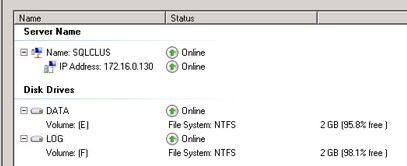
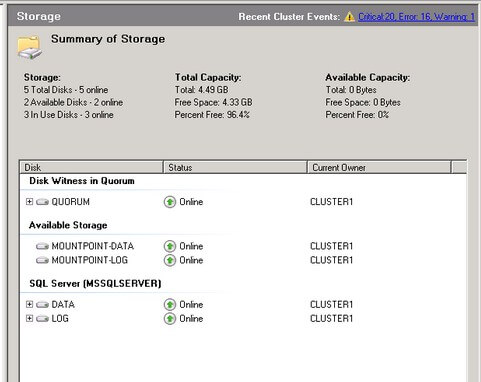
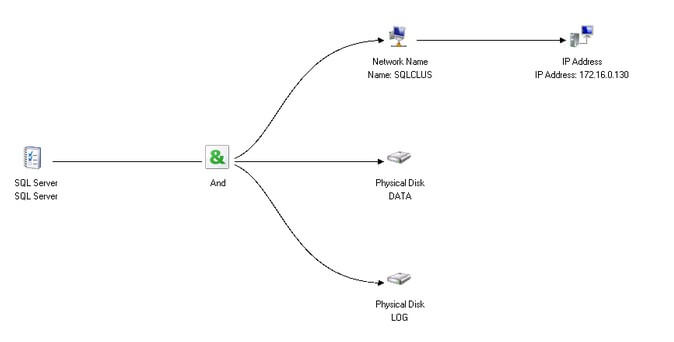
If you look at my basic SQL Server Failover Cluster setup below, I have two clustered disks that are being used by the SQL Server resource group - E:\ and F:\.
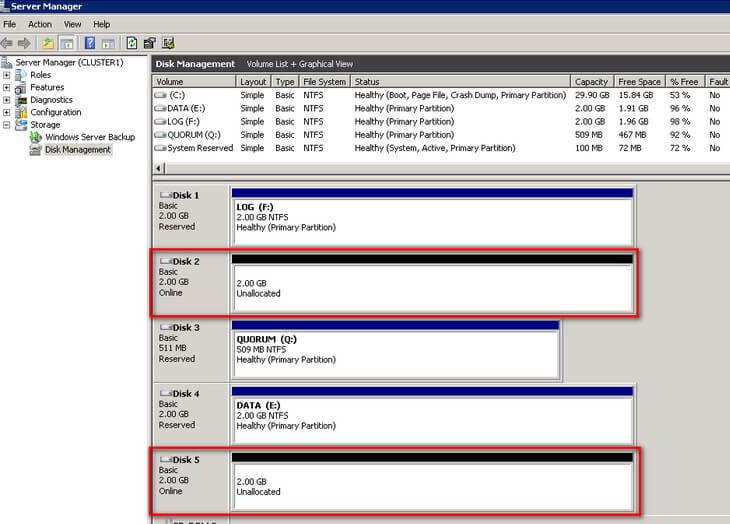
We will extend these two clustered drives by adding volume mountpoints so we can have different dedicated disk subsystems for our databases and not just have them in a single clustered disk subsystem like what I currently have. Before configuring the volume mountpoints in the Windows Failover Cluster, make sure that they have been configured and discovered in the Windows operating system. You may need the assistance of your storage vendors or engineers to complete this task. In my clustered environment, I have added two shared iSCSI disks on the server - Disk 2 and Disk 5. I've also configured this on all of the nodes in my cluster.
Adding Volume Mountpoints in a Windows Failover Cluster
Before we can add the volume mountpoints in the SQL Server clustered resource group, they have to be made available to the Windows Failover Cluster. Below are the steps to accomplish that task:
- Open the Failover Cluster Management console to manage your Windows Failover Cluster.
- In the navigation pane, right-click on Storage and click Add a disk.
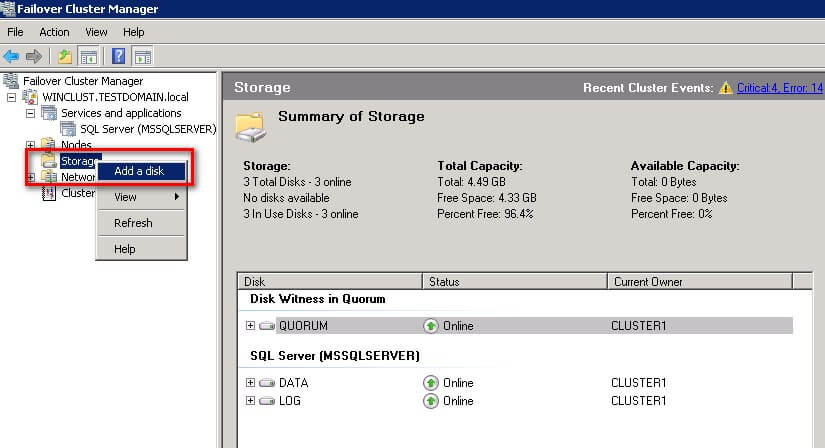
- In the Add Disks to a Cluster dialog box, make sure that the shared disks that you want to use as volume mountpoints are displayed and selected. Click OK to continue.
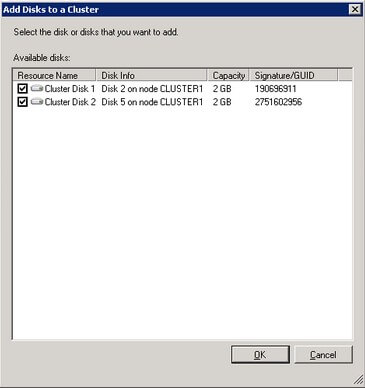
Once this is complete, the disks have been added to the Windows Failover Cluster, brought online and moved to the Available Storage group.
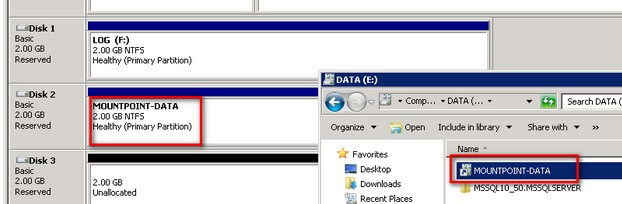
- Rename the clustered disks accordingly. While this step may seem trivial, note that the new clustered disks will be configured as volume mountpoints with no assigned drive letters. To avoid confusion when managing the cluster, renaming all the cluster resources accordingly, whether they be network adapters or storage, is considered a best practice. In my example, I renamed the new clustered disks MOUNTPOINT-DATA and MOUNTPOINT-LOG because I want to add them as volume mountpoints for the DATA and LOG drives, respectively.
Mapping the Volume Mountpoints in Clustered Disks
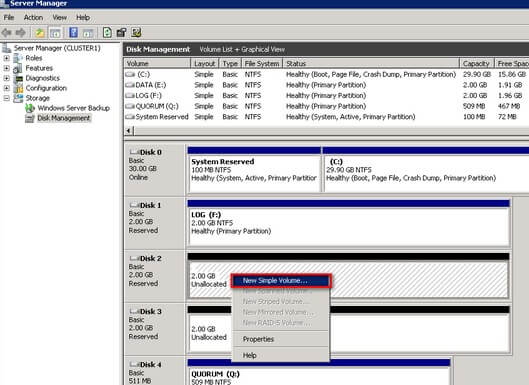
To enable SQL Server databases to use volume mountpoints, the mountpoints have to be mounted on a host volume that has a drive letter associated to it. Microsoft does not support storing SQL Server databases on the root of the mountpoint due to permission issues associated with layers of ACLs. Microsoft KB article 819546 describes the different scenarios for using SQL Server on mounted volumes. This is why we will mount the newly added clustered disks to the existing clustered disks that SQL Server already uses. We will be using the Disk Management console to perform the following tasks.
- In the Disk Management console, right-click the unallocated space on the disk that you want to configure and select New Simple Volume.
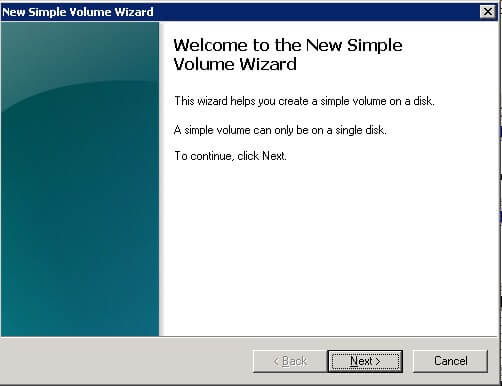
- In the Welcome to the New Simple Volume Wizard dialog box, click Next.
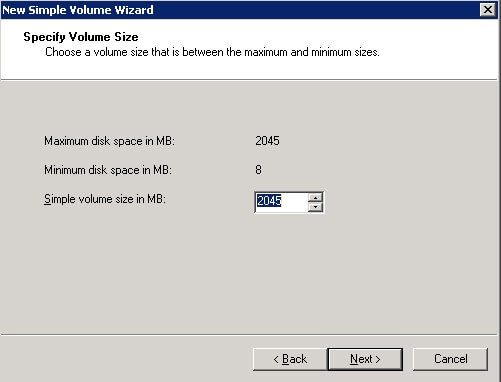
- In the Specify Volume Size dialog box, enter the volume size and click Next.
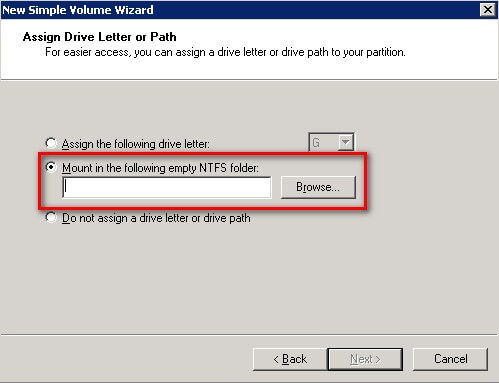
- In the Assign Drive Letter or Path dialog box, select the Mount in the following NTFS folder: option and click Browse.
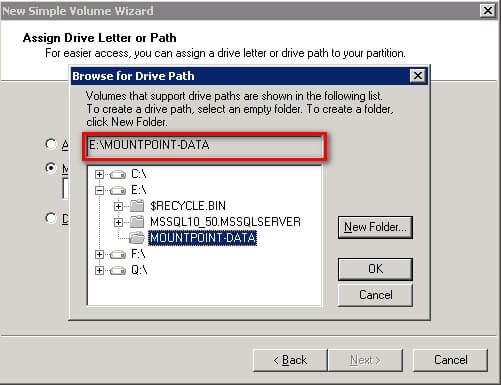
- In the Browse for Drive Path dialog box, navigate to the clustered disk where you want to mount the drive. You can either create a new NTFS folder or use an existing one. In this example, I want to mount the disk in the E:\ drive. I have created a new NTFS folder named MOUNTPOINT-DATA to keep the naming conventions consistent between the Windows operating system and the Failover Cluster. Click OK.
- Click Next after getting back to the Assign Drive Letter or Path dialog box.
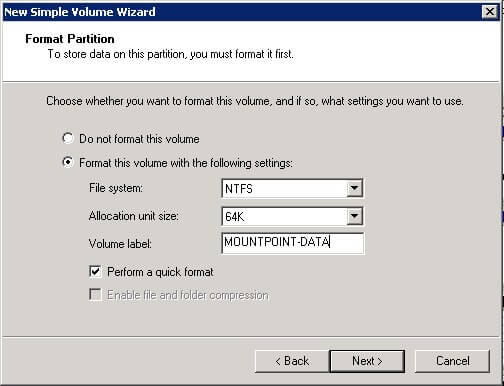
- In the Format Partition dialog box,
- Make sure that the file system selected is NTFS.
- To follow Microsoft best practices on allocation unit size, select 64K.
- In the Volume label: text box, enter the appropriate name. In my example, I used MOUNTPOINT-DATA to be consistent.
- In the Completing the New Simple Volume Wizard dialog box, review the settings you have made and click Finish.

You can verify the steps you took by making sure that the volume does not have a drive letter assigned to it. Also, the icon for the E:\MOUNTPOINT-DATA folder will not be your default folder icon, but rather a shortcut to a drive.
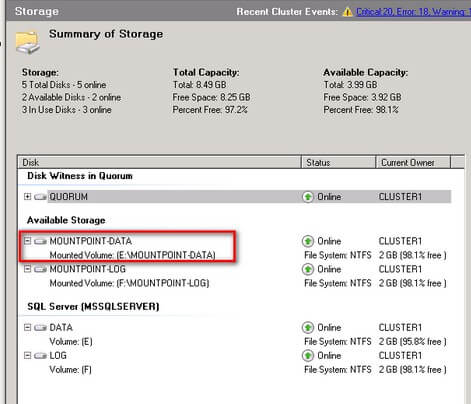
You can also check using the Failover Cluster Management console. The clustered drives added earlier now reflect the new configuration.
Repeat the steps for all the volumes that you want to configure as mountpoints.
Moving the Disks to the SQL Server Resource Group
Now that the volume mountpoints have been configured, we need to move them to the clustered resource group that contains the SQL Server resource. This is to make sure that the new volume mountpoints get included when the resource group fails over to another node. Bear in mind that the SQL Server clustered resource group should be treated as a single unit and, therefore, all of the components that make up the group - IP address, network name, disks, SQL Server service and SQL Server Agent - should stay together during a failover.
To move the new volume mountpoints to the SQL Server clustered resource group, follow these steps:
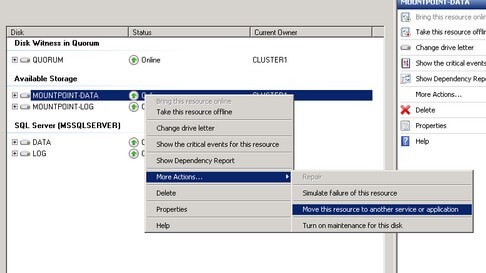
- Open the Failover Cluster Management console. In the Available Storage group, right-click the clustered disk, select More Actions ... -> Move this resource to another service or application.
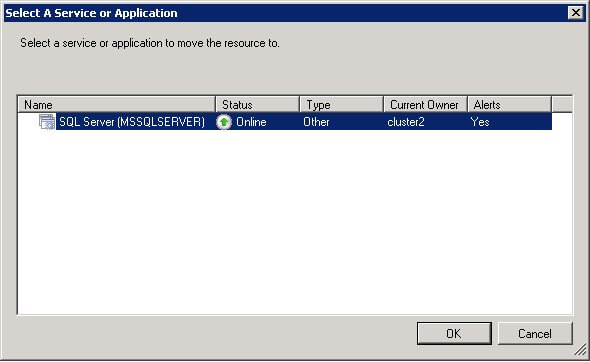
- In the Select A Service or Application dialog box, select the SQL Server clustered resource group where you want to move the disk. In cases where you have multiple SQL Server instances in a single Windows Failover Cluster, make sure to move the clustered disk to the appropriate resource group. Click OK.
Repeat the steps for all the mountpoints that you want to move to their corresponding SQL Server clustered resource group.
Configuring the Appropriate Dependencies
Resource dependency is a key concept in Windows Failover Clustering. A dependent resource requires another resource to properly function. For example, in order for the SQL Server resource to function properly, the virtual network name and the clustered disks that store the databases need to be brought online prior to bringing the SQL Server resource online. This can be illustrated by the resource's dependency report.
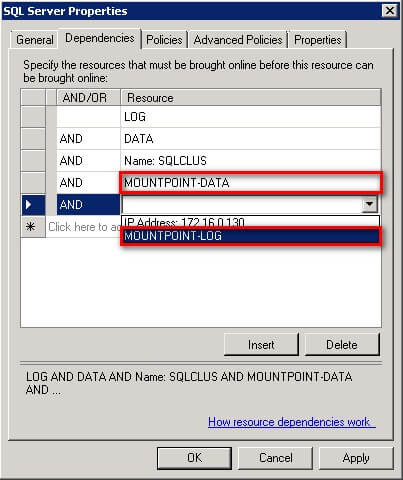
As part of the scenario that Microsoft supports for volume mountpoints for SQL Server, the mountpoint must be added as a SQL Server dependency. This prevents possible database corruption that may occur during failover. In my example, the two mountpoints I added will be used by my SQL Server instance for data and log files. Therefore, I need to add both of them as dependencies for my SQL Server resource.
- Open the Properties page of the SQL Server resource that you would like to use with your mountpoints. In the Dependencies tab, select the mountpoints you've added in the clustered resource group under the Resource drop-down list. Click OK.
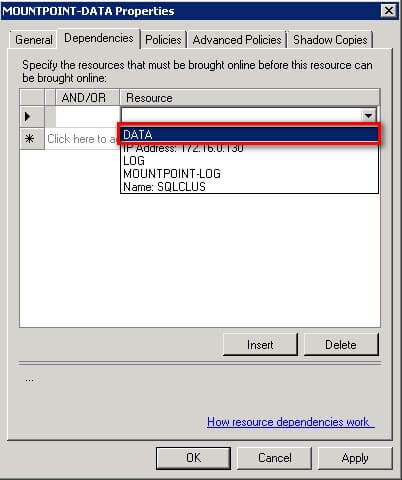
- Open the Properties page of the mountpoint resource. In the Dependencies tab, select the clustered disk hosting the mountpoint under the Resource drop-down list. Click OK. In my example, I am making the MOUNTPOINT-DATA mountpoint dependent on the DATA clustered disk. While not necessarily related to SQL Server, this just makes the mountpoint dependent on the host volume, making sure that the host volume comes online first before the mountpoint does. Repeat the steps for all the volume mountpoints in the same clustered resource group.
Test, Test, and Test
After configuring the mountpoints, make sure you test that they work properly. Do note that you cannot install or create databases in the root of the mountpoint - in my example, the E:\MOUNTPOINT-DATA or the F:\MOUNTPOINT-LOG folders. Instead, you need to create a subdirectory under the root of the mountpoint for the proper ACLs and permissions to be granted by SQL Server. For example, we can create the E:\MOUNTPOINT-DATA\MDF folder where we can store the data files and E:\MOUNTPOINT-LOG\LDF folder where we can store the log files. After creating the database files in the newly added volume mountpoints, perform the following tests:
- Manually failover the SQL Server clustered resource group to the other nodes of the cluster. Make sure that all the resources failover as a unit.
- While manually failing over, check how the clustered resources are switching from offline to online. When failing over, the SQL Server and SQL Server Agent resources should be the first ones to go offline, followed by the volume mountpoints and finally the host volume and/or the virtual network name, depending on which of them go offline first. The reverse should occur when the resource group goes online. This means that your resource dependencies are configured correctly
Next Steps
- Check out the Microsoft KB article on SQL Server support for mounted volumes.
- Check out the Microsoft KB article on How to configure volume mountpoints on a server cluster in Windows Server 2008. This is very helpful if you are supporting Windows Failover Clusters that aren't necessarily running SQL Server.
- Check out the SQL Server Clustering tips on MSSQLTips.com.


About the author
 Edwin M Sarmiento is a Microsoft SQL Server MVP and Microsoft Certified Master from Ottawa, Canada specializing in high availability, disaster recovery and system infrastructures.
This author pledges the content of this article is based on professional experience and not AI generated.
View all my tips
