By: Edwin Sarmiento | Updated: 2023-11-06 | Comments (2) | Related: 1 | 2 | 3 | > Clustering
Problem
I used a previous tip, Install SQL Server 2008 on a Windows Server 2008 Cluster Part 1, to install a SQL Server 2008 on a Windows Server 2008 failover cluster (WSFC). I want to upgrade and migrate my SQL Server 2008 failover clusters to SQL Server 2022 running on Windows Server 2022. How do I go about the process of installation and configuration?
Solution
Windows Server 2022, Microsoft's latest version of its server operating system, has been branded as a "cloud ready" operating system. There are many features introduced in this version that make working with Microsoft Azure a seamless experience, specifically the Azure Extended Network feature. For decades, Windows Server Failover Clustering (WSFC) has become the platform of choice for providing high availability for SQL Server workloads - both for failover clustered instances and Availability Groups.
Listed below are two Windows Server 2022 failover clustering features that I feel are relevant to SQL Server. This is in addition to the features introduced in previous versions of Windows Server. And while there are many features added to Windows Server 2022 Failover Clustering, not all of them are designed with SQL Server in mind.
- Clustering Affinity and AntiAffinity. Affinity is a failover clustering rule that establishes a relationship between two or more roles (or resource groups) to keep them together in the same node. AntiAffinity is the opposite, a rule that would keep two or more roles/resource groups in different nodes. While this mostly applies to virtual machines running on a WSFC, particularly VM guest clusters, this has been a long-awaited feature request for SQL Server failover clustered instances (FCI) that take advantage of the Distributed Transaction Coordinator (DTC). In the past, workarounds such as a SQL Server Agent job that moves the clustered DTC in the same node as the FCI were implemented to achieve this goal. Now, it's a built-in feature.
- AutoSites. This feature takes advantage of Active Directory sites and applies to multi-data center, stretched WSFCs. When configuring a WSFC, the setup process will check if an Active Directory site exists for the IP-subnet that the nodes belong to. If there is an existing Active Directory site, the WSFC will automatically create site fault domains and assign the nodes accordingly. If no Active Directory sites exist, the IP-subnets will be evaluated, and, similar to when Active Directory sites exist, site fault domains will be created based on the IP-subnet. While this is a great feature for local high availability and disaster recovery before SQL Server 2016, I no longer recommend a stretched WSFC for SQL Server. There are too many external dependencies that can impact local high availability.
In this series of tips, you will install a SQL Server 2022 failover clustered instance on a Windows Server 2022 failover cluster the traditional way - with Active Directory-joined servers and shared storage. Configuring TCP/IP and joining the servers to your Active Directory domain is beyond the scope of this tip. Consult your systems administrators on how to perform these tasks. It is assumed that the servers that you will add to the WSFC are already joined to an Active Directory domain and that the domain user account that you will use to perform the installation and configuration has local Administrative privileges on all the servers.
Preparing the Shared Disks
Similar to the previous tip, you need to provision your shared storage depending on your requirement. Talk to your storage administrator regarding storage allocation for your SQL Server failover clustered instances. This tip assumes that the underlying shared storage has already been physically attached to all the WSFC nodes and that the hardware meets the requirements defined in the Failover Clustering Hardware Requirements and Storage Options. Managing shared storage requires an understanding of your specific storage product, which is outside the scope of this tip. Consult your storage vendor for more information.
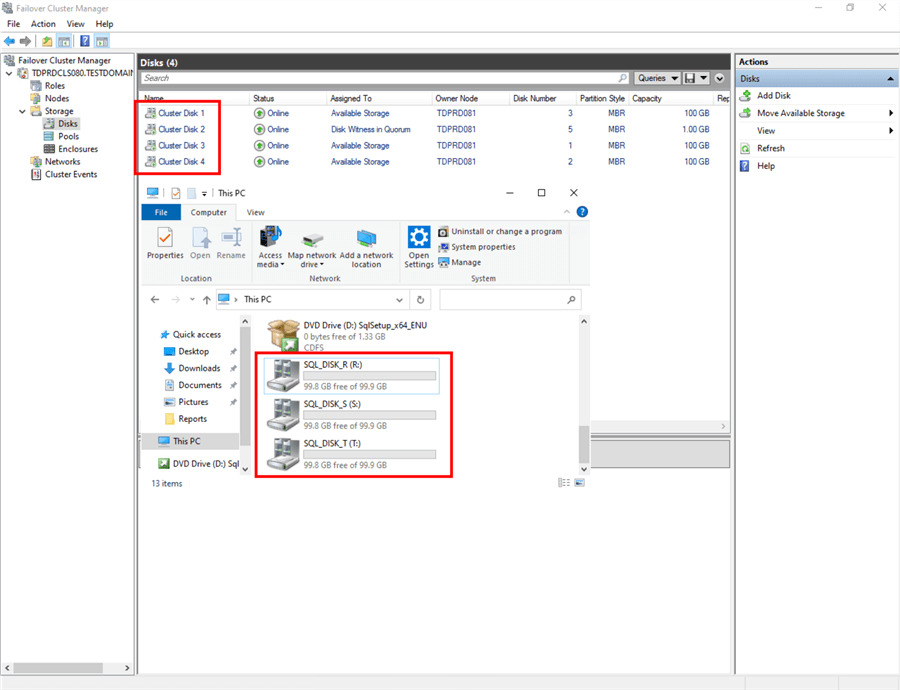
The environment used in this tip is configured with four (4) iSCSI shared storage volumes - SQL_DISK_R, SQL_DISK_S, and SQL_DISK_T allocated for the SQL Server databases and WITNESS for the witness disk.
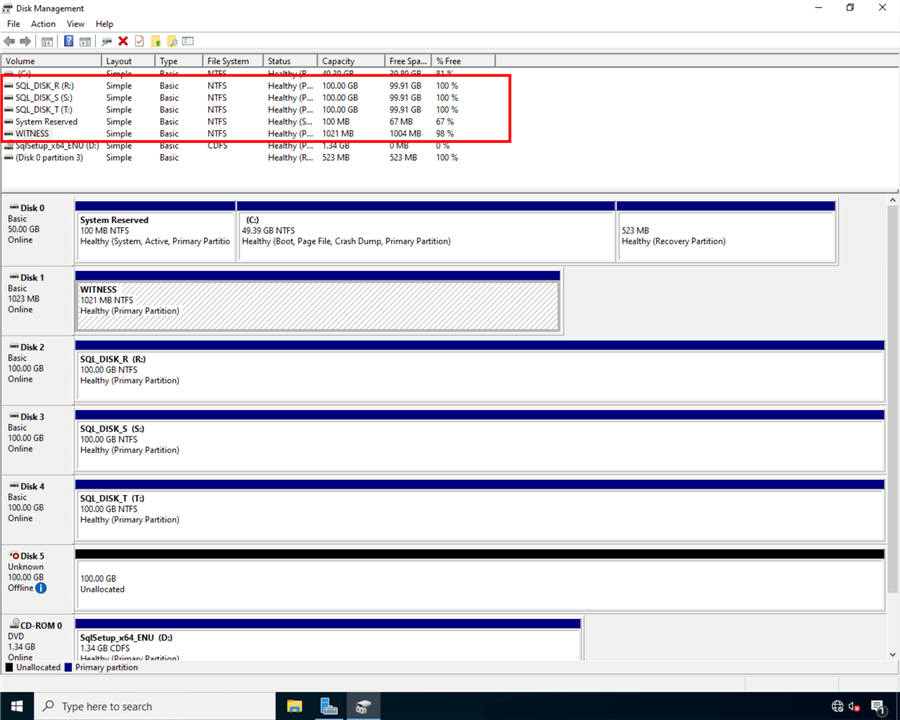
NOTE: Don't be alarmed if the WITNESS disk does not have a drive letter. It is not necessary. This frees up another drive letter for use with volumes dedicated to SQL Server databases. It also prevents you from messing around with it. I mean, you won't be able to do anything with it if you cannot see it in Windows Explorer.
The goal here is to provide shared storage both for capacity and performance. Perform the necessary storage stress tests to make sure that you are getting the appropriate amount of IOPS as promised by your storage vendor. You can use the DiskSpd utility for this purpose.
Adding the Failover Clustering Feature
Before you can create a failover cluster, you must install the Failover Clustering feature on all servers that you want to join in the WSFC. The Failover Clustering feature is not enabled by default.
Add the Failover Clustering feature using the following steps.
Step 1
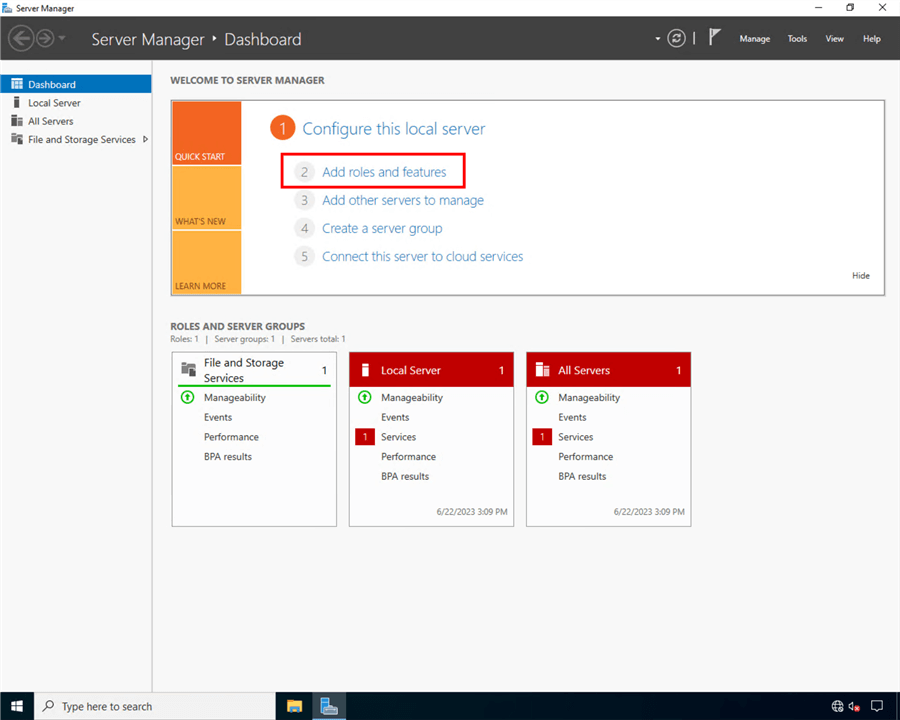
Open the Server Manager Dashboard and click the Add roles and features link. This will run the Add Roles and Features Wizard.
Step 2
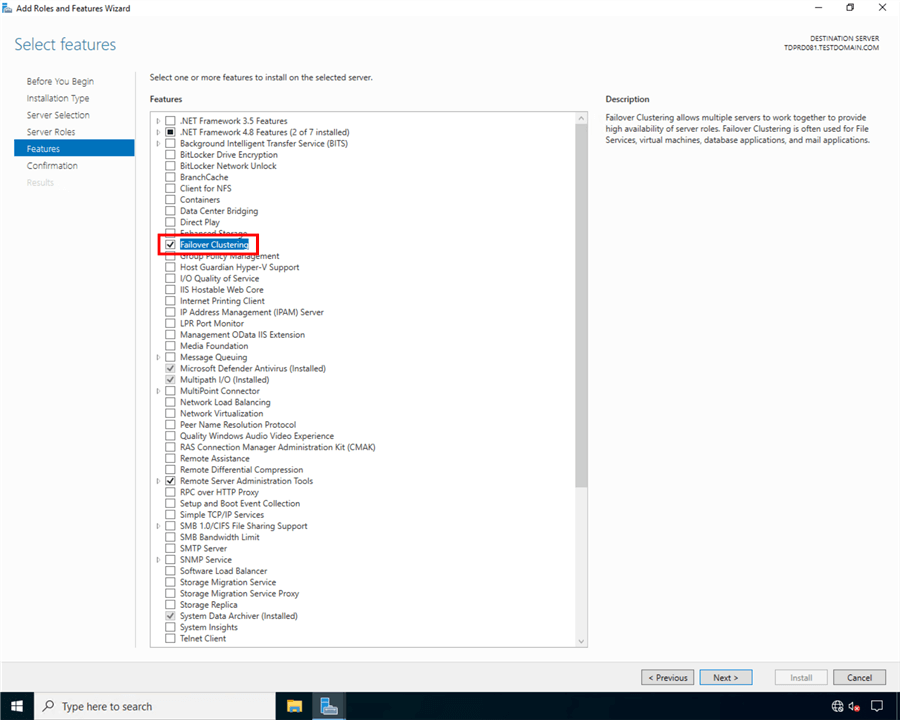
Click through the different dialog boxes until you reach the Select features dialog box. In the Select features dialog box, select the Failover Clustering checkbox.
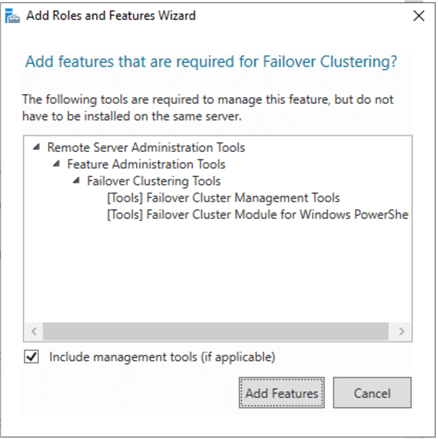
When prompted with the Add features that are required for Failover Clustering dialog box, click Add Features. Click Next.
Step 3
In the Confirm installation selections dialog box, click Install to confirm the selection and proceed to do the installation. You may need to reboot the server after adding this feature.
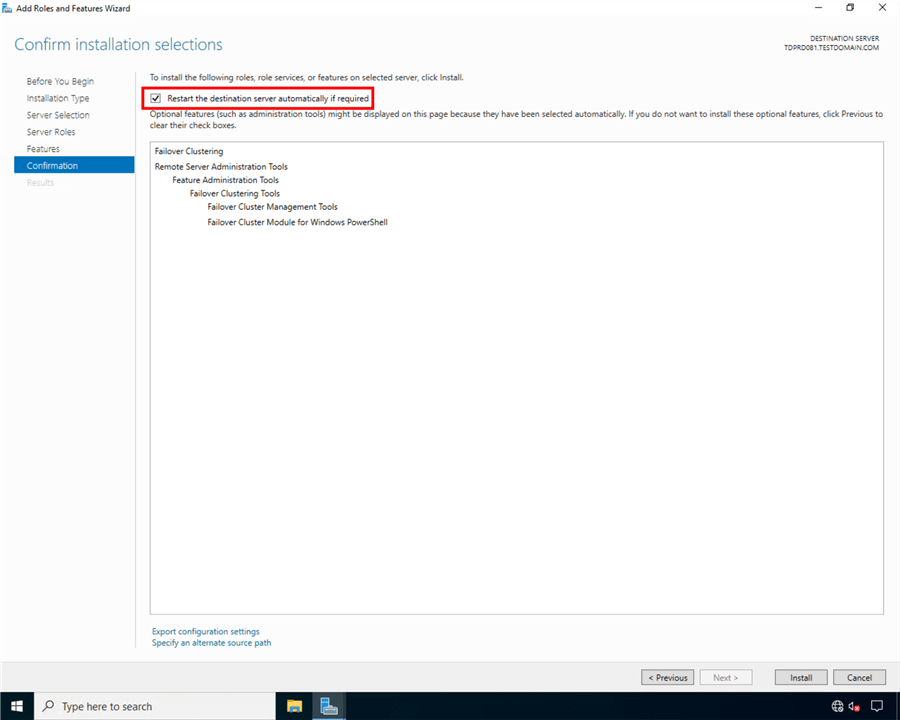
Alternatively, you can run the PowerShell command below using the Install-WindowsFeature PowerShell cmdlet to install the Failover Clustering feature.
Install-WindowsFeature -Name Failover-Clustering -IncludeManagementTools
NOTE: Perform these steps on all the servers you intend to join in your WSFC before proceeding to the next section.
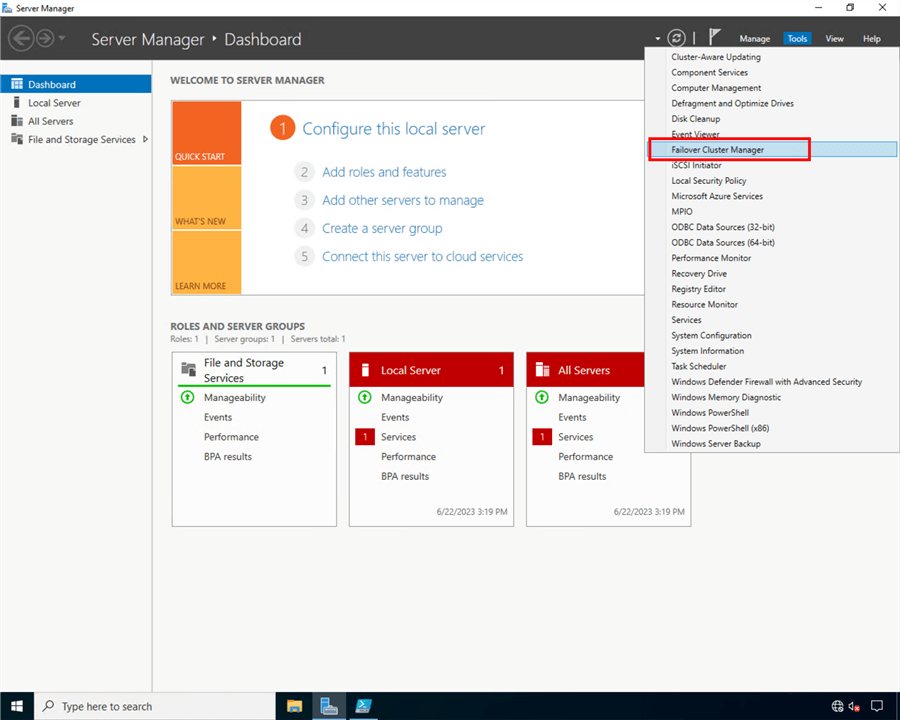
Running the Failover Cluster Validation Wizard
Next, you need to run the Failover Cluster Validation Wizard from the Failover Cluster Management console. You can launch the tool from the Server Manager dashboard, under Tools, and select Failover Cluster Manager.
NOTE: These steps can be performed on any servers that will serve as nodes in your WSFC.
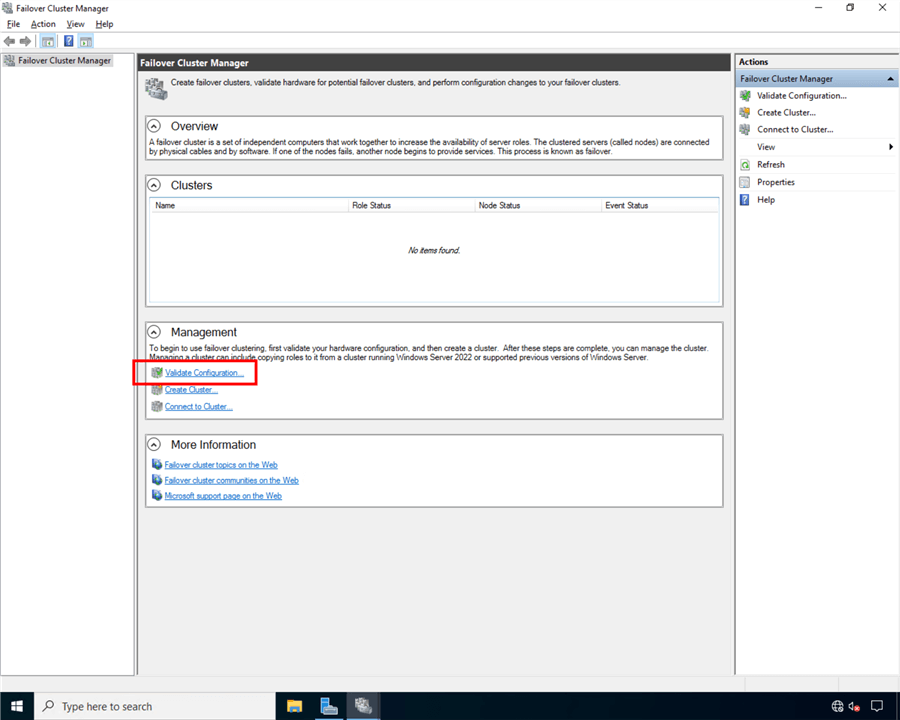
Step 1
In the Failover Cluster Management console, under the Management section, click the Validate Configuration link. This will run the Validate a Configuration Wizard.
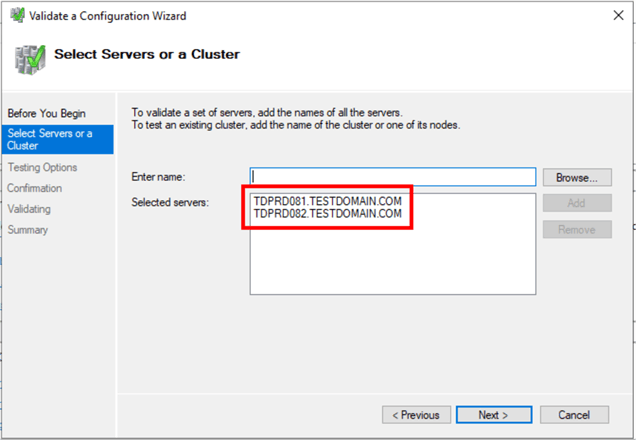
Step 2
In the Select Servers or a Cluster dialog box, enter the hostnames of the servers that you want to add as nodes in your WSFC. Click Next.
Step 3
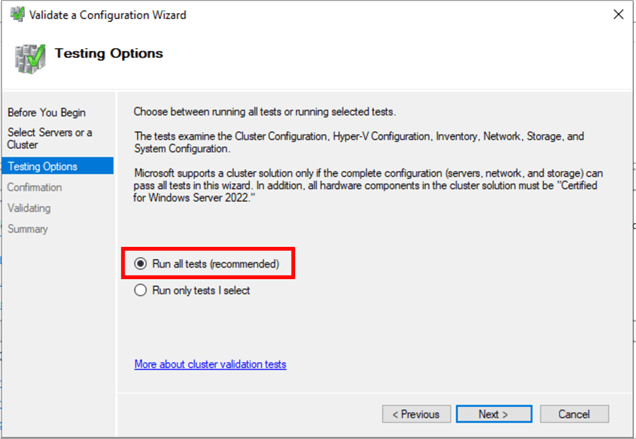
In the Testing Options dialog box, accept the default option, Run all tests (recommended), and click Next. This will run all the necessary tests to validate whether the nodes are OK for the WSFC.
Step 4
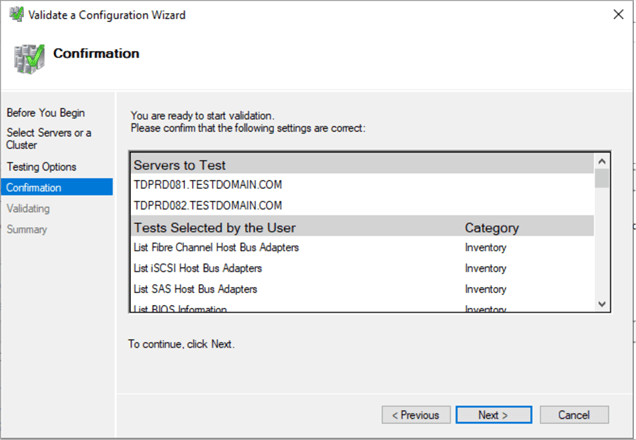
In the Confirmation dialog box, click Next. This will run all the necessary validation tests.
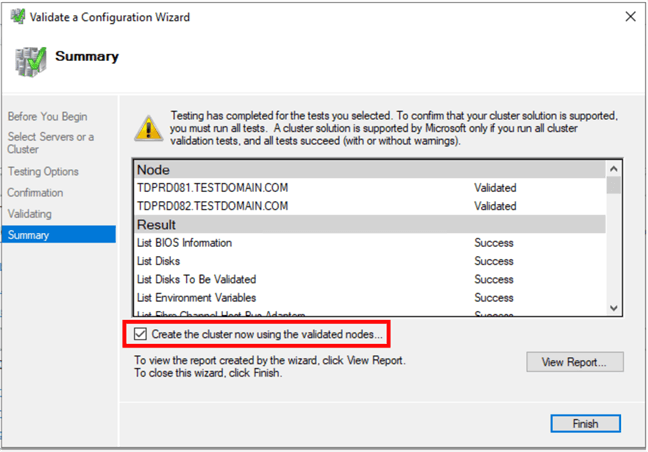
Step 5
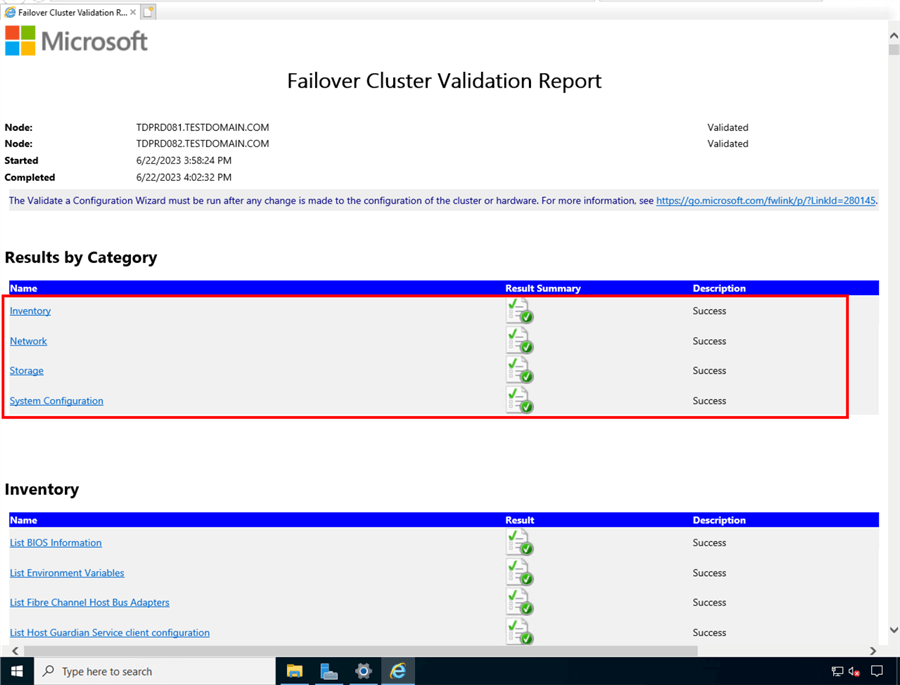
In the Summary dialog box, verify that all the selected checks return successful results. Click the View Report button to open the Failover Cluster Validation Report.
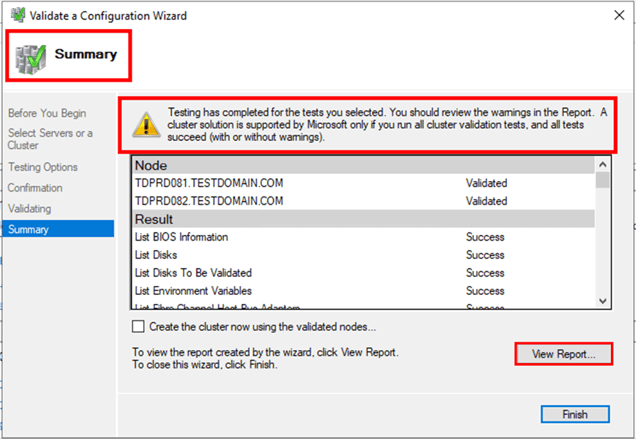
A note on the results: The icons in the Summary dialog box can be confusing. In the past, the Cluster Validation Wizard may report Warning messages pertaining to network and disk configuration issues, missing security updates, incompatible drivers, etc. The general recommendation has always been to resolve all errors and issues that the Cluster Validation Wizard reports before proceeding with the next steps. And it still is.
With Windows Server 2016 and later, checks for Storage Spaces Direct have been included in the Cluster Validation Wizard. Despite choosing the Run all tests (recommended) option, the Cluster Validation Wizard will exclude those checks.
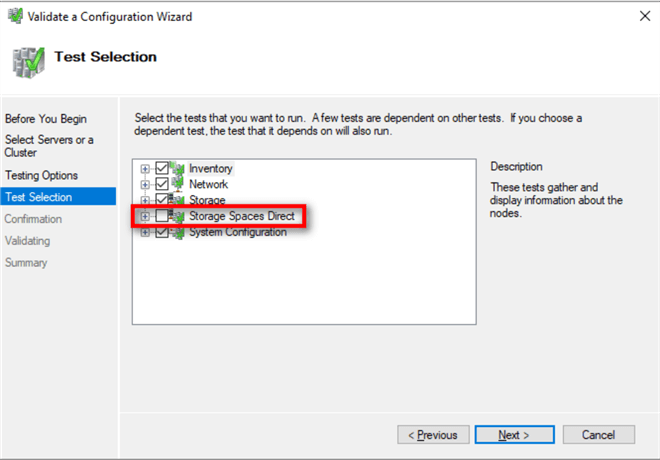
Hence, why you will get a Warning message in the cluster validation report despite having all selected default checks return successful results. Having both the Warning (yellow triangle with an exclamation mark) and Successful (green check mark) icons in the same result is confusing indeed. It is what it is.
Another issue that you might encounter involves the warnings regarding signed drivers and software update levels.
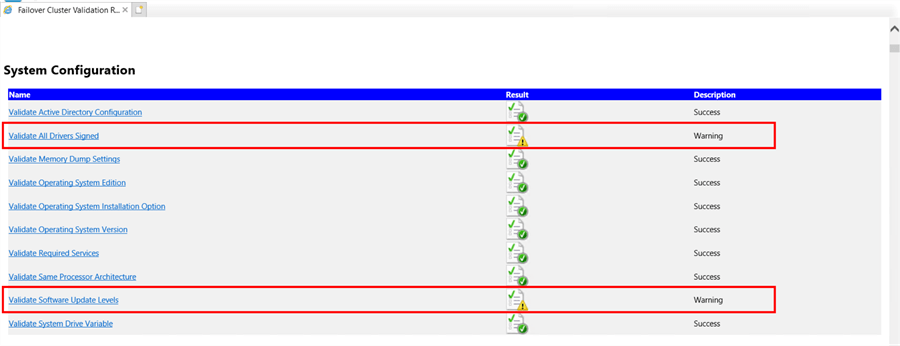
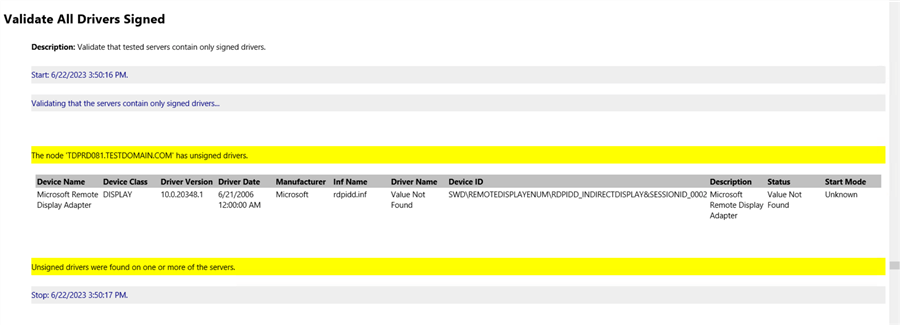
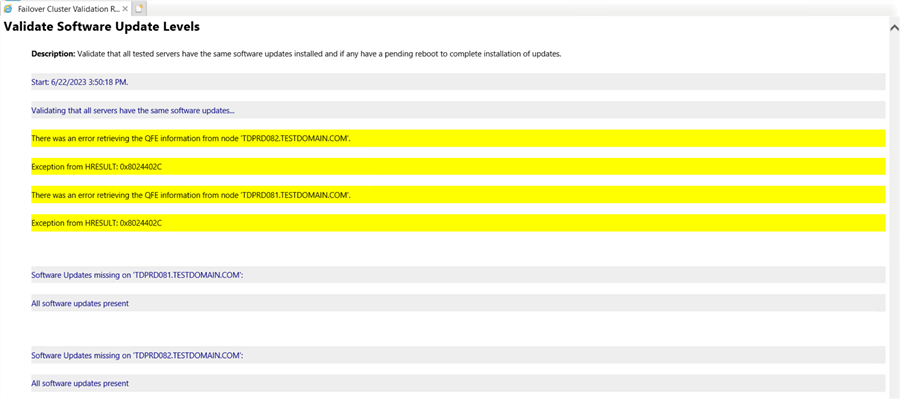
You can resolve the warning regarding signed drivers for the Microsoft Remote Display Adapter using the latest Windows Server 2022 installation media or downloading the latest updates from the Windows Update Center. Using the Windows Update Center to download the latest updates also resolves the warning on the software update levels. This assumes that your servers can access the internet. Work with your network administrators on enabling internet access to your servers.
Step 6
To create the WSFC using the servers you've just validated, select the Create the cluster now using the validated nodes... checkbox and click Finish.
Alternatively, run the PowerShell command below using the Test-Cluster PowerShell cmdlet to run Failover Cluster Validation.
Test-Cluster -Node TDPRD081, TDPRD082
Creating the Windows Server 2022 Failover Cluster (WSFC)
After validating the servers, create the WSFC using the Failover Cluster Manager console. You can launch the tool from the Server Manager dashboard, under Tools, and select Failover Cluster Manager. Alternatively, you can run the Create Cluster Wizard immediately after running the Failover Cluster Validation Wizard. Be sure to check the Create the cluster now using the validated nodes... checkbox.
NOTE: These steps can be performed on any servers that will serve as nodes in your WSFC.
Step 1
Within the Failover Cluster Manager console, under the Management section, click the Create Cluster... link. This will run the Create Cluster Wizard.

Step 2
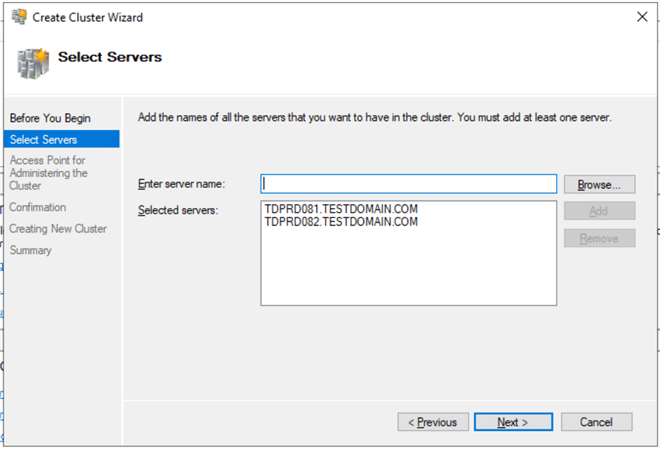
In the Select Servers dialog box, enter the hostnames of the servers that you want to add as nodes of your WSFC. Click Next.
Step 3
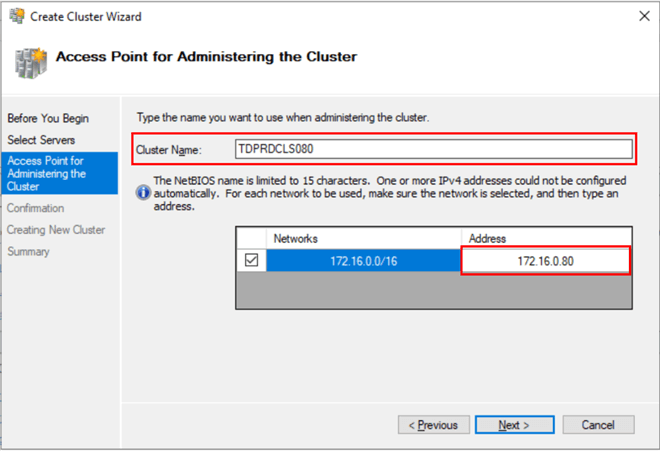
In the Access Point for Administering the Cluster dialog box, enter the virtual hostname and IP address you will use to administer the WSFC. Click Next. Note that because the servers are within the same network subnet, only one virtual IP address is needed. This is a typical configuration for local high availability.
Step 4
In the Confirmation dialog box, click Next. This will configure Failover Clustering on both servers that will act as nodes in your WSFC, add the configured shared storage, and add Active Directory and DNS entries for the WSFC virtual server name.
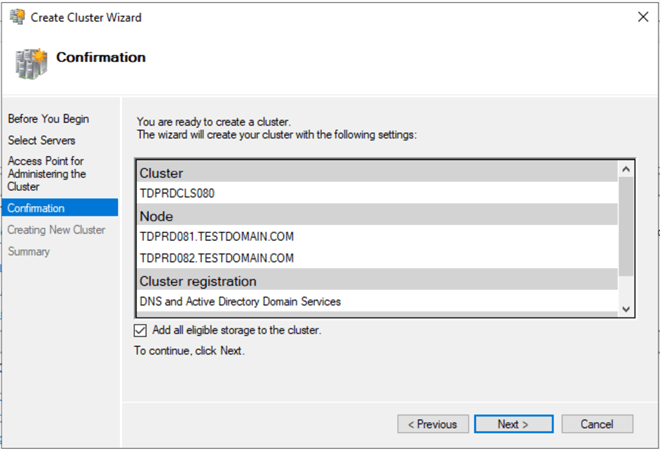
A word of caution before proceeding: Before clicking Next, be sure to coordinate with your Active Directory domain administrators on the appropriate permissions you need to create the computer name object in Active Directory. It will save you a lot of time and headaches troubleshooting if you cannot create a WSFC. Local Administrator permission on the servers that you will use as nodes in your WSFC is not enough. Your Active Directory domain account needs the following permissions in the Computers Organizational Unit. By default, this is where the computer name object that represents the virtual hostname for your WSFC will be created.
- Create Computer objects
- Read All Properties
For additional information, refer to Configuring cluster accounts in Active Directory.
In a more restrictive environment where your Active Directory domain administrators are not allowed to grant you those permissions, you can request them to pre-stage the computer name object in Active Directory. Provide the Steps for prestaging the cluster name account documentation to your Active Directory domain administrators.
Step 5
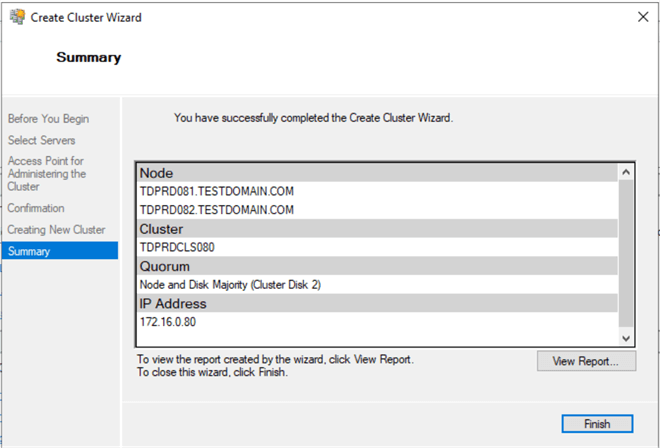
In the Summary dialog box, verify that the report returns successful results. Click Finish.
Step 6
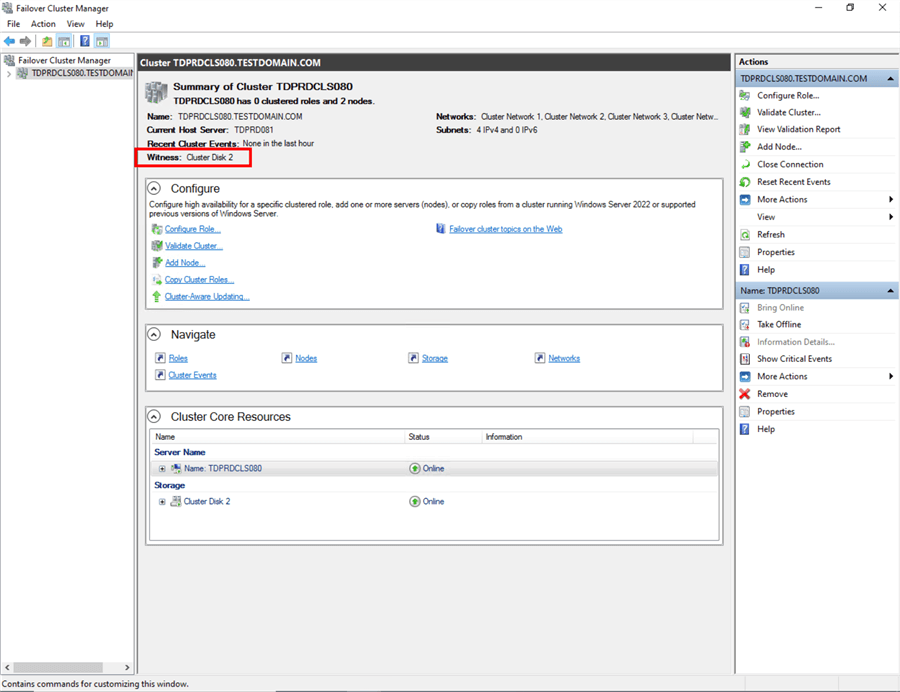
Verify that the quorum configuration is using Node and Disk Majority - Witness: Cluster Disk n, using the appropriate drive that you configured as the witness disk.
Alternatively, you can run the PowerShell command below using the New-Cluster PowerShell cmdlet to create a new WSFC.
New-Cluster -Name TDPRD080 -Node TDPRD081, TDPRD082 -StaticAddress 172.16.0.80
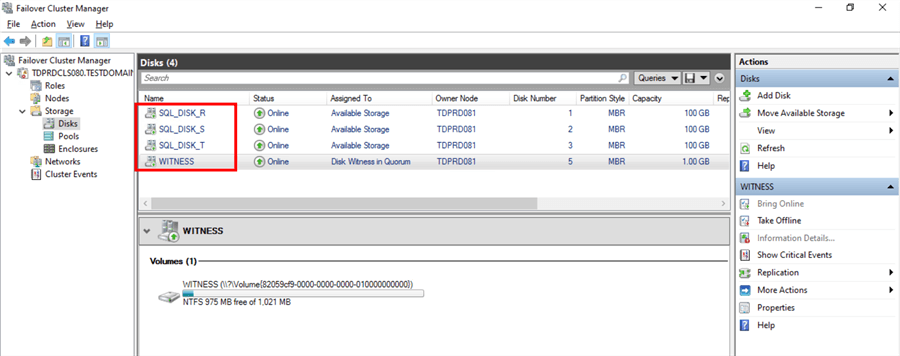
Renaming Shared Storage Resources
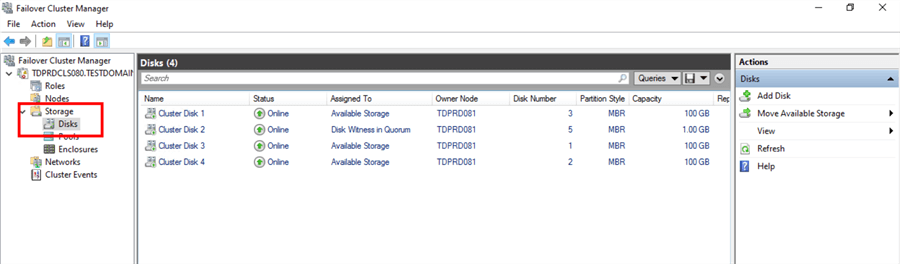
As a best practice, you should rename your shared storage resources before installing SQL Server 2022. This makes it easy to identify what the disks are used for - data, log, backups, etc. - during the installation and later when troubleshooting availability issues. And while you may have renamed the disks using the Disk Management console, you still have to rename them from the point-of-view of the WSFC. The default names of the shared storage will be Cluster Disk n, where n is the number assigned to the disks.
Step 1
Within the Failover Cluster Manager console, under the Storage navigation option, select Disks. This will display all of the shared storage resources added to the WSFC.
Step 2
Right-click one of the shared disks and select Properties. This will open the Properties page for that specific disk.
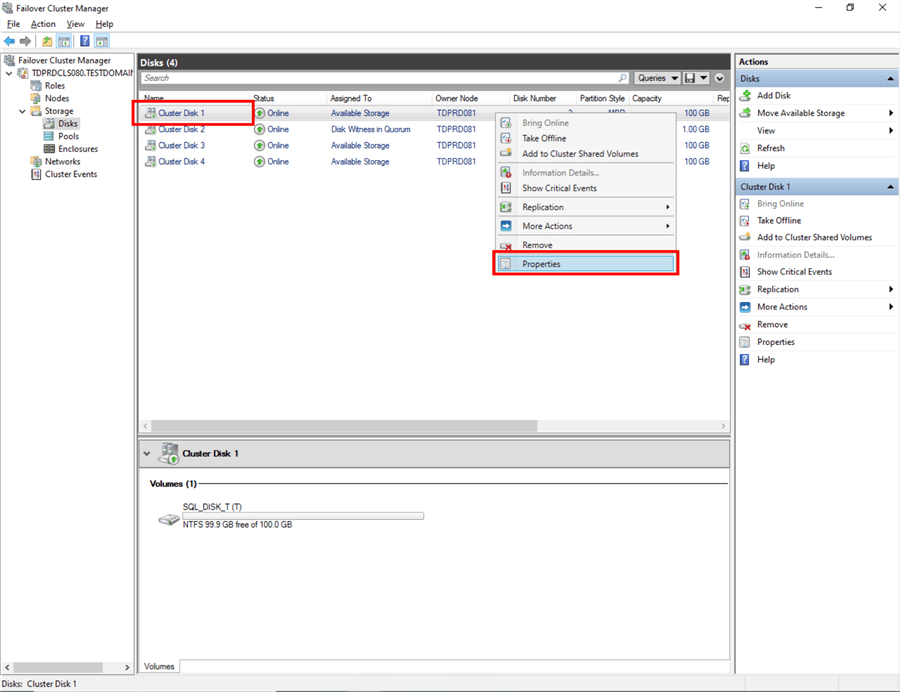
Step 3
In the Properties page, on the General tab, type the appropriate name for the shared disk in the Name textbox. Click OK.
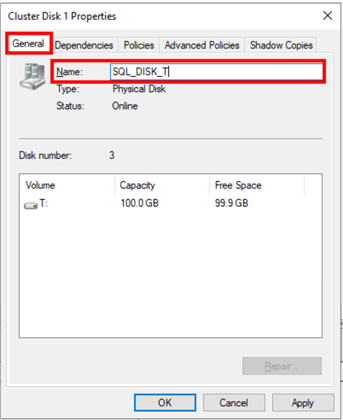
Do this on all of the shared storage resources available on your WSFC. Make sure the names of the shared disks in the WSFC reflect those you assigned using the Disk Management console.
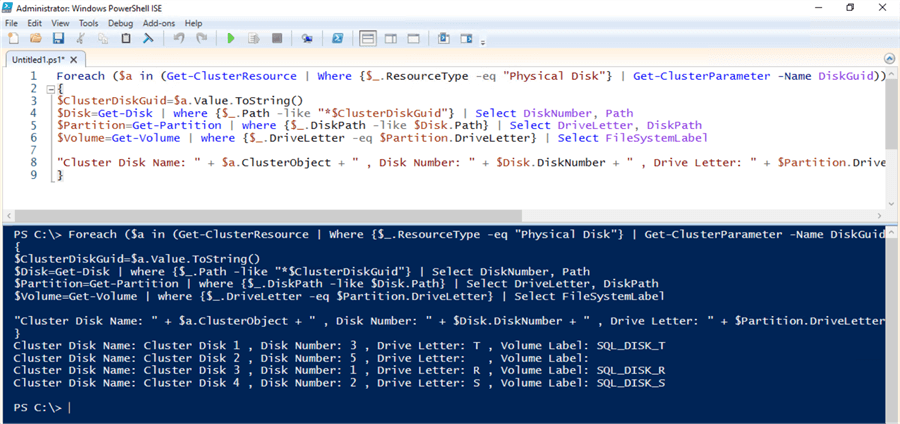
Alternatively, you can use the PowerShell script below to identify the clustered disks and their corresponding disk properties. The DiskGuid property of the cluster disk is used to identify the Path property of the physical disk. The Path property of the physical disk is used to identify the DiskPath and DriveLetter properties of the logical partition. The DriveLetter property of the logical partition is used to identify the FileSystemLabel property of the disk volume.
ForEach ($a in (Get-ClusterResource | Where {$_.ResourceType -eq "Physical Disk"} | Get-ClusterParameter -Name DiskGuid))
{
$ClusterDiskGuid=$a.Value.ToString()
$Disk=Get-Disk | where {$_.Path -like "*$ClusterDiskGuid"} | Select DiskNumber, Path
$Partition=Get-Partition | where {$_.DiskPath -like $Disk.Path} | Select DriveLetter, DiskPath
$Volume=Get-Volume | where {$_.DriveLetter -eq $Partition.DriveLetter} | Select FileSystemLabel

"Cluster Disk Name: " + $a.ClusterObject + " , Disk Number: " + $Disk.DiskNumber + " , Drive Letter: " + $Partition.DriveLetter  + " , Volume Label: " + $Volume.FileSystemLabel
}
Once you've mapped the cluster disks with the corresponding physical disks, you can rename them accordingly using the sample PowerShell commands below, replacing the appropriate values. Note that the disk without the drive letter is the witness disk. Make sure that it is also renamed accordingly.
(Get-ClusterResource -Name "Cluster Disk 1").Name = "SQL_DISK_T"
(Get-ClusterResource -Name "Cluster Disk 2").Name = "WITNESS"
(Get-ClusterResource -Name "Cluster Disk 3").Name = "SQL_DISK_R"
(Get-ClusterResource -Name "Cluster Disk 4").Name = "SQL_DISK_S"
Renaming Cluster Network Resources
Similarly, you should rename your cluster network resources before installing SQL Server 2022. And while you may have renamed the network adapters using the Network Connections management console, you still have to rename them from the point-of-view of the WSFC. The default names of the cluster network resources will be Cluster Network n, where n is the number assigned to the cluster network adapter.
Step 1
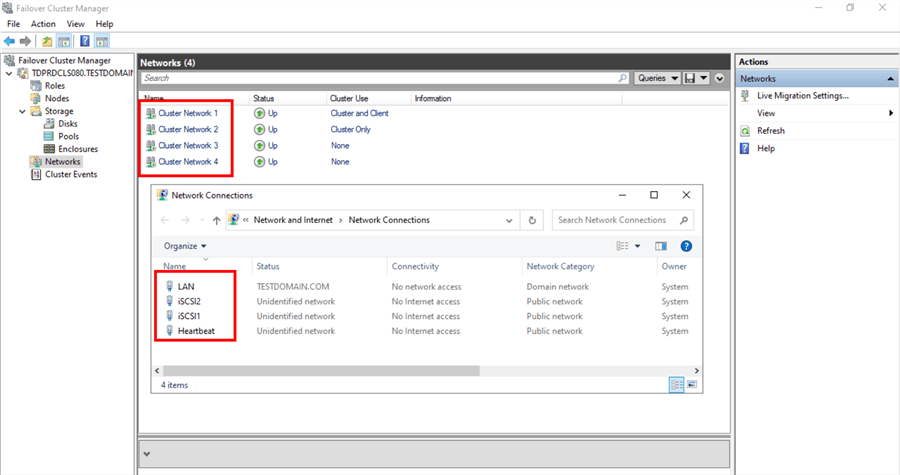
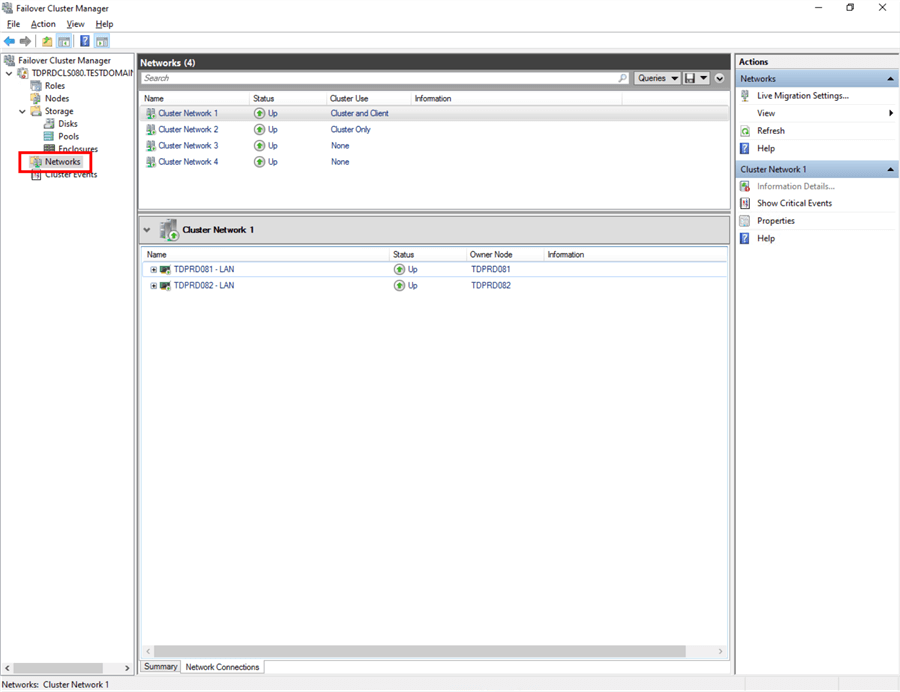
Within the Failover Cluster Manager console, select the Networks navigation option. This will display all the cluster network resources added to the WSFC.
Step 2
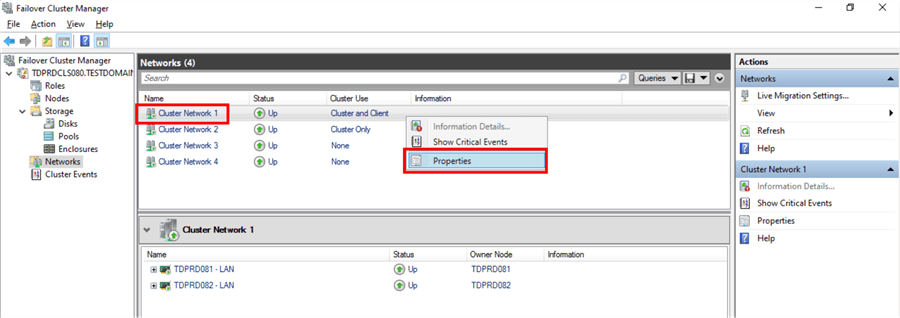
Right-click one of the cluster network adapters and select Properties. This will open the Properties page for that specific cluster network resource.
Step 3
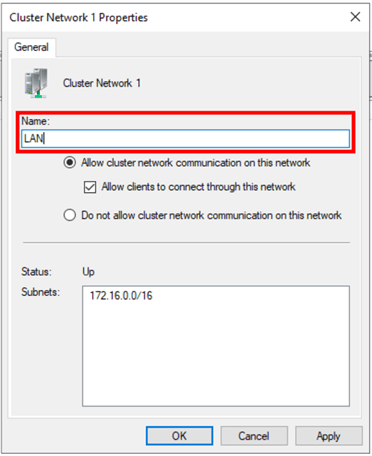
In the Properties page, type the appropriate name for the cluster network resource in the Name textbox. Click OK.
NOTE: The WSFC will automatically detect whether client applications can connect through the specific cluster network resource. This is determined by whether a network adapter has a default gateway and can be identified via network discovery. Thus, it is important to get your network administrators involved in properly assigning the IP address, the subnet mask, and the default gateway values of all the network adapters used on the WSFC nodes before creating the WSFC. An example of this is the network adapter configured for inter-node communication.
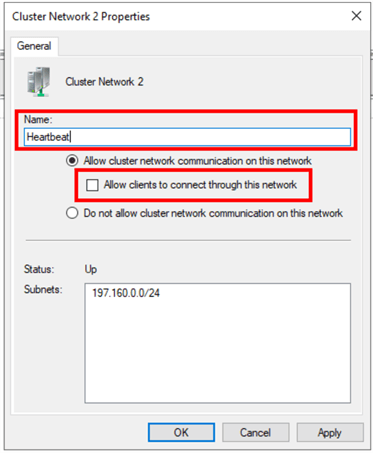
Other network adapters also need to be appropriately configured. The network adapter used for iSCSI in the example cluster has the Do not allow cluster network communication on this network option selected.
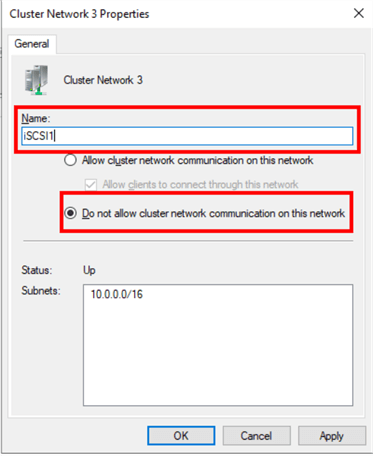
Do this on all the cluster network resources available on your WSFC.
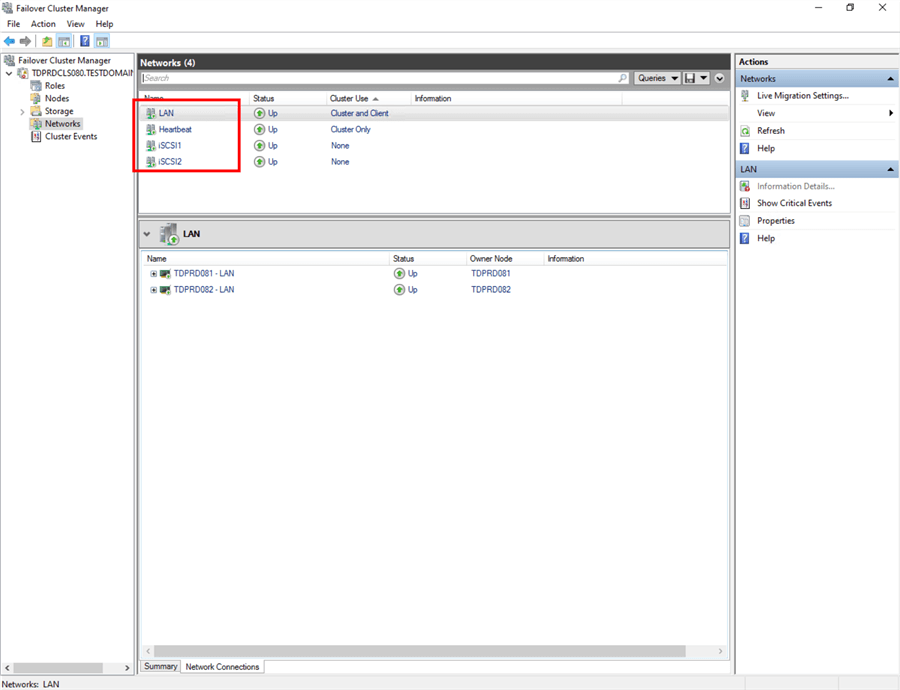
All available network adapters will be used for inter-node communication, including the network adapter you configure for production network traffic. How the WSFC prioritizes which network adapter is used for private/heartbeat communication traffic is determined by using the cluster network adapter's Metric property value. You can identify the cluster network adapter's Metric property value by running the PowerShell command below.
Get-ClusterNetwork | Sort Metric
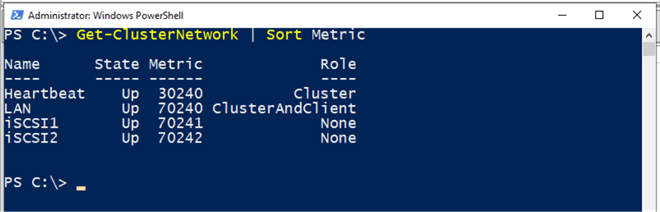
The cluster network adapter with the lowest Metric property value will be used for private/heartbeat communication (and cluster shared volume if configured). In the example provided, the Heartbeat cluster network adapter will be used for inter-node communication. And since the LAN cluster network adapter has a Role property value of ClusterAndClient, the WSFC will use it if the Heartbeat cluster network adapter becomes unavailable. This is described in more detail in the Configuring Network Prioritization on a Failover Cluster blog post from Microsoft.
Alternatively, you can use the sample PowerShell script below to identify the clustered network resources and rename them accordingly.
#Display all cluster network resources
Get-ClusterNetworkInterface

#Rename cluster network resources accordingly based on the results of Get-ClusterNetworkInterface
(Get-ClusterNetwork –Name "Cluster Network 1").Name = "LAN"
(Get-ClusterNetwork –Name "Cluster Network 2").Name = "Heartbeat"
(Get-ClusterNetwork –Name "Cluster Network 3").Name = "iSCSI1"
(Get-ClusterNetwork –Name "Cluster Network 4").Name = "iSCSI2"

Congratulations! You now have a working Windows Server 2022 failover cluster. Proceed to validate whether your WSFC is working or not. A simple test to do would be a continuous PING test on the virtual hostname or IP address that you have assigned to your WSFC. Reboot one of the nodes and see how your PING test responds. At this point, you are now ready to install SQL Server 2022.
In this tip, you've:
- Seen some of the new Windows Server 2022 failover clustering features that are relevant to SQL Server workloads,
- Had an idea of how to provision shared storage for your WSFC,
- Added the Failover Clustering feature on all the servers that you intend to join in a WSFC,
- Ran the Failover Cluster Validation Wizard and resolved potential issues before creating the failover cluster,
- Seen how the validation checks for Storage Spaces Direct that can cause a Warning message when running the Failover Cluster Validation Wizard,
- Created the WSFC,
- Renamed the shared storage resources,
- Renamed the cluster network resources, and
- Viewed network prioritization for cluster network adapters.
In the next tip in this series, you will go through the process of installing a SQL Server 2022 failover clustered instance on your WSFC.
Next Steps
- Review the previous tips on Install SQL Server 2008 on a Windows Server 2008 Cluster Part 1, Part 2, Part 3, and Part 4 to see the difference in the setup experience between a SQL Server 2008 FCI on Windows Server 2008 and a SQL Server 2022 FCI on Windows Server 2022.
- Read more on the following topics:


About the author
 Edwin M Sarmiento is a Microsoft SQL Server MVP and Microsoft Certified Master from Ottawa, Canada specializing in high availability, disaster recovery and system infrastructures.
This author pledges the content of this article is based on professional experience and not AI generated.
View all my tips
Article Last Updated: 2023-11-06
