By: Edwin Sarmiento | Updated: 2024-01-10 | Comments (7) | Related: 1 | 2 | 3 | > Clustering
Problem
I used the guide in a previous tip, Install SQL Server 2008 on a Windows Server 2008 Cluster Part 1, to install a SQL Server 2008 on a Windows Server 2008 failover cluster (WSFC). I want to upgrade and migrate my SQL Server 2008 failover clusters to SQL Server 2022 running on Windows Server 2022. How do I go about the installation and configuration process?
Solution
To continue this series on Step-by-step Installation of SQL Server 2022 on a Windows Server 2022 Failover Cluster, we will look at installing SQL Server 2022 on top of the existing Windows Server 2022 Failover Cluster (WSFC). In Part 1, you learned how to set up and configure a WSFC and rename the shared storage and cluster network resources using the Failover Cluster Manager console and PowerShell. This tip will walk you through installing a SQL Server 2022 failover clustered instance (FCI) on the WSFC.
Installing a SQL Server 2022 Failover Clustered Instance (FCI)
The steps outlined below will install a default SQL Server 2022 FCI. Choose a server in the WSFC to initiate the installation process.
Step 1
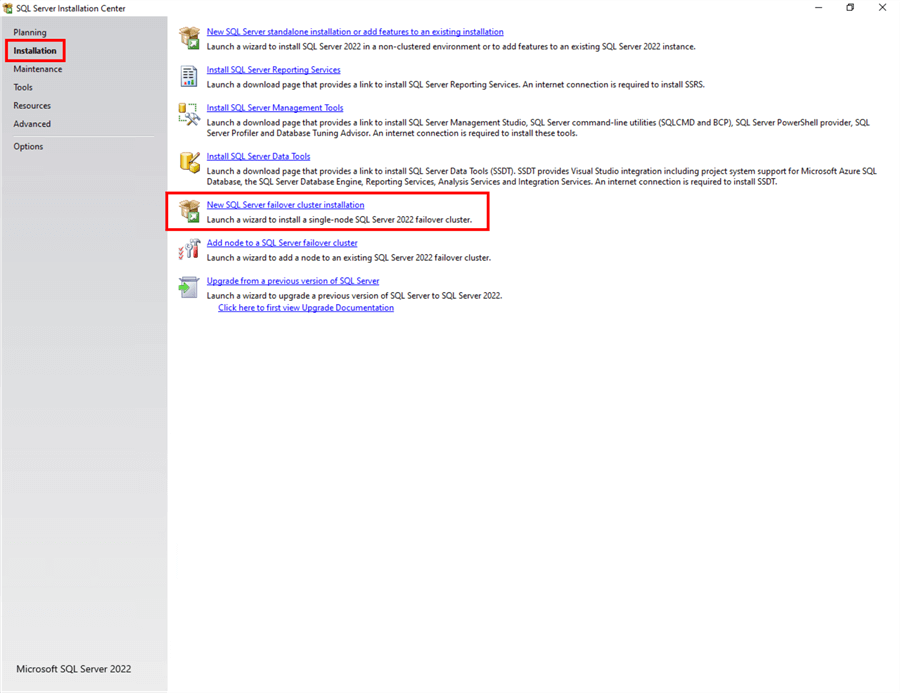
Run setup.exe from the SQL Server 2022 installation media to launch the SQL Server Installation Center. Click on the Installation link on the left-hand side.
Step 2
Click the New SQL Server failover cluster installation link. This will run the SQL Server 2022 Setup wizard.
Step 3
In the Edition dialog box, choose the option that works for you. If you have an existing product key, select the Enter the product key option and provide the product key that came with your installation media.
Click Next.
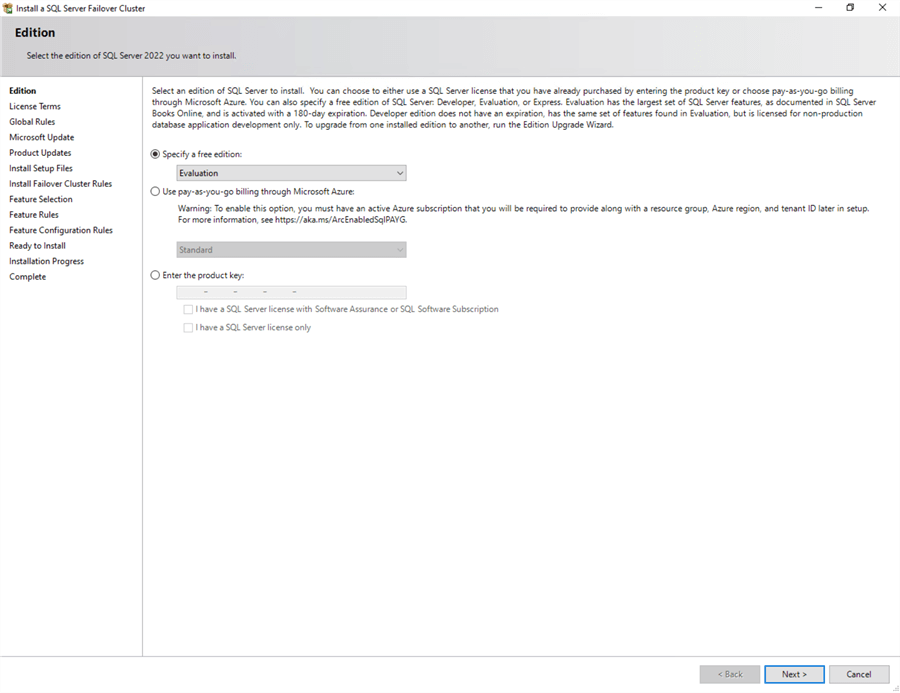
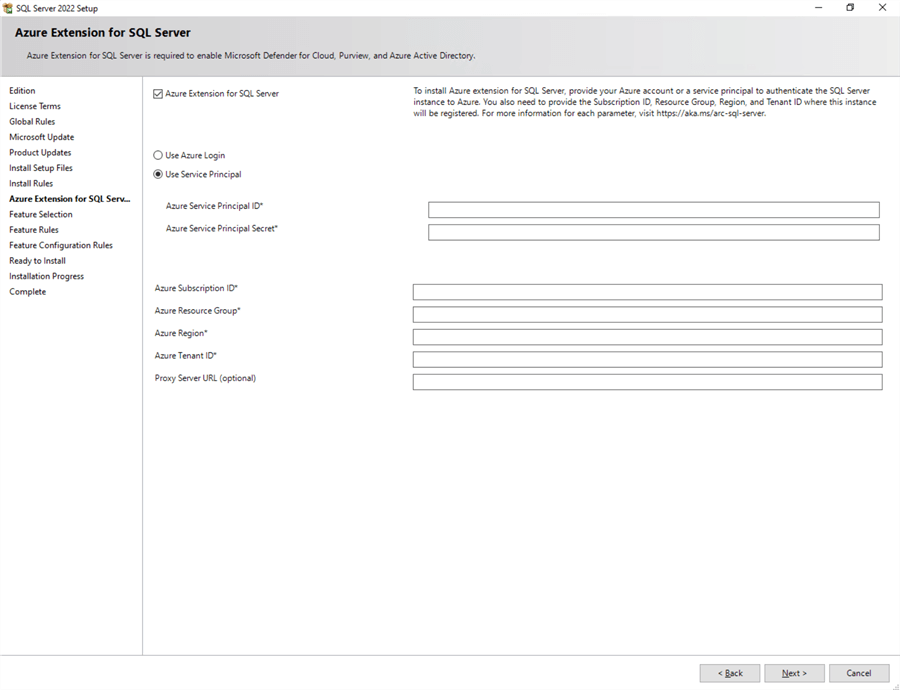
NOTE: This is a completely different dialog box compared to the previous versions. The dialog box shows the new Use pay-as-you-go billing through Microsoft Azure option. SQL Server 2022 introduced the Pay-As-You-Go (PAYG) model that provides per-hour consumption-type billing for on-premises or hosted SQL Server instances, just like running SQL Server on an Azure VM. There is no need to pay for SQL Server licenses up front, lowering the initial cost of running SQL Server. However, this requires having a Microsoft Azure subscription and installing the Azure extension for SQL Server. You need to have these details available during the installation, as shown in the dialog box below.
Step 4
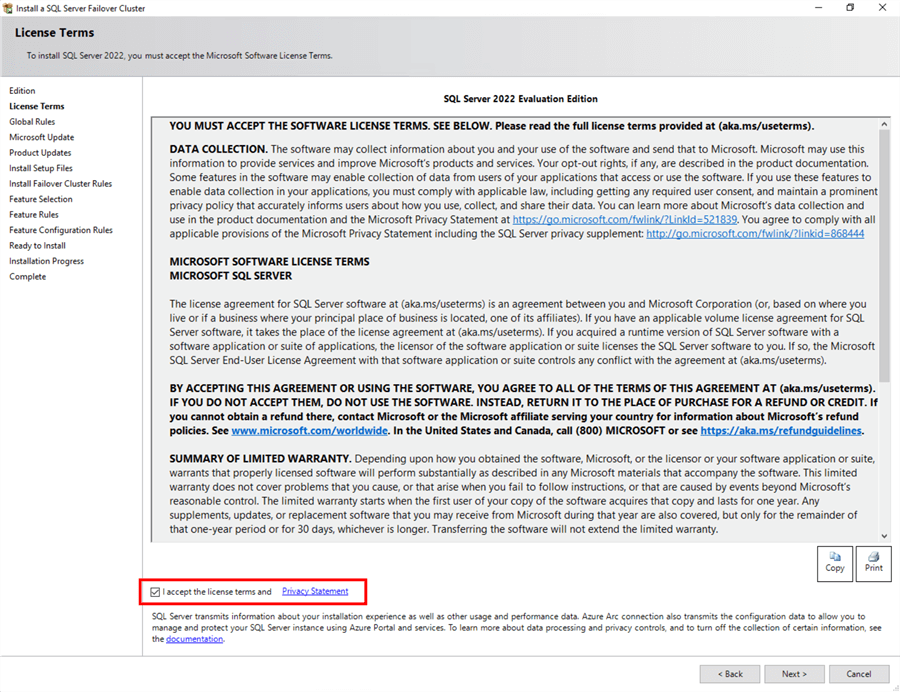
In the License Terms dialog box, click the I accept the license terms check box and click Next.
Step 5
In the Global Rules dialog box, validate that the checks return successful results and click Next.

Step 6
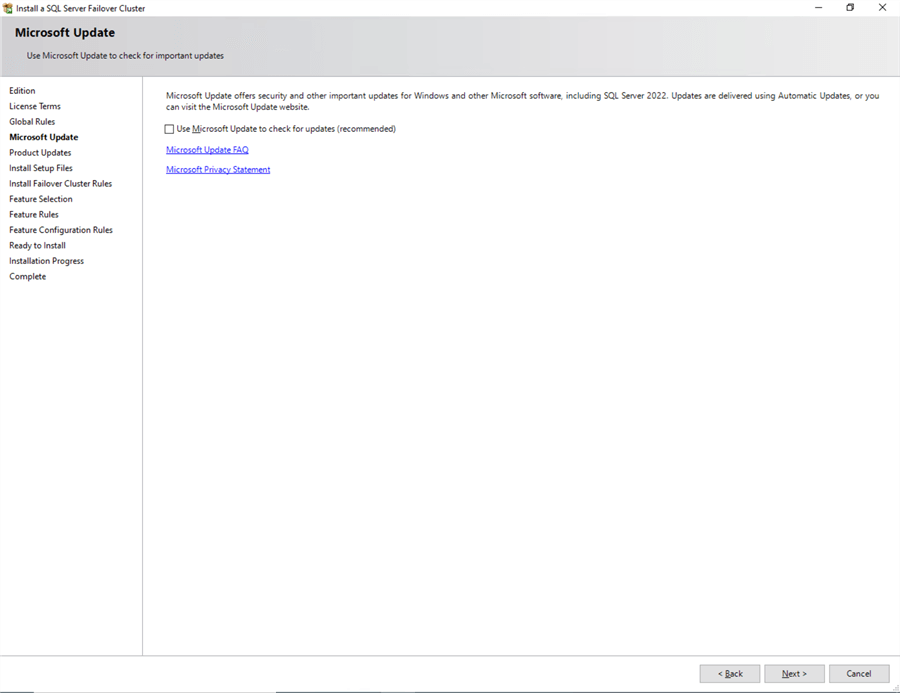
In the Microsoft Update dialog box, you can include SQL Server product updates in the installation process. When you check the Use Microsoft Update to check for updates (recommended) checkbox, it searches for product updates through the Microsoft Updates service online, on the assumption that the server has access to the Internet. In cases where your servers do not have access to the internet, you can manually download the updates and store them in a network-shared folder. Installing a SQL Server FCI while slipstreaming the latest cumulative update will be covered in the following section: Installing a SQL Server 2022 Failover Clustered Instance (FCI) with Slipstreamed Updates.
Click Next.
Step 7
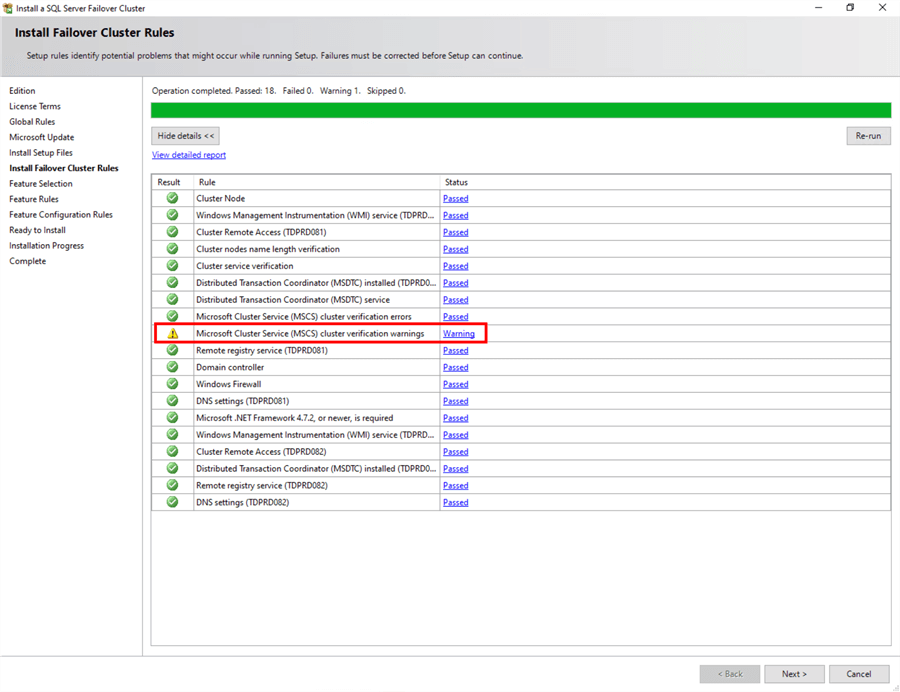
In the Install Failover Cluster Rules dialog box, validate that the checks return successful results. If the checks return a few warnings, fix them before installing.
Click Next.
Be aware that you will get a warning result for Microsoft Cluster Service (MSCS) cluster verification warnings as a side effect of the storage spaces direct (S2D) checks described in this tip: Step-by-step Installation of SQL Server 2022 on a Windows Server 2022 Failover Cluster - Part 1.
Step 8
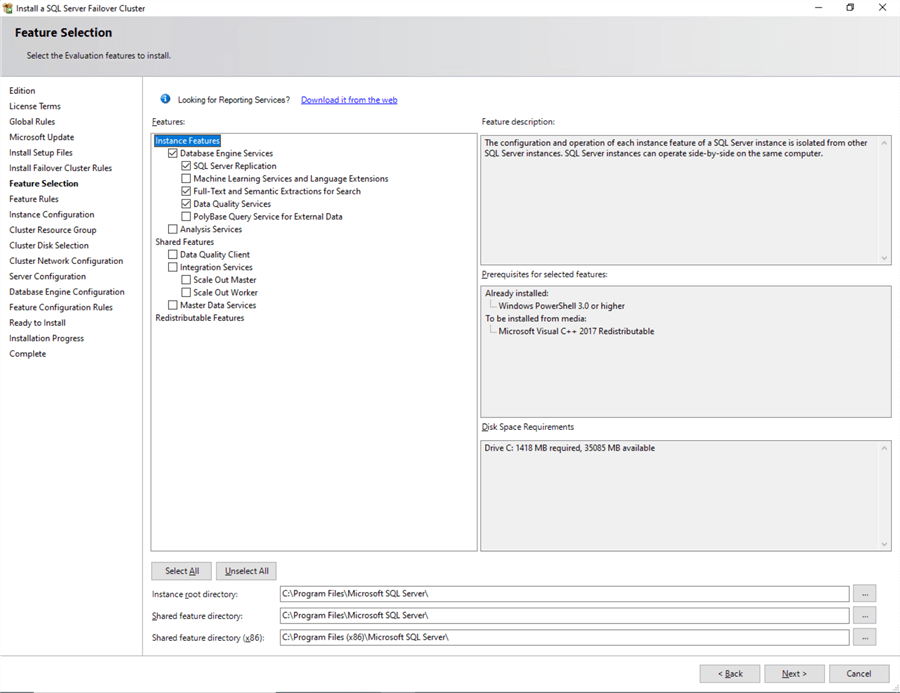
In the Feature Selection dialog box, select Database Engine Services. This will automatically select the other components that come with the installation, like SQL Server Replication, Full-Text and Semantic Extractions for Search, and Data Quality Services.
Click Next.
Starting with SQL Server 2016, SQL Server Management Studio is no longer included in the installation media. You must download it separately if you want it installed on your servers, which I don’t recommend. Only install the database engine on your servers and use a client workstation to manage them remotely.
Step 9
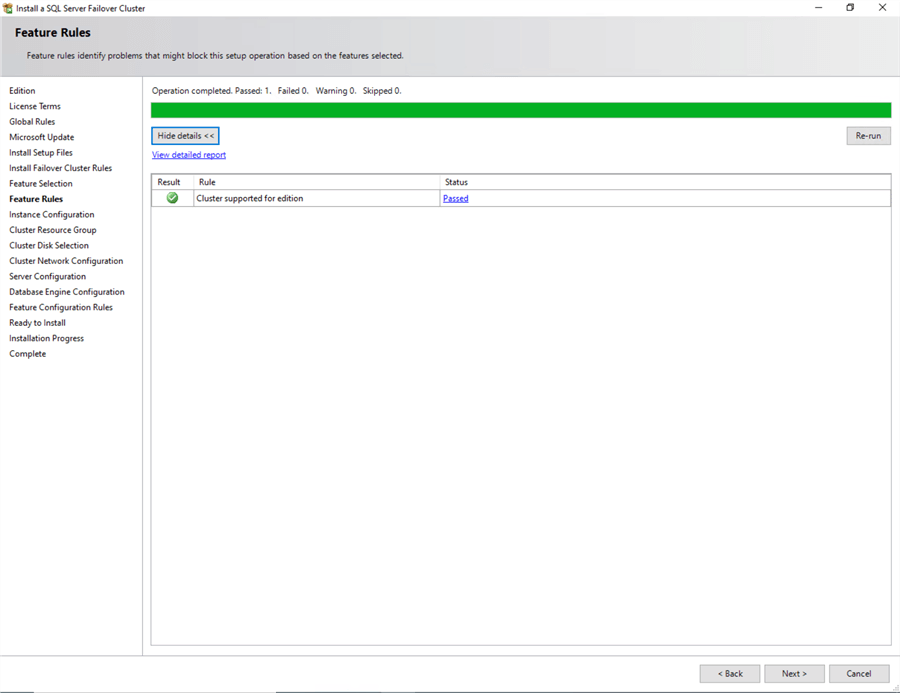
In the Feature Rules dialog box, verify that all the rules have passed. If the rules return a few warnings, fix them before installing.
Click Next.
Step 10
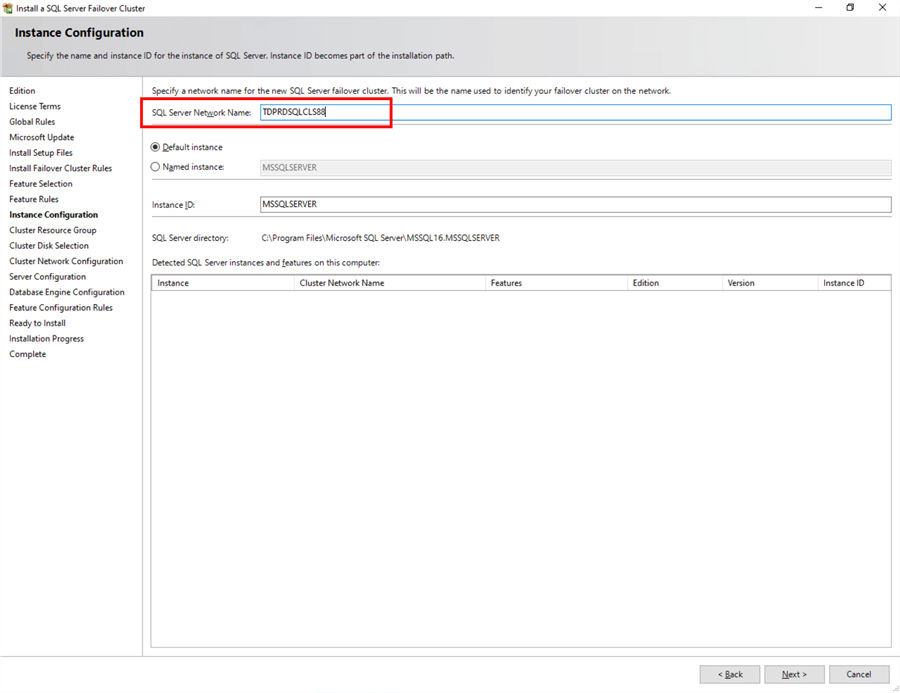
In the Instance Configuration dialog box, provide a value for the SQL Server Network Name. This is the name that the client applications will use to connect to this server. This name will be created as a virtual computer object (VCO) in Active Directory. Be sure that the appropriate permissions are assigned to the cluster name object (CNO) associated with the WSFC, as outlined in this Microsoft article.
A couple of things need highlighting in this section. By default, the instance name is used as the Instance ID. This is used to identify installation directories and registry keys for this specific instance of SQL Server. This is very useful when you want to run multiple instances in a WSFC. It applies to both the default instance and named instances. For a default instance, the instance name and instance ID would be MSSQLSERVER. To use a non-default instance ID, specify a value in the Instance ID text box.
Click Next.
Step 11
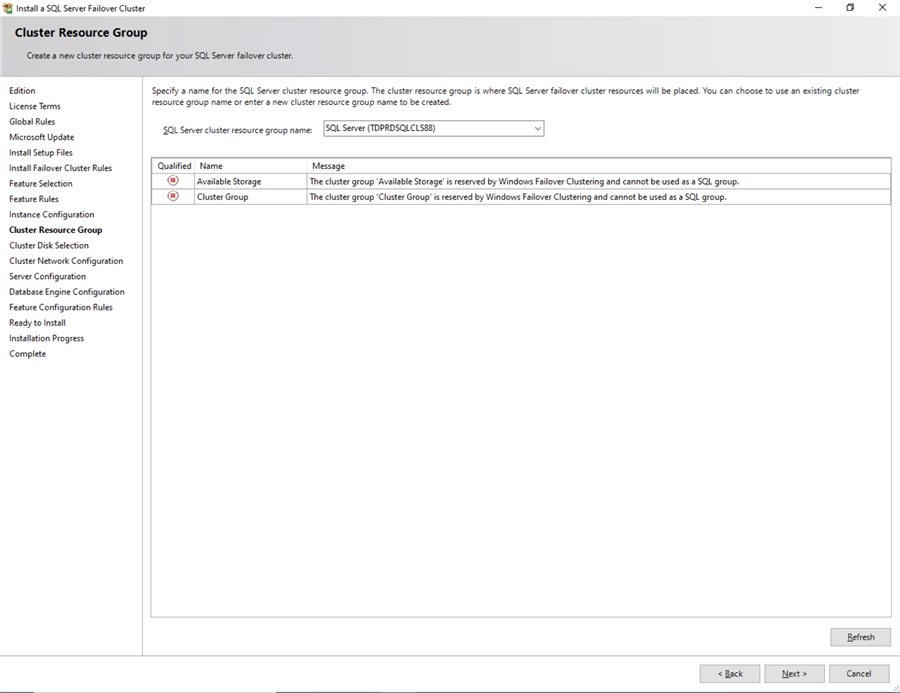
In the Cluster Resource Group dialog box, check the resources available on your WSFC. This tells you that a new Resource Group will be created on your WSFC for the SQL Server FCI. To specify the SQL Server cluster resource group name, you can either use the drop-down box to select an existing group to use or type the name of a new group to create it.
Click Next.
Step 12
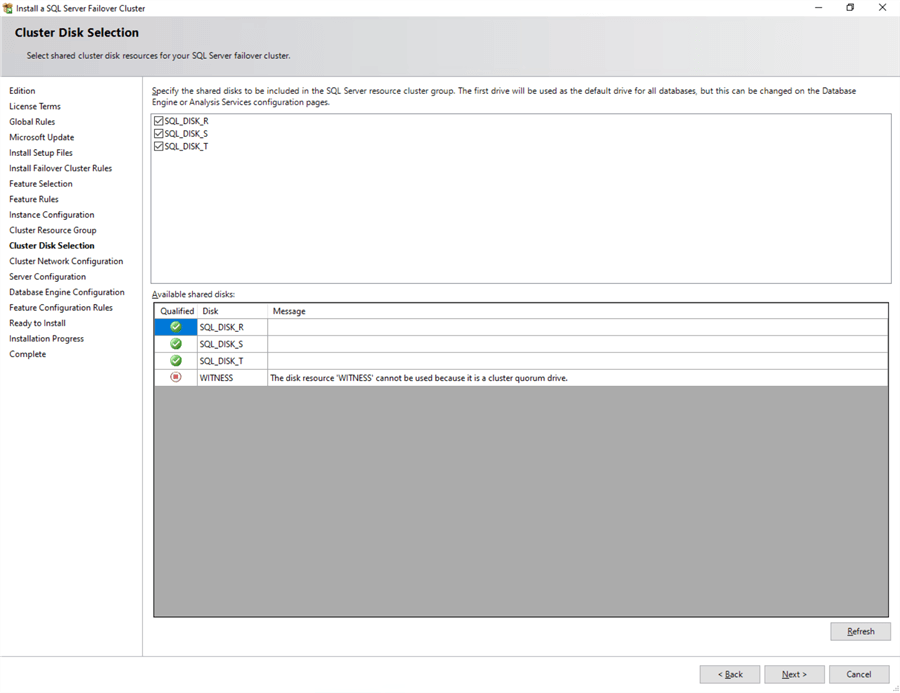
In the Cluster Disk Selection dialog box, select the available disk groups on the WSFC for the SQL Server FCI to use.
Click Next.
The list of disks displayed in this dialog box will depend on how you configured shared disk resources in your WSFC. This is where you’ll see the value of renaming the shared disk resources completed in this tip. Also, note that the WITNESS disk is no longer available as it is being used as a cluster quorum drive.
Step 13
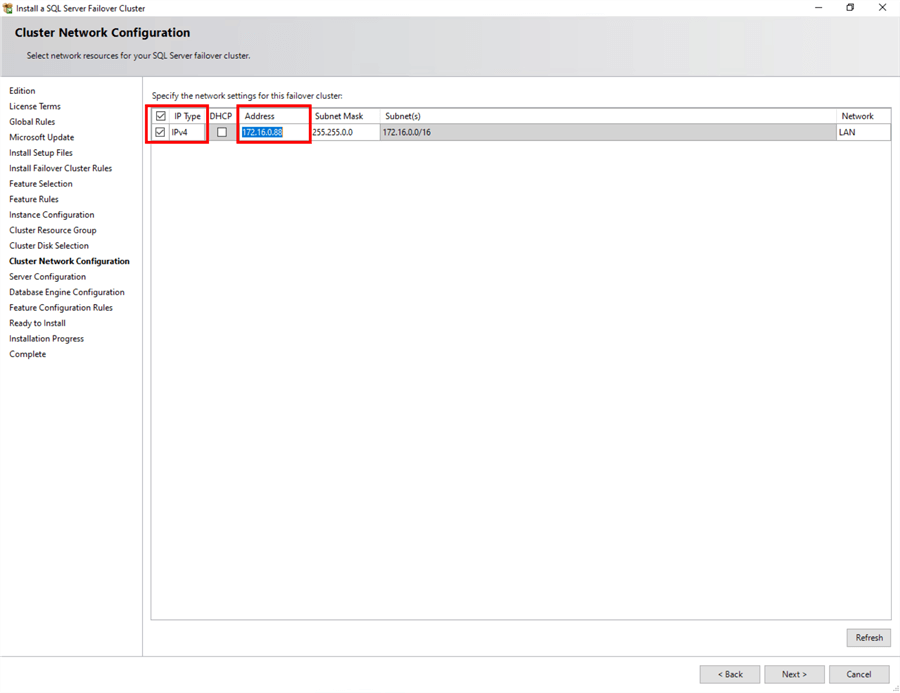
In the Cluster Network Configuration dialog box, enter the IP address and subnet mask values your SQL Server FCI will use. Select the IPv4 checkbox under the IP Type column, as you will use a static IP address.
Click Next.
The SQL Server Network Name with this virtual IP address will be created as an entry in your DNS server. Again, this is where you’ll see the value of renaming the cluster network resources as done in this tip.
Step 14
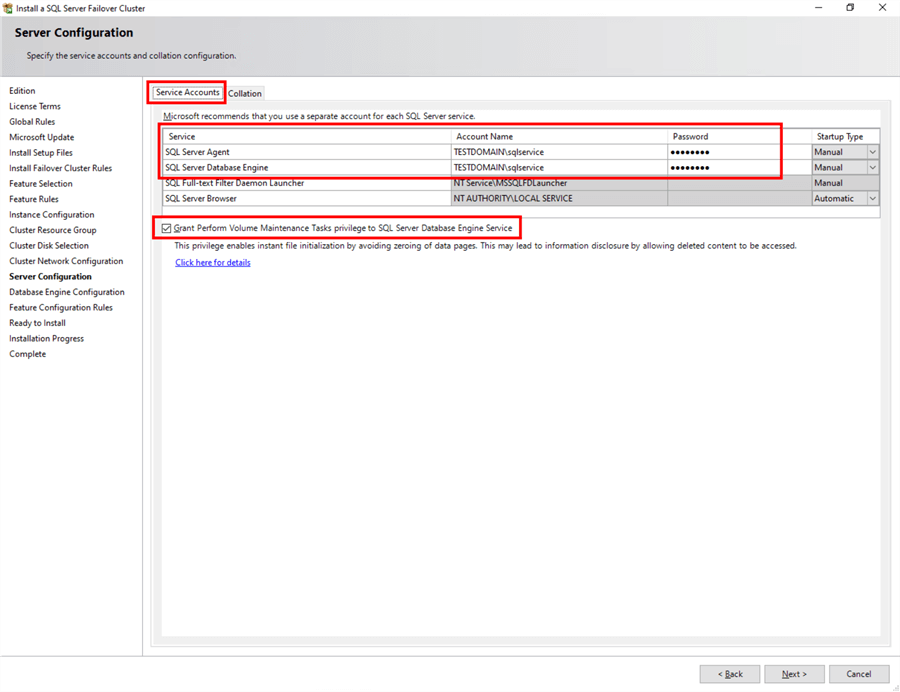
In the Server Configuration dialog box, provide the credentials for the SQL Server service accounts in the Service Accounts tab. Ensure that the SQL Server Agent and SQL Server Database Engine services have a Startup Type of Manual. The WSFC will take care of stopping and starting these services. Select the Grant Perform Volume Maintenance Task privilege to SQL Server Database Engine Service checkbox. This enables Instant File Initialization for SQL Server, as highlighted in this tip. Because this is a local permission assigned to an account, you need to explicitly do this on all the nodes in the SQL Server FCI.
Click Next.
Step 15
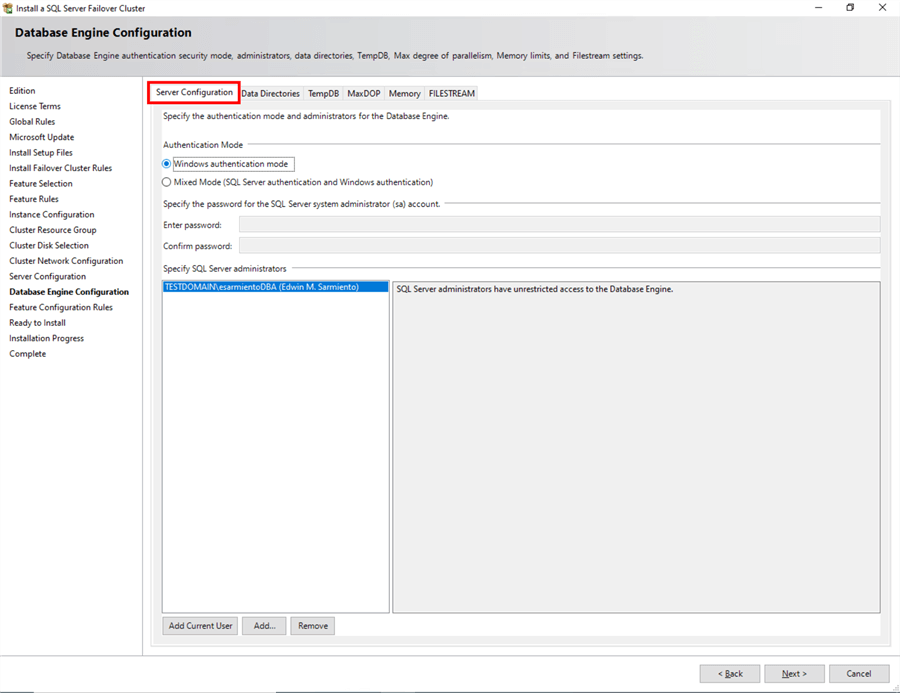
In the Database Engine Configuration dialog box, under the Server Configuration tab,
- Select Windows authentication mode in the Authentication Mode section. If required, you can change it later after the installation is complete.
- Add the currently logged-on user to be a part of the SQL Server administrators group by clicking the Add Current User button in the Specify SQL Server Administrators section. You can also add Active Directory domain accounts or security groups as necessary.
In the Data Directories tab, specify the location of the data files, the log files, and the backup files.

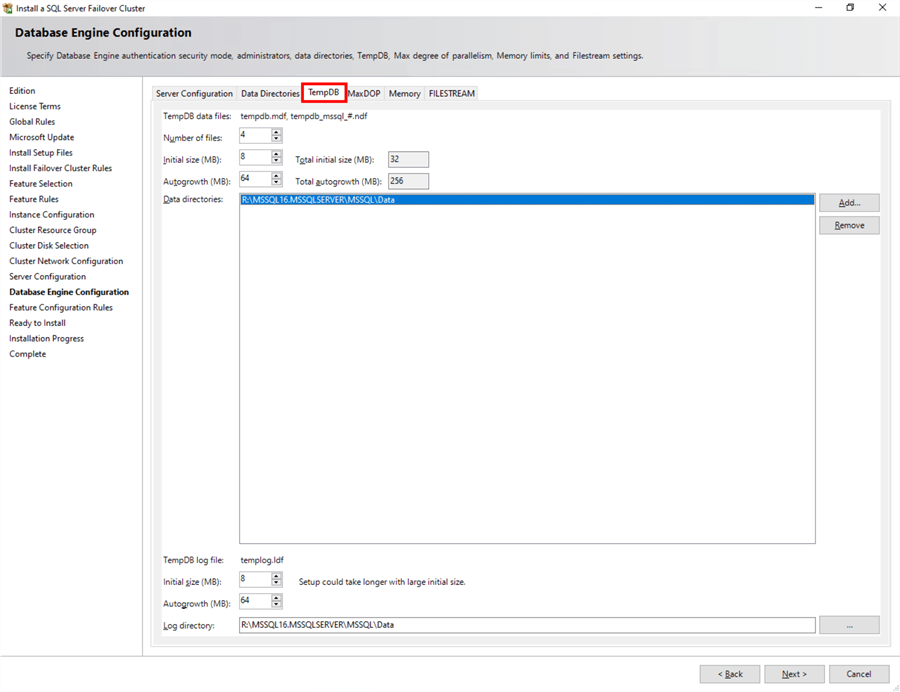
In the TempDB tab, you can set the appropriate number of tempdb data files, initial size, and autogrowth settings of both data and log files, as well as their corresponding locations. By default, it will configure the number of data files according to the number of logical CPU cores available.
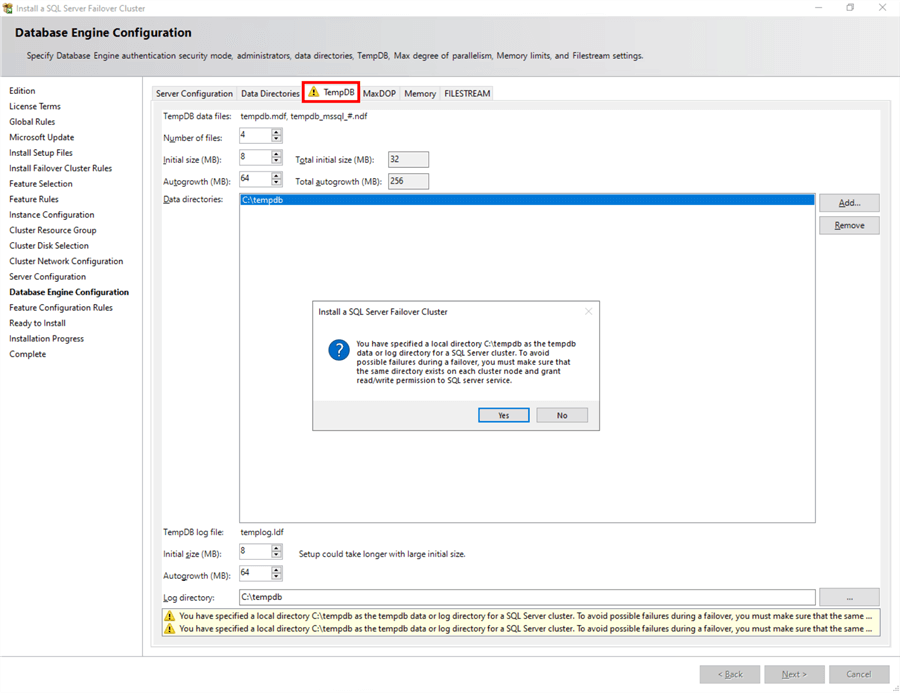
NOTE: You also have the option to store your tempdb database files on a local disk in a WSFC. You can still choose to host the tempdb database on shared storage like the one provided in this example. Should you decide to store tempdb on a local disk, you will get prompted to make sure that all the nodes in the WSFC contain the same directory structure and that the SQL Server service account has read/write permissions on those folders.
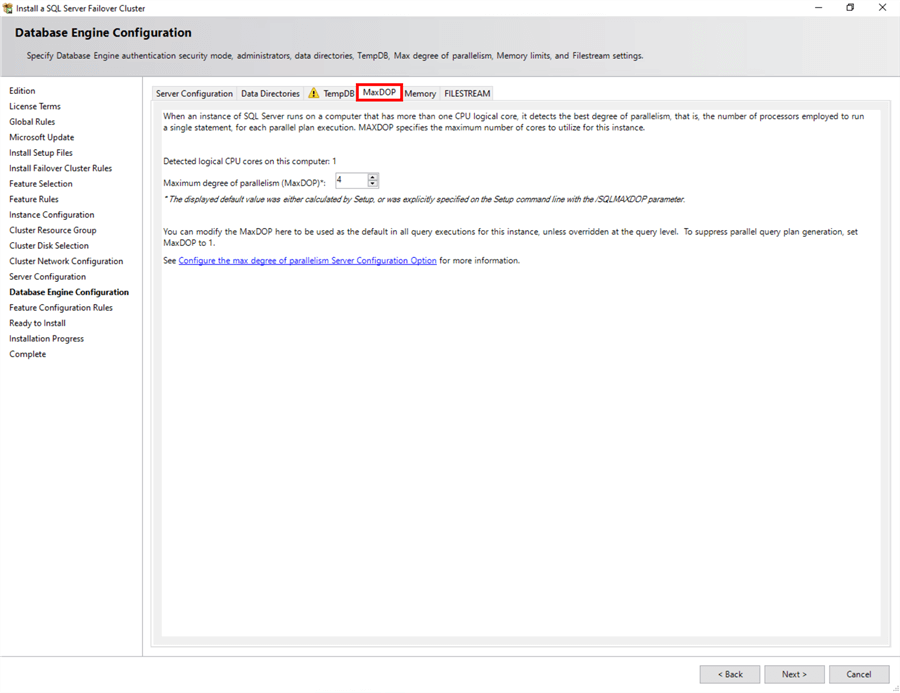
The MaxDOP tab introduces automatic recommendations for setting the MAXDOP server configuration option during installation. The recommended MAXDOP setting is based on the number of logical CPU cores detected on the server. You can accept the default recommendations and make modifications once you run your workload tests.
The Memory tab introduces the ability to set the minimum and maximum server memory during installation, just like you would with sp_configure after installation.

Click Next.
Step 16
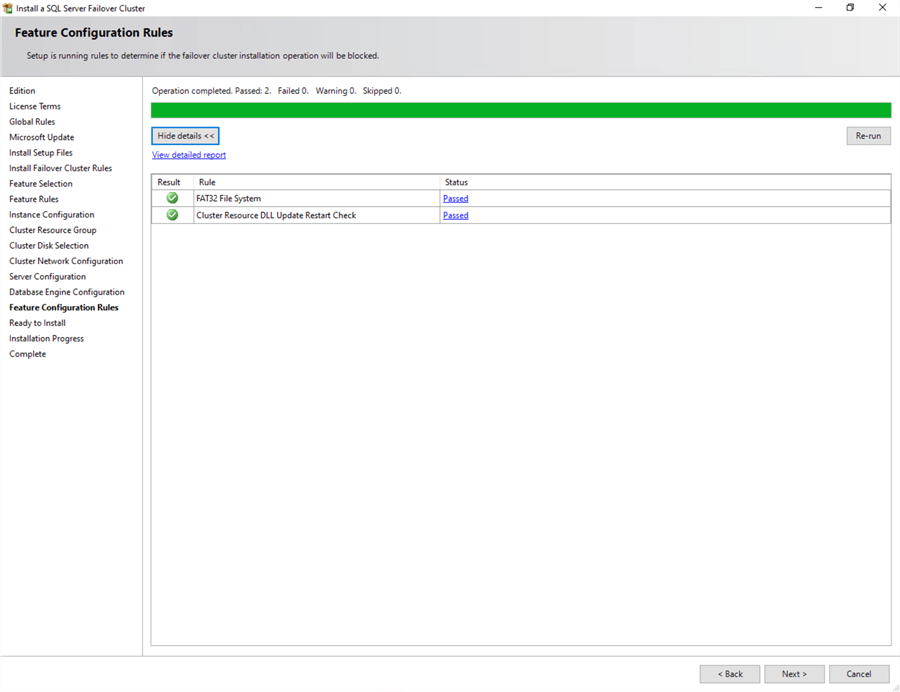
In the Feature Configuration Rules dialog box, verify that all checks are successful.
Click Next.
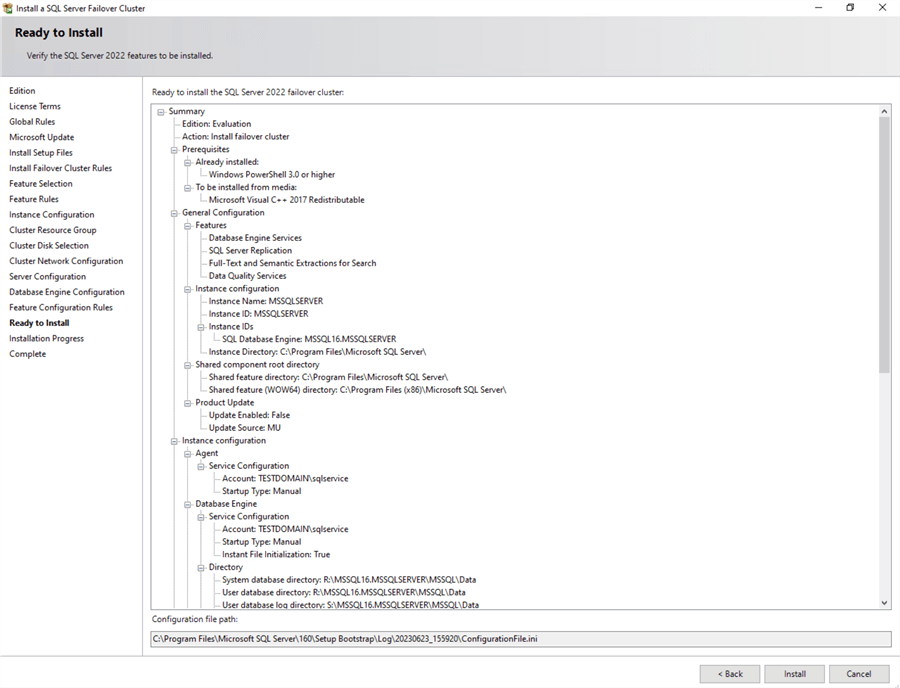
Step 17
In the Ready to Install dialog box, verify that all configuration settings are correct. Click Install to proceed with the installation.
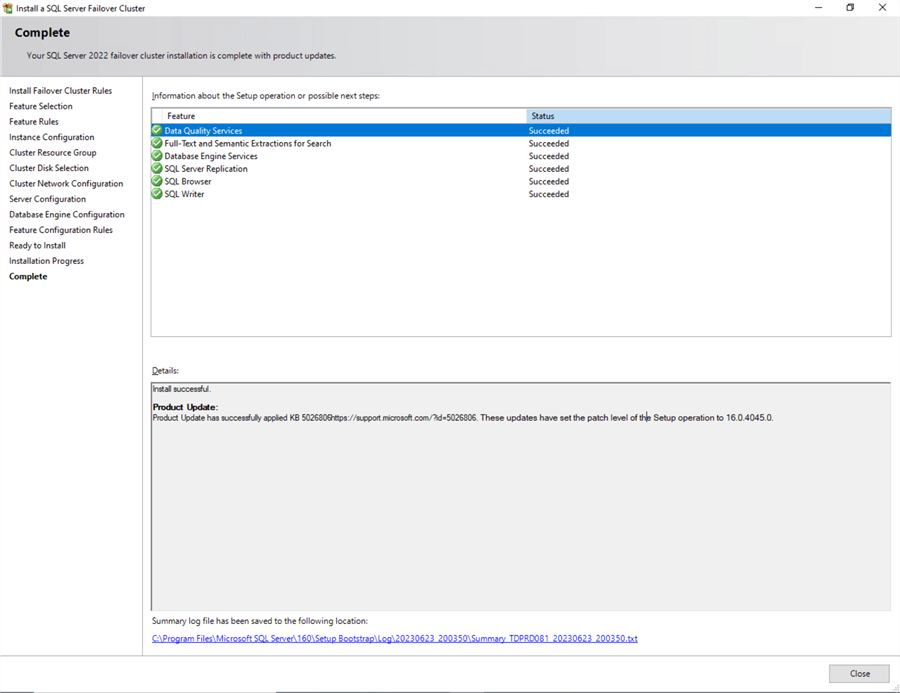
Step 18
In the Complete dialog box, click Close. This concludes the installation of a SQL Server 2022 FCI.
Installing a SQL Server 2022 Failover Clustered Instance (FCI) with Slipstreamed Updates
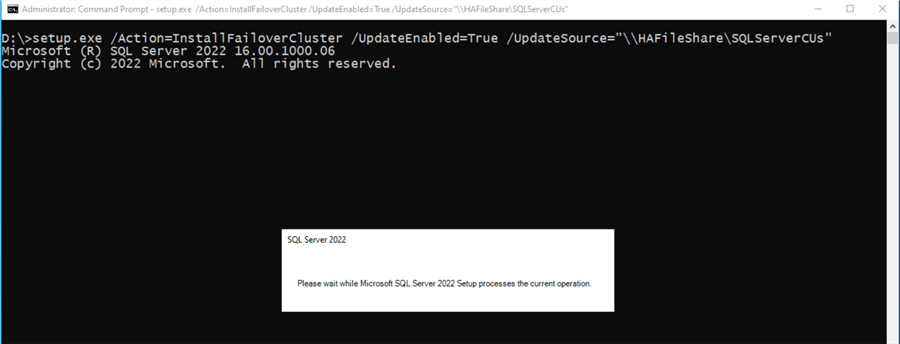
You can choose to slipstream updates as part of the SQL Server 2022 FCI installation as described in the tip, Slipstream Service Packs or Cumulative Updates on a SQL Server 2016 and higher Installation, to reduce deployment time and effort. Similar to the steps outlined in the tip, this requires installing SQL Server from the command line. But unlike installing a standalone instance, a SQL Server FCI requires the /Action=InstallFailoverCluster parameter.
The example command below references the \\HAFileShare\SQLServerCUs shared folder to look for SQL Server 2022 updates.
setup.exe /Action=InstallFailoverCluster /UpdateEnabled=True /UpdateSource="\\HAFileShare\SQLServerCUs"
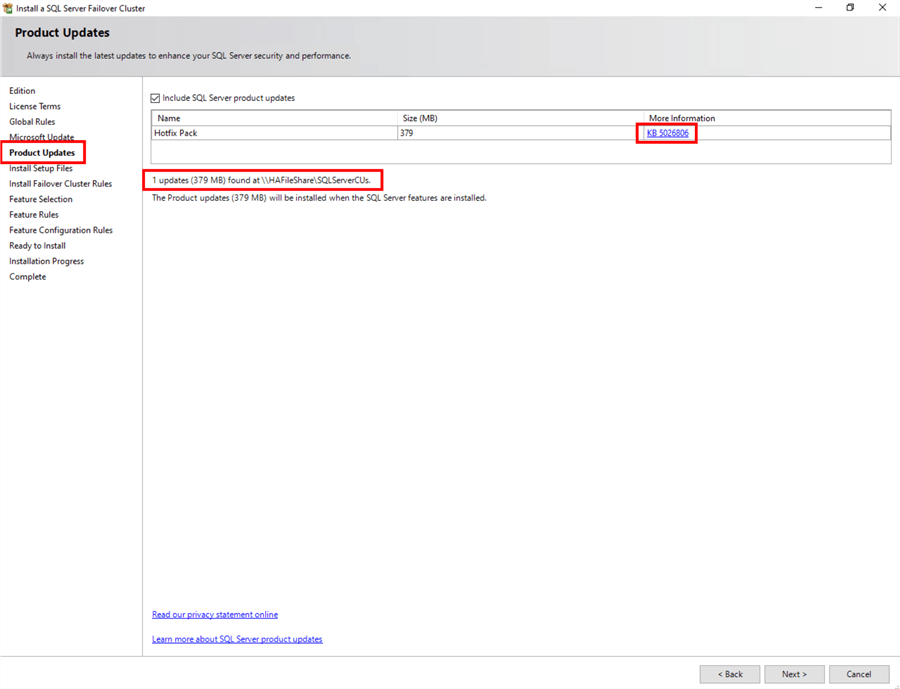
The Product Updates section of the installation process will confirm whether the updates have been detected.
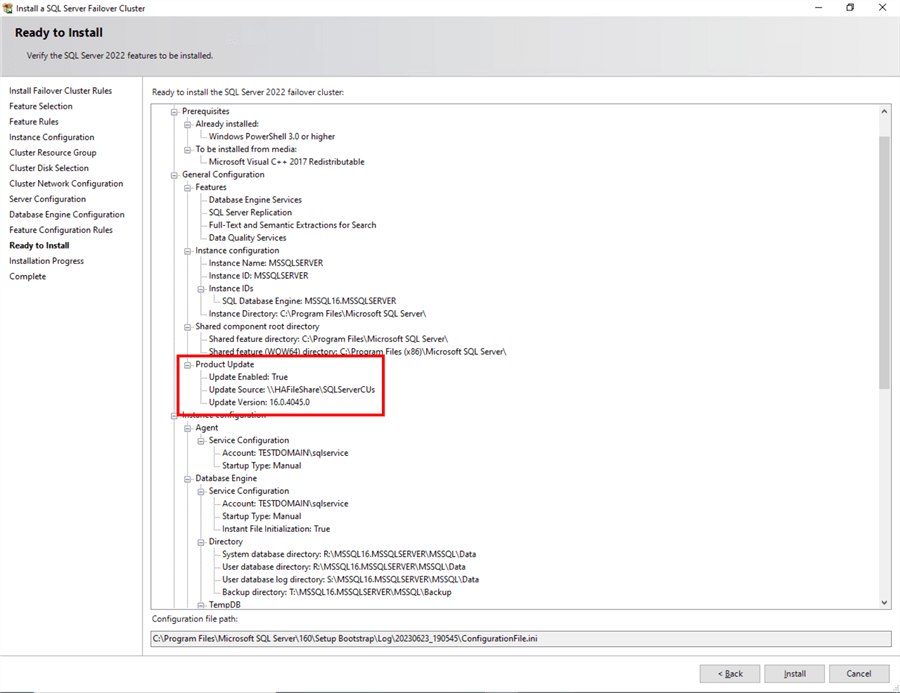
Proceed with the SQL Server installation process outlined in the previous section, Installing a SQL Server 2022 Failover Clustered Instance (FCI). The Ready to Install dialog box of the installation process will also confirm the SQL Server version number after the installation. In this example, the installation media uses the RTM version of SQL Server 2022 (16.0.1000.0), while the update contains SQL Server 2022 CU 5 (16.0.4045.0), as shown in the Update Version: field.
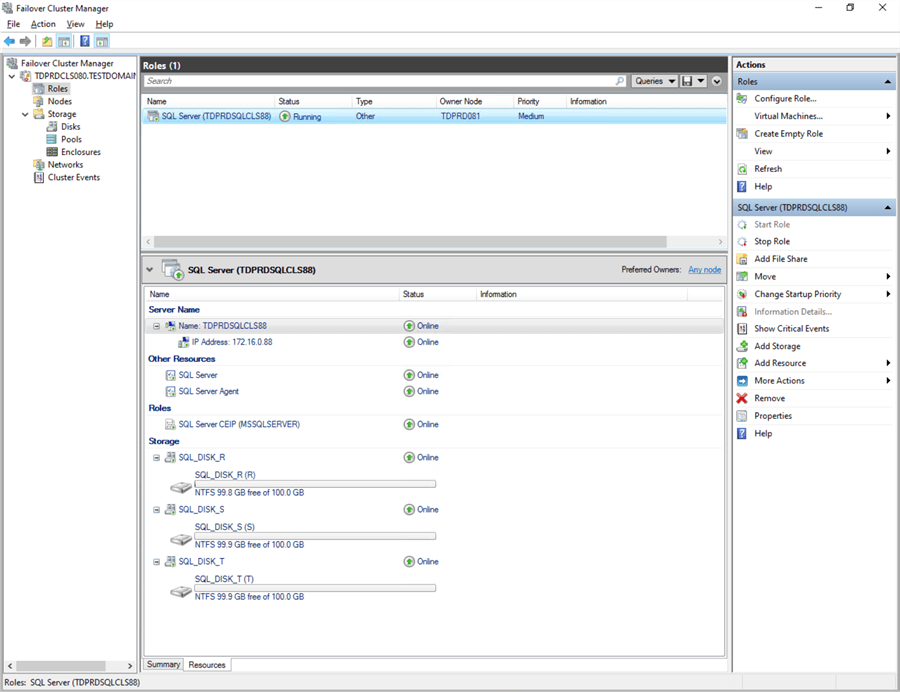
After successfully installing and configuring the node, you now have a fully functional SQL Server 2022 FCI.
To validate, open the Failover Cluster Manager console and click on SQL Server (<NAME>) under Roles. Make sure that all dependencies are online.
Although you have a fully functioning SQL Server 2022 FCI, it is not highly available yet because the SQL Server binaries are only installed on one of the nodes in the WSFC. To make it highly available, you still have to add the second node of the WSFC to the SQL Server FCI.
In the next tip in this series, you will add the second node in the SQL Server FCI and test client application connectivity.
Next Steps
Review the previous tips on Install SQL Server 2008 on a Windows Server 2008 Cluster Part 1, Part 2, Part 3, and Part 4 to see the difference in the setup experience between a SQL Server 2008 FCI on Windows Server 2008 and a SQL Server 2022 FCI on Windows Server 2022.
Read more on the following topics:
- Installing, Configuring and Managing Windows Server Failover Cluster using PowerShell Part 1
- Validating a Windows Cluster Prior to Installing SQL Server 2014
- New features of Windows Server 2022 Failover Clustering
- SQL Server 2022 Pricing and Licensing: Pay-as-you-go


About the author
 Edwin M Sarmiento is a Microsoft SQL Server MVP and Microsoft Certified Master from Ottawa, Canada specializing in high availability, disaster recovery and system infrastructures.
This author pledges the content of this article is based on professional experience and not AI generated.
View all my tips
Article Last Updated: 2024-01-10
