Problem
Before September 2025, there was a complex workaround to create time intelligence calculations in DAX catered to different calendar types apart from the standard Gregorian calendar. With the Power BI September 2025 feature updates (still in preview at the time of writing), it is now readily possible to define custom Power BI custom calendars based time intelligence, like Shifted Gregorian, ISO, and retail calendars, in the data model and then use the new extended DAX functions against these calendars.
The new feature eliminates the need for complex workarounds and ensures cleaner and more accurate reporting for organizations. This tip will explain the different calendars used in time intelligence reporting and how to define them based on the new calendar-based time intelligence capability in Power BI.
Solution
This tip will describe each type of calendar-based time intelligence available, how they can be created in Power Query and DAX (where applicable), and some use cases. In all examples, I will create a Dates table with both DAX and Power Query, then enrich it with columns needed, e.g., Year, Month, MonthNumber, Quarter, Week, WeekNumber, DateKey, etc. Next, I will create a calendar and map the required columns to categories for Year, Month, Quarter, Week, and Date. Lastly, I will use the new extended DAX time intelligence functions (like TOTALYTD, SAMEPERIODLASTYEAR, TOTALWTD, DATESWTD, STARTOFWEEK, ENDOFWEEK, etc.) to pass the calendar name in place of a date column where supported.
Prerequisites
Since this feature is still in preview in Power BI, there are some recommended prerequisites:
- Use a Power BI Desktop version that is September 2025 or newer
- Enable the Enhanced DAX Time Intelligence (preview) option in File > Options and settings > Options > Preview features > Enhanced DAX Time Intelligence and then restart your Desktop.
- Your model table should contain a date column (e.g., FactInternetSales[OrderDate]). Replace the references in the samples I provide with your table/column names.
Gregorian Calendar (Standard)
The Gregorian calendar is the standard January to December calendar type we are accustomed to, with standard months, quarters, and week numbers optional.
The DAX code below shows how to create a Gregorian calendar table.
Date =
VAR MinDate =
    MINX ( ALL ( 'FactInternetSales' ), 'FactInternetSales'[OrderDate] )
VAR MaxDate =
    MAXX ( ALL ( 'FactInternetSales' ), 'FactInternetSales'[OrderDate] )
RETURN
    ADDCOLUMNS (
        CALENDAR ( MinDate, MaxDate ),
        "DateKey", FORMAT ( [Date], "yyyyMMdd" ),
        "Year", YEAR ( [Date] ),
        "MonthNumber", MONTH ( [Date] ),
        "MonthName", FORMAT ( [Date], "MMMM" ),
        "QuarterNumber", QUARTER ( [Date] ),
        "QuarterName", "Q" & FORMAT ( QUARTER ( [Date] ), "0" ),
        "Day", DAY ( [Date] ),
        "DayOfWeek", WEEKDAY ( [Date], 2 ),
        -- 1=Mon..7=Sun
        "WeekOfYear", WEEKNUM ( [Date], 2 )
    )
The equivalent Power Query M code is shown below.
let
// Load the source table
Source = FactInternetSales,
// Convert OrderDate to Date type
OrderDateOnly = Table.TransformColumnTypes(Source, {{"OrderDate", type date}}),
// Determine min and max dates
MinDate = List.Min(OrderDateOnly[OrderDate]),
MaxDate = List.Max(OrderDateOnly[OrderDate]),
// Generate a continuous list of dates
DateList = List.Dates(MinDate, Duration.Days(MaxDate - MinDate) + 1, #duration(1,0,0,0)),
// Convert list to table
DateTable = Table.FromList(DateList, Splitter.SplitByNothing(), {"Date"}),
// Add DateKey column (yyyyMMdd)
AddDateKey = Table.AddColumn(DateTable, "DateKey", each
Number.ToText(Date.Year([Date])) &
Text.PadStart(Number.ToText(Date.Month([Date])),2,"0") &
Text.PadStart(Number.ToText(Date.Day([Date])),2,"0"), type text),
// Add Year
AddYear = Table.AddColumn(AddDateKey, "Year", each Date.Year([Date]), Int64.Type),
// Add MonthNumber
AddMonthNum = Table.AddColumn(AddYear, "MonthNumber", each Date.Month([Date]), Int64.Type),
// Add MonthName
AddMonthName = Table.AddColumn(AddMonthNum, "MonthName", each Date.ToText([Date], "MMMM"), type text),
// Add QuarterNumber
AddQuarterNum = Table.AddColumn(AddMonthName, "QuarterNumber", each Date.QuarterOfYear([Date]), Int64.Type),
// Add QuarterName
AddQuarterName = Table.AddColumn(AddQuarterNum, "QuarterName", each "Q" & Text.From(Date.QuarterOfYear([Date])), type text),
// Add Day
AddDay = Table.AddColumn(AddQuarterName, "Day", each Date.Day([Date]), Int64.Type),
// Add DayOfWeek (1 = Monday .. 7 = Sunday)
AddDayOfWeek = Table.AddColumn(AddDay, "DayOfWeek", each Date.DayOfWeek([Date], Day.Monday)+1, Int64.Type),
// Add WeekOfYear
AddWeekOfYear = Table.AddColumn(AddDayOfWeek, "WeekOfYear", each Date.WeekOfYear([Date], Day.Monday), Int64.Type)
in
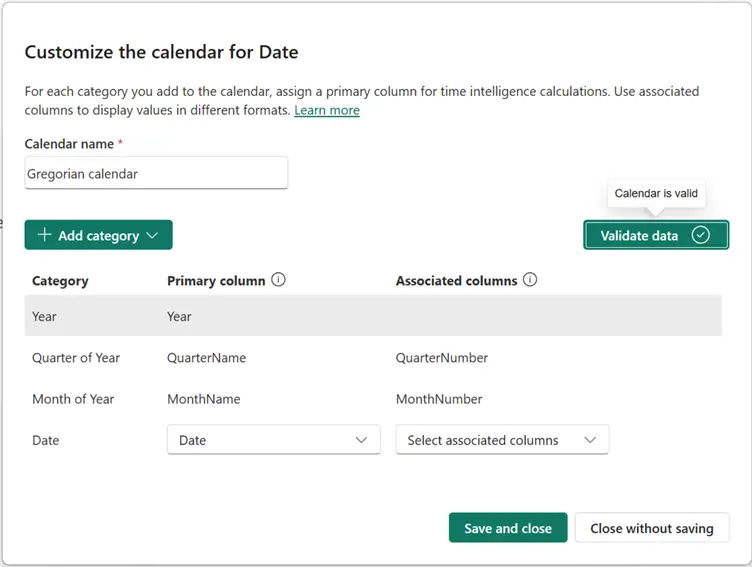
AddWeekOfYearNext, having created the Gregorian dates table, you need to create a relationship with the existing Fact tables. Then, define and map columns into a Calendar called “Gregorian calendar” as seen in the image below.
Example Use Cases
See the DAX code below for example use cases for the “Gregorian calendar” we just created.
Sales SPLY (Gregorian) =
CALCULATE (
    SUM ( FactInternetSales[SalesAmount] ),
    SAMEPERIODLASTYEAR ( 'Gregorian calendar' )
)
Here is another example.
Sales YTD (Gregorian) =
TOTALYTD (
    CALCULATE ( SUM ( FactInternetSales[SalesAmount] ) ),
    'Gregorian calendar'
)
Shifted Gregorian Calendar (Fiscal Calendar)
Businesses and government organizations mostly leverage Fiscal calendars for reporting. This is the kind of calendar that starts in any month (not necessarily January). For instance, the Fiscal year for the HMRC in the UK starts in April each year and ends in March the following year.
Before now, businesses relied on workarounds to implement this in their Power BI reporting. But with the September 2025 feature updates, this is now much more straightforward and efficient.
The code below shows how to define Fiscal dates in DAX.
Date (Fiscal) =
VAR MinDate =
    MINX ( ALL ( 'FactInternetSales' ), 'FactInternetSales'[OrderDate] )
VAR MaxDate =
    MAXX ( ALL ( 'FactInternetSales' ), 'FactInternetSales'[OrderDate] )
VAR FiscalStartMonth = 4 // change this to your fiscal start month (1..12)
RETURN
    ADDCOLUMNS (
        CALENDAR ( MinDate, MaxDate ),
        "DateKey", FORMAT ( [Date], "yyyyMMdd" ),
        "Year", YEAR ( [Date] ),
        "MonthNumber", MONTH ( [Date] ),
        "MonthName", FORMAT ( [Date], "MMMM" ),
        "FiscalMonthNumber",
            MOD ( MONTH ( [Date] ) - FiscalStartMonth + 12, 12 ) + 1,
        "FiscalYear",
            YEAR ( [Date] )
                + IF ( MONTH ( [Date] ) >= FiscalStartMonth, 0, -1 ),
        "FiscalQuarter",
            INT ( ( MOD ( MONTH ( [Date] ) - FiscalStartMonth + 12, 12 ) ) / 3 ) + 1,
        "WeekOfYear", WEEKNUM ( [Date], 2 )
    )
The equivalent Power Query M code is seen below.
let
// Load source table
Source = FactInternetSales,
// Convert OrderDate to Date type
OrderDateOnly = Table.TransformColumnTypes(Source, {{"OrderDate", type date}}),
// Determine min and max dates
MinDate = List.Min(OrderDateOnly[OrderDate]),
MaxDate = List.Max(OrderDateOnly[OrderDate]),
// Fiscal start month (change this to 1..12)
FiscalStartMonth = 4,
// Generate continuous date list
DateList = List.Dates(MinDate, Duration.Days(MaxDate - MinDate) + 1, #duration(1,0,0,0)),
// Convert list to table
DateTable = Table.FromList(DateList, Splitter.SplitByNothing(), {"Date"}),
// Add DateKey (yyyyMMdd)
AddDateKey = Table.AddColumn(DateTable, "DateKey", each
Text.PadStart(Text.From(Date.Year([Date])),4,"0") &
Text.PadStart(Text.From(Date.Month([Date])),2,"0") &
Text.PadStart(Text.From(Date.Day([Date])),2,"0"), type text),
// Add Year, MonthNumber, MonthName
AddYear = Table.AddColumn(AddDateKey, "Year", each Date.Year([Date]), Int64.Type),
AddMonthNumber = Table.AddColumn(AddYear, "MonthNumber", each Date.Month([Date]), Int64.Type),
AddMonthName = Table.AddColumn(AddMonthNumber, "MonthName", each Date.ToText([Date], "MMMM"), type text),
// Add FiscalMonthNumber
AddFiscalMonth = Table.AddColumn(AddMonthName, "FiscalMonthNumber", each Number.Mod(Date.Month([Date]) - FiscalStartMonth + 12, 12) + 1, Int64.Type),
// Add FiscalYear
AddFiscalYear = Table.AddColumn(AddFiscalMonth, "FiscalYear", each
if Date.Month([Date]) >= FiscalStartMonth then Date.Year([Date]) else Date.Year([Date]) - 1, Int64.Type),
// Add FiscalQuarter
AddFiscalQuarter = Table.AddColumn(AddFiscalYear, "FiscalQuarter", each Number.IntegerDivide(Number.Mod(Date.Month([Date]) - FiscalStartMonth + 12, 12),3) + 1, Int64.Type),
// Add WeekOfYear (Monday = 1)
AddWeekOfYear = Table.AddColumn(AddFiscalQuarter, "WeekOfYear", each Date.WeekOfYear([Date], Day.Monday), Int64.Type)
in
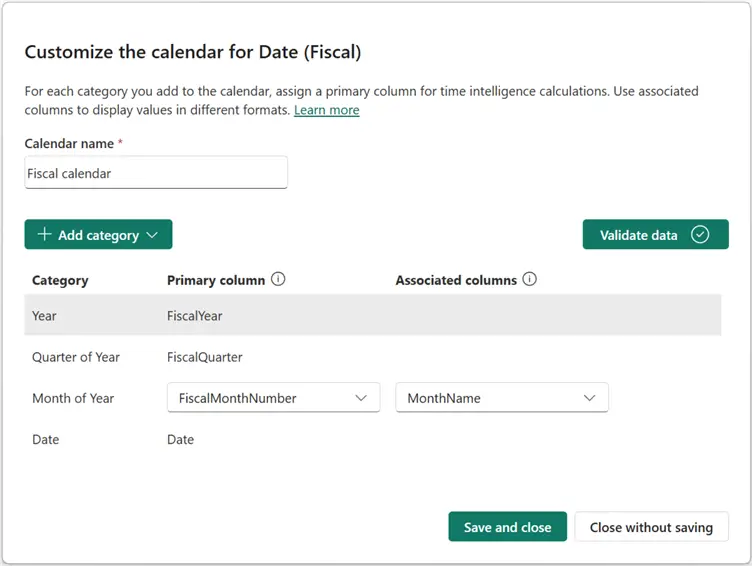
AddWeekOfYearHaving created the Fiscal dates table, you need to establish a relationship with other tables (FactInternetSales in this example). Let’s now also map the Fiscal columns into the “Fiscal calendar” time intelligence table, as seen below.
Example Use Cases
See the DAX code below for example use cases for the “Fiscal calendar” we just created.
Sales SPLY (Fiscal) =
CALCULATE (
    SUM ( FactInternetSales[SalesAmount] ),
    SAMEPERIODLASTYEAR ( 'Fiscal calendar' )
)
Here is another example.
Sales YTD (Fiscal) =
TOTALYTD(CALCULATE (
    SUM ( FactInternetSales[SalesAmount])),'Fiscal calendar' )
Retail Calendars (4‑4‑5, 4‑5‑4, 5‑4‑4)
Some organizations, particularly in the retail industry, prefer a calendar that matches their line of business reporting. These calendars are expected to be full-week months calendar styles where each “month” is an integer number of weeks associated with a 4-4-5 pattern per quarter for the United Kingdom and most of Europe, or a 4-5-4 pattern per quarter for the United States. The 5-4-4 pattern per quarter is used by some international chains. Note: I will dive deeper into Retail dates and calendars in another article, where I will demystify much of how they work.
The logic behind retail calendars is best designed as week-based, where we create weekly buckets such as “WeekKey” or “WeekStart” and then, depending on the pattern for each fiscal year you are using, you can build fiscal months by grouping consecutive weeks. The logic first starts by generating week rows or weekstart dates across the model range. Next, it then generates fiscal periods from a pattern array. And finally, from each date, it then looks up the fiscal month.
The M code below shows how to create this date table and use it to define the Retail calendar. The 4-4-5 retail example is used here. I recommend creating your production-ready Retail dates in Power Query M code for performance and efficiency reasons.
let
// Source table
Source = FactInternetSales,
// Ensure OrderDate is Date type
DatesOnly = Table.TransformColumns(Source, {{"OrderDate", each Date.From(_), type date}}),
// Get min/max dates from fact table
MinDate = Record.Field(Table.Min(DatesOnly, "OrderDate"), "OrderDate"),
MaxDate = Record.Field(Table.Max(DatesOnly, "OrderDate"), "OrderDate"),
// Generate full date list
Dates = List.Dates(MinDate, Duration.Days(MaxDate - MinDate) + 1, #duration(1,0,0,0)),
DateTable = Table.FromList(Dates, Splitter.SplitByNothing(), {"Date"}),
// Add DayOfWeek (1=Monday..7=Sunday)
AddDayOfWeek = Table.AddColumn(DateTable, "DayOfWeek", each Date.DayOfWeek([Date], Day.Monday) + 1, Int64.Type),
// Add FiscalYear
AddYear = Table.AddColumn(AddDayOfWeek, "FiscalYear", each Date.Year([Date]), Int64.Type),
// Week of Fiscal Year
WeekOfFiscalYear = Table.AddColumn(AddYear, "WeekOfYear",
each
let
YearStart = #date([FiscalYear],1,1),
DaysDiff = Duration.Days([Date] - YearStart),
Week = Number.IntegerDivide(DaysDiff,7) + 1
in Week, Int64.Type),
// Count total weeks per fiscal year
WeeksPerYear = Table.Group(WeekOfFiscalYear, {"FiscalYear"}, {{"MaxWeek", each List.Max([WeekOfYear]), type number}}),
// Merge total weeks into main table
MergeWeeks = Table.NestedJoin(WeekOfFiscalYear, {"FiscalYear"}, WeeksPerYear, {"FiscalYear"}, "YearInfo", JoinKind.LeftOuter),
ExpandWeeks = Table.ExpandTableColumn(MergeWeeks, "YearInfo", {"MaxWeek"}, {"WeeksInYear"}),
// Calculate FiscalQuarter
AddQuarter = Table.AddColumn(ExpandWeeks, "FiscalQuarter",
each Number.RoundUp([WeekOfYear] / 13), Int64.Type),
// Calculate FiscalMonth445
AddFiscalMonth = Table.AddColumn(AddQuarter, "FiscalMonth445",
each
let
WeekInQuarter = Number.Mod([WeekOfYear]-1,13) + 1,
MonthIndex = if WeekInQuarter <= 4 then 1
else if WeekInQuarter <= 8 then 2
else 3,
BaseMonth = ( ([FiscalQuarter]-1) * 3 ) + MonthIndex,
FinalMonth = if [WeeksInYear]=53 and [WeekOfYear]=53 then 12 else BaseMonth
in
FinalMonth, Int64.Type),
// Add Month Names
AddMonthName = Table.AddColumn(AddFiscalMonth, "FiscalMonthName", each "Month " & Text.From([FiscalMonth445]), type text),
// Add Quarter Names
AddQuarterName = Table.AddColumn(AddMonthName, "FiscalQuarterName", each "Q" & Text.From([FiscalQuarter]), type text),
// Add IsLastWeekOfYear flag
AddLastWeekFlag = Table.AddColumn(AddQuarterName, "IsLastWeekOfYear", each [WeekOfYear] = [WeeksInYear], type logical),
#"Changed Type" = Table.TransformColumnTypes(AddLastWeekFlag,{{"Date", type date}})
in
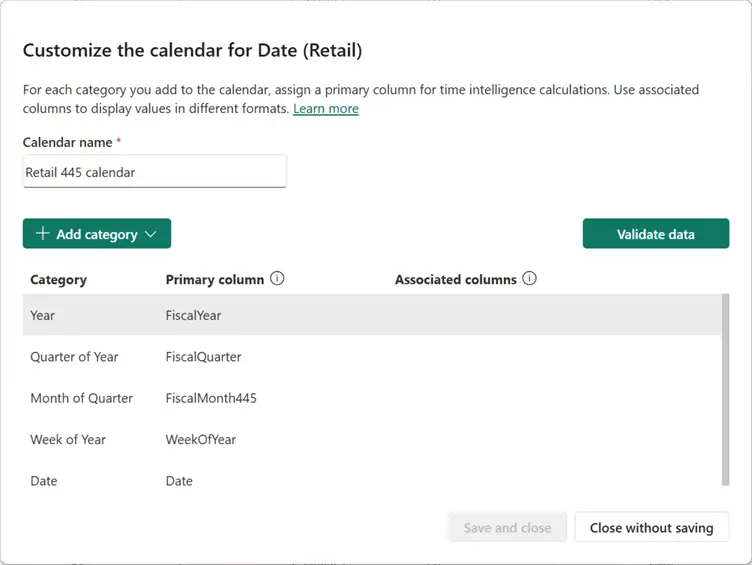
#"Changed Type"After creating the Retail dates table, we can then proceed to defining the “Retail 4-4-5” calendar.
Example Use Cases
See the DAX code below for example use cases of the Fiscal calendar called “Retail 445 calendar” we just created.
Sales RetailMonth SPLY =
CALCULATE (
    SUM ( FactInternetSales[SalesAmount] ),
    SAMEPERIODLASTYEAR ( 'Retail 445 calendar' )
)
Here is another example.
Sales WTD (Retail) =
TOTALWTD (
    CALCULATE ( SUM ( FactInternetSales[SalesAmount] ) ),
    'Retail 445 calendar'
)
13‑Month Calendar (13 × 4‑Week Periods)
The purpose of the 13-month calendar is to create equal-length periods of 28 days (4 weeks) each fiscal year. It is mostly used in some accounting, budgeting, and financial planning organizations since it is considered easier for forecasting, expenses, and tracking purposes, and it makes periods directly comparable in reporting.
The total days in a 13-month calendar are 13 multiplied by 28, or 364 days. However, since there are 365 days in a Gregorian calendar, the system will thus add a “leap week” every 5-6 years to ensure it stays aligned.
Since each quarter in a 13-month calendar has three months with exactly 4 weeks each, it is thus sometimes known as a 4-4-4 calendar.
The DAX code below shows how to create a dates table and use it to define a 13-month calendar.
Date_13Month =
VAR MinDate =
    MINX ( ALL ( FactInternetSales ), FactInternetSales[OrderDate] )
VAR MaxDate =
    MAXX ( ALL ( FactInternetSales ), FactInternetSales[OrderDate] )
VAR FiscalStartMonth = 1 // Change if fiscal starts in Apr (4), Jul (7), etc.
RETURN
    ADDCOLUMNS (
        CALENDAR ( MinDate, MaxDate ),
        "DayIndex", DATEDIFF ( MinDate, [Date], DAY ),
        "Year13", YEAR ( MinDate ) + QUOTIENT ( DATEDIFF ( MinDate, [Date], DAY ), 364 ),
        "DayOfYear13", MOD ( DATEDIFF ( MinDate, [Date], DAY ), 364 ) + 1,
        "Period13",
            VAR DayOfYear =
                MOD ( DATEDIFF ( MinDate, [Date], DAY ), 364 ) + 1
            RETURN
                IF ( DayOfYear > 364, 13, INT ( DIVIDE ( DayOfYear - 1, 28 ) ) + 1 ),
        "FiscalMonth",
            VAR DayOfYear =
                MOD ( DATEDIFF ( MinDate, [Date], DAY ), 364 ) + 1
            VAR P =
                IF ( DayOfYear > 364, 13, INT ( DIVIDE ( DayOfYear - 1, 28 ) ) + 1 )
            RETURN
                P,
        "FiscalYear",
            VAR DayOfYear =
                MOD ( DATEDIFF ( MinDate, [Date], DAY ), 364 ) + 1
            VAR P =
                IF ( DayOfYear > 364, 13, INT ( DIVIDE ( DayOfYear - 1, 28 ) ) + 1 )
            VAR Y =
                YEAR ( MinDate ) + QUOTIENT ( DATEDIFF ( MinDate, [Date], DAY ), 364 )
            RETURN
                IF ( P >= FiscalStartMonth, Y, Y - 1 ),
        "Quarter13",
            VAR DayOfYear =
                MOD ( DATEDIFF ( MinDate, [Date], DAY ), 364 ) + 1
            VAR P =
                IF ( DayOfYear > 364, 13, INT ( DIVIDE ( DayOfYear - 1, 28 ) ) + 1 )
            RETURN
                SWITCH ( TRUE (), P <= 3, "Q1", P <= 6, "Q2", P <= 9, "Q3", "Q4" ),
        "YearPeriod",
            VAR DayOfYear =
                MOD ( DATEDIFF ( MinDate, [Date], DAY ), 364 ) + 1
            VAR P =
                IF ( DayOfYear > 364, 13, INT ( DIVIDE ( DayOfYear - 1, 28 ) ) + 1 )
            VAR Y =
                YEAR ( MinDate ) + QUOTIENT ( DATEDIFF ( MinDate, [Date], DAY ), 364 )
            VAR FY =
                IF ( P >= FiscalStartMonth, Y, Y - 1 )
            RETURN
                "FY" & FORMAT ( FY, "0000" ) & "-P"
                    & FORMAT ( P, "00" ),
        "YearQuarter",
            VAR DayOfYear =
                MOD ( DATEDIFF ( MinDate, [Date], DAY ), 364 ) + 1
            VAR P =
                IF ( DayOfYear > 364, 13, INT ( DIVIDE ( DayOfYear - 1, 28 ) ) + 1 )
            VAR Y =
                YEAR ( MinDate ) + QUOTIENT ( DATEDIFF ( MinDate, [Date], DAY ), 364 )
            VAR FY =
                IF ( P >= FiscalStartMonth, Y, Y - 1 )
            VAR Q =
                SWITCH ( TRUE (), P <= 3, "Q1", P <= 6, "Q2", P <= 9, "Q3", "Q4" )
            RETURN
                "FY" & FORMAT ( FY, "0000" ) & "-" & Q
    )
The equivalent Power Query M code for creating a 13-month dates table is as seen below.
let
    // Load FactInternetSales and get OrderDate range
    Source = FactInternetSales,
    DatesOnly = Table.SelectColumns(Source, {"OrderDate"}),
    MinDate = Date.From(List.Min(DatesOnly[OrderDate])),
    MaxDate = Date.From(List.Max(DatesOnly[OrderDate])),

    // Generate continuous list of dates
    Dates = List.Dates(MinDate, Duration.Days(MaxDate - MinDate) + 1, #duration(1,0,0,0)),
    Table = Table.FromList(Dates, Splitter.SplitByNothing(), {"Date"}),

    // Add columns for 13-month logic
    AddDayIndex = Table.AddColumn(Table, "DayIndex", each Duration.Days([Date]-MinDate), Int64.Type),
    AddYear13 = Table.AddColumn(AddDayIndex, "Year13", each Date.Year(MinDate) + Number.IntegerDivide([DayIndex],364), Int64.Type),
    AddDayOfYear13 = Table.AddColumn(AddYear13, "DayOfYear13", each Number.Mod([DayIndex],364)+1, Int64.Type),
    AddPeriod13 = Table.AddColumn(AddDayOfYear13, "Period13", each if [DayOfYear13] > 364 then 13 else Number.IntegerDivide([DayOfYear13]-1,28)+1, Int64.Type),
    AddFiscalMonth = Table.RenameColumns(Table.DuplicateColumn(AddPeriod13, "Period13", "FiscalMonth"), {"FiscalMonth","FiscalMonth"}),

    // FiscalYear: shift logic (FiscalStartMonth=1 by default)
    FiscalStartMonth = 1,
    AddFiscalYear = Table.AddColumn(AddFiscalMonth, "FiscalYear",
        each if [FiscalMonth] >= FiscalStartMonth
             then [Year13]
             else [Year13] - 1, Int64.Type),

    // Quarters mapping
    AddQuarter13 = Table.AddColumn(AddFiscalYear, "Quarter13",
        each if [Period13] <= 3 then "Q1"
             else if [Period13] <= 6 then "Q2"
             else if [Period13] <= 9 then "Q3"
             else "Q4"),

    // Composite labels
    AddYearPeriod = Table.AddColumn(AddQuarter13, "YearPeriod", each "FY" & Text.From([FiscalYear]) & "-P" & Text.PadStart(Text.From([FiscalMonth]),2,"0")),
    AddYearQuarter = Table.AddColumn(AddYearPeriod, "YearQuarter", each "FY" & Text.From([FiscalYear]) & "-" & [Quarter13])
in
    AddYearQuarter
As usual, having created your dates table, you need to establish a relationship with the fact table before mapping the columns to define the 13-month calendar.
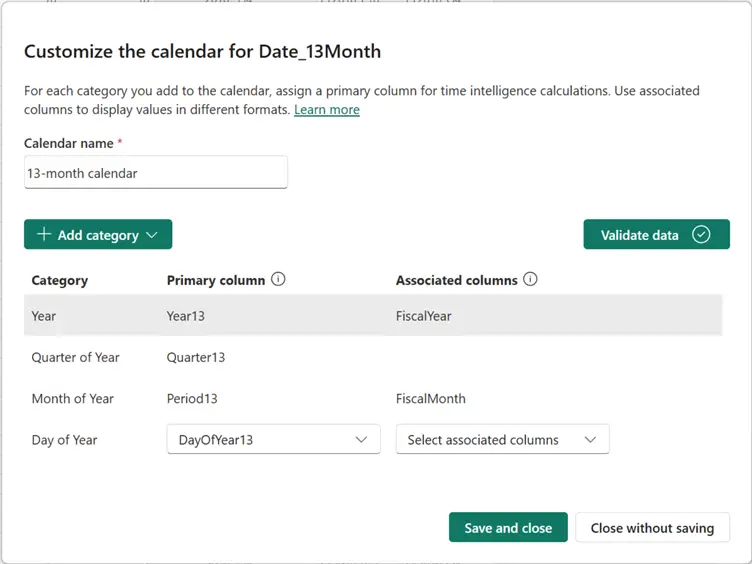
Example Use Cases
See the DAX code below for example use cases for the 13-month calendar, also called a“4-4-4 calendar” that we just created.
Sales Period-To-Date (13m) =
CALCULATE ( SUM ( FactInternetSales[SalesAmount] ), DATESMTD ( 'Date'[Date] ) )
-- or use a custom period filter using Period13
Here is another example.
Sales 13-Period SPLY =
CALCULATE (
    SUM ( FactInternetSales[SalesAmount] ),
    SAMEPERIODLASTYEAR ( '13-month calendar' )
)
Lunar Calendars
Lunar calendars are usually different from Gregorian calendars since they follow some religious or cultural timings. Examples include the Hijri/Islamic and the Chinese Lunar calendars.
Hijri / Islamic Lunar Calendar
The Hijri/Islamic Lunar calendar is shorter than the Gregorian calendar year, and it’s approximately 354 days. Its month boundaries are dependent upon moon cycles. It is 11 days shorter than a Gregorian year. It is required for reporting in certain regions of the world, predominantly in the Middle East region.
To derive a Hijiri/Islamic Lunar calendar, it is not advisable to use Power BI DAX as it does not contain accurate, built-in lunar conversion functions. Some proven and reliable approaches to manage this are listed below:
- Leverage Power Query (M language) Culture conversions, or
- Import a pre-computed Hijiri/Islamic dates table, or
- Leverage APIs or external conversion libraries to create a mapping table, then import it to Power BI.
For robust solutions, the recommendation is to use options 2 and 3. However, you can also use option 1 efficiently as a good recommendation, too. For this tip, let’s see how we can utilize our existing dates in our fact table along with the culture conversions in Power Query (M) to generate a Hijri dates table. The M code below provides a reusable/adaptable script for this.
let
    // 1. Load source dates
    Source = FactInternetSales,
    DatesOnly = Table.SelectColumns(Source, {"OrderDate"}),

    // 2. Get min and max dates
    MinDate = Date.From(List.Min(DatesOnly[OrderDate])),
    MaxDate = Date.From(List.Max(DatesOnly[OrderDate])),

    // 3. Generate continuous date list
    Dates = List.Dates(MinDate, Duration.Days(MaxDate - MinDate)+1, #duration(1,0,0,0)),
    DateTable = Table.FromList(Dates, Splitter.SplitByNothing(), {"Date"}),

    // 4. Convert to Hijri text (yyyy-MM-dd)
    AddHijriText = Table.AddColumn(
        DateTable,
        "HijriText",
        each Date.ToText([Date], "yyyy-MM-dd", "ar-SA"),
        type text
    ),

    // 5. Split Hijri text into Year/Month/Day
    SplitHijri = Table.SplitColumn(
        AddHijriText,
        "HijriText",
        Splitter.SplitTextByDelimiter("-"),
        {"HijriYear", "HijriMonth", "HijriDay"}
    ),

    // 6. Change types to numeric
    ChangeTypes = Table.TransformColumnTypes(
        SplitHijri,
        {{"HijriYear", Int64.Type}, {"HijriMonth", Int64.Type}, {"HijriDay", Int64.Type}}
    ),

    // 7. Map HijriMonth to month names
    AddHijriMonthName = Table.AddColumn(
        ChangeTypes,
        "HijriMonthName",
        each
            if [HijriMonth]=1 then "Muharram"
            else if [HijriMonth]=2 then "Safar"
            else if [HijriMonth]=3 then "Rabi’ al-awwal"
            else if [HijriMonth]=4 then "Rabi’ al-thani"
            else if [HijriMonth]=5 then "Jumada al-awwal"
            else if [HijriMonth]=6 then "Jumada al-thani"
            else if [HijriMonth]=7 then "Rajab"
            else if [HijriMonth]=8 then "Sha’ban"
            else if [HijriMonth]=9 then "Ramadan"
            else if [HijriMonth]=10 then "Shawwal"
            else if [HijriMonth]=11 then "Dhul-Qi’dah"
            else if [HijriMonth]=12 then "Dhul-Hijjah"
            else "Unknown",
        type text
    ),

    // 8. Compute Quarter
    AddQuarter = Table.AddColumn(
        AddHijriMonthName,
        "HijriQuarter",
        each Number.RoundUp([HijriMonth]/3),
        Int64.Type
    ),

    // 9. Add composite labels for reporting
    AddYearPeriod = Table.AddColumn(
        AddQuarter,
        "YearPeriod",
        each "FY" & Text.From([HijriYear]) & "-M" & Text.PadStart(Text.From([HijriMonth]),2,"0"),
        type text
    ),
    AddYearQuarter = Table.AddColumn(
        AddYearPeriod,
        "YearQuarter",
        each "FY" & Text.From([HijriYear]) & "-Q" & Text.From([HijriQuarter]),
        type text
    ),
    #"Changed Type" = Table.TransformColumnTypes(AddYearQuarter,{{"Date", type date}})
in
    #"Changed Type"
Note that the conversion from Gregorian to Hijiri was done using the code part snippet below:
// 4. Convert to Hijri text (yyyy-MM-dd)
    AddHijriText = Table.AddColumn(
        DateTable,
        "HijriText",
        each Date.ToText([Date], "yyyy-MM-dd", "ar-SA"),
        type text
    )
After the creation of the Hijiri dates table, you should establish a relationship with existing fact table(s) and then define the mapping of the “Hijiri Lunar calendar” if required. See the image below.
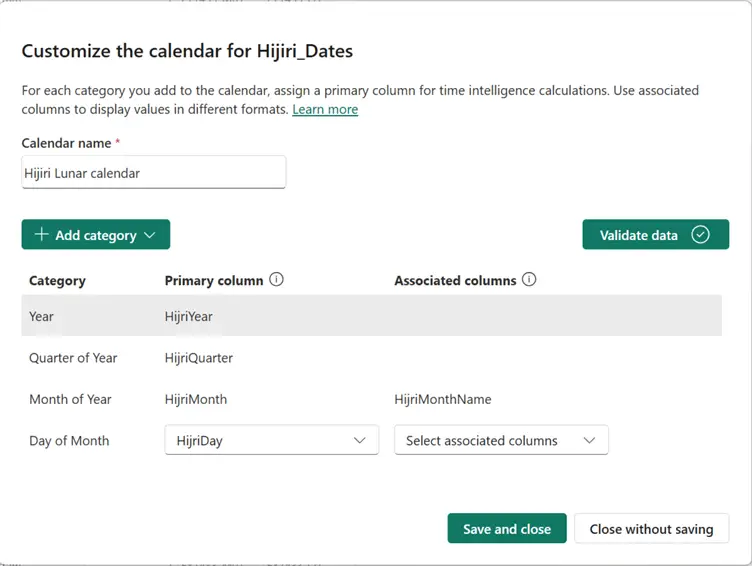
Example Use Cases
See the DAX code below for example use cases of the Hijiri Lunar calendar created. When we need to do a comparison of say “same period last year,” this means we are comparing a different set of Gregorian dates.
Sales SPLY (Hijri) =
CALCULATE( SUM(FactInternetSales[SalesAmount]), SAMEPERIODLASTYEAR( 'Hijiri Lunar calendar' ) )
Here is another example.
Sales YTD (Hijri) = TOTALYTD(SUM(FactInternetSales[SalesAmount]), 'Hijiri Lunar calendar')In summary, this article described (with examples) some of the different types of calendar-based time intelligence implementations you would find in organizations today. As this feature is still in preview, we expect that there might be updates or improvements in the months and years ahead. However, this tip exposes you to the different calendars that can be implemented for business reporting and how to implement them.
Also provided are some scripts that can be copied and adapted straight away, or you can use the examples in this tip as a guide. It would be great to hear how readers are implementing the different calendars they use in their organizational reporting.
Next Steps
- Read more about calendars in this article by NASA.
- Read more about Calendar-based Time Intelligence by SQLBI.
- Check out this Microsoft documentation for Implementing Time-based calculations in Power BI.
- Read my other tips here.
