Problem
Logging on to each SQL Server instance for daily DBA Administrative tasks can be quite lengthy. Are there any options available in PowerShell to reduce the effort and complexity of managing a SQL Server environment? In this tip, I will describe a step by step process to enable PowerShell remoting on your SQL Server instances so that you can access all of your servers from your local machine via PowerShell.
Solution
We can ease some of the administrative headaches by using PowerShell remoting. PowerShell Remoting is a great feature in PowerShell 2.0 version because it allow us to manage any SQL Server instance remotely. There is no need to login on the server locally for checking the Event Viewer or Windows Services. Once you are connected to a remote server through PowerShell Remoting you can perform any administrative task from your local machine.
Powershell Remoting was introduced in PowerShell 2.0 version and it runs on the WinRM protocol (Windows Remote Management). As such, the WinRM windows service should be running if you want to enable PowerShell Remoting. To get started, let’s check the PowerShell version and winRM services as shown below.
Steps to Enable PowerShell Remoting
Step 1 – Run the command below to determine the PowerShell version:
get-host
In the image below you can see the PowerShell version is 2.0 on my machine. PowerShell remoting was introduced in version 2.0, so we are ready to move forward. If you have PowerShell version 1.0, then install PowerShell version 2.0 on the required machine.

Step 2 – Next we will check the status of the WinRM services by running the following command:
get-service winrm
As you can see in my circumstances, the service is stopped.

If the WinRM stopped enable it by running below cmd:
start-service winrm
Now we can see the WinRM service is started as shown below:

Step 3 – Now we will enable the PowerShell remoting feature. Run the ‘Enable-PSRemoting’ cmndlet in your PowerShell window as shown below.
Enable-PSRemoting

As you can see there are 5 options to choose: ‘Yes’, ‘Yes to all’, ‘No’, ‘No to All’ and ‘Suspend’. Type ‘A’ for the ‘Yes to All’ option then press the enter key.
Step 4 – The next step is to check all of the PowerShell providers. Windows Powershell providers provide access to data and components. It is basically .NET framework-based programs that make the data in a specialized data store so that you can view and manage it. The data that a provider provides appears in a drive, and you access the data in a path like you would on a hard drive. To access the providers issue the following command type ‘Get-PSProviders’ and press enter.
Get-PSProviders

Step 5 – In the screen shot above you can see all available providers. Wsman is the provider used for PowerShell remoting and we can browse the associated directories. Here we need to check Trustedhosts setting for the directory of Trustedhosts.
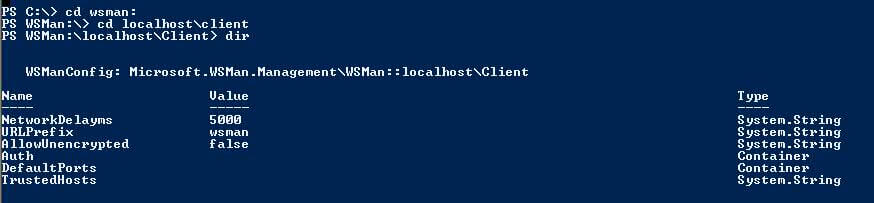
Step 6 – In this step we will set the value of the Trustedhosts. Trustedhosts is the container with all server name information to determine which machines you can access remotely. If you use the ‘*’ option, then it will register all servers for that domain for remoting so you can access this server from every server which is hosted in your domain. If you want to access only one machine from your local machine or only from a specific machine then you can use that parameter rather than the ‘*’ parameter.
set-item trustedhosts *

Step 7 – Now start winrm service as we did in step 2 (i.e. ‘start-service winrm’) to have all of the changes take commit.
Step 8 – Once we have PowerShell Remoting setup, lauch powershell on your local machine and type ‘Enter-pssession’
enter-pssession SERVERNAME
Once you are connected to the remote machine, the following screen will appear:

Next Steps
- Learn more about PowerShell. The scripting features are great to manage servers.
- If you want to use PowerShell Remoting to manage your SQL Servers then enable PowerShell Remoting on your SQL Server boxes in order to perform the administrative tasks from your local machine. You also have the ability to run a script or batch file on your remote server with PowerShell Remoting.

Manvendra is a passionate database lover currently working as a Technical Architect at one of the top MNCs. He has extensive experience on all versions of SQL Server since 2000 and has built Big Data skills. He has lead projects on the following database features: Database Mirroring, Always ON, Replication, Log Shipping, Geo-Clustering and Performance Tuning and delivered many SQL Server projects on consolidation, upgrades, heterogeneous replication, HA / DR solutions, automation and major performance tuning projects. You can also follow Manvendra on his blog, Twitter, LinkedIn and Facebook.
- MSSQLTips Awards: Champion (100+ tips) – 2018 | Author Contender – 2015-2018, 2021-2022