Problem
Django can help develop a solid backend for web applications and interact with SQL Server or SQL-related databases, like SQLite3, MySQL, and PostgreSQL, without having to write complex SQL syntax. Its Object Relational Mapping (ORM) tool translates Python code to SQL and vice versa, while also offering raw SQL syntax support. How do you get started with Django and SQL Server?
Solution
Django is a high-level Python web framework that enables developers to delegate the handling of common backend operations, allowing them to focus on the frontend and integration. It handles the backend of your application, which includes communication between your application and the database or DataSource. Django supports SQL Server, PostgreSQL, MongoDB, MySQL, Oracle, and SQLite databases.
Overview of Django
At the core of Django is the Model-View-Template (MVT) architecture, and you need to understand how this architecture glues your backend together to get the best out of Django. What Django does is create a database table and fields using the models defined as Python classes in the Models.py file. To ensure that you only make valid requests to your database, Django uses serializers that ensure that the data going to and from the database matches the data expected.
Django’s Manager feature has an interface through which database query operations are provided to your Models. It simply acts as the entry point to the ORM. Each model you create has at least one Manager, and its named objects by default. To retrieve and alter objects from your database, you must generate a QuerySet through a Manager on your Model classes. You will call these Models later in your Views using their Manager like this:
queryset = TechnicalArticle.objects.all()A QuerySet represents a group of objects from your database. QuerySet corresponds to the SQL Server SELECT statement in SQL Server.
Django automatically creates QuerySet API endpoints that enable you to create a View for your Models or Database tables. This will serve as the interface to interact with your database tables via Django. You will be learning how to create a Django application that utilizes the Queryset API and ORM to interact with your backend.
Below is Django’s bare application architecture that encompasses features within this section:
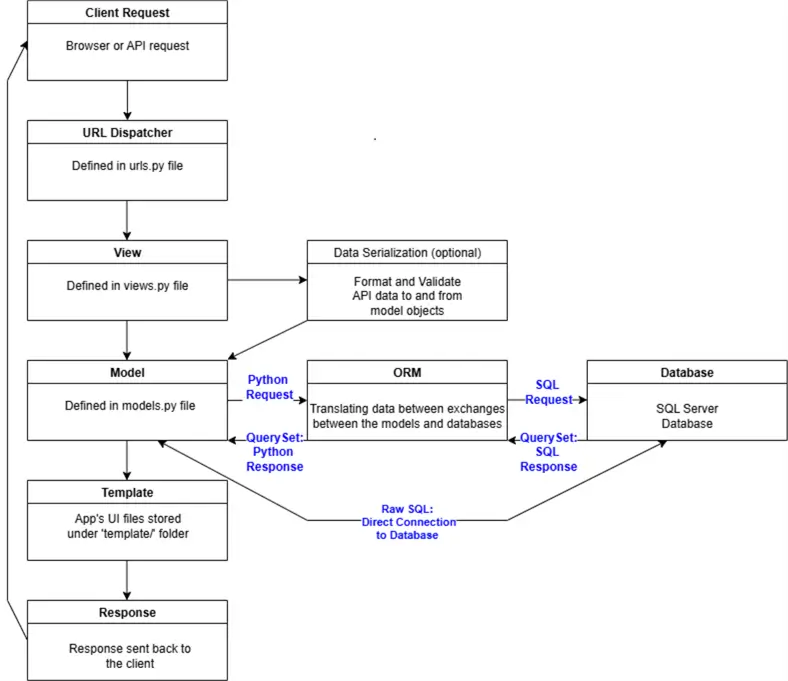
Figure 1: Django overview architecture
Try to visualize the diagram above when working with Django to have a clear overview of your project. This diagram shows an overview of the architecture; however, there are many smaller details that cannot be captured in an image. I hope you pick up on these smaller details while you go through this article.
We will explore these features and more in this article. But, reading too much about technical topics without getting your hands dirty can be boring. So, let’s proceed with this article and develop a Django project with these features.
Django Features
Django has many features. Updates occur constantly by a huge community with over 2000 people watching it and more than 80000 reviews on GitHub. Here are some of its outstanding features:
Speed
Django is a one-of-a-kind backend framework that offers a boilerplate template to kick-start your application. Django fast tracks your web application development by doing most of the heavy lifting for the backend setup and processes.
Security
Django has inbuilt standard encryption packages necessary to secure your web application. It protects QuerySets from common attacks like SQL injection and clickjacking.
MVT Architecture
The MVT architecture makes your project way much cleaner and separates the data layer (Models), logic layer (Views), and presentation layer of your application. The bigger your project gets, the more important this feature becomes.
Library and Tools
Django has all the libraries and tools necessary to build most applications, like Admin Interface, Session Management, Sitemaps, Authentication Packages, and Django ORM. This all-in-one package barely uses external packages and makes the workflow more viscous for developers.
Documentation
The up-to-date and easy-to-navigate documentation complements the vast tools featured with Django.
ORM
This feature makes it possible for a Python developer to interact with their SQL Server database without having to use SQL syntax, and includes features like query caching and input sanitization. Experienced SQL developers can opt to use raw SQL statements over the ORM.
Admin Interface
Django automatically creates an admin portal graphic interface that’s accessible through a browser.
Raw SQL
If for some reason you prefer using direct SQL statements for communication between your models and databases, you can use RAW SQL and bypass the ORM. Bypassing the ORM means you also bypass all the processes it executes over the data.
Django Disadvantages
As great as Django is, you still need to be aware of some of its shortcomings. Here are some things to keep in the back of your mind:
- Abstraction Layers: Although abstraction layers are mostly useful for developers, relying on too many abstraction layers can confuse you as a developer and detach you from understanding how your application runs under the hood. Issues can arise when you debug your application, and you might find it difficult to understand errors you encounter.
- ORM Difficulty: The ORM does a lot of work behind the scenes, and understanding the principles around it, like QuerySets, Relationships, and lazy evaluation, is not straightforward, requiring time to understand.
- Frontend Integration: Since Django is a backend framework, it does not pay too much attention to how your frontend integrates with your backend application. Django does not have out-of-the-box solutions or a full description on how to integrate with UI software, like React or Vue. This is a problem if you are not a full-stack developer or are uncomfortable with full-stack development.
Note: To continue with the following demonstration, it is important to be familiar with the structure of a Django project, as well as have an idea of what to expect when creating the application.
Creating a Django Application
To get started, first create an environment for your application using venv:
python -m venv mssqltips-django-envThen change directories into your env folder:
cd mssqltips-django-envRun the activate script to activate the environment:
bin\activateEnsure Django is installed in your application. If you have not installed Django yet, use the following pip command to install:
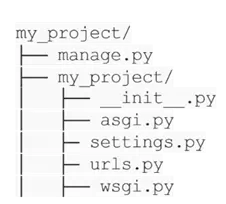
py -m pip install DjangoNow, use the following Django command to create your Django project:
django-admin startproject mssqltips_backendThis command will create a Django project with the following folder structure:
After creating the Django project, please note that there is a difference between a Django project and a Django application:
- Django Application: A web application with a Django backend and optional frontend.
- Django Project: A collection of configurations and 1 or more Django applications for a specific website.
While on your Django project’s main directory, create a Django web application as a child to the project you just created using the following command:
py manage.py startapp mssqltips_articles_appThis will create a Django application with the following file structure:
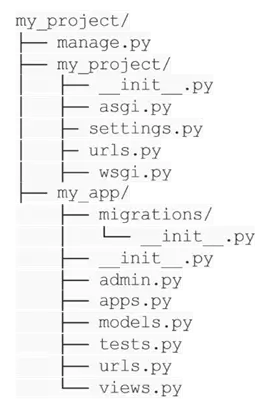
This creates a Django application entity equipped with its own Models, URLs, Views, and more. You must ensure to add the application to your main Django project and register your application’s URLs on the main Django’s project; you will see this below in this article.
Setting Up the Application
To set up your SQL Server database and Django connection, you must create an ODBC connection on your computer. Carefully follow the instructions in this article, Python Connect to SQL Server with Code Examples, on your PC. Then, open SQL Server Management Studio (SSMS) and create a database using the following SQL code:
CREATE DATABASE django_articles;
GO
One of the first things you should attend to when creating a Django project is to set up your database. As mentioned previously, Django supports most of the major SQL databases. Choose the database that meets your project requirements. Make sure to define your database in the <yourDjangoProject>/settings.py file. By default, Django uses SQLite; however, this tutorial uses a SQL Server as the database, as shown in the settings.py file defined by the DATABASE variable:
# Database
DATABASES = {
    'default': {
        'ENGINE': 'mssql',
        'NAME': 'django_articles',  # or your actual DB name
        'HOST': 'DESKTOP-GTCV10B\\SQLEXPRESS',
        'PORT': '',  # Leave blank for named instance
        'OPTIONS': {
            'driver': 'ODBC Driver 17 for SQL Server',
            'dsn': 'mssqltips_odbc17',
            'trusted_connection': 'yes',
            'extra_params': 'TrustServerCertificate=Yes;',
        },
    }
}
One more important setting for your Django project is the INSTALLED_APPS setting variable found in the <yourDjangoProject>/settings.py file. Ensure that it has at least the following values:
INSTALLED_APPS = [
    'django.contrib.admin',
    'django.contrib.auth',
    'django.contrib.contenttypes',
    'django.contrib.sessions',
    'django.contrib.messages',
    'django.contrib.staticfiles',
    'mssqltips_articles_app',
    'rest_framework',
    'mssql'
]
This setting will be analyzed when you use the migrate command later in this project:
py manage.py migrateThis command synchronizes the database state with the current set of models and migrations. then you must run this command after making any changes that will alter your database schema:
Py manage.py makemigrationsModels
A model is a definitive source of information about your data. Models define your data’s fields and how these fields are interacted with. Each model is essentially a Python class that subclasses django.db.models.Model, and each defined attribute in a Model is equal to a database field.
Following this guide, create a backend for a blogging web application. To get started, open your <yourDjangoApplication>/models.py file and add the following code:
from datetime import date

from django.db import models

class TechnicalArticle(models.Model):
    name = models.CharField(max_length=100)
    tagline = models.TextField()
    def __str__(self):
        return self.name

class Author(models.Model):
    name = models.CharField(max_length=200)
    email = models.EmailField()
    def __str__(self):
        return self.name

class Entry(models.Model):
    technical_article = models.ForeignKey(TechnicalArticle, on_delete=models.CASCADE)
    headline = models.CharField(max_length=255)
    body_text = models.TextField()
    pub_date = models.DateField()
    mod_date = models.DateField(default=date.today)
    authors = models.ManyToManyField(Author)
    number_of_comments = models.IntegerField(default=0)
    number_of_pingbacks = models.IntegerField(default=0)
    rating = models.IntegerField(default=5)

    def __str__(self):
        return self.headline
Now remember that each model you create has at least one Manager, and its named objects by default. Now, you must alert your backend database of these changes by running the makemigrations command:
py manage.py makemigrations <yourDjangoApplication>After running this, you will see the following:

Django creates and runs SQL statements in the background when you migrate your application. Take a look at these background scripts by opening the <yourDjangoApplication>/migrations/0001_initial.py or by running the following command:
py manage.py sqlmigrate <yourDjangoApplication> 0001This command will display the SQL script, and it looks like this in this instance:
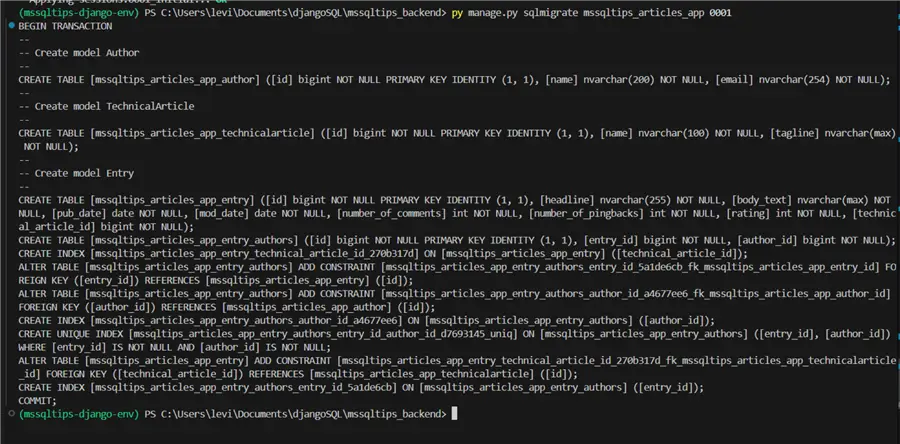
And here is the code:
BEGIN;
-- Create model Author
CREATE TABLE "mssqltips_articles_app_author" ("id" integer NOT NULL PRIMARY KEY AUTOINCREMENT, "name" varchar(200) NOT NULL, "email" varchar(254) NOT NULL);
-- Create model TechnicalArticle
CREATE TABLE "mssqltips_articles_app_technicalarticle" ("id" integer NOT NULL PRIMARY KEY AUTOINCREMENT, "name" varchar(100) NOT NULL, "tagline" text NOT NULL);
-- Create model Entry
CREATE TABLE "mssqltips_articles_app_entry" ("id" integer NOT NULL PRIMARY KEY AUTOINCREMENT, "headline" varchar(255) NOT NULL, "body_text" text NOT NULL, "pub_date" date NOT NULL, "mod_date" date NOT NULL, "number_of_comments" integer NOT NULL, "number_of_pingbacks" integer NOT NULL, "rating" integer NOT NULL, "technical_article_id" bigint NOT NULL REFERENCES "mssqltips_articles_app_technicalarticle" ("id") DEFERRABLE INITIALLY DEFERRED);
CREATE TABLE "mssqltips_articles_app_entry_authors" ("id" integer NOT NULL PRIMARY KEY AUTOINCREMENT, "entry_id" bigint NOT NULL REFERENCES "mssqltips_articles_app_entry" ("id") DEFERRABLE INITIALLY DEFERRED, "author_id" bigint NOT NULL REFERENCES "mssqltips_articles_app_author" ("id") DEFERRABLE INITIALLY DEFERRED);
CREATE INDEX "mssqltips_articles_app_entry_technical_article_id_270b317d" ON "mssqltips_articles_app_entry" ("technical_article_id"); CREATE UNIQUE INDEX "mssqltips_articles_app_entry_authors_entry_id_author_id_d7693145_uniq" ON "mssqltips_articles_app_entry_authors" ("entry_id", "author_id");
CREATE INDEX "mssqltips_articles_app_entry_authors_entry_id_5a1de6cb" ON "mssqltips_articles_app_entry_authors" ("entry_id");
CREATE INDEX "mssqltips_articles_app_entry_authors_author_id_a4677ee6" ON "mssqltips_articles_app_entry_authors" ("author_id"); COMMIT;
As you can see, Django runs SQL scripts to the SQL Server database on your behalf. It does this using its ORM, which translates the queries written with Python on the application to SQL for the database.
Running the makemigrations command will alert the database to potential changes. To apply the changes, you must run the migrate command:
py manage.py migrateAfter running the migrate command after, Django will automatically generate a database-access Queryset API that lets you create, retrieve, update and delete an object:
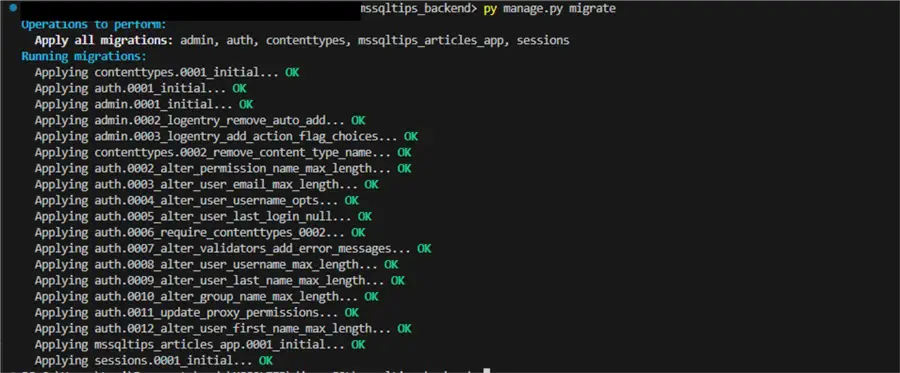
The above process shows that Django automatically updating the connected database using the models you define.
These created Queryset APIs lead us to Views.
Data Serialization
Given that this application will utilize Django’s Queryset API to interact with your model’s data, it is important to serialize data being sent to and from your data models. This will help validate the requested data from your model data and posted data. Django’s serialization framework also enables you to translate data formats for data written to your model or requested data, like enabling you to write and read your model data using the JSON format.
To serialize your model data, create a Python file named serializers.py and add the following code:
from rest_framework import serializers
from .models import TechnicalArticle, Author, Entry

class TechnicalArticleSerializer(serializers.ModelSerializer):
    class Meta:
        model = TechnicalArticle
        fields = '__all__'

class AuthorSerializer(serializers.ModelSerializer):
    class Meta:
        model = Author
        fields = '__all__'

class EntrySerializer(serializers.ModelSerializer):
    class Meta:
        model = Entry
        fields = '__all__'
Views
Views are known as the logic layer of your application. They sit right between your data layer (Model) and your presentation layer (front-end), i.e., it is basically your Django App’s Application Programming Interface (API) layer. Just like an electrical wall socket, it is responsible for providing an interface for an appliance (application’s frontend) to connect to the electricity circuit (application’s backend).
This enables you to decouple the frontend and backend, allowing for development separately if they both adhere to the same data conversions and formats. This fact also reinforces how important it is to build a Serialization layer between your Views and Models; it increases the flexibility of your data formats and validates data before it’s passed on.
To create views for your application, open the <yourDjangoApplication>/views.py file and add the following code:
from django.shortcuts import render
# Create your views here.
from rest_framework import viewsets
from .models import TechnicalArticle, Author, Entry
from .serializers import TechnicalArticleSerializer, AuthorSerializer, EntrySerializer

class TechnicalArticleViewSet(viewsets.ModelViewSet):
    queryset = TechnicalArticle.objects.all()
    serializer_class = TechnicalArticleSerializer

class AuthorViewSet(viewsets.ModelViewSet):
    queryset = Author.objects.all()
    serializer_class = AuthorSerializer

class EntryViewSet(viewsets.ModelViewSet):
    queryset = Entry.objects.all()
    serializer_class = EntrySerializer
The code above declares Python classes that use the Viewsets library and Django’s Queryset API to gain access and interact with the backend database.
The responses are named queryset since this is exactly what the Manager returns when called, which is a group of database data objects.
Routing
Django uses a simple, straightforward URL scheme with no framework limitations. Although, ideally, you must create a Python file named urls.py in your Django application and define your web URLs for defined models:
from django.urls import path, include
from rest_framework.routers import DefaultRouter
from .views import TechnicalArticleViewSet, AuthorViewSet, EntryViewSet

router = DefaultRouter()
router.register(r'articles', TechnicalArticleViewSet)
router.register(r'authors', AuthorViewSet)
router.register(r'entries', EntryViewSet)

urlpatterns = [
    path('api/', include(router.urls)),
]
Then open the provided urls.py file under your Django project’s main directory and add the following code to register your Django application’s URL scheme on the main URL file:
"""
URL configuration for mssqltips_articles project.

The `urlpatterns` list routes URLs to views. For more information please see:
    https://docs.djangoproject.com/en/5.1/topics/http/urls/
Examples:
Function views
    1. Add an import:  from my_app import views
    2. Add a URL to urlpatterns:  path('', views.home, name='home')
Class-based views
    1. Add an import:  from other_app.views import Home
    2. Add a URL to urlpatterns:  path('', Home.as_view(), name='home')
Including another URLconf
    1. Import the include() function: from django.urls import include, path
    2. Add a URL to urlpatterns:  path('blog/', include('blog.urls'))
"""
from django.contrib import admin
from django.urls import path
from django.urls import include

urlpatterns = [
    path('admin/', admin.site.urls),
    path('', include('mssqltips_articles_app.urls')),
]
Running the Application
To run the Django backend application, use the following command to start the application:
python manage.py runserverThis command boosts your application and exposes your model data via its API. You can view the Query API in your browser by running the defined URLs in your browser.
These are the URLs:
- http://127.0.0.1:8000/api/articles/
- http://127.0.0.1:8000/api/authors/
- http://127.0.0.1:8000/api/entries/
While the Django project is still running, inserting one of these into your browser will reveal this API UI:
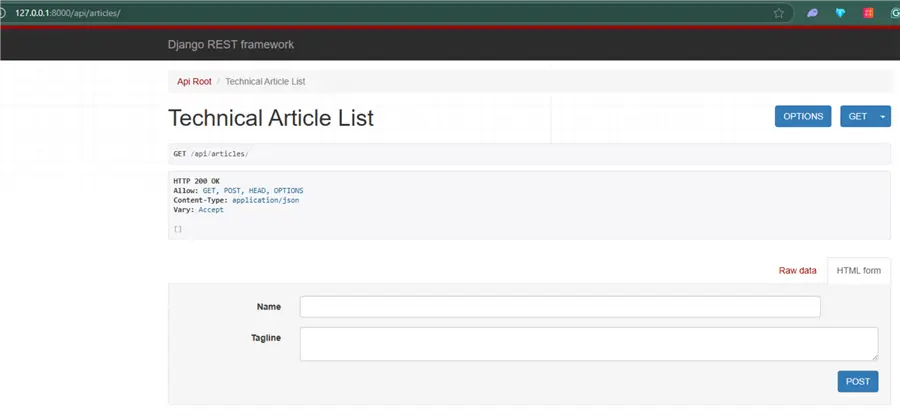
As you can see, Django has created a simple UI for the defined View on the http://127.0.0.1:8000/api/articles/ URL. This is the TechnicalArticle View that exposes stored Name and Tagline fields from the Database and receives the Name and Tagline fields using the POST requests from a user Client.
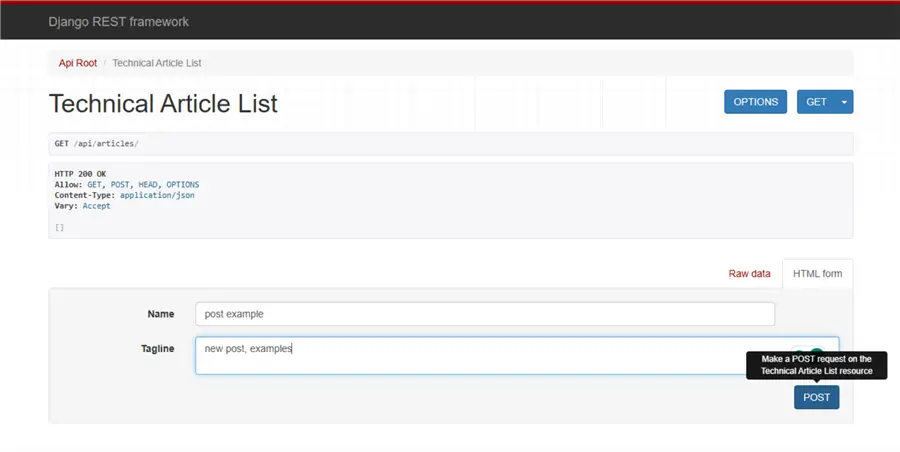
To test, add new data for the Name and Tagline fields, then submit a post request using the Post button:
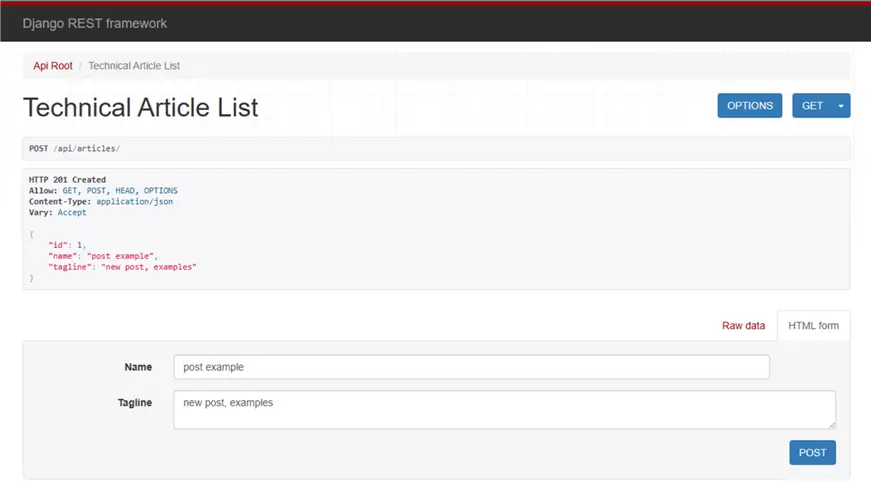
After submitting data, the GET request will get a hit from the database and return the stored data:
Admin Portal
To activate the admin portal, you must register your models to the admin in the file named admin.py on your application’s directory by adding the following code:
from django.contrib import admin from .models import TechnicalArticle, Author, Entry

@admin.register(TechnicalArticle)
class TechnicalArticleAdmin(admin.ModelAdmin):
     list_display = ('name', 'tagline')
     search_fields = ('name',)
@admin.register(Author)
class AuthorAdmin(admin.ModelAdmin):
     list_display = ('name', 'email')
     search_fields = ('name', 'email')
@admin.register(Entry)
class EntryAdmin(admin.ModelAdmin):
     list_display = ('headline', 'pub_date', 'mod_date', 'rating')
     list_filter = ('pub_date', 'rating')
     search_fields = ('headline', 'body_text')
     filter_horizontal = ('authors',)
Then, create a superuser using this command:
python manage.py createsuperuserThis will ask for a username, email address, and password:

Now, start your application again:
python manage.py createsuperuserThen, use this endpoint on your browser to access your admin portal:
http://127.0.0.1:8000/admin/Enter your created superuser’s credentials to login:
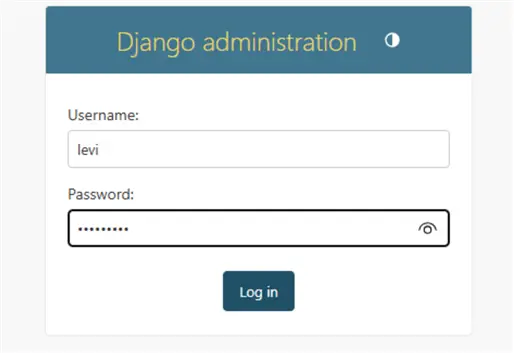
After logging in, you should see the Models you registered in the admin.py file and the default Authentication and Authorization Models:
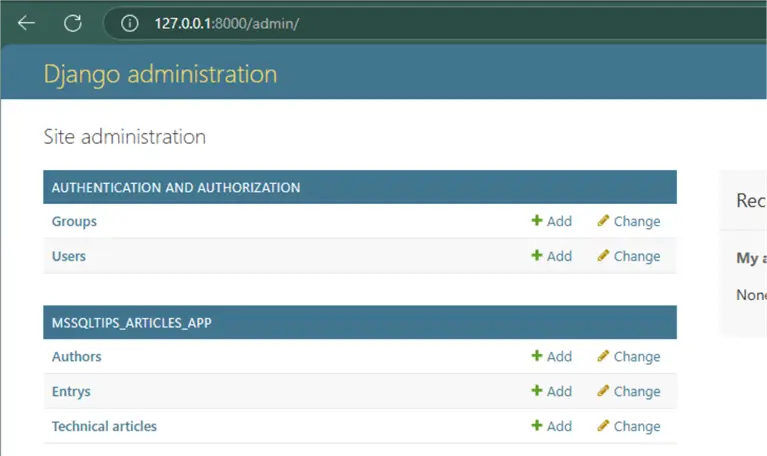
From this portal, you have superuser rights and can edit all the models’ registers.
Conclusion
This article is an overview of how Django works, its core architecture, and how to run it. Although this article covers a lot of concepts and features, there is still more to learn about Django, like the all-important built-in authentication systems, storage systems, and security features.
Next Steps
- If you are keen to use databases other than SQLite3 as the database, check out this tip: Python Django Tutorial for Website with SQL Server Database – MSSQLTips.com
- Learn how to use Python for Data Professionals – MSSQLTips.com
- Learn how to create SharePoint List CRUD Operations using Python – MSSQLTips.com
- Compare SQLAlchemy vs SQL Server Management Studio for Database Tasks – MSSQLTips.com
