Problem
MQTT is a lightweight Industrial IoT communications protocol allowing efficient communication to and from edge devices such as machines, sensors, and actuators. How can we get data from an MQTT on-premises or cloud broker and persist them in an SQL Server database? How can we leverage the newest features in SQL Server 2025 to make efficient query compilations and build a scalable solution for a data pipeline for permanently storing IoT data?
Solution
To read data from an MQTT broker we can use the paho-mqtt Python library. Having subscribed to the broker from our code we can then manage the data in-memory and write them to SQL Server 2025 using the optimized sp_execute_sql stored procedure.
Scenario
For this scenario, I will subscribe to a cloud-based MQTT broker. Every 145 seconds, the controller I have makes a POST request to an API Service (out of the scope of this document). The API Service publishes the incoming data to the MQTT cloud broker. The image below provides an overview of the setup. This document focuses on the area highlighted in green. We will develop a solution that subscribes to the broker and persists the data in an SQL Server 2025.

Here is what the data payload of every request looks like:

Environment Setup
Begin by creating a project folder and open it in VS Code. Then, create a requirements.txt file containing six lines: paho-mqtt, attrs, pandas, pyodbc, SQLAlchemy, python-dotenv.

Next, hit Ctrl+Shift+P and choose Python: Create Environment.

Follow the prompts for creating a local virtual environment. Make sure to check requirements.txt so the environment agent will install the required Python packages directly:

Once you have your environment ready, please proceed to the next steps where we set up the complete solution.
Database Connection
For this scenario I am using SQL Server 2025 for the final data destination. This brand-new release is currently in public preview available for download here. After installing it, let us check what the newest version number is. Then create the target database:

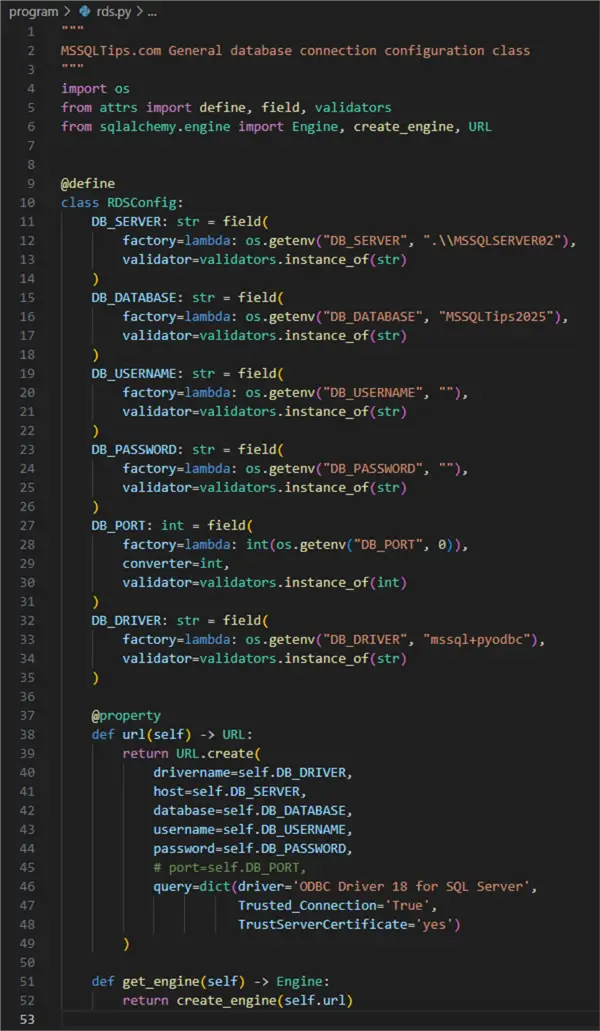
As a result, we see the current public preview version is 17.0.700.9 and we have a new database to get our data to. Let us create the script that will connect us to that database using the familiar approach from previous documents:
--MSSQLTips.com Python
01: """
02: MSSQLTips.com General database connection configuration class
03: """
04: import os
05: from attrs import define, field, validators
06: from sqlalchemy.engine import Engine, create_engine, URL
07:
08:
09: @define
10: class RDSConfig:
11:     DB_SERVER: str = field(
12:         factory=lambda: os.getenv("DB_SERVER", ".\\MSSQLSERVER02"),
13:         validator=validators.instance_of(str)
14:     )
15:     DB_DATABASE: str = field(
16:         factory=lambda: os.getenv("DB_DATABASE", "MSSQLTips2025"),
17:         validator=validators.instance_of(str)
18:     )
19:     DB_USERNAME: str = field(
20:         factory=lambda: os.getenv("DB_USERNAME", ""),
21:         validator=validators.instance_of(str)
22:     )
23:     DB_PASSWORD: str = field(
24:         factory=lambda: os.getenv("DB_PASSWORD", ""),
25:         validator=validators.instance_of(str)
26:     )
27:     DB_PORT: int = field(
28:         factory=lambda: int(os.getenv("DB_PORT", 0)),
29:         converter=int,
30:         validator=validators.instance_of(int)
31:     )
32:     DB_DRIVER: str = field(
33:         factory=lambda: os.getenv("DB_DRIVER", "mssql+pyodbc"),
34:         validator=validators.instance_of(str)
35:     )
36:
37:     @property
38:     def url(self) -> URL:
39:         return URL.create(
40:             drivername=self.DB_DRIVER,
41:             host=self.DB_SERVER,
42:             database=self.DB_DATABASE,
43:             username=self.DB_USERNAME,
44:             password=self.DB_PASSWORD,
45:             # port=self.DB_PORT,
46:             query=dict(driver='ODBC Driver 18 for SQL Server',
47:                        Trusted_Connection='True',
48:                        TrustServerCertificate='yes')
49:         )
50:
51:     def get_engine(self) -> Engine:
52:         return create_engine(self.url)
Using attrs and SQLAlchemy we create a reusable database connection class. The class can be further abstracted or modified to become applicable to other db engines. Here is how it works:
- 04 – 06: define imports.
- 11 – 35 define the member attributes representing the mandatory connection properties applicable to any database.
- 37 – 49 using the URL method we create a URL for connecting to the database using the mandatory connection properties. Using this approach on a MSSQL Server 2025 on localhost we must pass a dictionary with extra connection properties such as the driver, TrustedConnection and TrustServerCertificate.
- 51: create a function to return the connection URL.
Having taken care of this part, we can proceed to the next step.
MQTT Listener
The next step is to develop functionality that will allow us to subscribe to an MQTT broker. The approach I have chosen is by using the paho-mqtt Python library and designing a custom class. We could directly use the paho Client type, however, having a custom class wrapper allows the application to easily scale in the future and modify the subscription logic in a more modular way.
--MSSQLTips.com Python
001: import os
002: from dotenv import load_dotenv
003: from attrs import define, field
004: import paho.mqtt.client as mqtt
005: import paho.mqtt.reasoncodes as rc
006: import paho.mqtt.properties as pr
007: import ssl
008: from typing import Any, List
009:
010:
011: @define
012: class MQTTListener(mqtt.Client):
013:     load_dotenv()
014:
015:     mqtt_topic: str = field(default='#')
016:     callback_api_version: str = field(default=mqtt.CallbackAPIVersion.VERSION2)
017:     client_id: str = field(default='default')
018:     mqtt_username: str = field(factory=lambda: os.getenv('MQTT_USER'),
019:                                validator=lambda i, a, v: v is not None)
020:     mqtt_password: str = field(factory=lambda: os.getenv('MQTT_PASSWORD'),
021:                                validator=lambda i, a, v: v is not None)
022:     broker: str = field(factory=lambda: os.getenv('BROKER'),
023:                         validator=lambda i, a, v: v is not None)
024:
025:     def __attrs_post_init__(self):
026:         """Initialize the MQTT client after attrs initialization."""
027:
028:         # Initialize the parent MQTT client
029:         super().__init__(
030:             callback_api_version=self.callback_api_version,
031:             client_id=self.client_id
032:         )
033:
034:         if self.mqtt_username and self.mqtt_password:
035:             self.username_pw_set(self.mqtt_username, self.mqtt_password)
036:         else:
037:             raise ValueError('Missing credentials.')
038:
039:         self.tls_set(tls_version=ssl.PROTOCOL_TLS)
040:         self.connect(self.broker, 8883, 60)
041:
042:         self.on_connect = self._on_connect_callback
043:         self.on_message = self.on_message_callback
044:         self.on_disconnect = self._on_disconnect_callback
045:
046:         self.subscribe(self.mqtt_topic)
047:
048:     def _on_connect_callback(self, mqttc: mqtt.Client, user_data: Any, flags: mqtt.ConnectFlags,
049:                              rc: rc.ReasonCode, properties: pr.Properties) -> None:
050:         """Callback function invoked when the client connects to the broker.
051:
052:         Args:
053:             mqttc (mqtt.Client): mqtt client instance.
054:             user_data (Any): the private user data as set in Client()
055:             flags (mqtt.ConnectFlags): any connect flags.
056:             rc (rc.ReasonCode): mqtt reason code.
057:             properties (pr.Properties): properties received from the broker.
058:         """
059:         print('rc: ' + str(rc))
060:
061:     def _on_connect_fail(self, mqttc: mqtt.Client, user_data: Any) -> None:
062:         """The callback called when the client failed to connect to the broker.
063:
064:         Args:
065:             mqttc (mqtt.Client): mqtt client instance.
066:             user_data (Any): the private user data as set in Client()
067:         """
068:         print('Connection failed.')
069:
070:     def _on_disconnect_callback(self, mqttc: mqtt.Client, user_data: Any, rc: rc.ReasonCode,
071:                                 properties: pr.Properties = None) -> None:
072:         """Callback function invoked when the client disconnects from the broker.
073:         Args:
074:             mqttc (mqtt.Client): mqtt client instance.
075:             user_data (Any): the private user data as set in Client()
076:             rc (rc.ReasonCode): mqtt reason code.
077:             properties (pr.Properties): properties received from the broker.
078:         """
079:         print(f"Disconnected from MQTT broker. Return code: {rc}")
080:
081:     def on_message_callback(self, mqttc: mqtt.Client, user_data: Any, msg: mqtt.MQTTMessage) -> None:
082:         """The callback called when a message has been received on a topic that the client subscribes to.
083:            This callback will be called for every message received.
084:
085:         Args:
086:             mqttc (mqtt.Client): mqtt client instance.
087:             user_data (Any): the private user data as set in Client()
088:             msg (mqtt.MQTTMessage): _description_
089:         """
090:
091:         print(str(msg.payload))
092:
093:     def on_subscribe(self, mqttc: mqtt.Client, user_data: Any, mid: int, reason_code_list: List[rc.ReasonCode],
094:                      properties: pr.Properties) -> None:
095:         """Callback function invoked when the client subscribes to the broker.
096:
097:         Args:
098:             mqttc (mqtt.Client): mqtt client instance.
099:             user_data (Any): the private user data as set in Client().
100:             mid (int): matches the mid variable returned from the corresponding subscribe() call.
101:             reason_code_list (List[rc.ReasonCode]): list of reason codes.
102:             properties (pr.Properties): properties received from the broker.
103:         """
104:         print("Subscribed: "+str(mid)+" "+str(reason_code_list))
105:
106:     def on_log(self, mqttc: mqtt.Client, user_data: Any, level: int, buf: str) -> None:
107:         """The callback called when the client has log information. Defined to allow debugging.
108:
109:         Args:
110:             mqttc (mqtt.Client): mqtt client instance.
111:             user_data (Any): the private user data as set in Client().
112:             level (int):  gives the severity of the message and will be one of MQTT_LOG_INFO,
113:             MQTT_LOG_NOTICE, MQTT_LOG_WARNING, MQTT_LOG_ERR, and MQTT_LOG_DEBUG.
114:             buf (str): the message.
115:         """
116:         pass
117:
118:     def run(self) -> int:
119:         """Sets user name and password to connect to a broker and subscribes to a topic.
120:
121:         Returns:
122:             int: result code.
123:         """
124:
125:         rc = 0
126:         while rc == 0:
127:             rc = self.loop_forever()
128:         return rc
129:
Code Description
This part of the program is over one hundred lines of code, but it is easier to follow than it looks. Let us break it down:
- 01 – 08: define the necessary imports, including type references.
- 12: define a custom class
MQTTListenerthat inherits from the core type ofmqtt.Clientwith the following member attributes after loading the environment variable file for later reference on line 13:- 15: mqtt topic
- 16: callback API version, required when instantiating a client
- 17: client id
- 18, 20: username and password for connecting to the broker
- 22: broker URL.
- 25 – 46: initialize the class
- 29 – 32: initialize the parent class
- 34 – 37: check that the username and the password have been defined as they are required for connecting to the broker I am using.
- 39, 40: set TLS version and connect using port and keep alive values.
- 42, 43, 44: set the callbacks that the instance of the class will invoke accordingly. This includes instructing the connector what to do when connected, when a message is received and when disconnected.
- 46: subscribe the instance to the target topic. If no topic name was passed, the instance will subscribe to all topics (the “#” wildcard).
- 48 – 59: on connect callback invoked when connected to the broker (green message below).
- 61 – 68: callback invoked in case connection fails.
- 70 – 79: callback invoked in case disconnected.
- 81 – 91: callback invoked for each message received.
- 93 – 104: callback invoked when our client subscribes to the broker (blue message).
- 106 – 116: logging function, can be used for debugging.
- 118- 128: function for running the instance. Result code zero means no errors. On every other result code (e.g., five for connection refused), the program will halt.


Here is what the output from on_connect_callback and on_subscribe will look like:

SQL Client
The next step is to code the SQL Client. This is the part of the program that will take care of doing something specific with incoming messages and connecting and writing to the database.
Target table
First, we need a simple table for storing our data:
--MSSQLTips.com T-SQL
CREATE TABLE IoTData(
    Id INT IDENTITY PRIMARY KEY,
    TimeStamp DATETIME DEFAULT GETDATE(),
    ValueType NVARCHAR(128) NOT NULL,
    Value DECIMAL(5,2) NOT NULL
)
Stored procedure
Second, we create a stored procedure for inserting data. The stored procedure will require two input parameters: the value type (NVARCHAR describing what we measured) and the value (DECIMAL value of the measurement). The stored procedure has the following characteristics:
- acts as a wrapper for the insert clause so we forego messy insert strings in the program code
- structures the insert statement making it more readable what we are inserting
- uses
sp_execute_sqlunder the hood to insert the incoming parameters into the target table avoiding compilation storms that might be inflicted if using a raw insert statement. This part may not be as impactful when dealing with a single sensor writing to one table but will have influence in scenarios with a heavier data load. - wraps the code block as a transaction to ensure consistency.
CREATE PROCEDURE InsertIoTDataPoint (
    @Value_Type NVARCHAR(128),
    @Value DECIMAL
)
AS
DECLARE @InsertString AS NVARCHAR (500);

SET @InsertString = 'INSERT INTO dbo.IoTData (ValueType, Value)' +
    ' VALUES (@Ins_Value_Type, @Ins_Value)';

EXECUTE sp_executesql
    @InsertString,  N'@Ins_Value_Type NVARCHAR(128), @Ins_Value DECIMAL',
    @Value_Type,
    @Value
GO
As Microsoft recommends, we are using the fully qualified object name to further improve performance. Please note, to take advantage of the improved sp_executesql, you must first set OPTIMIZED_SP_EXECUTESQL to ON. The setting is by default off. It applies to SQL Server 2025 (17.x) Preview, Azure SQL Database, and SQL database in Microsoft Fabric only:
ALTER DATABASE SCOPED CONFIGURATION SET OPTIMIZED_SP_EXECUTESQL = ON;Having the setting on will ensure that identical batches obtain a compile lock and guarantee query compilation process serialization. Thus, despite different parameter values, the first execution of sp_executesql compiles and inserts a plan into the plan cache, while subsequent calls of the same query reuse the plan instead of waiting for compilation.
SQL Client Class
Now having created the table and the stored procedure in the database, we can write the SQL Client class definition:
--MSSQLTips.com Python
01: import logging
02: import json
03: from sqlalchemy import text
04: from attrs import define, field
05: from rds import RDSConfig
06: from mqtt_listener import MQTTListener
07:
08:
09: logging.basicConfig(level=logging.INFO)
10: logger = logging.getLogger(__name__)
11:
12:
13: @define
14: class SQLClient(MQTTListener):
15:
16:     # inject RDS config instance
17:     rds_config: RDSConfig = field(kw_only=True)
18:     db_engine = field(init=False, default=None)
19:
20:     def __attrs_post_init__(self):
21:         super().__attrs_post_init__()
22:         self.db_engine = self.rds_config.get_engine()
23:
24:     def _store_message(self, topic: str, payload: str) -> None:
25:         try:
26:             if isinstance(payload, bytes):
27:                 payload = payload.decode('utf-8')
28:
29:             data = json.loads(payload)
30:             allowed_value_types = {'SDS_P1', 'SDS_P2', 'BME280_temperature', 'BME280_humidity'}
31:             all_sensor_values = data.get('sensordatavalues', [])
32:             sensor_values = [item for item in all_sensor_values if item.get('value_type') in allowed_value_types]
33:
34:             with self.db_engine.connect() as conn:
35:                 for sensor_data in sensor_values:
36:                     value_type = sensor_data.get('value_type')
37:                     value = sensor_data.get('value')
38:
39:                     if value_type and value is not None:
40:                         conn.execute(text('dbo.InsertIoTDataPoint :value_type, :value'),
41:                                      {'value_type': value_type, 'value': value}
42:                                      )
43:
44:                 conn.commit()
45:
46:             logger.info(f"Stored {len(sensor_values)} sensor values from topic {topic}")
47:
48:         except json.JSONDecodeError as e:
49:             logger.error(f"JSON parsing error: {e}")
50:             raise
51:         except Exception as e:
52:             logger.error(f"Database error: {e}")
53:             raise
54:
55:     # override parent callback function
56:     def on_message_callback(self, mqttc, obj, msg) -> None:
57:         try:
58:             topic = msg.topic
59:             payload = msg.payload
60:
61:             self._store_message(topic, payload)
62:
63:         except Exception as e:
64:             logger.error(f"Error processing MQTT message: {e}")
65:
66:         logger.info(payload)
67:
Here is what this code does:
- 05, 06: import the
RDSConfigconnector class and the customMQTTListener. - 09, 10: configure the class logger.
- 17, 18: define two member attributes: rds_config of type
RDSConfigand db_engine that the rds_config will generate later. - 20 – 22: initialize the class along with the parent. Get the engine from rds_config.
- 24 – 46: function for ingesting the MQTT payload to the database:
- 26, 27: check if the payload is a
bytesobject and decode it - 29: parse the payload into a json object
- 30: define the keys we are interested in, in this case particulate matter readings, temperature and humidity
- 31: get the data from the
sensordatavalueskey in the json payload - 32: extract the sensor values according to the keys defined on line 30
- 34: using the db_engine, connect to the database
- 36, 37: get the value type and its value
- 40: call the stored procedure for inserting the data by passing in the value type and corresponding value
- 44: commit the call
- 46: log the received sensor values and topic name for debugging.
- 26, 27: check if the payload is a
- 56: override the
on_message_callbackfunction of the parent class. Using this approach, we can have different clients for writing to different data destinations. - 58, 59: get the topic and the payload.
- 61: pass the topic and the payload to the previously defined private function
_store_message. - 63 – 66: catch any exceptions and log the payload for debugging.

Putting it all together
This is what the namespace should look like at this point:

Having our database connector class, MQTT Listener, and SQL Client, we can put everything together in a straightforward way in the app.py script file:
--MSSQLTips.com Python
01: from sql_client import SQLClient
02: from rds import RDSConfig
03:
04: db_config = RDSConfig()
05:
06: sql_client = SQLClient(mqtt_topic='uns/weather',
07:                        rds_config=db_config)
08:
09: sql_client.run()- 01, 02: import the custom modules
- 04: get a
db_configconnection instance of typeRDSConfig - 06: make an
sql_clientinstance of typeSQLClientby passing the MQTT topic we subscribe to and the rds config instance. - 09: run the client, which calls the
mqtt.client.run()loop defined earlier

Running the app.py file produces the following output, where we can see:
- successful subscription
- ODBC driver warning due to SQL Server version 17 (the driver is not yet updated to cover all new features in SQL Server 2025)
- MQTT topic
- MQTT topic payload being logged and stored in the database as it comes from the broker.

Checking the results
Let us check the data in the database where it is all coming in nicely:

Conclusion
Using a modular data engineering approach, we created separate modules for connecting to an SQL Server 2025 database, subscribing to an MQTT broker and topic, and finally writing the incoming MQTT topic payload to a table in the database. The source code can be easily adapted to include a subscription to more than one MQTT topic and write to more than one database or table as needed.
Next Steps
- sp_esxecutesql
- OPTIMIZED_SP_EXECUTESQL
- Execute Dynamic SQL commands in SQL Server
- SQL Server Stored Procedure with Parameters

Hristo Hristov is a seasoned data professional with 10+ years of experience spanning the intersection of data engineering and smart manufacturing solutions. Since 2017, he has specialized in implementing advanced analytics solutions for bridging the IT/OT gap.
A technical writer with over 80 published articles on data and AI technologies, Python development, and cloud solutions. Passionate about transforming complex data into business value through innovative applications of Azure Data Platform, Python, IoT solutions, databases, and other cloud technologies.
Currently applying Industry 4.0 best practices, focusing on IoT connectivity, and implementing data and AI systems in manufacturing. Hristo holds a degree in Data Science and several Microsoft certifications covering SQL Server, Power BI, and related technologies.
- MSSQLTips Awards
- Achiever Award (75+ tips) – 2026
- Rookie of the Year – 2021
- Author Contender – 2022/2023/2024/2025


