Problem
In this tutorial, we look at how to connect to a Microsoft SQL Server database, along with creating some simple database objects, with the Python programming language.
Solution
There are some steps you can take to ensure your connection does not fail. First, you should try to make the connection string from your machine; you might be surprised how tiny details can affect your connection. Then you can use Python modules to ensure your connection string is clean to establish a connection.
I used the following for this Python program tutorial, but this should work for many different configurations:
- SQL Server 2019
- Python, Version 3.11.0
- Visual Studio Code, Version 1.72.1
- Windows 10 PC or Windows Server 2019/2022
ODBC Driver Configuration
Before creating a connection with Python, we will use a Windows machine using the ODBC Data Source Administrator, which manages ODBC connections and data sources. This is used to create and verify a data source.
Use your search bar to search for ODBC Data Source Administrator (64-bit) and open it.

Select the System DNS tab and click Add to add a new data source.

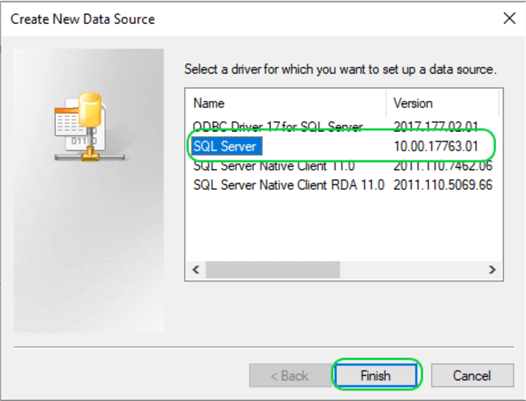
Select SQL Server to create a SQL Data Source.
Name your data source and select a SQL instance installed on your machine. Once done, click Next.

Then, you will see the details of your data source. Click on Test Data Source to test your Data Source.

You will get a Tests Completed Successfully alert if the connection is good. Take note of the ‘Server’ value and ‘Data Source Name’ value as you will use the values for your Python connection string.

Create Database
Now, fire up Visual Studio Code to start working with Python code.
Click “Ctrl + Shift + ` ” to open a new terminal.
Use the sqlcmd command sqlcmd -S <yourServerName> -E to log in to the SQL Server instance. Once logged in, create a new database using the create command CREATE DATABASE MSSQLDB</code>; execute the command by typing <code>GO and pressing “Enter”.

Now you can connect to your SQL database using the SQLAlchemy ORM for Python, as shown below.
Engine Configuration
The engine marks the starting point of your SQLAlchemy application. The engine describes the connection pool and dialect for the BDAPI (Python Database API Specification), a specification within Python to define common usage patterns for all database connection packages, which in turn communicates with the database specified.
Click “Ctrl + Shift + ` ” in Visual Studio Code to open a new terminal.
Use the npm command npm install sqlalchemy in your terminal to install the SQLAlchemy module and create a Python file called “DBconnect.py”.
# DBconnect.py
import sqlalchemy as sa
from sqlalchemy import create_engine
import urllib
import pyodbc

conn = urllib.parse.quote_plus(
    'Data Source Name=MssqlDataSource;'
    'Driver={SQL Server};'
    'Server=POWERSERVER\POWERSERVER;'
    'Database=MSSQLDB;'
    'Trusted_connection=yes;'
)

try:

    coxn = create_engine('mssql+pyodbc:///?odbc_connect={}'.format(conn))
    print("Passed")

except:
    print("failed!")
Create a New Table in the Database
Metadata contains definitions of tables and associated objects such as index, view, triggers, etc.
After creating a metadata construct, you can use the Table construct, which represents CREATE TABLE in regular SQL syntax, to create a table.
# CreateTable.py
from DBconnect import coxn
from sqlalchemy import Table, Column, Integer, String, MetaData

meta = MetaData()

students = Table(
   'students', meta,
   Column('id', Integer, primary_key = True),
   Column('name', String),
   Column('lastname', String),
)
meta.create_all(coxn)
The create_all() function uses the engine object to create all the defined table objects and stores the information in the metadata.
To confirm the results, open your SQL Server Management Studio and check the database, table, and columns created.

Great! The database, table, and columns are visible on the SQL instance.
Write to SQL Table
Now that you have created an SQL database table, it’s time to write to it.
Add some entries to your database using the code below:
 from CreateTable import students
from DBconnect import coxn

ins = students.insert().values([
   {'name':'Bob','lastname':'Marley'},
   {'name':'Bob','lastname':'Dylan'}
])
conn = coxn.connect()
conn.execute(ins)**
Great! You just added new entries to the database.
Database and Security Best Practices
So far, you have created a connection between your Python code and SQL Server. But the only connection allowed is the local PC connection. You will likely want to share your SQL database with external PCs to enable remote connection. For this to work, you need to ensure the server allows remote connection from a specific IP address and the SQL Server has a user defined with a password.
This tutorial employs a contained database isolated from other databases and the instance of the SQL Server/ SQL Database (and the master database) that hosts the database. Microsoft encourages developers to start using the contained database model. Eventually, you will be required to use the contained database model, so it is in your best interest to start using it now.
For the Traditional Login and User Model to work, both the login (in the master database) and the user (in the user database) must exist and be related. This ties down the user database to the master database, limiting the database’s ability to be moved to a different SQL Server or Azure SQL Database server.
The contained database model does not rely on the master database login. The authentication process occurs at the user database, and the database user in the user database does not have an associated login in the master database.
Although Microsoft is headed towards Contained User Databases, the model poses some threats. Users in a contained database with ALTER ANY USER permission, such as members of the db_owner and db_accessadmin fixed database roles, can grant access to the database without the knowledge or permission of the SQL Server administrator. So, the permissions are essential, and regular user auditing on the database is critical too. Now you can create a user following the next section.
Creating a User
On your command prompt window, you can configure your contained database and create a new user, as shown below. (Note: the numbered lines are the commands and the non-numbered lines show the command output.)
C:\Users\Administrator>sqlcmd -S POWERSERVER\POWERSERVER -E1> sp_configure 'contained database authentication', 1;
2> GO
Configuration option 'contained database authentication' changed from 0 to 1. Run the RECONFIGURE statement to install.
1> RECONFIGURE;
2> GO
1> ALTER DATABASE [MSSQLDB] SET CONTAINMENT = PARTIAL;
2> GO
1> USE [MSSQLDB]
2> GO
Changed database context to 'MSSQLDB'.
1> CREATE USER Adam WITH PASSWORD = 'Password';
2> GO
Msg 15118, Level 16, State 1, Server POWERSERVER\POWERSERVER, Line 1
Password validation failed. The password does not meet the operating system policy requirements because it is not complex enough.
1> CREATE USER Adam WITH PASSWORD = '<Your Password>';
2> GO
As you can see, SQL still maintains some of its security standards, like the password.
Now, you can create a new Python connection string as shown below:
import sqlalchemy as sa
from sqlalchemy import create_engine
import urllib
import pyodbc

conn = urllib.parse.quote_plus(
    'Data Source Name=MssqlDataSource;'
    'Driver={SQL Server};'
    'Server=POWERSERVER\POWERSERVER;'
    'Database=MSSQLDB;'
    'Trusted_connection=yes;'
    'Username=Adam;'
    'Password=Pass1234word;'
)

try:

    coxn = create_engine('mssql+pyodbc:///?odbc_connect={}'.format(conn))
    print("Passed")

except:
    print("failed!")
Using the SQL authentication method, you can use this connection string to connect to the database from an external PC.
Conclusion
Creating a SQL connection with Python offers a simpler way to interact with an SQL database than other ways of managing this connection using programs. This is because Python has excellent libraries that make interacting with SQL easier, such as sqlalchemy, which was key to this tutorial.
The contained database model is ideal for handling user logins but can pose a threat if not administered properly. Overall, Python and SQL are an excellent duo to work with. You can explore more Python libraries made for SQL.
Next Steps
- Learn how to Load API Data to SQL Server Using Python and Generate Report with Power BI.
- New to python? Go through Introducing Python User Defined Functions to SQL Server Professionals.
- If you want to learn more about T-SQL queries, check out SQL Cheat Sheet for Basic T-SQL Commands.

Levi Masonde is a developer passionate about analyzing large datasets and creating useful information from these data. He is proficient in Python, ReactJS, and Power Platform applications. He is responsible for creating applications and managing databases as well as a lifetime student of programming and enjoys learning new technologies and how to utilize and share what he learns.
- MSSQLTips Awards:
Trendsetter (25+ tips) – 2025 | Author of the Year Contender – 2023 | Rookie of the Year Contender – 2022


I really struggled finding instructions to accomplish this task but these worked! One additional thing to consider is you might need to add the server connection to the User DSN as well as the System DSN.
Thank you!
Dear Levi;
I tried your instruction, but i get the following massage is:
(Background on this error at: https://sqlalche.me/e/20/rvf5)
Please assist me to resolve the problem.
RGDS