By: Hristo Hristov | Updated: 2022-06-24 | Comments (1) | Related: > Python
Problem
Python is a versatile programming language used for data analytics, scripting, automation and much more. In our thematic series so far, we have examined the basics of Python such as data types, how to create and call functions and more. Now let us examine how to use extra functionality, typically provided by external Python modules. One such functionality is connecting to a database and data extraction with Python scripts.
Solution
In this tutorial we examine pyodbc, an open-source module that provides easy access
to ODBC databases. The module supports both DDL and DML statements. I will use my
environment with VSCode and run a Python script file from it. If you do not have
a similar environment configured, then
check out this tip. Assuming you followed that article and have VS Code, you
can create a new file and save it with a .pyextension. Then hit ctrl+shift+p
and from the dialog choose Python: Select Interpreter and then
select your preferred environment. From there, to install the pyodbc package, either
open the environment's terminal from Anaconda or install directly from the
VS code terminal. In the latter case you will have to prepend py to
ensure you are invoking the Python system variable:
Running this command, you should be all set to begin this tip.
Getting started
Database Connection
First and foremost, we must establish a connection to our database. To do so, we will make a connection variable and invoke the connection method:
conn = pyodbc.connect('DRIVER= {ODBC Driver 17 for SQL Server}; \
                        SERVER=.; \
                        DATABASE=AdventureWorks2019; \
                        Trusted_Connection=yes')
All arguments are required:
- Driver: In case you don't have one head to here
- Server: in this example
localdbdenoted as. - Database: in this example
AdventureWorks2019
Trusted_connection: use to skip username and password if using windows authentication.
If using a Microsoft SQL Server login, then the connection string will look like this. Note UID
and PWD:
conn = pyodbc.connect('DRIVER= {ODBC Driver 18 for SQL Server}; \
                        SERVER=.; \
                        DATABASE=AdventureWorks2019; \
                        UID=user_name;\
                        PWD=your_password')
Running this code will give you a valid connection object. Here are some important additional arguments when making a connection:
- Auto_commit: by default, false. If true, will perform a COMMIT after each statement. Most of the time, you will want to set this to True. Note, when True, it is the database that executes a commit after each SQL statement, not pyodbc.
- Read_only: by default, false
- Timeout: connection timeout in seconds
With this in hand, we can proceed to using our connection.
Cursor object
Prior to executing any statement, you need a cursor object. This is a database cursor, which provides the context of the operation being executed. Database cursors map to ODBC handles statements (HSTMTs). Cursors created from the same connection are not isolated, i.e., any changes made to the database by one cursor are immediately visible by the other cursors. The cursor you make from your script cursors do not manage database transactions, transactions are committed and rolled-back from the connection. Two important attributes are:
- Messages: displays any messages generated by the query
- RowCount: how many rows were modified by the last statement
I will provide examples as we go along.
Run a statement
First let us get a list of all tables:
cursor = conn.cursor()
for row in cursor.tables(schema='HumanResources', tableType='TABLE'):
    print(row.table_name)
print(cursor.messages)
print(cursor.rowcount)
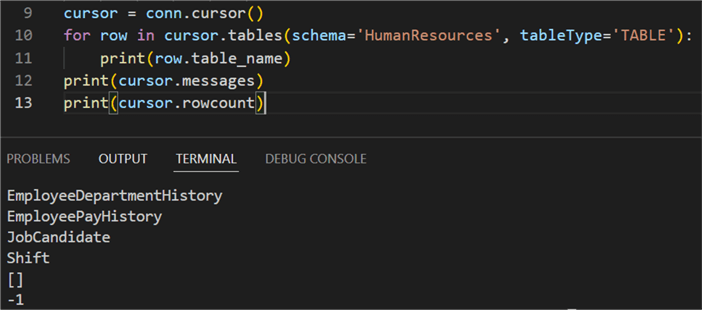
To the tables method we can pass an argument for schema name, as
well as table type. The supported tableType arguments are: 'TABLE', 'VIEW', 'SYSTEM
TABLE', 'GLOBAL TEMPORARY', 'LOCAL TEMPORARY', 'ALIAS', 'SYNONYM'.
In our example, we get a list of the tables under the HumanResources
schema. There were no messages returned after query execution completed and no rows
have been modified.
Next, we can get some basic information about one or more tables. We can use the statistics function:
keys = ('table_cat','table_schem','table_name','non_unique','index_qualifier','index_name','type',
'ordinal_position','column_name','asc_or_desc','cardinality','pages','filter_condition')

for row in cursor.statistics(table='Department',schema='HumanResources'):
    print(dict(zip(keys,row)))
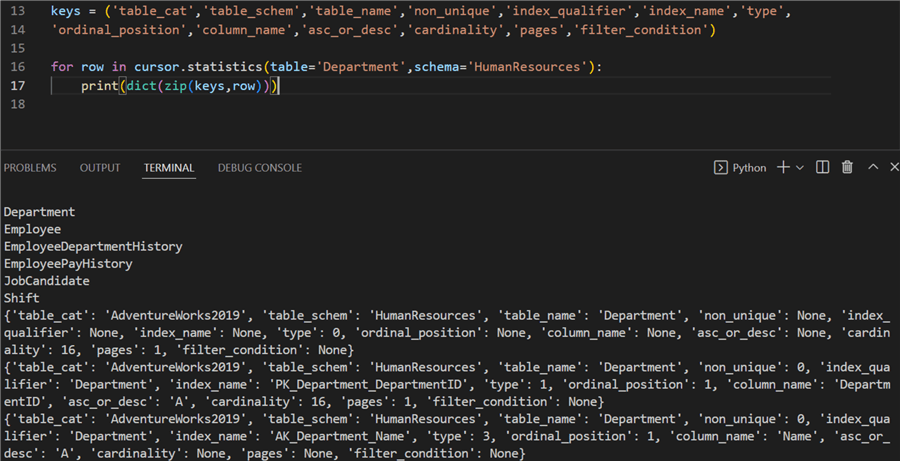
We have defined a tuple of keys prior to running statistics. The keys are listed
in the pyodbc documentation. The method itself returns one row per index and one
default row. By using dict and zip we can map the keys
to the tuple output. Here you can see the basic table info, containing 16 rows and
two indices.
SELECT statements
To run a SELECT statement, we must invoke the execute method on
the cursor object. Optionally, you can pass parameters to it and codemore complex
queries. Using parameters is the only proper way. Pyodbc does not support string
concatenation to create a query due to the risk of SQL injections.
cursor.execute(sql_statement, *parameters)
For example, this SQL query:
top_var = 100
result = cursor.execute('SELECT TOP (?) * FROM Sales.SalesOrderHeader', top_var)
The return value is the cursor itself. To access the data, there are a couple of ways.
Accessing data with a for loop
for row in result:
    print(f'{row.SalesOrderNumber}: {row.TotalDue}')
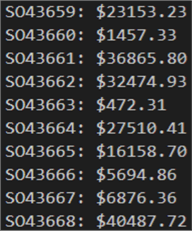
The row object represents every row returned from the table. You can select individual columns as shown in the example. The result is:
Accessing data one row at a time
Using the same result variable holding the whole dataset, we can call the fetchone() method. It will give you the next row the cursor stores.
row = result.fetchone()
if row:
   print(f'{row.SalesOrderNumber}: ${row.TotalDue:.2f}')
Accessing all rows
rows = result.fetchall()
for row in rows:
    print(f'{row.SalesOrderNumber}: ${row.TotalDue:.2f}')
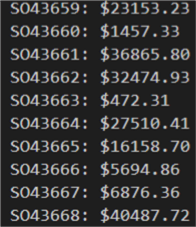
This will load all rows in memory so beware of huge result sets. Accessing the data is identical to working directly with the cursor as shown previously. The result set is the same:
Result set schema
Regardless of how you access (row by row, one row at a time or all rows together), you can find the description attribute helpful. It returns a list of tuples. Each tuple contains 7 elements:
- column name (or alias, if specified in the SQL)
- type code
- display size (pyodbc does not set this value)
- internal size (in bytes)
- precision
- scale
- nullable (True/False)
print(result.description[:3]) # first three columns
Further query parameterization
The power and real use of pyodbc comes from the fact that you can build your query dynamically and/or pass parameters to it based on the rest of the program's logic. Let us look at further examples showing how to do this.
Where
Looking at the same table, let us grab the top 5 records with a total due of less than or equal to 2000 USD:
top_var = 10
top_var = 5
total_due_limit = 2000
result = cursor.execute('SELECT TOP (?) * FROM Sales.SalesOrderHeader WHERE TotalDue <= ?', top_var, total_due_limit)
rows = result.fetchall()
for row in rows:
    print(f'{row.SalesOrderNumber}: \n {row.CustomerID} ${row.TotalDue:.2f}')
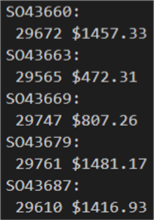
We have more than one query parameter here. The question mark placeholder appears multiple times and the arguments will be used in the order they are provided. Note the first question mark is encompassed in parenthesis – otherwise the query string will not be interpreted correctly.
Order by
The problem that you will encounter when parameterizing a query with an ORDER BY clause is that pyodbc supports parameters for column values but not column names. So, you are not able to pass column names dynamically. Instead, you must use string substitution. In the order by case, this may also include the ASC/DESC optional clause. Having two queries, one for an ascending result set and one for descending, is quite a lot of duplication.
top_var = 5
total_due_limit = 2000
desc = True
order_by_cols = ', '.join(['OrderDate', 'SalesOrderID'])
order_by = 'DESC' if desc == True else 'ASC'
result = cursor.execute(f'SELECT TOP (?) * FROM Sales.SalesOrderHeader\
                         WHERE TotalDue <= ?\
                         ORDER BY {order_by_cols} {order_by}', (top_var, total_due_limit))
rows = result.fetchall()
for row in rows:
    print(f'{row.SalesOrderNumber}: \n {row.CustomerID} ${row.TotalDue:.2f}')
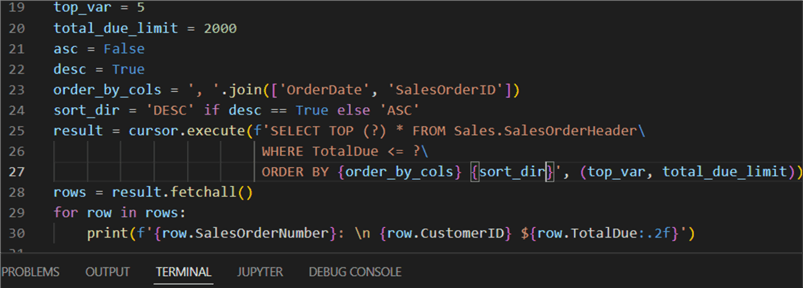

The variable order_by_cols concatenates all columns we want to use
in an ORDER BY by using the join function. The next variable
sort_dir returns a string for descending or ascending from a ternary
expression, depending on the prior variable desc. The assumption here
is that these two variables can be manipulated elsewhere in the code. Finally, you
build your query the same way (with cursor.execute), however, this
time you use literal string interpolation (the so-called "f-string")
denoted by f at its start. The resulting string contains multiple placeholders
denoted by curly brackets. These placeholders are evaluated at run-time using Python's
format() protocol. Here we pass the variables for column list (order_by_cols)
and sort direction (sort_dir). Further, pyodbc compiles the query with
the parameters (in this case one for the TOP clause and the WHERE clause).
Join
Joining two or more tables is a breeze with pyodbc. Having your query tested
prior, you can pass it to execute. Typically, specific columns are
preselected:
var_top = 5
result = cursor.execute('SELECT TOP (?) p.FirstName, p.LastName, a.PostalCode\
                        FROM Person.Person p\
                        JOIN Person.BusinessEntityAddress bea ON p.BusinessEntityID = bea.BusinessEntityID\
                        JOIN Person.Address a ON a.AddressID = bea.AddressID\
                        ORDER BY p.LastName, p.FirstName', var_top)
for row in result:
    print(row)
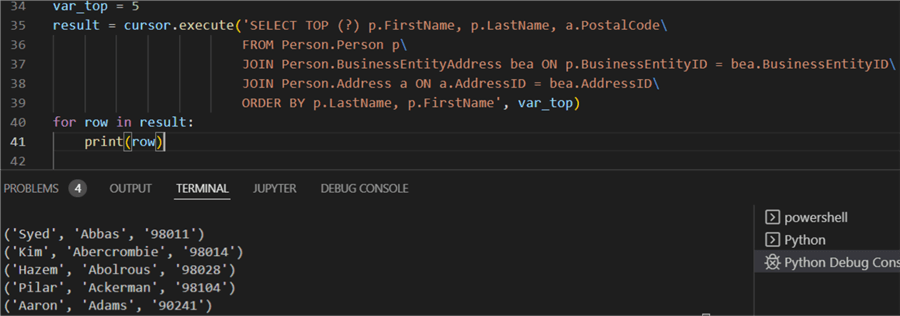
Since we already have our column selection, we just print the row variable. In this case (unlike the previous examples), we get a series of tuples. Each tuple represents a row from the result set. Each value in a tuple represents a column value.
Visualizing results
To finalize and bring this tip to a logical end, let us examine what would be the biggest benefit of using Python to access your data. That is data visualization. Let us imagine we wanted to see the top 15 postal codes, i.e., where do we have the most customers from:
result = cursor.execute('SELECT TOP 15 COUNT(p.FirstName) count, a.PostalCode\
                        FROM Person.Person p\
                        JOIN Person.BusinessEntityAddress bea ON p.BusinessEntityID = bea.BusinessEntityID\
                        JOIN Person.Address a ON a.AddressID = bea.AddressID\
                        GROUP BY a.PostalCode\
                        ORDER BY COUNT(p.FirstName) DESC')
rows = result.fetchall()
In this case we need all rows, so we use fetachall. Next, let us
bring the result set to a proper format for visualization:
cols = []
for i,_ in enumerate(result.description):
    cols.append(result.description[i][0])

df = pd.DataFrame(np.array(rows), columns=cols)
df['count'] = pd.to_numeric(df['count'])

plt.barh(df['PostalCode'], df['count'])
plt.show()
To complete these commands, you also need to import the pandas, matplotlib and numpy packages. Here is how the complete program looks like:
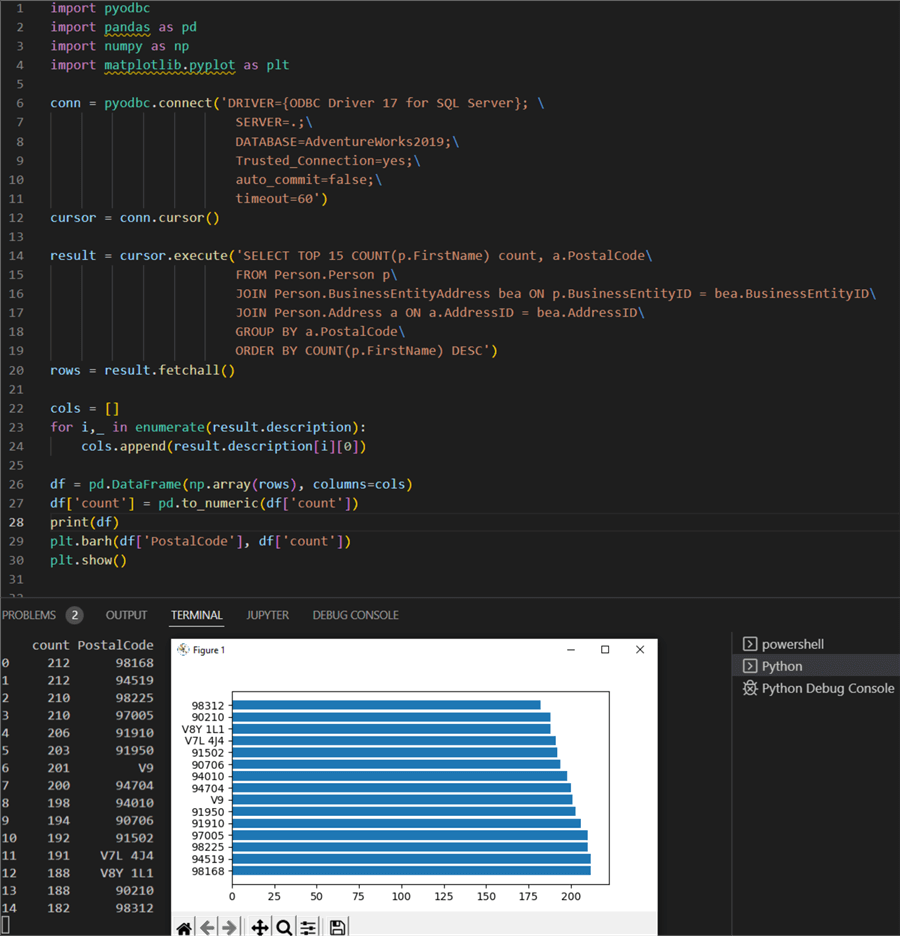
First, we connect to our database. Then we execute a SELECT statement with a
GROUP BY clause counting the number of people (customers) we have per postal code.
The JOIN uses the relations defined in the database. Next, we use fetchall
to access the whole result set. With the help of description we can
access the column names and add them to a list. Next, using pd.Dataframe,
we convert the result set to a numpy array and then to a pandas dataframe using
the column names we have. We print the dataframe for debugging purposes. Finally,
matplotlib displays a pop-up window with a basic bar plot showing the top 15 postal
codes by customer count.
Conclusion
In this tutorial, we examined how to access data from an SQL database using Python
and the pyodbc module. First, we showed how to create a connection after which we
invoke a cursor object. We looked at passing different queries, with or without
parameters to the execute function. Finally, we showed how to convert
the result set from a pyodbc query directly into a Pandas dataframe and plot it.
Next Steps
- Pyodbc connection (mkleehammer on github)
- Pyodbc cursor (mkleehammer on github)
- Pyodbc row (mkleehammer on github)
About the author
 Hristo Hristov is a Data Scientist and Power Platform engineer with more than 12 years of experience. Between 2009 and 2016 he was a web engineering consultant working on projects for local and international clients. Since 2017, he has been working for Atlas Copco Airpower in Flanders, Belgium where he has tackled successfully multiple end-to-end digital transformation challenges. His focus is delivering advanced solutions in the analytics domain with predominantly Azure cloud technologies and Python. Hristo's real passion is predictive analytics and statistical analysis. He holds a masters degree in Data Science and multiple Microsoft certifications covering SQL Server, Power BI, Azure Data Factory and related technologies.
This author pledges the content of this article is based on professional experience and not AI generated.
View all my tips
Article Last Updated: 2022-06-24


