Problem
Some Python scripts need to be running 24×7. For example, we use Python scripts to synchronize data between two platforms or to constantly collect data from the Internet. In these cases, we may want to run Python scripts as Windows services, also known as NT services, which offer long-running executable applications that run in their own Windows sessions (Gajic, 2019). The primary advantage of running Python scripts as a service is having a program start when the system boots (Glenn, 2017), even if nobody logs onto the computer. However, some Python developers or data scientists may have limited knowledge of the Windows application programming interface (API). Therefore, they want to use a service helper to run Python scripts as Windows services.
Solution
We use Non-Sucking Service Manager (NSSM) to install Windows services written in Python (Allbee, 2018). NSSM provides a simple way to wrap the specific executable (i.e., the python.exe) along with arguments (i.e., the Python script) and make them available as a Windows service. The service helper program also can monitor the execution state and handle execution failures. In addition, this helper program records its progress to the Windows event log so we can use this information for troubleshooting.
To exhibit the use of NSSM, we write a Python script that scans the images on the MSSQLTips website’s landing page. The Python script first reads the web content on the landing page. Next, the program discovers the URLs of images. We then use the “python-magic” module to identify image types by checking their headers. In this process, the script uses the “print()” function to print messages on the screen that is the standard output, denoted as stdout. In addition, we use the logging module to send debugging or error messages to the standard error, also known as stderr. This Python script does not include any specific code for running as a Windows service.
The tip first presents a folder structure that defines the Python script’s location and the virtual environment’s location. We then briefly introduce the Python script. Next, we explore the NSSM command lines we should use to turn the Python script into a Windows service. We then cover the steps to use the NSSM’s graphical user interface (GUI) to install and manage a service. Moreover, we specify output files so NSSM can capture messages generated by the Python script.
The version of NSSM used in this exercise is NSSM 2.24 (2014-08-31). We downloaded NSSM from the official website https://nssm.cc/. NSSM is a single file nssm.exe that does not need any particular installation. The author tested the project on Windows 10 Pro 10.0 <X64> and ran the Python script with Python 3.9.7 (64-bit). The script extracted web content and images from the landing page of the website https://www.mssqltips.com/. The IDE is Microsoft Visual Studio Community 2022 (64-bit).
1 – Writing a Python Script to Identify Image Type on the Internet
A typical Python program often uses third-party libraries. In this case, we recommend running a Python script in an isolated environment. Therefore, we follow the instructions on the tip (Zhou, 2021) to create a Python virtual environment in the “C:\pyvirtuals\WebImageCheck” folder. The “requirements.txt” file contains all packages the virtual environment requires. The following block shows the content in the file.
beautifulsoup4==4.11.1
bs4==0.0.1
certifi==2022.6.15
charset-normalizer==2.1.0
idna==3.3
python-magic-bin==0.4.14
requests==2.28.1
setuptools==62.6.0
soupsieve==2.3.2.post1
urllib3==1.26.9
We create the “requirements.txt” file and put it into the “C:\temp\” folder. Then, we can use the following three command lines to create the virtual environment and install the necessary packages. The first command creates a virtual environment, the second command line activates the virtual environment, and the last line installs all the required packages. Note that these commands are run from the command prompt, not from within Python.
python -m venv C:\pyvirtuals\WebImageCheck
C:\pyvirtuals\WebImageCheck\Scripts\activate.bat
pip install -r C:\temp\requirements.txt
We then create the Python script “WebImageCheck.py” and put it in the “C:\pyapps\WebImageCheck” folder. Click here to download the source code. The Python script consists of several user-defined functions. The function “check_web_page_images()” is the main function and invokes others to implement the business requirements. The following code block indicates that we execute the main function infinitely. Therefore, the script stays running after we run the script. In this case, we check the images on the MSSQLTips landing page every five seconds.
# Use this condition to determine the execution context.
if __name__ == '__main__':
    # Initializes variables.
    base_url = 'https://www.mssqltips.com/'
    image_types = ('PNG', 'JPEG')
    # Set logger.setLevel to DEBUG, the method prints all the debugs.
    logging.basicConfig(stream=sys.stderr, level=logging.DEBUG)
    # Invoke the function to examine images on the web page repeatedly.
    while True:
        check_web_page_images(base_url,'', image_types)
        time.sleep(5)
The main function sends the starting and ending time of execution to the standard output, i.e., the screen. Some other functions, for example, the “process_web_request()” function, print the error messages to the standard output. When troubleshooting, we often need to monitor the program execution. The Python script uses the logging module to output logs to the standard error. The “logging.basicConfig()” function help configure some basic parameters for logging in Python, as shown in the preceding code block. Therefore, we can view debugging messages on the screen. We use the following command line to ensure we can run the Python script correctly:
C:\pyvirtuals\WebImageCheck\Scripts\python.exe C:\pyapps\WebImageCheck\WebImageCheck.py
The output should look like Figure 1. The screenshot shows the debugging messages from the logging module and the “print()” function. The image examination process starts with extracting web content from the landing page. Next, the program discovers all image links on the web page. After downloading images and identifying image types, the “check_web_page_images” function completes execution. The process repeats every five seconds. Even though this long-running script can satisfy business requirements, we must log in to the Windows system to run the Python script. We want to run the Python script as a Windows service to eliminate human intervention.

Figure 1 Run the Python Script in the Command Window
2 – Using Command Lines to Install and Manage a Windows Service
NSSM is a service helper program, which we can download the zip package from its official website https://nssm.cc/. When we unzip the file, we can find the executable “nssm.exe.” NSSM is a single file and is easy to install. First, we copy the file “nssm.exe” to a folder, for example, “C:\NSSM,” on the Windows system. We then add the folder path to the PATH environment variable. Figure 2 illustrates the PATH variable’s values. Note that running multiple instances or different versions of NSSM from various locations may be confusing. Therefore, we should reference the official website for more information when upgrading NSSM.

Figure 2 Add the NSSM Path to the PATH Environment Variable
We have already run the Python script “WebImageCheck.py” through the command line. We also copied the “nssm.exe” to the “C:\NSSM” folder. Now, we are ready to create a Windows service and manage the service using NSSM. We can use the following steps to turn the Python script into a Windows service.
Step 1: Open the command prompt as administrator.
Enter “cmd” in the Windows 10 search box. The “Command Prompt” appears in the pop-up list. Right-click on the “Command Prompt” item and select “Run as administrator” in the context menu. The Command Prompt window should look like Figure 3.

Figure 3 Open the Command Prompt as Administrator
Step 2: Install the Windows service.
Run the following command in the Command Prompt to install the service (Dano, 2020). Figure 4 illustrates the output after running the installation command. The command line generates a Windows system log (Event ID 7045), as shown in Figure 5. The log message confirms that we installed the Windows service. The log message also indicates the service name, Service file name, service type, and service start type. Note that the service file name is “C:\NSSM\nssm.exe.”
nssm install "MSSQLTipsImageWatching" "C:\pyvirtuals\WebImageCheck\Scripts\python.exe" "C:\pyapps\WebImageCheck\WebImageCheck.py"

Figure 4 Install the Windows Service

Figure 5 The Windows System Logs Indicate the New Installed Service
Step 3: Specify the output files.
It is convenient for us to troubleshoot a Python script when we can view output messages. As shown in Figure 1, we can watch the script execution through the console output. However, windows services run in the background, and the console window is unavailable. Fortunately, NSSM can capture log messages generated by the script and save them into text files. We use the following two commands to configure text files for the standard output (stdout) and the standard error (stderr). Figure 6 illustrates the outcome in the command window.
nssm set "MSSQLTipsImageWatching" AppStdout "C:\pyapps\WebImageCheck\out_file.txt"
nssm set "MSSQLTipsImageWatching" AppStderr "C:\pyapps\WebImageCheck\error_file.txt"

Figure 6 Add Service Parameters
Step 4: Start the Windows service.
We can use the following command line to start the service. Figure 7 illustrates the output of the command line. The command automatically generates the “error_file.txt” and “out_file.txt” files in the “C:\pyapps\WebImageCheck” folder if these two text files do not exist. The service writes log messages into the “error_file.txt” file by default settings. Therefore, we can check information in the “error_file.txt” file to ensure the service runs correctly. However, the “out_file.txt” is empty. This tip aims to provide just sufficient tutorials to run Python scripts as a Windows service. We can reference the official website for more information about configuring output files.
nssm start "MSSQLTipsImageWatching"
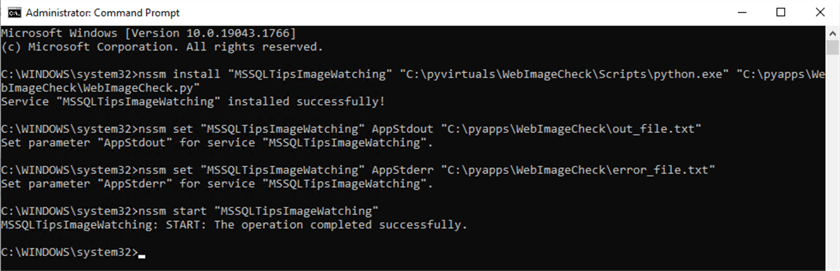
Figure 7 Start the Windows Service
The Windows application log captures the service start event. The record indicated that the service started, as shown in Figure 8.

Figure 8 The Windows Application Logs Indicate the Service Started
There are several ways to run a Windows service. For example, we can start a Windows service through the Service Control Manager (also known as SCM), as shown in Figure 9. The GUI provides us with some helpful information about the newly installed service. When NSSM installs a Windows service, the service startup type is “Automatic,” meaning the service automatically starts when the system boots. The service account is LocalSystem, a predefined local account used by the service control manager. It is worth noting that the service account should be permitted to access any external sources that the service needs.

Figure 9 Use the Service Control Manager to Manually Start Services
Step 5 (optional): Restart the Windows service.
We can restart a Windows service while it is running. For example, the following command line restarts the Windows service. Figure 10 shows the output of the command. We notice that the restart command consists of two steps. The first step is to stop the service, and the second step is to start the service.
nssm restart "MSSQLTipsImageWatching"

Figure 10 Restart the Windows Service
Step 6 (optional): Stop the Windows service.
We use the following command line to stop the service. Figure 11 shows the output of the command.
nssm stop "MSSQLTipsImageWatching"

Figure 11 Stop the Windows Service
Step 7 (optional): Edit the service Using NSSM GUI.
NSSM provides the GUI for us to access the Windows service configuration. We use the following command line to open the NSSM service editor, as shown in Figure 12. The editor GUI has several tabs with lots of configurable parameters. For example, the Details tab lists system details about the service. We can edit the display name, description, and startup type through the Details table. After the edition, we click the “Edit service” button to apply the changes.
nssm edit "MSSQLTipsImageWatching"

Figure 12 The NSSM Service Editor
Step 8 (optional): Uninstall the service.
If we no longer need a Windows service, we can remove it using the command line, as shown below. When executing the command, we first get a pop-up window, as shown in Figure 12. Next, we select the “Yes” option in the pop-up window to remove the service. Subsequently, a confirmation window appears, as shown in Figure 13. Finally, Figure 14 illustrates the command output, indicating we successfully removed the Windows service.
nssm remove "MSSQLTipsImageWatching"

Figure 13 NSSM Pop-up Window

Figure 14 Service Removed Confirmation Window

Figure 15 Remove the Windows Service
3 – Using NSSM GUI to Install a Windows Service
We explored several NSSM commands that created and managed a Windows service. NSSM also provides GUI for us to install and configure a Windows service. We can use the following command to open the GUI. The GUI consists of several tabs. It is sufficient for us to install a Windows service through the Application tab only. We enter values on the Application tab according to Figure 16.
nssm install "MSSQLTipsLandingPageWatching"

Figure 16 NSSM Service Installer
Since the Python script we used in this tip has the standard output and standard error, we use the I/O tab to specify the output files. When enabling I/O redirection, we usually configure the rotation of output files on the File rotation tab. However, we do not recommend using standard output in a Windows service, even though we may use the print() function for troubleshooting purposes. Therefore, this tip does not dig into the I/O settings in more depth.
Since the Python script we used in this tip has the standard output and standard error, we use the I/O tab to specify the output files. When enabling I/O redirection, we usually configure the rotation of output files on the File rotation tab. However, we do not recommend using standard output in a Windows service, even though we may use the print() function for troubleshooting purposes. Therefore, this tip does not dig into the I/O settings in great depth. For completeness, we specify the output files according to Figure 17.

Figure 17 Specify the Output Files
We then click on the “Install service” button to install the Windows service. Next, an NSSM pop-up window, as shown in Figure 18, appears and confirms that we installed the service successfully. The windows operation system treats this service as a proper Windows service. Therefore, we can use the SCM to configure all standard Windows service settings and properties.

Figure 18 The Service Installation Confirmation
Summary
Since we wanted a long-running Python script to stay running whenever the computer was up, we used a service helper program, the Non-Sucking Service Manager (NSSM), to create a Windows service. The service helper program allowed us to create a Window service to run Python scripts. After installing the service, we used NSSM to manage the service. We also used the Service Control Manager and Event Viewer to help maintain the service.
We first explored the steps to create a Python virtual environment. We then briefly introduced the Python script that extracts web content and identifies image types on the web page. Subsequently, we tested the Python script to ensure it satisfied the business requirements. Next, we used NSSM commands to install and manage a Windows service. Moreover, we captured log messages generated by the Python script when running the service. Here is a list of commands used in this tip:
nssm install <servicename>
nssm install <servicename> <Path to Python.exe> <Path to Python script>
nssm edit <servicename>
nssm start <servicename>
nssm stop <servicename>
nssm restart <servicename>
nssm remove <servicename>
nssm set <servicename> AppStdout <Path to log file>
nssm set <servicename> AppStderr <Path to error file>
We also introduced the NSSM GUI that can manage Windows services. We first used the GUI to edit the Windows service. The GUI allowed us to edit the NSSM-created properties of a Windows service. Then, we used the GUI to install the Windows service. Once we clicked on the “Install service” button on the GUI, the service was available in the SCM.
Reference
Allbee, B. (2018). Hands-On Software Engineering with Python. Birmingham, Mumbai: Packt.
Dano, N. (2020). Run Python Script as Windows Service. https://www.devdungeon.com/content/run-python-script-windows-service.
Ellzey, K. (2020). Understanding Windows Services. https://resources.infosecinstitute.com/topic/understanding-windows-services/.
Glenn, W. (2017). How to Run Any Program as a Background Service in Windows. https://www.howtogeek.com/50786/using-srvstart-to-run-any-application-as-a-windows-service/.
Heddings, L. (2019). Understanding and Managing Windows Services. https://www.howtogeek.com/school/using-windows-admin-tools-like-a-pro/lesson8/.
Zhou, N. (2021). Creating a SQL Server Agent Job to Run Python Scripts in a Virtual Environment. https://www.mssqltips.com/sqlservertip/7083/run-python-scripts-sql-server-agent-job/.
Next Steps
- This tip used the standard output (i.e., stdout) and standard error (i.e., stderr) for troubleshooting purposes. Unfortunately, the text file that captured the stdout was empty. However, we did not investigate the issue in this tip. We aim to provide just sufficient tutorials to run Python scripts as a Windows service. We should reference the official website for more information if the actual business requirements need to use these techniques. In addition, some companies may not allow running the NSSM.exe in their environments. In this case, we may look at the Python for Win32 (pywin32) extensions which provide access to many of the Windows APIs from Python.
- Check out these related tips:

Nai Biao Zhou has twenty years of experience in software development, with strong analytical skills and a broad range of computer expertise.
He has fifteen years of experience in development and maintenance of database applications on SQL Server in OLTP/OLAP/BI environments.
He has a master’s degree in Control Engineering and is pursuing a Master of Science degree in Predictive Analytics.
Knowledge/Skills
Advanced computer programming skills and well versed with C/C#, Java, ASP.NET, JavaScript, and SQL.
In depth knowledge of Solution Architecture, and Software Development Life Cycle (SDLC).
Microsoft Certified Application Developer (MCAD) since 2004.
- MSSQLTips Awards: Author of the Year – 2021 | Rising Star (50+ tips) – 2024 | Author Contender – 2020, 2023


