Problem
Companies that adopt Microsoft technologies likely have a Visual Studio development environment and a SQL Server database management system (DBMS). Business users usually need assistance from IT professionals to access and manipulate data in databases. If these business users master a programming language, they can handle data by themselves. Python, described as a glue language, is the right candidate for these users who don’t have any programming background. Besides, according to the Popularity of Programming Languages (PYPL) index, as of April 2020, Python is the most popular language worldwide [1]. Business users want to learn a programming skill quickly, solve business problems with Python code right away, and have effective communication with IT professionals.
Solution
Business users often want to load data from a database and then manipulate them. In this tip, we give practice in the use of a Python program to read data from a database, then perform some data transformation and, after that, save data into a CSV file.
Since many companies have used the Visual Studio development environment, we continue to work in this environment to avoid increasing technology diversity. We start with a brief introduction to Visual Studio 2019. Then, we use Python’s mathematical operators to solve simple math problems. To save information for later use, we create variables that can store various types of objects, including Python sequence collections.
The use of variables allows us to run a block of statements; then, we write the first Python program. The program is a sequence of Python statements stored in a text file. Additionally, the file containing Python definitions and statements is called a Python module.
Python has many built-in functions that are ready to use. Besides, we can define user-defined functions. There are many benefits of using user-defined functions including, but not limited to, applying a divide-and-conquer strategy, reusing code, and increasing readability. In addition to these built-in functions, the Python standard library, included in every Python distribution, contains hundreds of modules. Because of these incredibly extensive libraries, we may use a few lines of code to perform significant tasks. We briefly explore third-party libraries that are available for us to install.
The Python executes code, by default, line by line. However, business requirements may need to change the execution order. We introduce three basic types of control structures: sequential, selection, and iteration. We may use these structures together to solve a specified problem.
After we have known these basics of Python programming, we put all these together to solve a real business problem. A data analyst in the fictitious company, Adventure Works Cycles [2], wants to investigate all North American customers who are bike buyers. He wants to export data in the database to a CSV file so that his reporting tool can use the data. Besides, instead of retaining birthday date in the CSV file, he wants to classify customers into age groups:
- Youth (<18)
- Young Adult (18 to 35)
- Adult (36 to 55)
- Senior (56 and up)
To provide business users with just enough knowledge of programming to realize business requirements, we demonstrate the process of producing a Python program. We run the program to connect the SQL server database and then write data into a CSV file.
I organize this tutorial as follows. Section 1 is a general introduction to the integrated development environment used to write a computer program. Section 2 demonstrates some mathematical operations in Python. Sections 3 to 5 introduce the basics of Python programming. Sections 6 and 7 briefly explore python libraries. Section 8 focuses on execution control structures. Section 9 uses a collection of techniques introduced in this tip to solve a real-world problem. Finally, I wrap up this tip in the Summary section.
I have tested all the codes used in this tip with SQL Server Management Studio V18.3.1, Microsoft Visual Studio Community 2019, and Python 3.7 (64-bit) on Windows 10 Home 10.0 <X64>. The DBMS is Microsoft SQL Server 2017 Enterprise Edition (64-bit).
1 – Installing Visual Studio 2019
The integrated development environment (IDE) I recommended for Python programming on Windows is Visual Studio 2019 (Community Edition). The installer is available from https://visualstudio.microsoft.com/vs/. Visual Studio is a widely used IDE in companies that adopt Microsoft technologies. When business users choose this IDE, they communicate more effectively with IT professionals. They can share programs and configurations within organizations, as well.
We download the installer first, then run it. The installer presents us with a list of workloads, and we should select the Python development workload, as shown in Figure 1. We follow the on-screen instructions to complete the installation.

Figure 1 Select Python development workload
Some people have installed Visual Studio 2019 already, but the installation did not include the Python development workload. We launch the installer through the menu: Tools > Get Tools and Features, as shown in Figure 2. Then we follow the on-screen instructions to complete the installation of the Python development workload.
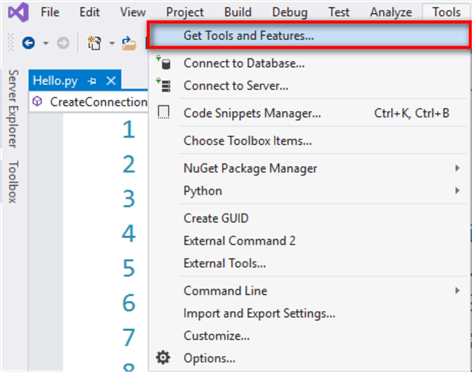
Figure 2 Launch the Visual Studio installer
Mani wrote an article to introduce how to install or update Python in Visual Studio and how to create a Python project. We access his article from Getting Started with Python Development in Visual Studio 2019 and follow his instructions to create a “Python Application” project. Then, we enable the “Python Interactive Window” through the menu item: View > Other Windows > Python Interactive Window, as shown in Figure 3. An alternative method to open the Python Interactive window is to press “Alt + I” keys.

Figure 3 Open the Python Interactive window
Now, the integrated development environment should look like Figure 4. The web site “docs.microsoft.com” also introduces Python in Visual Studio. Many tutorials are available from Python in Visual Studio.

Figure 4 The interface of the integrated development environment
2 – Performing Mathematical Operations
An effective strategy to learn Python programming skills is to learn by doing. With the Python Interactive window, we execute Python statements and see the results right away. I provide sample code to practice the use of Python. There is much room to improve the code. Besides reading the code, I strongly recommend you run the code and tinker with it.
2.1 Python Arithmetic Operators
We use the Python Interactive window as an arithmetic expression calculator in which we perform multiplication, addition, subtraction, and division. Python uses some basic symbols, listed in Table 1, to perform mathematical operations. It is not necessary to do these math calculations by using Python expressions. The practice of mathematical operations lays the groundwork for complex tasks in subsequent sections.
| Symbol | Operation | Example |
|---|---|---|
| + | Addition | 129 + 36 |
| – | Subtraction | 54 – 19 |
| * | Multiplication | 98 * 365 |
| / | Division | 76/23 |
Table 1 Basic Python arithmetic operators
The prompt in the Python Interactive window is “>>>.” At the prompt, we enter an expression, for example, “129 + 36”, then press the “Enter” key. We immediately see the result in the next line, as shown in Figure 5.

Figure 5 Perform a mathematical operation
Let’s evaluate another expression “4.5*((129 + 36)/23 + (54 – 19) *3) + 27”. Enter the expression at the prompt, hit the “Enter” key, and the output should look like Figure 6.

Figure 6 Evaluate a mathematical expression with mixed operations
2.2 Learn Python Comparison Operators
Boolean expressions often involve comparison operators shown in Table 3. A comparison creates a Boolean value that is either true or false. For example, the expression “100 > 98” is True, and “100 < 98” is False.
| Symbol | Description | Example |
|---|---|---|
| == | Equal to | 129 == 36 |
| != | Not equal to | “Hello” != “Hi” |
| > | Greater than | 98 > 365 |
| >= | Greater than or equal to | 76 >= 76 |
| < | Less than | 23 < 86 |
| <= | Less than or equal to | 94 <= 120 |
Table 2 Basic Python comparison operators
At the prompt, we enter an expression, for example, “129 == 36”, then press “Enter” key to see the result: False, as shown in Figure 7.

Figure 7 Perform a comparison operation
The operands used in the Boolean expressions are not limited to numeric values. We can compare two strings, “Hello” != “Hi”, for example. Figure 8 shows the evaluated result. If we have an interest in comparing a string to a number, for example, “Hi”> 2, we receive an error that explains why the Python interpreter cannot evaluate the expression.

Figure 8 Perform a comparison operation between two strings
We have seen four different data types: Integer, Float, Boolean, and String. There are other data types in Python. Python has a built-in function type() to discover the data type of a specific value. A Python function is a block of code that accomplishes a specific task. We pass a value to the function type(), the function returns the data type of the value. We pick some values from previous examples and use the function type() to find their data types. Figure 9 shows the results.

2.3 Python Logical Operators
We used logical operators frequently in everyday language. Here are three examples:
- If it is warm and sunny, I go to the beach.
- If it is cold or snowing, I stay home.
- If it is not raining, I go swimming.
We can combine multiple conditions by using these three words: “and,” “or,” and “not.” Python language uses these words as logical operators. Assuming today is cold and sunny, this weather observation does not meet conditions in the first statement but meets conditions in the second and the third statements. Figure 10 demonstrates that we used Python logical operations to simulate the decision-making process.
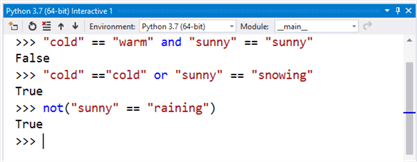
Figure 10 Perform logical operations
Logical operators can link any Boolean expressions. All Boolean expression evaluates to True or False. Figure 11 shows more examples.

Figure 11 Perform more logical operations
3 – Creating a Simple Python Program
We have had a taste of Python language. We entered Python statements in the Interactive window, and then we saw the results immediately. If we want to execute the same statement, we must enter all the information again. Another way to execute Python statements is to save all statements into a file with the .py extension and then execute the Python file as a script on the command line. By executing a set of statements, we can accomplish complex tasks. The set of Python statements is called a program.
3.1 Using Variables to Store Information
When we assessed several logical expressions shown in Figure 11, we used the numeric value 98 several times. We typed the value whenever we need to use it. If the value is a lengthy string or another complicated object, it is easier to store information than to type it repeatedly [4]. When we create an object, for example, a number, computers store the object somewhere in memory. A variable is used to describe the location of the stored information. For example, we create a value 98, which is an object in Python, then use the variable “temperature” to point to the location of this value. Instead of keyboarding the value repeatedly, we access the value via the variable name.
The variable looks like a label for an object, and we use an equal sign (=) to tell Python what label we have attached to the object [5]. Figure 12 illustrates an assignment statement, which has this format:
<variable name> = <expression>
When executing this statement, Python evaluates the expression and assigns the result to the variable. The variable name, such as “temperature,” may consist of letters, digits, and underscores (_) but cannot begin with a digit. The built-in function “print()” used in this example prints the specified message to the screen or other standard output device.

Figure 12 Assign an integer to a variable
3.2 Writing a Simple Python Program
With assignment statements and the print() function, we can write a program to perform a meaningful task. A program created in a text file allows us to run it repeatedly, modify it later and share it with others. A co-worker wants to convert Fahrenheit to Celsius and asks us to write a Python program for him. Here is the step-by-step process to create a Python program through Visual Studio 2019:
Step 1: Open the Python file GettingStartedWithPython.py. This file was created in Section 1, as shown in Figure 4.
Step 2:Enter the following lines of code. The first line in the program starts with a hash character (#) that introduces a comment. We use this comment to indicate the purpose of this program. There is another comment above the print() function. We use this comment to explain the string passed to the print() function. These comments make the code easier to understand. We should always add comments to a program to improve readability. Python ignores comments when it runs the program.
# A program to convert Fahrenheit to Celsius
fahrenheit  = 98
celsius = (fahrenheit - 32) * 5.0 / 9
# Use f-string to format the float value
print(f"The temperature is {celsius:.2f} °C" )
Step 3:Press “Ctrl + A” to select all statements; then press “Ctrl + Enter” to execute the program. The execution result should look like Figure 13.

Figure 13 Execute the first Python program
Step 4:Save the program. We save the file by hitting the “Save” icon on the toolbar, or we select a “Save” option under the “File” pulldown menu. After we save the program, we can run this program on a command line “>Python GettingStartedWithPython.py.” Figure 14 presents the execution result of this method.

Figure 14 Execute a Python script on the command line
4 – Diving into Python Sequence Collections
Almost everything in Python is an object. A sequence in Python is an ordered collection of objects, and every sequence can be iterated over by the interpreter [6]. Strings, lists, and tuples are three essential types of sequences in Python.
4.1 String
We have already seen strings. We can think of a string as a collection of alphanumeric characters. To make Python recognize a string value, we put a pair of single-quotes or double-quotes around the string. Table 3 lists some basic string operations.
| Symbol | Description | Example Expression | Example Return |
|---|---|---|---|
| + | Concatenates two strings. | “class” + “room” | “classroom” |
| s*n | Repeats a string n times. | “class” * 2 2 * “class” returns | “classclass” “classclass” |
| x in s | Returns True if the string x appears anywhere in the string s. | “la” in “class” | True |
| s[i] | Returns the ith character of the string s. The first character has index 0. | “class”[1] | “l” |
| s[-i] | Returns the ith character from the end of the string s. The last character has index -1. | “class”[-3] | “a” |
| s[i:j] | Returns a substring from the string s beginning at start index, running up to but not including end index. | “classroom”[1:4] | “las” |
Table 3 Basic Python string operations
We use the following Python statements to practice the examples in Table 3, and Figure 15 presents the output from this exercise.
print(f'"class" + "room": {"class" + "room"}')
print(f'"class" * 2: {"class"*2}')
print(f'2 * "class": {2*"class"}')
print(f'"la" in "class": {"la" in "class"}')
print(f'"class[1]": {"class"[1]}')
print(f'"class[-3]": {"class"[-3]}')
print(f'"classroom[1:4]": {"classroom"[1:4]}')
Figure 15 Output of Python string operations
Python can handle a string value with multiple lines of text. To create a valid multiline string, we use a pair of triple-single-quotes or a pair of triple-double-quotes to surround the text. The following statements assign multiline text to strings. It is worth noting that the texts contain single quotes and double quotes. The output of these statements should look like Figure 16. This exercise also demonstrates the fact that a string can include single and double quotes if we use the triple-single-quotes or triple-double-quotes.
# I take notes while I am reading a book

myNote1 = '''That said, when you install Python 3 on your computer, an interpreter is installed, too.
This's the technology that runs your Python code.
Rather confusingly, this interpreter is also known by the name "Python."[6]'''

myNote2 = """By right, we'd use the more correct name when referring to this technology,
which is to call it "the Python interpreter."
But, alas, nobody ever does.[6]"""

print (myNote1)
print (myNote2)

Figure 16 Print out of multiline strings
4.2 List
A Python list, enclosed in square brackets ([ and]), is an ordered mutable collection of objects. A mutable collection means we can change its state or contents after we create it. A list can contain different types of objects, for example, strings, numbers, Boolean values, or other types. Taking a list as a parameter, the built-in function “print ()” displays the contents of the list on a screen. Besides, we can use a set of built-in methods on lists. As shown in Figure 17, the “append()” method adds an item to the end of the list. The “remove ()” method removes an item from the list.

Figure 17 Create and manipulate a list
Lists respond to all the sequence operations we have used on strings. We can concatenate two lists, multiply a list by a number, and search an item in a list. Table 4 outlines some basic list operations with examples.
| Symbol | Description | Example Expression | Example Return |
|---|---|---|---|
| + | Concatenates two lists. | [“class”,”room”] + [101, False] | [‘class’, ‘room’, 101, False] |
| lst*n | Repeats the list n times. | [101, False] * 2 | [101, False, 101, False] |
| x in lst | Returns True if the item is in the list. | “room” in [“class”, “room”] | True |
| lst[i] | Returns the ith item of the list. The first item has index 0. | [“class”, “room”, 101, False][1] | ‘room’ |
| lst[-i] | Returns the ith item from the end of the list. The last item has index -1. | [“class”, “room”, 101, False][-3] | ‘room’ |
| lst[i:j] | Returns a sub-list beginning at start index, running up to but not including end index | [“class”, “room”, 101, False][1:3] | [‘room’, 101] |
Table 4 Basic Python list operations
We use the following Python statements to practice the examples in Table 4. Figure 18 shows the output of this exercise.
print(f'"["class","room"] + [101, False]": {["class","room"] + [101, False]}')
print(f'[101, False] * 2: {[101, False] * 2}')
print(f'2 * [101, False]: {2 * [101, False]}')
print(f'"room" in ["class", "room"]: {"room" in ["class", "room"]}')
print(f'["class", "room", 101, False][1]: {["class", "room", 101, False][1]}')
print(f'["class", "room", 101, False][-3]: {["class", "room", 101, False][-3]}')
print(f'["class", "room", 101, False][1:3]: {["class", "room", 101, False][1:3]}') 
Figure 18 Output of Python list operations
4.3 Tuple
We have already performed many general sequence operations on lists and strings. A Python tuple, another standard sequence data type, is an ordered and immutable collection of objects. An immutable collection means we cannot change its state or contents after we create it. Like a Python list, a tuple can contain different types of objects. A critical difference between tuples and lists is that tuples are immutable. Once we create a tuple, we cannot modify it later.
We use parentheses () to create tuples. Figure 19 demonstrates the Python syntax to create a tuple and shows the error when we try to change an item in the tuple. This exercise also presents a method to split the one-line statement into multiple lines. We use the backslash (\) to tell Python that a statement continues to the next line.
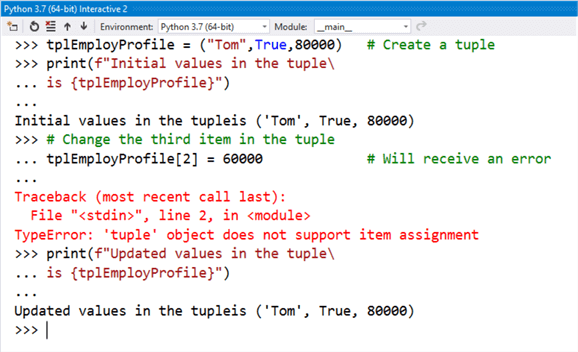
Figure 19 Create and manipulate a tuple
Tuples can perform all general sequence operations shown in Table 4. We use the following statements to practice the examples in that table. Figure 21 shows the output of this exercise.
print(f'"("class","room") + (101, False)": {("class","room") + (101, False)}')
print(f'(101, False) * 2: {(101, False) * 2}')
print(f'2 * (101, False): {2 * (101, False)}')
print(f'"room" in ("class", "room"): {"room" in ("class", "room")}')
print(f'("class", "room", 101, False)[1]: {("class", "room", 101, False)[1]}')
print(f'("class", "room", 101, False)[-3]: {("class", "room", 101, False)[-3]}')
print(f'("class", "room", 101, False)[1:3]: {("class", "room", 101, False)[1:3]}') 
Figure 20 Output of Python tuple operations
5 – Exploring Python Functions
A function, in all programming languages, is a reusable block of related statements that performs a task. We call functions in a program without knowing their implementation details. Other programmers and other programs can also use these functions. Code reuse is a crucial programming goal. In business intelligence projects, we frequently use Python functions. Not only can we use build-in functions provided by Python, but we also can define user-defined functions ourselves.
5.1 Python Built-in Functions
We have already repeatedly used the built-in function: print(). When we want to display some text on the screen, we call the print() function and pass the formatted text to it, and then the function presents us with the desired text on the screen. The function encapsulates a block of code that can accomplish the print task. When we want to perform this task, we can call the function rather than implement this task ourselves. The way of using a function in Python programming avoids re-inventing the wheel. Therefore, we can place our focus on business logic.
The Python Software Foundation lists many built-in functions in alphabetical order on their website [7]. We do not need to take time to memorize all these functions. We should learn by doing. The sooner we start playing with these functions, the quicker we learn them. We write a program to practice the use of some built-in functions.
Suppose a sensor reports temperature on the Fahrenheit scale. The sensor records temperature at regular intervals and writes data to a text file. We use a program to read the text file and append summary information, including the date when running the program, the number of records, the lowest degree, and the highest degree. For demonstration purposes, I assume I received a data file “TemperatureF.txt,” and the data in the file are 72.9, 74.3, 76.1, 68.4, 72.3, 67.7, 61.5, as presented in Figure 21.

Figure 21 A data file received from the temperature sensor
To write a program that achieves this task, we practice the following built-in functions: input, len, list, map, max, min, and open. Another frequently used function is the help function that displays the documentation of functions, keywords, and other objects. The following program accomplishes this task and shows the data file with summary information in Figure 22.
# A program to append summary information to the data file

# Asks user to enter the today's date
reviewDate = input("Please enter today's date (yyyy-mm-dd): ")
# Opens the file "TemperatureF.txt" in read mode, and stores its reference in the variable inFile
inFile = open("C:\\temp\\TemperatureF.txt","r")
# Calls read function the objects to read data from the file and returns in form of a string
data = inFile.read()
# Closes the opened file. It is a good practice to use the close() method to close a file.
inFile.close()
# Calls split function on the string and return a list
lstString = data.split(",")
# Calls map function to convert a string list to a float list
# Calls list function to create a new list
lstTemperature = list(map(float, lstString))
# Returns number of items in the list
obversationCount = len(lstTemperature)
# Returns the minimum number in the list
lowestTemperature = min(lstTemperature)
# Returns the maximum number in the list
hightestTemperature = max(lstTemperature)
# Opens the file "TemperatureF.txt" in append mode, and stores its reference in the variable outFile
outFile = open("C:\\temp\\TemperatureF.txt","a")
# write a separate line for the text file
outFile.write("\n")
outFile.write("--------------------------------------------")
# Use f-string to format the output
outFile.write("\n")
outFile.write(f"Review Date {reviewDate}")
outFile.write("\n")
outFile.write(f"Number of observation is {obversationCount}")
outFile.write("\n")
outFile.write(f"The lowerest degree is {lowestTemperature}")
outFile.write("\n")
outFile.write(f"The highest degree {hightestTemperature}")
# Closes the opened file. It is a good practice to use the close() method to close a file.
outFile.close()

Figure 22 Append summary information to the data file
5.2 User-defined Functions
The program I wrote in Section 5.1 has some limitations, specifically in a team environment. Whenever business users want to improve or add new features, programmers who may not be the author of the program have to read the entire code from beginning to end. After they add new lines, the program becomes more massive and even more challenging to understand. To increase the readability of the program, we make user-defined functions. Through using user-defined functions, we also achieve some other desirable goals in programming: code reuse, encapsulation, and modularity.
In Python, we use the keyword “def,” followed by a function name and a colon (:) to inform the Python interpreter that we define a user-defined function. The function body is a group of Python statements. The group must be indented. Here is the general format of a function definition:
def <function name>(0 or more arguments):
    <indented function body>
The following lines of code demonstrate two user-defined functions. The first function passes the full path of a file as an input argument and returns a string value. Input arguments through which we pass values to a function are optional. The second function does not have any argument. We test a user-defined function in the Python Interactive window when we complete the function. We call a user-defined function in the same way as we call the print () function shown in Figure 12.
# Reads text in the data file and returns a string
def readDataFromFile(filePath):
    '''Accept data file path, and returns a string value'''
    inFile = open(filePath,"r")
    rawData = inFile.read()
    inFile.close()
    return rawData

# Takes user input from the screen and return it as a string
def readUserInput():
    '''Returns user input '''
    reviewDate = input("Please enter today's date (yyyy-mm-dd): ")
    return reviewDate
The return statement in a user-defined function is also optional. When a return statement is absent, the function returns None, which represents a null value. The following two functions take input arguments and perform some tasks, but they do not return any non-null value to callers.
# write summary information to a text file
def writeSummaryInfo(fileObject, reviewDate, obversationCount, lowestTemperature, hightestTemperature):
    '''Take summary information and write them into a text file'''
    fileObject.write("\n")
    fileObject.write("--------------------------------------------")
    fileObject.write("\n")
    fileObject.write(f"Review Date {reviewDate}")
    fileObject.write("\n")
    fileObject.write(f"Number of observation is {obversationCount}")
    fileObject.write("\n")
    fileObject.write(f"The lowerest degree is {lowestTemperature}")
    fileObject.write("\n")
    fileObject.write(f"The highest degree {hightestTemperature}")
# Take summary information from the parameters and append to the data file
def appendSummaryInfo(filePath,reviewDate, obversationCount, lowestTemperature, hightestTemperature):
    '''Append summary informatin to a text file '''
    outFile = open(filePath,"a")
    writeSummaryInfo(outFile, reviewDate, obversationCount, lowestTemperature, hightestTemperature)
    outFile.close()
When we separate multiple values by commas in a return statement of a function, the function returns all these values in a tuple to the caller. The following function show this simple method that returns multiple values from a function.
# Extract the summary information from the raw data
def getSummaryInfo(rawData):
    '''Calls split fucntion on the string and return a list'''
    lstString = rawData.split(",")
    lstTemperature = list(map(float, lstString))
    obversationCount = len(lstTemperature)
    lowestTemperature = min(lstTemperature)
    hightestTemperature = max(lstTemperature)
    return obversationCount, lowestTemperature, hightestTemperature
With all these user-defined functions, I write several lines of code to perform the task step-by-step. At each step, the program calls a user-defined function, as shown in the following lines of code. When we write a program in this manner, the program is simple, readable, and maintainable. In case we need to make a change with the program, we can quickly identify the location of the code block. For example, to give users a more friendly interface, we only need to modify the readUserInput() function. The following program also shows how a function caller assigns multiple return values to different variables.
filePath = "C:\\temp\\TemperatureF.txt" # initialize variable
reviewDate = readUserInput()
rawDate = readDataFromFile(filePath)
obversationCount, lowestTemperature, hightestTemperature = getSummaryInfo(rawDate)
appendSummaryInfo(filePath,reviewDate, obversationCount, lowestTemperature, hightestTemperature)
6 – Importing the Python Standard Library
We have already called some built-in functions which are always ready to use. In addition to these built-in functions distributed with every copy of Python, the standard library contains hundreds of modules. By importing these modules into our programs, we often accomplish significant tasks with just a few lines of code.
6.1 The Python Standard Library
The Python standard library provides an extensive range of functionalities, for example, file handling, internet data handling, and operating system interaction. Having been tested, all these models are ready to be used to jump-start the development of our applications [8].
Some built-in modules in the standard library, written in C, provide access to system functionality such as file I/O. Many other built-in modules with source code programmed in Python provide standardized solutions for numerous programming problems [9]. To discover a list of all available modules, we use the help() function, as shown in Figure 23.

Figure 23 Several modules in the Python Standard Library
6.2 A Simple Example of Writing CSV Files
To demonstrate the use of a Python program to solve a business problem, we assume that a data analyst in the fictitious company, Adventure Works Cycles [2], wants to export data in a database table to a CSV file. The csv module [10] contributes functions for this exercise. By adding the import statement in a program, we can call all functions in the module. The following program imports the csv module, then writes data from Python lists into a CSV file. For simplicity purposes, I have initialized 5 Python list variables with values. The program is self-explained using the comment lines. I executed the program and used MS Excel to open the output file. The data in the CSV file looks like Figure 24.
# This program writes data from lists into a csv file
import csv   # Imports csv module
# Assumes we have loaded data into lists already
header = ['CustomerKey','AgeGroup','MaritalStatus','Gender','YearlyIncome','TotalChildren','NumberChildrenAtHome','EnglishEducation','EnglishOccupation','HouseOwnerFlag','NumberCarsOwned','CommuteDistance']
row1 = [29013,'Adult','S','F',40000.00,2,1,'Partial High School','Skilled Manual',1,3,'10+ Miles']
row2 = [27543,'Adult','M','F',70000.00,1,0,'Bachelors','Professional',1,1,'2-5 Miles']
row3 = [18860,'Adult','M','F',70000.00,3,1,'High School','Professional',0,0,'1-2 Miles']
row4 = [29138,'Young Adult','M','M',70000.00,4,2,'Bachelors','Professional',1,2,'2-5 Miles']
row5 = [23139,'Adult','S','M',60000.00,2,0,'High School','Professional',0,2,'1-2 Miles']
# Opens the file "NorthAmericaBikeBuyer.csv" in write mode, and stores its reference in a variable
outFile = open('C:\\temp\\NorthAmericaBikeBuyer.csv', 'w', newline='')
# Constructs a csv module's writer object
writer = csv.writer(outFile)
# Writes the data into the writer's file object,
writer.writerow(header)
writer.writerow(row1)
writer.writerow(row2)
writer.writerow(row3)
writer.writerow(row4)
writer.writerow(row5)
# Closes the opened file.
outFile.close()

Figure 24 Write data into a CSV file
7 – Installing Python Package
In addition to the standard library, there is a growing collection of several thousand third-party packages maintained by the Python community all over the world [9]. All these packages make programming job easier because somewhat commonly required functions have been made ready for use, and there is no need to rewrite code. We install these packages through the Python Package Index (PyPI), which is a repository of software for the Python programming language [11].
7.1 Python Virtual Environments
These community-built packages are evolving, and they usually have several versions in uses. One Python program uses version 1.0 of a module while the other program imports version 2.0. If these two versions are not compatible, it is impossible to run these two programs successfully in one Python environment. We create virtual environments to solve this issue; consequently, each program runs in its context. In Visual Studio 2019, we use the “Python Environments” window to manage virtual environments.
We want to install the package “pyodbc” that makes accessing ODBC databases simple. Walking through the following 8 steps, we create a virtual environment in Visual Studio and install the package inside the new virtual environment:
Step 1: Select the View > Other Windows > Python Environments menu command. This step opens the “Python Environments” window, as shown in Figure 25.

Figure 25 The Python Environments window
Step 2: Click on the “Add Environment…” button in the “Python Environments” window. The “Add environment” dialog appears, then select the “Virtual Environment” tab. Enter a name for the new virtual environment and use default values for other fields. Figure 26 illustrates the dialog after this step.

Figure 26 Add environment dialog
Step 3: Click on the “Create” button in the “Add environment” dialog. The virtual environment is created and appears in the “Python Environments” window, as shown in Figure 27.

Figure 27 The new virtual environment appears in the window
Step 4: Switch to the “Solution Explorer” window and expand the environment’s node. We can view all packages installed in this environment, as shown in Figure 28.

Figure 28 View installed packages
Step 5: Select the new virtual environment and right-click on it. A context menu appears, and we select “Manage Python Packages” from the context menu. Then, a search box appears in the “Python Environments” window. Enter the package name “pyodbc” in the search box. Visual Studio displays matching packages, as shown in Figure 29.

Figure 29 Install a Python package
Step 6: Click on “Run command: pip install pyodbc” to install the package. After installation, the package with version number shows up, as illustrated in Figure 30.

Figure 30 Confirm the installation of the package
Step 7: Switch to the “Solution Explorer” window and expand the environment’s node. We can view all those packages installed in this environment, as shown in Figure 31.

Figure 31 The new package shows installed packages
Step 8: Activate the “Python Interactive” window and switch the environment to the new virtual environment. Execute the statement “import pyodbc” to ensure we have installed the package correctly. The result should look like Figure 32.

Figure 32 Switch virtual environments in the “Python Interactive” window
In subsequent sections, we work in the virtual environment “env_mssqltips.” The package “pyodbc” is available for use. Although getting started with Python programming in a global environment seems straightforward, I recommend creating a virtual environment for a project. Each project works against a specific set of packages with known versions. Conflicts cannot occur when two projects require incompatible packages or different versions of the same package.
7.2 A Simple Example of Loading Data from Database Tables
Sometimes, business users want to retrieve data from databases, but they cannot access databases directly. A Python program can obtain data from databases for these users. The package “pyodbc” we installed in the previous section is an open-source Python module to access databases. The following program imports the “pyodbc” module, then reads data from a database table to a list. The program is self-documented using some inline comments. The program prints the data loaded from the database, as shown in Figure 33.
import pyodbc
# Specifies the ODBC driver, server name, database, etc.
# We can have this information from the DBA
conn = pyodbc.connect(Driver="{SQL Server}",Server=".",Database="AdventureWorksDW2017",Trusted_Connection="Yes")
# Creates a cursor from the connection
cursor = conn.cursor()
# SQL statements are executed using the Cursor execute() function.
cursor.execute("SELECT top 10 [CustomerKey], [BirthDate], [MaritalStatus]  \
                        ,[Gender], [TotalChildren], [NumberChildrenAtHome]  \
                        ,[EnglishEducation], [EnglishOccupation]  \
                    FROM [AdventureWorksDW2017].[dbo].[vTargetMail]  \
                    WHERE [Region] = 'North America' And [BikeBuyer] = 1")
# Assigns all remaining rows to a list
rows = cursor.fetchall()
if rows:                        # Check if rows have any data
    print(*rows,sep="\n")       # Print the list
# Close the connection
conn.close() 
Figure 33 Load data from a SQL Server database table
8 – Using Execution Control Structures
We have already written several Python programs. By default, the Python interpreter executes a program line by line in the order in which they appear. We call this execution manner the sequential control structure. Execution control structures are programming language statements that control the execution flow of a program; they determine the sequence of statement execution.
In everyday life, we often need to make a choice depending on whether a specific condition is met; for example, I go to the beach if it is warm and sunny. Similarly, a program may face two or more alternative branches, and it needs to choose one to continue execution. We name this structure the selection control structure. The third type of control structure is the iteration control structure that repeatedly executes a block of code based on a given Boolean condition. We can use these three basic types of control structures together to solve a specified problem.
8.1 One-way if Statement
A one-way if statement starts with the keyword “if,” followed by a condition, a colon(:), and an indented code block. Here is the general format of a one-way if statement:
if <condition>:
    <indented code block>
<non-indented statements>
We use this statement to test a condition. If the condition is true, the statements in the indented code block run. Otherwise, the program skips the indented code block and runs the immediately followed non-indented statements. Let’s give practice in the use of the one-way if statement:
temperature = input("What does the temperature feel like today? ")
weather = input("How is the weather today? ")
if temperature == "warm" and weather == "sunny":
    print("I go to the beach")
print("I read a book")
When users enter “warm” and “sunny,” these two string values meet the condition defined in the if statement; therefore, the program prints two lines, as shown in Figure 34.

Figure 34 Runs a one-way if statement program on the true condition
When users enter anything else, the evaluation of the condition is false, the program skips the indented line and prints only one line, as shown in Figure 35.

Figure 35 Runs a one-way if statement on the false condition
8.2 Two-way if Statement
When we add an optional else clause to a one-way if statement, we obtain a two-way if statement. Here is the general format of a two-way if statement:
if <condition>:
    <indented if code block>
else:
    <indented else code block>
<non-indented statements>
When using a two-way if statement, a program either executes the indented if code block (when it evaluates the condition to true) or runs the indented else code block on the false condition. The immediately followed non-indented statements always run. Let’s give practice in the use of a two-way if statement:
temperature  = input("What does the temperature feel like today? ")
weather = input("How is the weather today? ")
if temperature == "warm" and weather == "sunny":
    print("I go to the beach")
else:
    print("I stay at home")
print("I read a book")
When users enter “warm” and “sunny,” the program evaluates the condition to true, the statement in the indented if code block runs, and the output of the program should look like Figure 36.

Figure 36 Runs a two-way if statement on the true condition
When users enter anything else, the condition is false, the statement in the indented else block runs, and Figure 37 shows the execution result.

Figure 37 Runs a two-way if statement on the false condition
8.3 For Loop Statement
The example given in Section 7.2 used the fetchall() function to obtain a list of all the remaining rows in the query result set, and then display all rows on a screen by using this statement: print(*rows,sep= “\n”). If we want to transform the date of birth into an age group, we need to access data row by row. We can use the fetchone() function to read the next row in the query result set, and then manipulate the date of birth. When we have 10 rows, the procedure repeats 10 times. To avoid writing the same code block repeatedly, we use a for loop, an iteration control structure to run the same code block repeatedly. This control structure has the general format:
for <variable> in <sequence collection>
    <indented code block>
<non-indented statements>
For every item in a sequence collection, for example, a string, a list, or a tuple, the program runs the indented code block repeatedly. Thus, we can manipulate birthday date in every loop:
rows = cursor.fetchall()
currentYear = 2020
for row in rows:                            # loop through all rows in the query result
    yearOfBirth = int(row.BirthDate[0:4])   # The first 4 characters represent the year
    age = currentYear - yearOfBirth
    if age < 18:                            # Determine the age group
        ageGroup = "Youth"
    elif age <= 35:
        ageGroup = "Young Adult"
    elif age <= 55:
        ageGroup = "Adult"
    else:
        ageGroup = "Senior"
    print(f"{row.CustomerKey:6} {ageGroup:12} {row.MaritalStatus:2} {row.Gender:2} {row.TotalChildren:2} {row.NumberChildrenAtHome:2} {row.EnglishEducation:20} {row.EnglishOccupation:16}")
By using the for loop statement in the example in Section 7.2, the program displays a modified list, as shown in Figure 38. It is noteworthy that we add several “elif” blocks between the “if” and “else” block. These “elif” blocks allow the program to evaluate multiple conditions.

Figure 38 Print the query result using the for loop
8.4 While Loop Statement
When we know how many iterations the loop performs in advance, we use a for loop in a program. The number of iterations that a program should perform is not always apparent. Sometimes we do not know when a program needs to stop looping. We use a Python while loop in this situation. This control structure has the general format:
while <condition>
    <indented code block>
<non-indented statements>
We say a while loop is active when a program evaluates the condition of the loop to true. A program runs an indented code block in the while loop statement repeatedly when the loop is active. We used a cursor’s fetchall() function to fetch a query result set into a list. This method could be expensive in terms of memory when the result set is enormous. An alternative solution is to use fetchone() function that reads the next row in the query result set. By calling the fetchone() function in the indented code block, the program reads data row by row repeatedly until fetching all rows. When the cursor reaches the end of the result set – that is to say, the next row has a value of None, the program stops looping.
while True:
    row = cursor.fetchone()     # Get next row in the query
    if row == None:             # Check if cursor reaches the end of the result set
        break                   # The break statement terminates the current loop
    print(row)
If the condition is always true, the loop runs infinitely. In the intended code block, we check whether the cursor reaches the end of the result. When the cursor moves to the end of the query result set and the next row is not available; then, the program terminates the while loop. We name this approach the loop-and-a-half pattern when we cut the last loop iteration “in half.” The result shows in Figure 39.

Figure 39 Read data row by row from the result set
9 – Solving a Real-World Problem
We have explored some basics of Python programming, and now we are ready to tackle the real business problem I introduced in the Solution section. The task is to export data in a database table to a CSV file, and we also need to categorize customers into age groups: Youth, Young Adult, Adult, and Senior.
When we work on a programming task, we should resist the temptation to code immediately. We must understand the task and at least develop some rough ideas. In other words, we should analyze business requirements and design the program. The divide and conquer strategy is a design approach to divide a big problem into smaller problems, and then we create tasks to solve each problem independently. Intuitively, I divide the problem into two smaller problems: (1) load data from a database table, and (2) write data into a CSV file. If we divide the problem in this way, we need to pass the entire result set from the first task to the second task. We have known that loading the entire result set into computer memory could be expensive when the result set is enormous. Instead of passing the entire result set between tasks, we can pass the cursor. Therefore, here are several sub-tasks that work together to solve the initial problem:
- Create a database connection;
- Create a cursor from the database connection;
- Create a CSV writer;
- Write data from the cursor into the CSV writer;
- Close the CSV writer;
- Close the database connection;
The steps (5) and (6) are not apparent in the design phase. We should always release resources immediately after we have completed the use of them. Sometimes, sub-tasks are still significant such as task 4. We can further divide the task into two smaller tasks:
- 4.1 Compute the age;
- 4.2 Determine the age group;
Now, we have a rough design of the program, and the next step is to convert each task to a Python user-defined function. Note that we need to revisit this design when we have any challenges in programming. Here is the implementation of this design, and the program is self-documented.
# This program is for demonstration only.
# The codes used in this program are straightforward and there are a lot of rooms for improvement.
import csv
import pyodbc
import datetime
# Create a database connection. We can get the connection string from a DBA
def createConnection():
    '''
    Returns a database connection
    '''
    conn = pyodbc.connect(Driver="{SQL Server}",Server=".",Database="AdventureWorksDW2017",Trusted_Connection="Yes")
    return conn
# Takes input the database connection, and create a cursor object
def createCursor(conn):
    '''
    Returns a cursor object created from the input database connection
    '''
    cursor = conn.cursor()
    # SQL statements are executed using the Cursor execute() function.
    cursor.execute("SELECT [CustomerKey],[BirthDate],[MaritalStatus],[Gender] ,[YearlyIncome] \
                          ,[TotalChildren],[NumberChildrenAtHome],[EnglishEducation],[EnglishOccupation] \
                          ,[HouseOwnerFlag],[NumberCarsOwned],[CommuteDistance] \
                      FROM [AdventureWorksDW2017].[dbo].[vTargetMail] \
                      WHERE [Region] = 'North America' And [BikeBuyer] = 1")
    return cursor
# Open a file and then construct a csv writer object
def createCSVWriter(path):
    '''
    Takes input a csv full path, and returns a file object and a csv writer object
    '''
    CSVFile = open(path, 'w',newline='\n', encoding='utf-8')
    writer = csv.writer(CSVFile)
    return CSVFile,writer
# Loop through the cursor and write every row into a csv file
def writeCSVFromCursor(writer,cursor):
    '''
    Fetch rows from cursor and write them into the csv file
    '''
    while True:
        row = cursor.fetchone()     # Get next row in the query
        if row == None:             # Check if cursor reaches the end of the result set
            break                   # The break statement terminates the current loop
        age = computeAge(row.BirthDate)
        determineAgeGroup(age,row)
        writer.writerow(row)
# Compare the birthdate to today's date to compute the age of a person
def computeAge(birthdayString):
    '''
    Returns age of a person based on the birthday
    '''
    currentYear = datetime.datetime.now().year
    birthdayYear = int(birthdayString[0:4])
    return currentYear - birthdayYear
# Tag the row with age group based on the age
# We continue to use the BirthDate column for the age group
def determineAgeGroup(age,row):
    '''
    Assigns the ageGroup value to the BirthDate column
    '''
    if age < 18:
        row.BirthDate = "Youth"
    elif age <= 35:
        row.BirthDate = "Young Adult"
    elif age <= 55:
        row.BirthDate = "Adult"
    else:
        row.BirthDate = "Senior"
# Close the database connection
def closeConnection(conn):
    conn.close()
# Close the file project
def closeCSVFile(file):
    file.close()
# Entry point of this program'
def main():
    '''
    The program load data from a database, then write data into a csv file
    '''
    # Initialize variables
    targetFilePath = "c:\\ssistemp\\NorthAmericaBikeBuyer.csv"
    # Create a database connection
    conn = createConnection()
    # Create a cursor object
    cursor = createCursor(conn)
    # Create a CSV writer
    file,writer = createCSVWriter(targetFilePath)
    # Write data from cursor object into a CSV file
    writeCSVFromCursor(writer,cursor)
    # Close file
    closeCSVFile(file)
    # Close database connection
    closeConnection(conn)
# The variable __name__ contains a string whose value depends on
# how the code is being used. A module's __name__ is set equal to
# __main__ when read from standard input, a script, or from an
# interactive prompt. Use this condition to determine the execution context.
if __name__ == "__main__":  # Check the execution context.
    main()                  # Execute main function when run the program directly.
    print("The program ran successfully!")
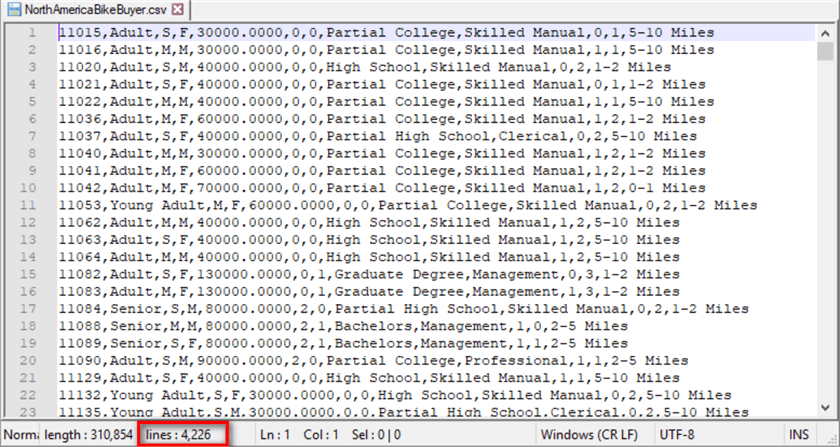
I run this program to generate a file “NorthAmericaBikeBuyer.csv.” There are 4,226 rows in the file, and Figure 40 shows the first 23 rows. Now the data analyst can feed this file to his/her reporting tools.
Summary
Business users want to learn a programming skill, and then they can access databases and manipulate data by themselves. I recommended using Python, one of today’s most compelling programming languages, to solve their problems. I provided them a hands-on tip with a strong emphasis on learning by doing.
We started with a brief introduction to Visual Studio 2019. Then, we used the Python Interactive window to perform mathematical operations. Then, we created variables to store information. The Python interpreter supports a range of data types to store sequences, and we have introduced three of them: string, list, and tuple.
Next, we have explored several built-in functions that are always ready to use. Additionally, we also discussed how to create user-defined functions. The Python standard library and third-party packages help to increase programming productivity. We also created a virtual environment so that each Python application runs independently.
The Python interpreter executes code line by line, but business requirements may need to change the order. We have explored three basic types of control structures: sequential, selection, and iteration.
After we covered these basics of Python programming, we put all these together to solve a real business problem.
References
[1] Carbonnelle, P. (2020). PYPL Popularity of Programming Language. Retrieved from http://pypl.github.io/PYPL.html.
[2] Kess, B. (2017). AdventureWorks sample databases. Retrieved from https://github.com/Microsoft/sql-server-samples/releases/tag/adventureworks/.
[3] Mani, V. (2020). Getting Started with Python Development in Visual Studio 2019. Retrieved from https://www.c-sharpcorner.com/article/getting-started-python-development-in-visual-studio-2019/.
[4] Heitz, R. (2016). Hello Raspberry Pi!: Python programming for kids and other beginners. Shelter Island, NY: Manning Publications.
[5] Briggs, R. J. (2012). Python for Kids: A Playful Introduction to Programming. San Francisco, CA: No Starch Press.
[6] Barry, P. (2016). Head First Python, Second Edition. Champaign, IL: O’Reilly Media.
[7] Python Software Foundation. (2020). Built-in Functions. Retrieved from https://docs.python.org/3.8/library/functions.html.
[8] Hellmann, D. (2017). The Python 3 Standard Library by Example, Second Edition. Boston, MA: Addison-Wesley.
[9] Python Software Foundation. (2020). The Python Standard Library. Retrieved from https://docs.python.org/3/library/.
[10] Python Software Foundation. (2020). csv — CSV File Reading and Writing. Retrieved from https://docs.python.org/3/library/csv.html.
[11] Python Software Foundation. (2020). Find, install and publish Python packages with the Python Package Index. Retrieved from https://pypi.org/.
Next Steps
- The examples used in this tip are for demonstration only. The techniques used are straightforward, and there is much room for improvement. To learn to program quickly, I recommend improving the sample code while learning. Besides, we learn programming rather than programming languages. When we determine to use Python, it is good to stick with it. Then, we strengthen programming skills through practice, practice, and practice enough. There are 19 guiding principles, known as the Zen of Python, for writing good computer programs. To list these principles, we enter the Python statement “import this” in the Python Interactive window. Here is the first principle: Beautiful is better than ugly.
- Check out these related tips:
- SQL Server 2017 and Python Basics
- Web Screen Scraping with Python to Populate SQL Server Tables
- Run Python Scripts in SQL Server Agent
- Import Historical Stock Prices into SQL Server using Python
- Introduction to SQL Server Machine Learning Services with Python
- Beginners Guide to Python for SQL Server Professionals
- Deep dive into Python scripts execution in SQL Server
- Exploratory Data Analysis with Python in SQL Server 2017

Nai Biao Zhou has twenty years of experience in software development, with strong analytical skills and a broad range of computer expertise.
He has fifteen years of experience in development and maintenance of database applications on SQL Server in OLTP/OLAP/BI environments.
He has a master’s degree in Control Engineering and is pursuing a Master of Science degree in Predictive Analytics.
Knowledge/Skills
Advanced computer programming skills and well versed with C/C#, Java, ASP.NET, JavaScript, and SQL.
In depth knowledge of Solution Architecture, and Software Development Life Cycle (SDLC).
Microsoft Certified Application Developer (MCAD) since 2004.
- MSSQLTips Awards: Author of the Year – 2021 | Rising Star (50+ tips) – 2024 | Author Contender – 2020, 2023


