Problem
Undoubtedly, many of us have the task of installing a new stand-alone SQL Server instance which includes just the database engine service. For instance, it can primarily be needed for dedicated and consolidated OLTP environments and we may be asked to create a formal document for others to easily follow for future installations and standard configurations.
Solution
Today's post is going to outline the process to install a basic stand-alone SQL Server 2017 instance. This process is just a basic guideline and not a rule for each installation, because I fully understand that every environment is different and needs a customized installation to meet very specific requirements.
It is worth noting that SQL Server 2017 must be installed on Windows Server 2016 when it comes to production environments. Having said that, let's click on the setup.exe application to start with the installation of SQL Server.

The following page will be opened. This is the section where you can find useful documentation about Hardware and Software requirements, security, upgrade, and also a link to install SQL documentation. What's more, some very important tools are also available like the Migration Assistant (SSMA) to migrate from other technologies such Oracle and MySQL. So, it is worth checking thoroughly (when you have time).
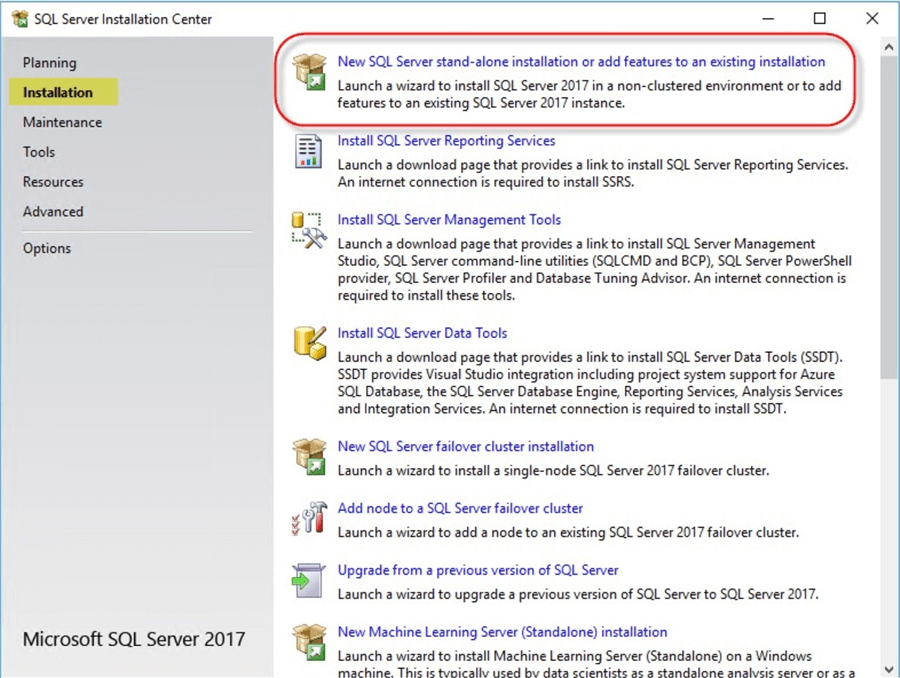
Select the Installation option on the left.

On the Installation page click on "New SQL Server stand-alone installation or add features to an existing installation" to install just one stand-alone SQL instance (non-clustered). From this page, it is also possible to install other tools like SSMS, SSDT, and services such as Reporting Services and Machine Learning service. Furthermore, if you are installing a SQL Server clustered instance, from here you must install the rest of nodes that will be part of the cluster ("Add node to a SQL Server failover cluster").
We will have to enter the product key. In this example, I am using a product key for a Standard Edition, you need to use the product key of the edition you are want to install.

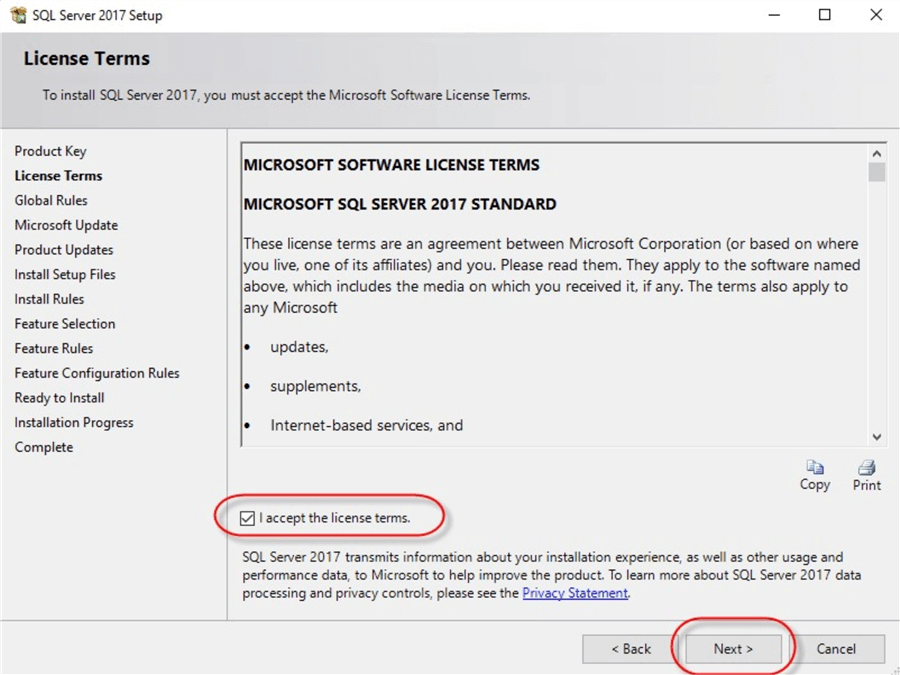
After entering a valid product key, we must accept the license terms and move on by clicking the "Next" button.
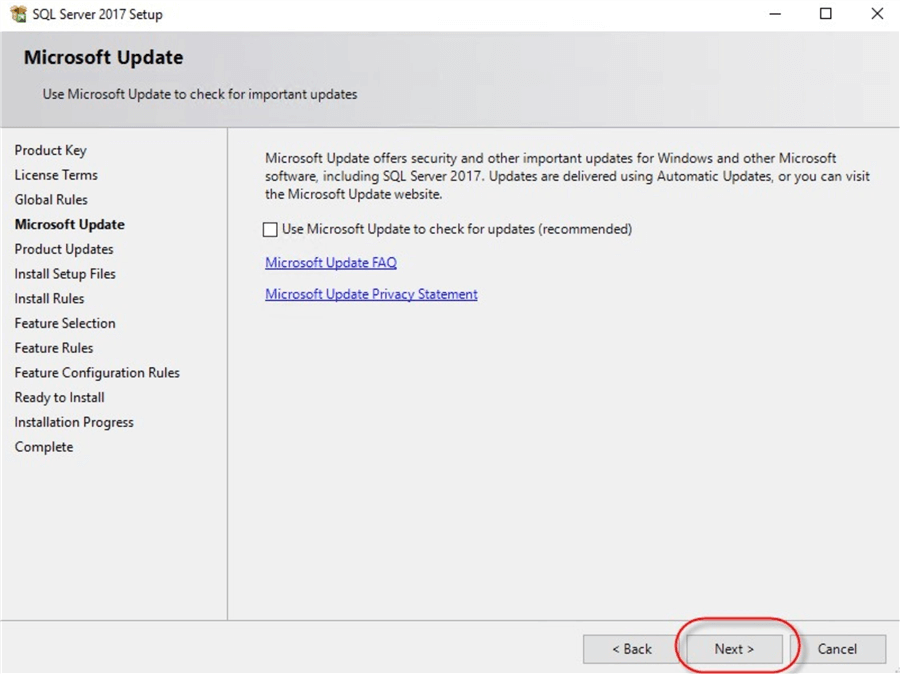
In the next page we will find the option to update SQL Server as part of this installation process. I suggest moving on without updating it for now, especially if there is no high-quality internet connection locally. Preferably, you should apply Service Packs after finishing this process. Honestly, no database server should have internet connection due to security reasons.
So after clicking on "Next", we will now see the validation process of rules. We must meet the rules before moving on, for example, the server in question should not be a computer domain controller. Furthermore, in this case, we will mostly see that "Windows Firewall" rule will result in "warning" because the Windows Firewall is enable, don't panic, this just means that we have to configure it properly after finishing the installation so that applications can connect to the database server. To give you an example, we may need to create a rule to allow connections via the port number for the SQL instance, in this case the port will be 1433. Items like this need to be completed as part of the configuration to enable the SQL Server instance to be used by applications. For now, just move on. Click Next.

It is time to select the services and other features we want to install. In this example, we will only install the database engine, so just choose “Database Engine Services” and move on. It is highly recommended to install only the services that are really necessary (do not install more than you need), and also SQL Server binaries should be placed on the partition disk “C” for this installation.

Because this is the first SQL instance is being installed on the server, this should be a Default instance (without a name, and listening on the default port 1433), so do not change "MSSQLSERVER". Move on.

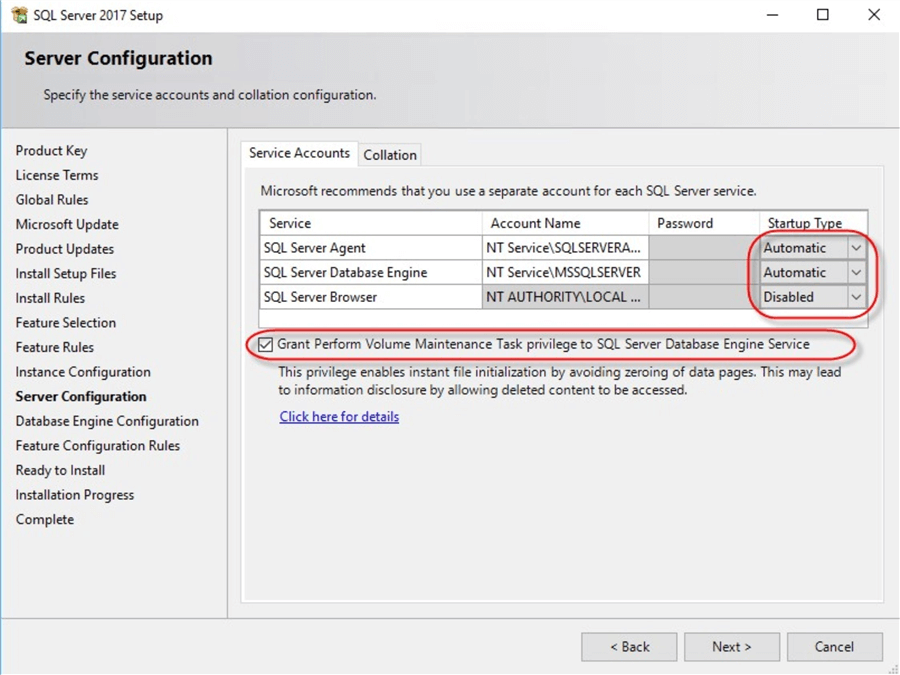
Now we have to configure many things related to Service Account and Collation settings. First, in this window, you can set the Windows Account that will be used by each service such as SQL Server Agent, SQL Browser, and others. Make sure that the startup type is "Automatic". Additionally, it is also possible to configure in advance the windows policy "Grant Perform Volume Maintenance" to SQL Server Database Engine service. This privilege allows SQL Server to enable Instant File Initialization and run data and log growth, alter/create database, and backup/restore operations much faster.
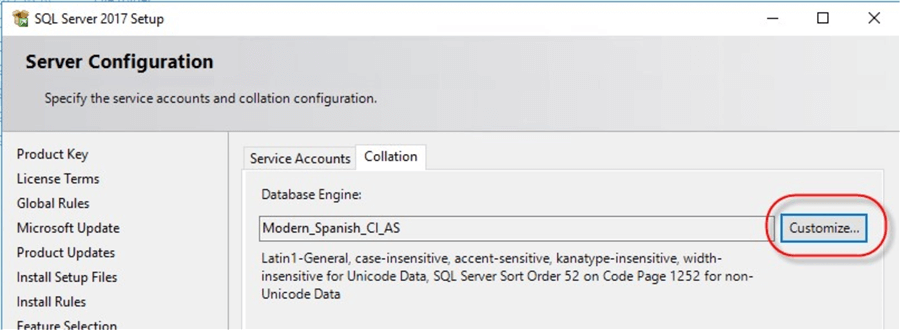
Another important setting to set is the "Collation" for the whole SQL instance. More specifically, this collation is for the "model" database and the other system databases. By default, all new user databases will inherit the collation of the "model" database. So, bearing in mind the importance of this setting because after installing it you cannot modify it without reinstalling again. Click on "Customize" to choose the proper collation for your environment.
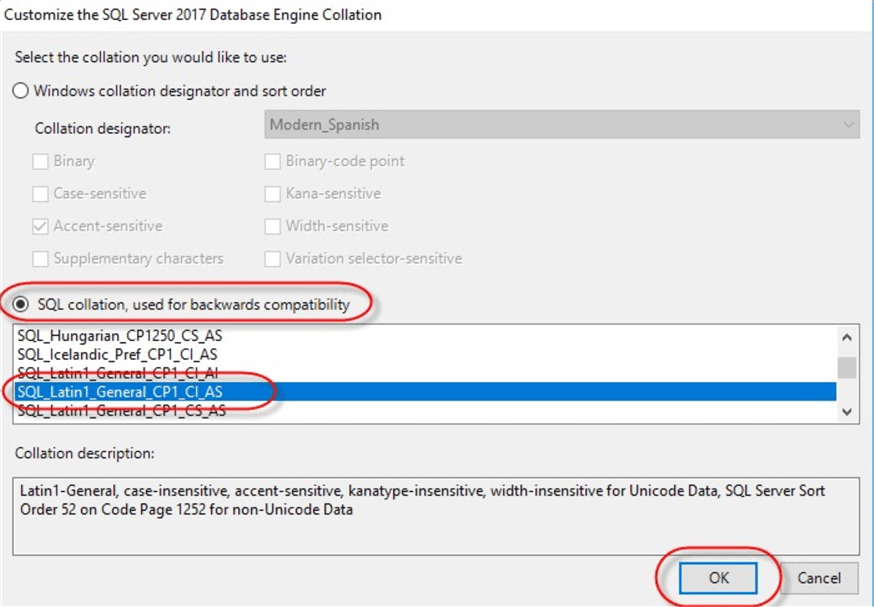
It is worth noting that "SQL_Latin1_General_CP1_CI_AS" is a very common SQL collation and mostly used in Spanish and English versions of applications for backward compatibility reasons. However, if you are installing a SQL instance for a new system then it is highly advisable using a Windows Collation like "Latin1_General_CP1_CI_AS".

Security is of paramount importance in SQL Server configuration. So, I recommend using Windows Authentication mode as much as possible. Nevertheless, if you had to create SQL users at some time, you can enable "Mixed Mode" via SSMS. In this part, we must also create an Administrator user for the SQL instance. Just click on "Add Current User" to create that Windows login as Administrator.

Now, it is a good opportunity to set the default directory for Data, Log, Backup files of user and system databases. We must modify the directories for user databases.

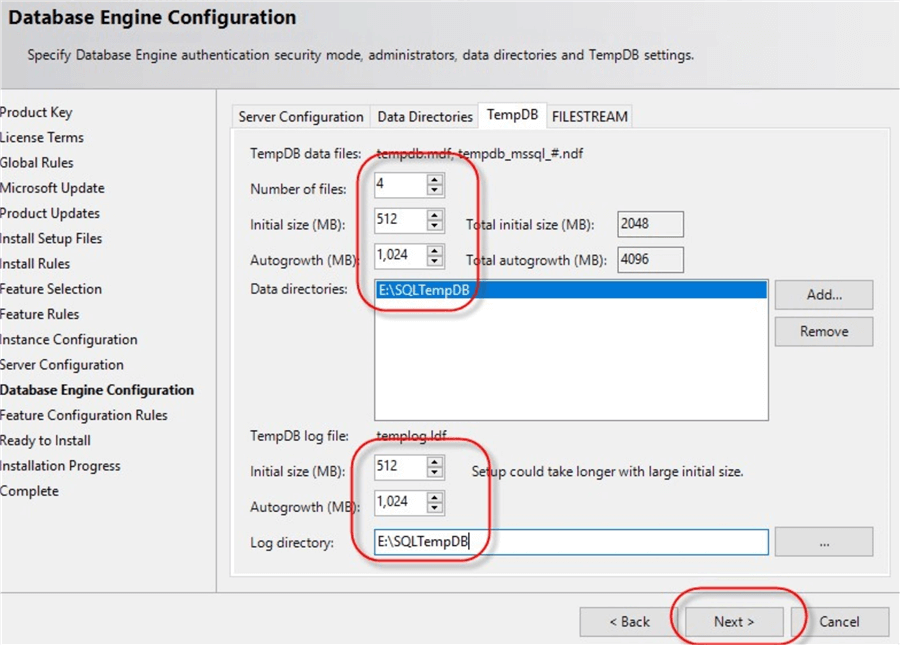
The next step is to configure the TempDB database with respect to Initial Size, Autogrowth, directory for data and log files, and the number of data files. Here I show off some possible values, but you can change them after the installation finishes.

Secondly, we change the directory for TempDB data and log files.

Finally, keep in mind that TempDB data and log files should be located on a dedicated partition disk (different from the one used for user databases) and under RAID 10 or RAID 1.
Having followed all the previous steps, we have come to the last window before starting the installation. This window just shows a summary of what is going to be installed. We must ensure that everything is ok and then proceed with the install.
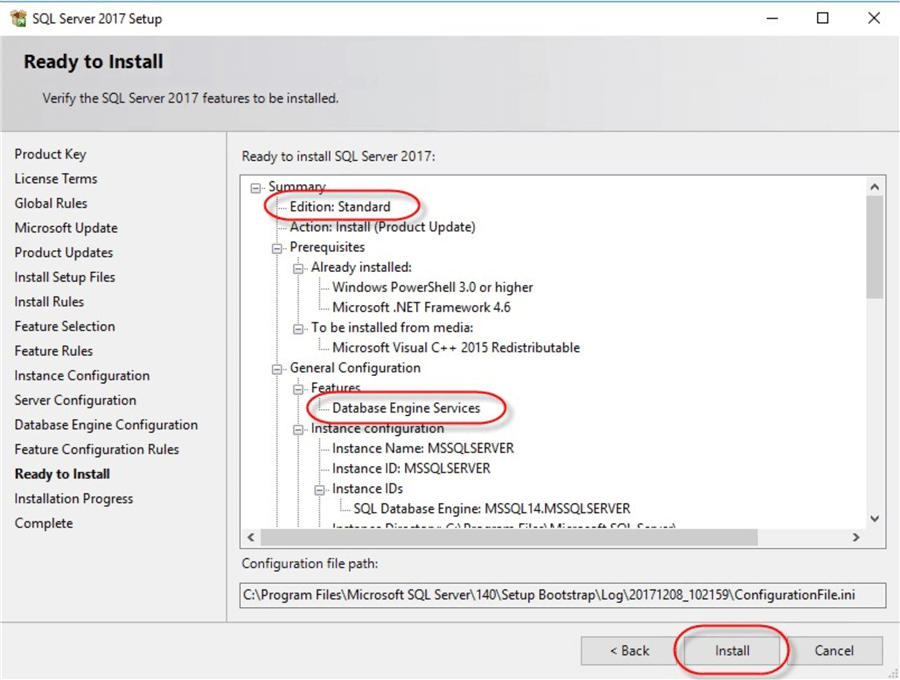
After clicking on "Install", the process of installation will start and at this point we just have to wait.

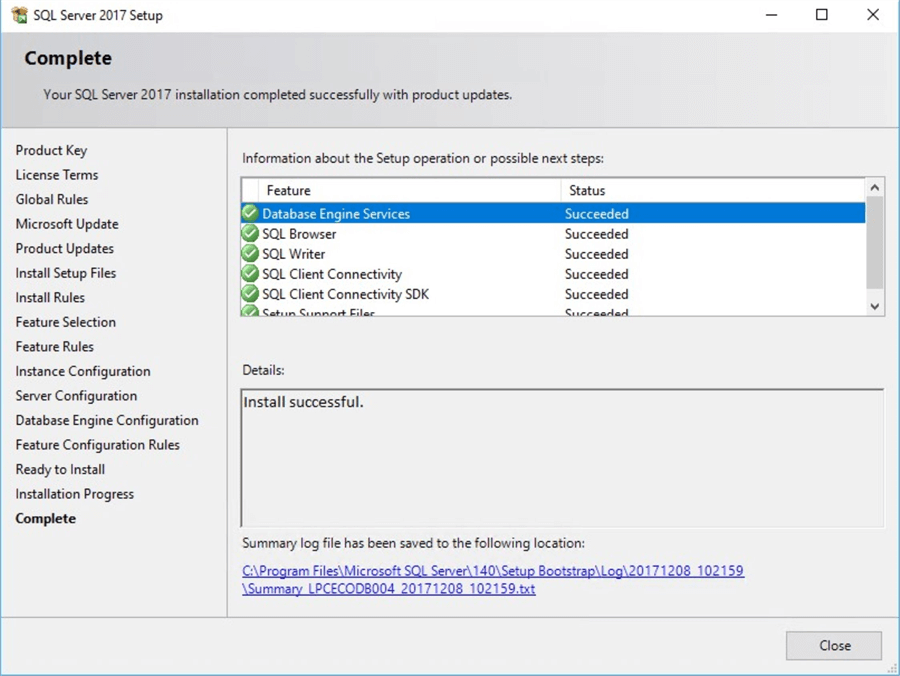
If everything runs as expected, we will see the following end results.
That is all for now. Thanks for reading. Let me know any remarks you may have in the comments section below.
Next Steps
- For more information about other considerations on installing SQL Server you can check out this article.
- It is also important to review other related features to the SQL Server Database Engine.
- It is recommended to review other details of the whole installation process of SQL Server.

Percy Reyes has a Bach. Systems Engineering and Certified Senior Database Administrator focused on Microsoft SQL Server Internals with over 15+ years of extensive experience managing database servers on SQL Server 6.5, 7.0, 2000, 2005, 2008, 2008 R2, 2012, 2014, 2016, and 2017. He has in-depth knowledge and strong experience in database administration of SQL Server including installation and upgrading the database server and client tools, allocation system storage and planning future storage requirements for the database system, Backup/Restore operations, Indexing, Statistics, Integrity Checks, Database Maintenance, Database Reduction, Storage Engine, Replication, Monitoring, Optimization and Performance Tuning, In-Memory OLTP, Security and Compliance, Scalability, High Availability, Mirroring, Log Shipping, AlwaysOn, Failover Clustering, FileStream, Partitioning Very Large Tables, Disaster Recovery, Troubleshooting, and internals issues. Percy is always contributing to the SQL Community via twitter (@percyreyes) and writing in his blog and also as a frequent speaker about SQL Server technologies for over 10+ years at local user group meetings, webcasts, and national conferences. He can be reached at https://www.percyreyes.com.
- MSSQLTips Awards: Rookie of the Year Contender – 2014