By: Manvendra Singh | Comments (34) | Related: 1 | 2 | 3 | 4 | 5 | 6 | 7 | 8 | 9 | > SQL Server Configurations
Problem
I was doing an install of SQL Server and after the install I was told that we were supposed to use a different collation setting for the instance. In this tip I will explain step by step how to change the server level collation setting for an existing SQL Server instance.
Solution
Before moving ahead, let's discuss what the collation setting is used for as per books online
"Collations specify the rules for how strings of character data are sorted and compared, based on the norms of particular languages and locales. For example, in an ORDER BY clause, an English speaker would expect the character string 'Chiapas' to come before 'Colima' in ascending order. However, a Spanish speaker in Mexico might expect words beginning with 'Ch' to appear at the end of a list of words starting with 'C'. Collations dictate these kinds of sorting and comparison rules. The Latin_1 General collation will sort 'Chiapas' before 'Colima' in an ORDER BY ASC clause, whereas the Traditional_Spanish collation will sort 'Chiapas' after 'Colima'."
The server collation acts as the default collation for all system databases that are installed with the instance of SQL Server, and also any newly created user databases. The server collation is specified during SQL Server installation. It is not mandatory that we change the default server level collation, because you can specify a different collation level when you create users databases, but you need to remember to specify this when creating user databases.
To change the default SQL Server collation you can simply rebuild the system databases. When you rebuild the master, the model, msdb and tempdb system database are actually dropped and recreated in their original location. If a new collation is specified in the rebuild statement the system databases are rebuilt using that collation setting. Any user modifications to these databases will be lost, so it is important to backup any of this information you wish to retain. For example, you may have user-defined objects in the master database, scheduled jobs in msdb, or changes to the default database settings in the model database. The tempdb database is recreated each time SQL Server is restarted, so there is nothing in that database that you will need to retain.
Changing the server-level collation does not change the collation of existing user databases, but all newly created user databases will use the new collation by default.
NOTE: DO NOT MAKE ANY CHANGES IN PRODUCTION WITHOUT PROPER TESTINGS IN LOWER-LIFE CYCLE ENVIRONMENTS
Steps to change server level collation of a given SQL Server Instance
Step 1
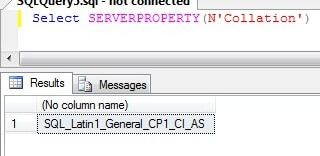
First check the existing SQL Server collation setting of your instance. Run the command below to get the collation value of your SQL Server instance.
SELECT SERVERPROPERTY(N'Collation')

Step 2
You can see in the above screenshot that the collation setting is "SQL_Latin1_General_CP1_CI_AS". For our example we want to change this to "SQL_Latin1_General_CP1_CI_AI". As I mentioned, we have to rebuild our system databases to change the server level collation and put this new collation value in the rebuild command.
Make sure to record all server level settings before rebuilding the system databases to ensure that you can restore the system databases to their current settings. Record all server-wide configuration values by running the below commands and save the output. If this was a brand new setup and you haven't made any changes to the system databases you don't need to worry about collecting this data.
SELECT * FROM sys.configurations;
-- OR
EXEC SP_CONFIGURE
Step 3
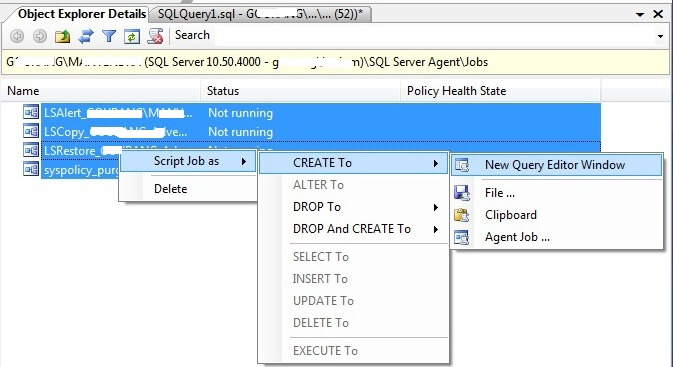
Create and prepare all scripts related to jobs, maintenance plans, logins and their access levels. You can generate scripts by selecting all jobs in object explorer in SSMS and right click on your selection then choose the "script as" option to create the script for all jobs. You can do similar steps to generate scripts for alerts and operators as well. The below screenshot to generate scripts for all your jobs.

Next is to secure your logins, passwords and their access levels. You can use sp_help_revlogin stored procedure to create a script for all logins so they can be recreated easily.
Step 4
Detach all user databases before rebuilding your system databases. If you leave databases attached they will be detached and will be found in the database folder.
Step 5
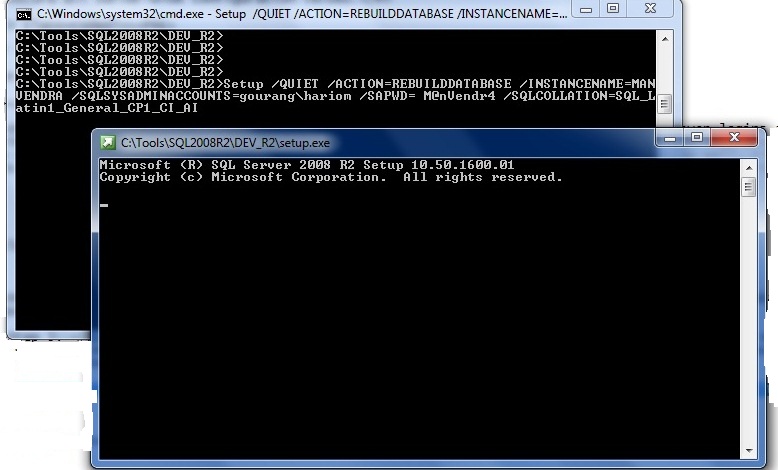
Now its time to rebuild your system databases. This operation will recreate your master database and all existing settings will be reset. Run the below command from a Windows command prompt. Make sure to run this command from the directory where you have placed your SQL Server setup files. Once you press enter, a separate window will appear to show you the progress bar. Once the rebuild is done, that window will disappear.

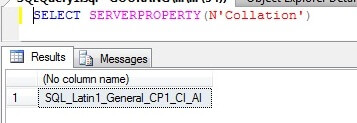
Once the rebuild operation is complete, check the server collation to verify whether this change is successful or not. As we can see in the screenshot below, the server collation has changed to SQL_Latin1_General_CP1_CI_AI. At this point we cannot restore any of the system databases, because doing so will revert back to the previous collation setting. So we will need to use the scripts that were created to recreate logins, jobs, etc...

Step 6
Attach all user databases which were detached in Step 4. If you have any issues, take a look at this tip How to fix database attach error in SQL Server 2008R2.
Step 7
Now change the collation settings of all user databases. It's not necessary to change the collation settings for the user databases, it totally depends on your requirement.
Run the commands below to change the collation settings of your user databases.
ALTER DATABASE DBName collate SQL_Latin1_General_CP1_CI_AI
Sometimes the command fails to execute and you get this error:
In that case you may need to export all data and recreate the database with the new collation settings.
Step 8
Now run all of the scripts which were created in Step 3 to restore jobs, alerts, logins, operators, etc... Also don't forget to change the server level configuration settings which were captured in Step 2.
Now your instance is ready to use the new server level collation.
Next Steps
- Follow this process to change the server level collation of any SQL Server instance. This process could get quite complex if you have made changes to the system databases and also have user databases, so make sure you script out any objects or data you need to recreate and that you also have good backups of all your databases to avoid any data loss in the case of an issue or failure.
About the author
 Manvendra Singh has over 5 years of experience with SQL Server and has focused on Database Mirroring, Replication, Log Shipping, etc.
This author pledges the content of this article is based on professional experience and not AI generated.
View all my tips


