Problem
Today’s architecture is serverless intensive, with multiple microservices performing a particular task. Industries are beginning to move away from traditional monolithic applications, which have a single large codebase infrastructure handling everything, to an easier microservice approach.
Solution
Industries are beginning to abandon monolithic applications due to their updating difficulties and scaling process challenges. Today, all industries are moving to Microservices, which breaks down an application into small, independent services, each responsible for a specific function. Numerous benefits result from this, including enhanced fault isolation, more freedom in selecting technologies, and independent deployments.
What is Serverless Architecture?
For most developers today, serverless computing allows us to concentrate on building code rather than worrying about maintaining servers or infrastructure. With serverless, you only deploy your functions or services; the cloud provider is responsible for the underlying resource, scaling, and availability issues.
Serverless Architecture with Azure Functions – Microsoft Learn
What are Microservices?
Microservices are architectural styles that structure applications as a group of loosely connected, independently deployable services, each with a distinct role. A microservices architecture allows each service to be created, deployed, and scaled separately while concentrating on a particular business feature and interacting with other services via APIs.
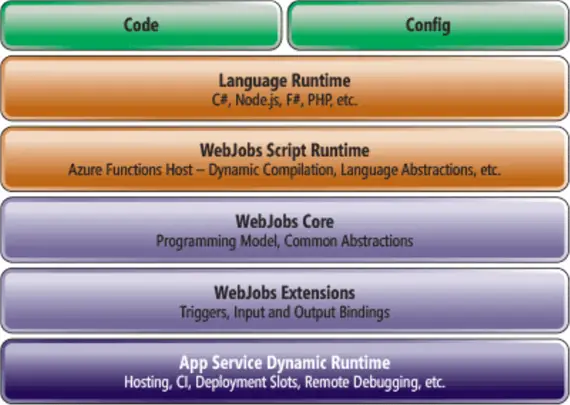
What are Azure Functions?
Azure Functions are serverless compute services that are event-triggered code without having to provision or manage infrastructure.
Azure Functions Core Concepts
- Serverless: No server management is required. Azure takes care of scaling, maintenance, and the underlying infrastructure. You only pay attention to your code.
- Event-driven: They can be triggered by various events like HTTP requests, changes in databases, messages in queues, file uploads, or timers. The function is automatically called when the event occurs.
- Automatic Scaling: Azure Functions adjust their size automatically in response to the volume of events or requests that come in. They will automatically scale up in response to high demand and scale down in response to low demand. Therefore, it is perfect for applications with erratic workloads.
- Numerous Programming Languages: Azure Functions are compatible with several programming languages:
- JavaScript (Node.js)
- C#
- JAVA
- Python
- PowerShell
- TypeScript
- Connectivity with Azure Services: Azure Functions easily connect with Azure Storage, Azure Event Grid, Azure Service Bus, Azure Logic Apps, and other Azure services. This enables you to use Azure Functions as a key component to create robust workflows, event-driven systems, or microservices.
Prerequisites
To get a full grasp of this project, the following requirements are needed:
- Basic Python knowledge.
- Basic understanding of Azure.
- Preferred IDE (using Visual Studio Code).
- Understanding of IaC in Azure (using ARM Template).
- Azure CLI installed.
- Azure Functions Core Tools Extension.
Setting Up Project Environment
Before starting, we need to set up our environment in Visual Studio Code (VSCode) and install all necessary extensions for the project.
Write the following command to create a Python virtual environment to serve as an isolation to all other resources.
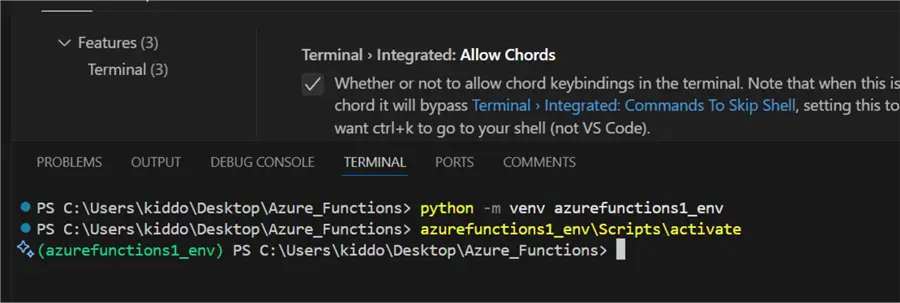
python -m venv azurefunctions1_env
azurefunctions1_env\Scripts\activate
Installing Necessary Extensions
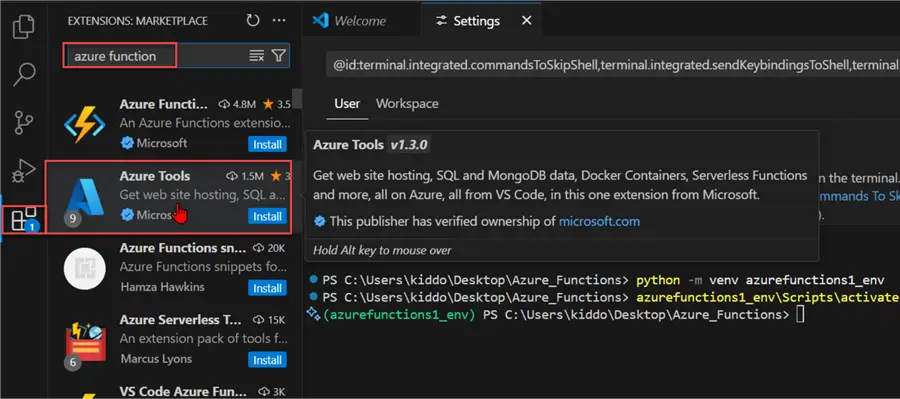
Now, we need to install the Azure Tools extension in VSCode in our location environment. Click on the Extension tab, then search for Azure Tools. The Azure Tool houses several extensions, ultimately providing a comprehensive set of tools for creating, managing, and deploying Azure resources. Consider it your one-stop shop for Visual Studio Code Azure development.
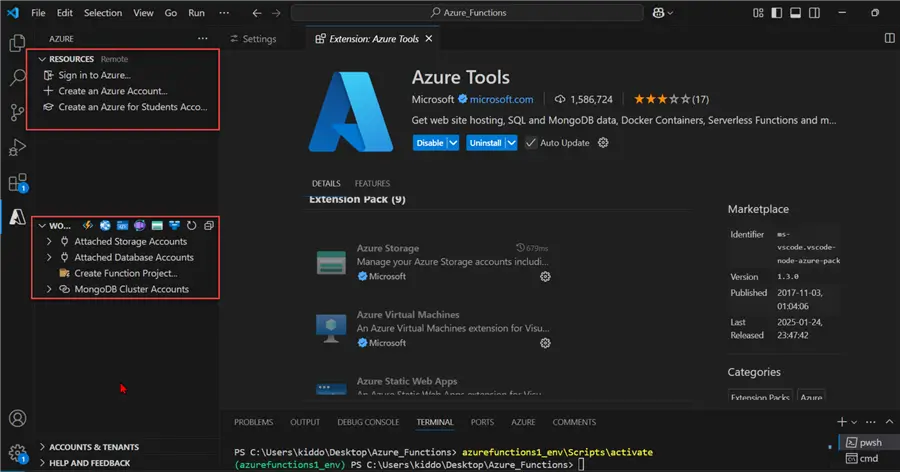
If properly installed, you should see an extra Widget for Azure containing all the different resources in Azure.
Provisioning Resources
For this project, we will use Azure Resource Management (ARM) Template, which serves as an Infrastructure as a Code (IaC) for creating all our necessary resources.
The following steps should be followed to create an Azure Function App using ARM Template.
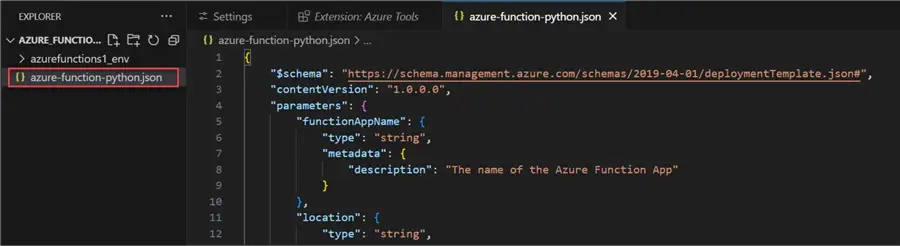
Step 1: Create ARM Template JSON file
In your VSCode, create a new file called azure-function-python.json and write the following JSON inside:

Step 2: Deploy ARM Template
In your VSCode Command Line, write the following commands.
>> az loginThis command is needed to log into the Azure Portal.
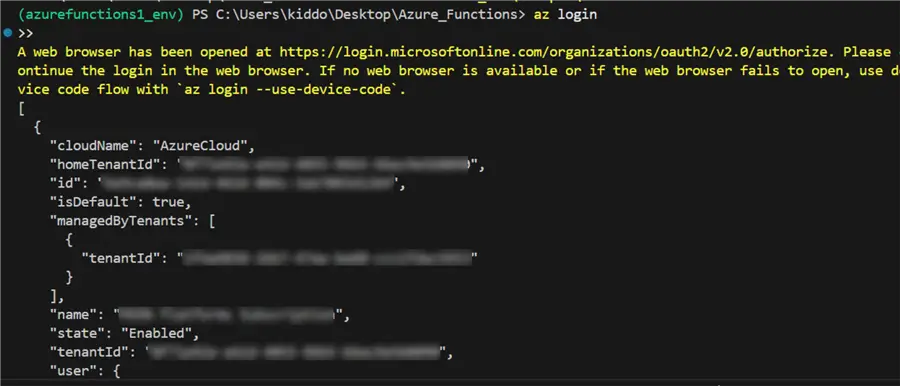
After successfully logging into Azure, you need to select your Subscript with the command below.

The following are kept into consideration before creating the ARM template JSON file:
- Resource Group: docker_rg
- Storage Account Name: airflowdatalakestaging
- Region: UK South
- Python Version: Python 3.11 Linux Version
With this information listed above, we can create the necessary Azure Function App service.
Start by creating a new ARM template in your VSCode with the .json extension.
After creating the new file, paste it into the ARM template and save your work.
{
    "$schema": "https://schema.management.azure.com/schemas/2019-04-01/deploymentTemplate.json#",
    "contentVersion": "1.0.0.0",
    "parameters": {
        "functionAppName": {
            "type": "string",
            "metadata": {
                "description": "The name of the Azure Function App"
            }
        },
        "location": {
            "type": "string",
            "defaultValue": "uksouth",
            "metadata": {
                "description": "Location for all resources"
            }
        },
        "storageAccountName": {
            "type": "string",
            "defaultValue": "airflowdatalakestaging",
            "metadata": {
                "description": "The name of the existing storage account"
            }
        }
    },
    "variables": {
        "hostingPlanName": "[concat('asp-', parameters('functionAppName'))]",
        "functionWorkerRuntime": "python",
        "functionRuntime": "~4",
        "pythonVersion": "3.11"
    },
    "resources": [
        {
            "type": "Microsoft.Web/serverfarms",
            "apiVersion": "2022-03-01",
            "name": "[variables('hostingPlanName')]",
            "location": "[parameters('location')]",
            "sku": {
                "name": "Y1",
                "tier": "Dynamic"
            },
            "properties": {
                "computeMode": "Dynamic",
                "reserved": true
            }
        },
        {
            "type": "Microsoft.Web/sites",
            "apiVersion": "2022-03-01",
            "name": "[parameters('functionAppName')]",
            "location": "[parameters('location')]",
            "kind": "functionapp,linux",
            "dependsOn": [
                "[resourceId('Microsoft.Web/serverfarms', variables('hostingPlanName'))]"
            ],
            "properties": {
                "serverFarmId": "[resourceId('Microsoft.Web/serverfarms', variables('hostingPlanName'))]",
                "siteConfig": {
                    "linuxFxVersion": "[concat('PYTHON|', variables('pythonVersion'))]",
                    "appSettings": [
                        {
                            "name": "AzureWebJobsStorage",
                            "value": "[concat('DefaultEndpointsProtocol=https;AccountName=',parameters('storageAccountName'),';AccountKey=',listKeys(resourceId('Microsoft.Storage/storageAccounts', parameters('storageAccountName')), '2022-05-01').keys[0].value,';EndpointSuffix=','core.windows.net')]"
                        },
                        {
                            "name": "FUNCTIONS_EXTENSION_VERSION",
                            "value": "[variables('functionRuntime')]"
                        },
                        {
                            "name": "FUNCTIONS_WORKER_RUNTIME",
                            "value": "[variables('functionWorkerRuntime')]"
                        },
                        {
                            "name": "WEBSITE_RUN_FROM_PACKAGE",
                            "value": "1"
                        }
                    ],
                    "use32BitWorkerProcess": false,
                    "ftpsState": "Disabled"
                }
            }
        }
    ],
    "outputs": {
        "functionAppName": {
            "type": "string",
            "value": "[parameters('functionAppName')]"
        }
    }
}
Run the command below in your terminal to provision the Azure Function App. This should take a couple of minutes, depending on your internet speed.
az deployment group create --resource-group docker_rg --template-file azure-function-python.json --parameters functionAppName=first-time location=uksouth

ARM Template Breakdown.The ARM template is broken as follows:
- Parameters
- functionAppName: Name of the Azure Function App.
- Location: Default region set to UKSouth.
- StorageAccountName: Using an existing storage account.
- Variables
- hostingPlanName: Creates a hosting plan name using asp-<functionAppName>.
- functionWorkerRuntime: Specifies the runtime as Python.
- functionRuntime: Uses ~4 (latest Function runtime).
- pythonVersion: Sets Python version to 3.11.
- Resources
- App Service Plan (Microsoft.Web/serverfarms)
- Function App (Microsoft.Web/sites)
Step 3: Confirm Deployment
To confirm deployment of Azure Function App, log in to your Azure Portal and check the resource group used.

Section A: Timer Trigger with Azure Function
The Timer Trigger in Azure Functions allows you to run a function on a schedule. It’s great for when you need to perform activities frequently.
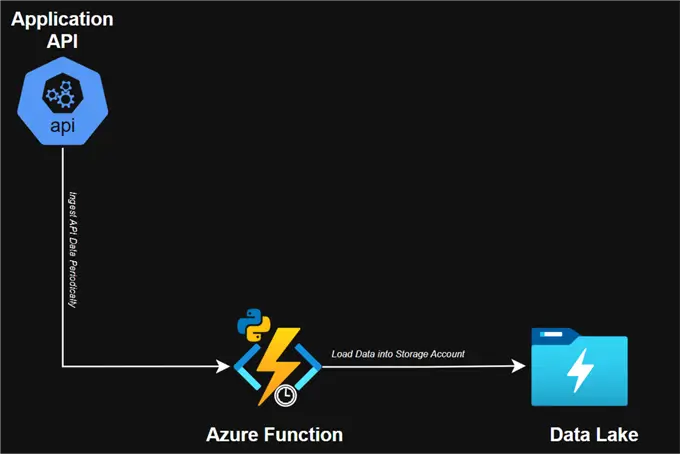
Project Architecture – Timer Trigger
Mini Project with Timer Trigger Function
Let’s start by creating a test script to ingest data from an API every minute and store the data in memory in Python. After 5 minutes, the data will upload into the Azure storage account.
The following steps are needed to achieve this process.
Step 1: Create the Python Script that Performs the Operation
First, start by installing all the necessary libraries for this project. Create a requirements.txt file in the same directory as your project.
Pip install -r requirements.txt

requests
pandas
python-dotenv
azure-storage-blob
azure-functions
Second, set up the .env file directory to store all credentials.
AZURE_STORAGE_ACCOUNT_NAME=airflowdatalakestaging
AZURE_STORAGE_CONTAINER_NAME=airflowcontainer
AZURE_STORAGE_SAS_TOKEN=?sv=xxxxxxxxxxxxxxxxxxxx
Last, using the Python script, we can ingest and save the data from the API as a data frame. Then, after 5 minutes, it will upload to Azure Storage Account.
import azure.functions as func
import logging
import os
import json
import requests
import pandas as pd
from datetime import datetime, timedelta
from typing import List, Dict

app = func.FunctionApp()

# Global variable to store data between function executions
stored_data: List[Dict] = []
last_upload_time: datetime = datetime.min

class DataCollector:
    def __init__(self):
        self.api_url = os.getenv('API_URL')
        self.account_name = os.getenv('AZURE_STORAGE_ACCOUNT_NAME')
        self.container_name = os.getenv('AZURE_STORAGE_CONTAINER_NAME')
        self.sas_token = os.getenv('AZURE_STORAGE_SAS_TOKEN')

    def fetch_api_data(self):
        """Fetch data from the Random User API"""
        try:
            response = requests.get(self.api_url)
            response.raise_for_status()
            return response.json()['results'][0]
        except requests.RequestException as e:
            logging.error(f"Error fetching API data: {e}")
            return None

    def flatten_json(self, json_data):
        """Flatten nested JSON data"""
        flattened = {}
        def flatten(x, prefix=''):
            if isinstance(x, dict):
                for key, value in x.items():
                    flatten(value, f"{prefix}{key}_" if prefix else key)
            else:
                flattened[prefix.rstrip('_')] = x
        flatten(json_data)
        return flattened

    def upload_to_azure(self, data_to_upload):
        """Convert collected data to CSV and upload to Azure Storage"""
        if not data_to_upload:
            logging.warning("No data to upload")
            return

        # Convert to DataFrame
        df = pd.DataFrame(data_to_upload)

        # Generate filename with timestamp
        timestamp = datetime.now().strftime('%Y%m%d_%H%M%S')
        filename = f"random_users_{timestamp}.csv"
        folder_name = "timer_folder"
        blob_path = f"{folder_name}/{filename}"

        from azure.storage.blob import BlobServiceClient

        try:
            # Create blob service client
            blob_service_client = BlobServiceClient(
                account_url=f"https://{self.account_name}.blob.core.windows.net",
                credential=self.sas_token
            )

            container_client = blob_service_client.get_container_client(self.container_name)
            csv_data = df.to_csv(index=False).encode('utf-8')
            blob_client = container_client.get_blob_client(blob_path)
            blob_client.upload_blob(csv_data, overwrite=True)

            logging.info(f"Successfully uploaded {filename} to Azure Storage with {len(data_to_upload)} records")

        except Exception as e:
            logging.error(f"Error uploading to Azure Storage: {e}")

@app.schedule(schedule="*/1 * * * * *", arg_name="myTimer", run_on_startup=True,
              use_monitor=False)
def timer_trigger(myTimer: func.TimerRequest) -> None:
    global stored_data, last_upload_time
    current_time = datetime.now()

    # Initialize last_upload_time if this is the first run
    if last_upload_time == datetime.min:
        last_upload_time = current_time
        logging.info("Initialized last upload time")

    logging.info(f'Timer trigger function executed at: {current_time}')

    # Create collector instance
    collector = DataCollector()

    # Fetch and store data
    data = collector.fetch_api_data()
    if data:
        flattened_data = collector.flatten_json(data)
        stored_data.append(flattened_data)
        logging.info(f"Added new data point. Total records in memory: {len(stored_data)}")

    # Check if 5 minutes have passed since last upload
    if current_time - last_upload_time >= timedelta(minutes=5):
        logging.info("5 minutes have passed, preparing to upload data")

        if stored_data:
            # Upload data
            collector.upload_to_azure(stored_data)

            # Clear the stored data and reset timer
            stored_data = []
            last_upload_time = current_time

            logging.info("Data uploaded and memory cleared")
        else:
            logging.warning("No data to upload after 5-minute interval")

    logging.info('Timer trigger function completed.')
Step 2: Observe Data Output
Using the Python run command, notice in the command terminal that the data are successfully ingested from the API for 5 minutes and later converted to a dataframe which is later uploaded to an Azure Storage account.
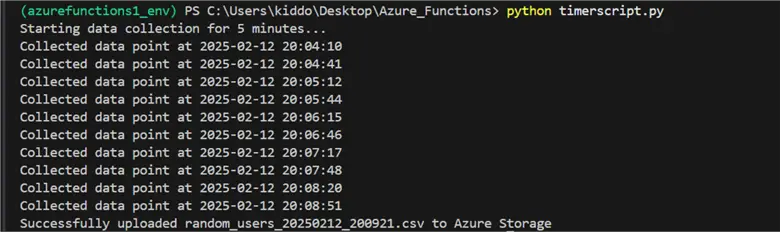
You will notice the CSV file updated successfully in your Azure storage account.

Step 3: Create Azure Timer Trigger Function
We will repeat the entire process, but this time, we will set up a CRON job (Timer Trigger) using Azure Functions.
In our VSCode, click the Azure Tool widget and create a new Azure Function. In the top window, select the project directory we are currently working on. We will use the Python language and the latest Model version (V2 for this project).

For this project, we will select the Timer Trigger, then provide Azure Function with a name.

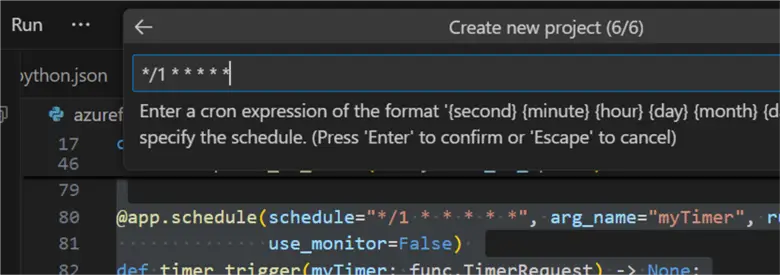
We need to create a CRON job that will run every 1 minute by using the timer */1 * * * * * and then clicking Enter. It will take a few minutes to provision and set up all the necessary environments.
Step 4: Credential Mapping
A couple of files will be generated. Click on the Local.settings.json file. This will house the necessary credentials before being uploaded to the Azure Function.
{
    "IsEncrypted": false,
    "Values": {
        "FUNCTIONS_WORKER_RUNTIME": "python",
        "AzureWebJobsStorage": "UseDevelopmentStorage=true",
        "API_URL": "https://randomuser.me/api/",
        "AZURE_STORAGE_ACCOUNT_NAME": "airflowdatalakestaging",
        "AZURE_STORAGE_CONTAINER_NAME": "airflowcontainer",
        "AZURE_STORAGE_SAS_TOKEN": "your-sas-token-here"
    }
}
Step 5: Timer Script with Azure Function
A new Python file will be generated called function_app.py connecting the default timer trigger function.
import logging
import azure.functions as func

app = func.FunctionApp()

@app.timer_trigger(schedule="*/1 * * * * *", arg_name="myTimer", run_on_startup=False,
              use_monitor=False)
def timer_trigger(myTimer: func.TimerRequest) -> None:
    if myTimer.past_due:
        logging.info('The timer is past due!')

    logging.info('Python timer trigger function executed.')
With the default script generated, let’s update it to get data from the API and do all necessary processes after.

Some adjustments must be made to our script before integrating it with the Azure Function Timer trigger. This time, there will be a loop that collects data for 60 seconds, then after 2 minutes, the timer gets triggered, and data are uploaded to the storage account.
At the top corner, click the Run button and select Start Debugging. It will take a few minutes to install all necessary dependencies and start running the script.
Note: Adjustments were made to the timer for 2 minutes instead of the original 1 minute due to some inconsistency during loading.
import azure.functions as func
import logging
import os
import json
import requests
import pandas as pd
from datetime import datetime, timedelta
from typing import List, Dict
import asyncio
import aiohttp

app = func.FunctionApp()

# Global variables to store data and track execution state
stored_data: List[Dict] = []
is_collecting: bool = False
collection_start_time: datetime = datetime.min

class DataCollector:
    def __init__(self):
        self.api_url = os.getenv('API_URL')
        self.account_name = os.getenv('AZURE_STORAGE_ACCOUNT_NAME')
        self.container_name = os.getenv('AZURE_STORAGE_CONTAINER_NAME')
        self.sas_token = os.getenv('AZURE_STORAGE_SAS_TOKEN')

    async def fetch_api_data_async(self, session):
        """Fetch data from the Random User API asynchronously"""
        try:
            async with session.get(self.api_url) as response:
                if response.status == 200:
                    data = await response.json()
                    return data['results'][0]
                else:
                    logging.error(f"API request failed with status {response.status}")
                    return None
        except Exception as e:
            logging.error(f"Error fetching API data: {e}")
            return None

    def flatten_json(self, json_data):
        """Flatten nested JSON data"""
        flattened = {}
        def flatten(x, prefix=''):
            if isinstance(x, dict):
                for key, value in x.items():
                    flatten(value, f"{prefix}{key}_" if prefix else key)
            else:
                flattened[prefix.rstrip('_')] = x
        flatten(json_data)
        return flattened

    async def collect_data_for_duration(self, duration_seconds: int = 60):
        """Collect data for the specified duration"""
        collected_data = []
        async with aiohttp.ClientSession() as session:
            start_time = datetime.now()
            while (datetime.now() - start_time).total_seconds() < duration_seconds:
                data = await self.fetch_api_data_async(session)
                if data:
                    flattened_data = self.flatten_json(data)
                    collected_data.append(flattened_data)
                await asyncio.sleep(1)  # Wait 1 second between requests
        return collected_data

    def upload_to_azure(self, data_to_upload):
        """Convert collected data to CSV and upload to Azure Storage"""
        if not data_to_upload:
            logging.warning("No data to upload")
            return

        # Convert to DataFrame
        df = pd.DataFrame(data_to_upload)

        # Generate filename with timestamp
        timestamp = datetime.now().strftime('%Y%m%d_%H%M%S')
        filename = f"random_users_{timestamp}.csv"
        folder_name = "timer_folder"
        blob_path = f"{folder_name}/{filename}"

        from azure.storage.blob import BlobServiceClient

        try:
            # Create blob service client
            blob_service_client = BlobServiceClient(
                account_url=f"https://{self.account_name}.blob.core.windows.net",
                credential=self.sas_token
            )

            container_client = blob_service_client.get_container_client(self.container_name)
            csv_data = df.to_csv(index=False).encode('utf-8')
            blob_client = container_client.get_blob_client(blob_path)
            blob_client.upload_blob(csv_data, overwrite=True)

            logging.info(f"Successfully uploaded {filename} to Azure Storage with {len(data_to_upload)} records")

        except Exception as e:
            logging.error(f"Error uploading to Azure Storage: {e}")

@app.schedule(schedule="0 */2 * * * *", arg_name="myTimer", run_on_startup=True,
              use_monitor=False)
async def timer_trigger(myTimer: func.TimerRequest) -> None:
    global stored_data, is_collecting, collection_start_time
    current_time = datetime.now()

    logging.info(f'Timer trigger function executed at: {current_time}')

    # Check if we're already collecting data
    if is_collecting:
        logging.info("Data collection already in progress")
        return

    try:
        # Start collection process
        is_collecting = True
        collection_start_time = current_time

        # Create collector instance
        collector = DataCollector()

        # Collect data for 1 minute
        logging.info("Starting data collection for 1 minute")
        new_data = await collector.collect_data_for_duration(60)  # 60 seconds = 1 minute

        if new_data:
            # Upload collected data
            collector.upload_to_azure(new_data)
            logging.info(f"Uploaded {len(new_data)} records to Azure Storage")
        else:
            logging.warning("No data collected during the collection period")

    except Exception as e:
        logging.error(f"Error in timer trigger: {e}")
    finally:
        # Reset collection state
        is_collecting = False
        logging.info('Timer trigger function completed.')
Step 6: Observation and Confirmation
We need to confirm the data ingestion, conversion, and upload to Azure Storage Account.

In your Azure storage account, navigate to the container and check for new data uploads.

Deploy Timer Trigger Function to Azure Portal
With the Azure Function working as expected, we need to deploy our solution to the Azure Portal, making it work as a PaaS.
The following steps should be followed to achieve this:
Step 1: Deploy to Azure
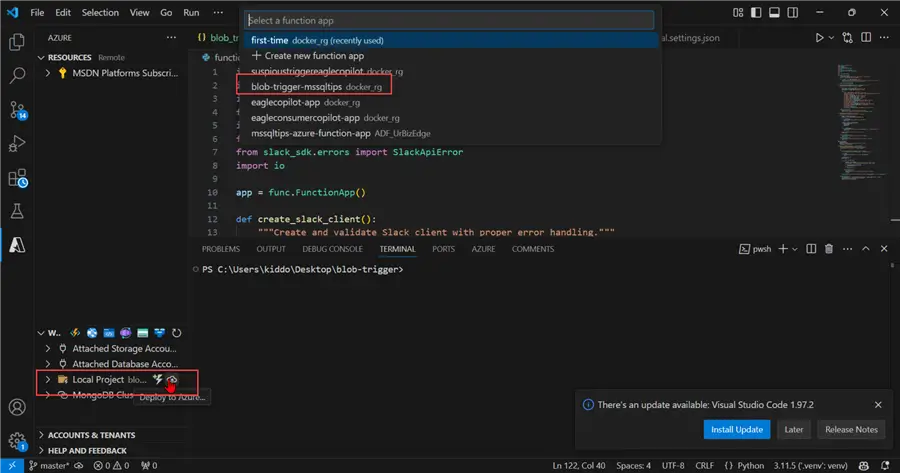
In your VSCode, click the Azure Widget, and ensure you are signed in to your Azure Subscription. Right-click on the Local Project folder and select Deploy to Azure.

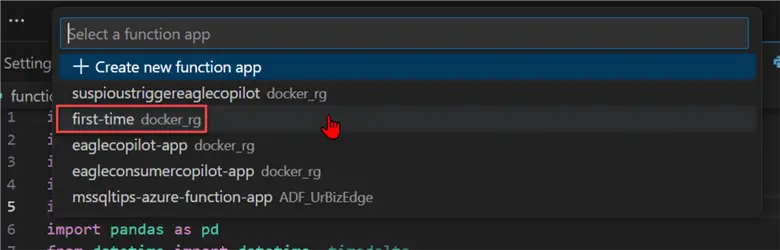
A terminal will open. Select the Azure Function App you want to use.
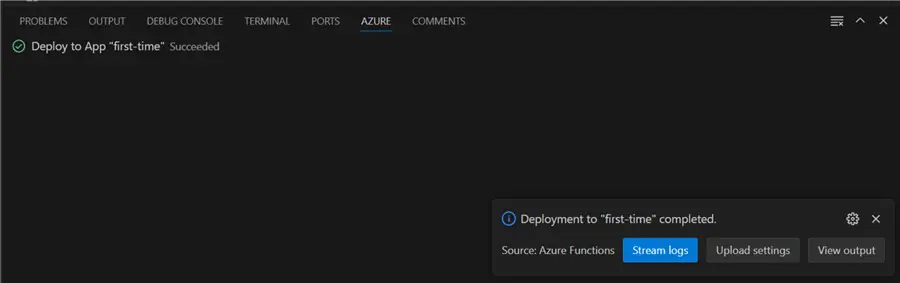
A new window will appear to confirm deployment. Click Deploy if you are ready for deployment.

You should receive a Succeeded message on your Azure Terminal if all works as expected.
Step 2: Confirm Deployment
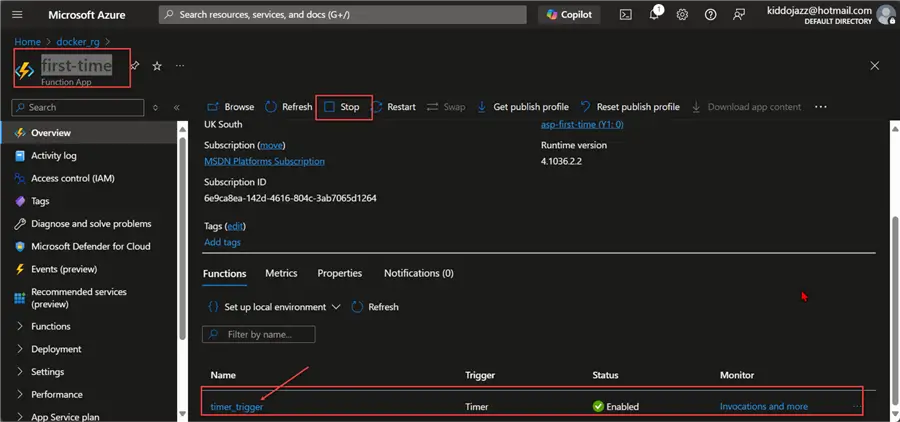
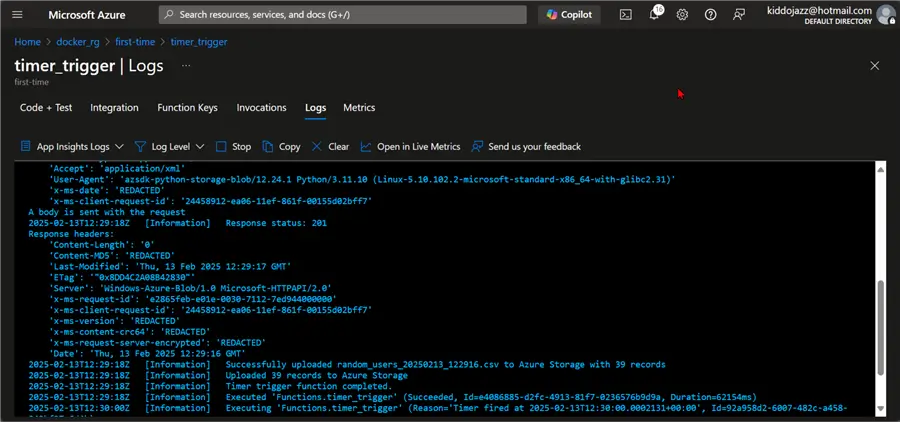
In your Azure Portal, navigate to your resource group and select the Azure Function Resource. You will notice the Azure Function App is running.
The following image shows what you will see in the Azure Function App timer_trigger. The Code + Test shows the code we uploaded to Azure Function from the VSCode development environment.

Step 3: Possible Errors
We must take into consideration that some processes that work in the development environment in VScode might not work in Azure Function. For the error below, notice there is an issue with the SAS Token and how it is being read in the Azure Function.
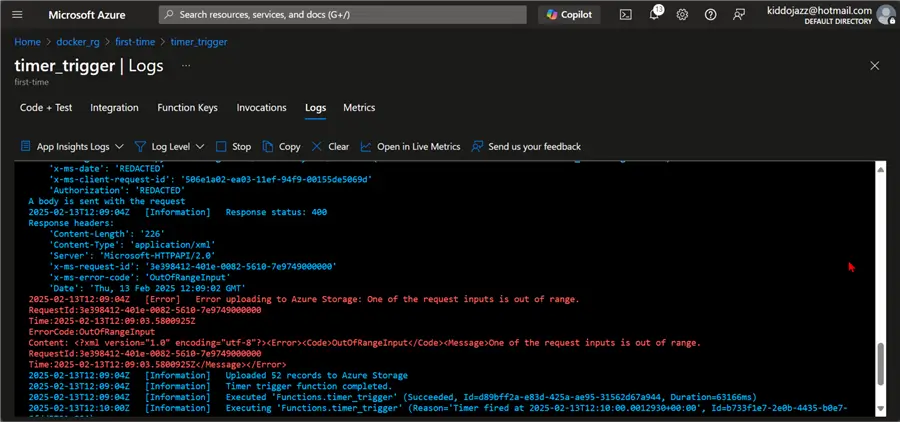
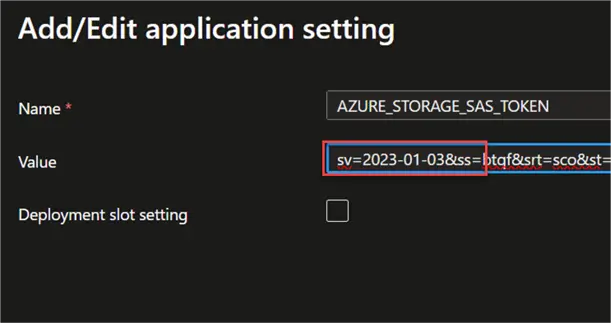
An Environment Variable needs to be created in Azure Function to fix this. Click Add to add the variable.
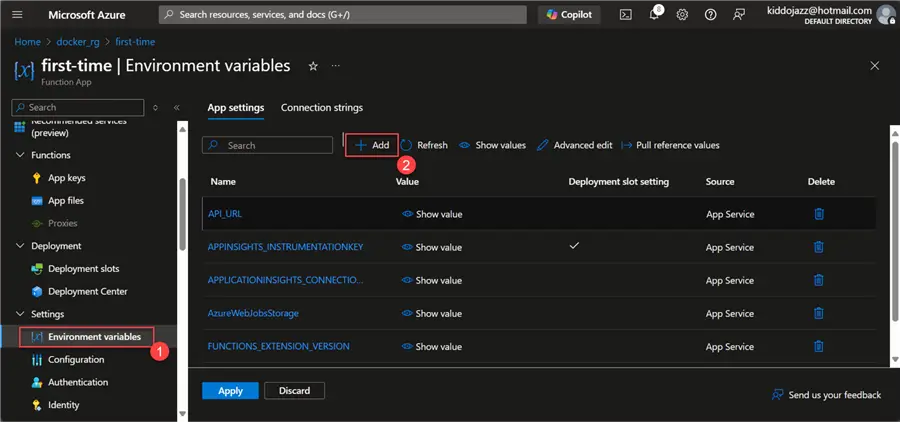
Ensure you remove the “?” when putting in the values in the Environment Variable in Azure Functions.
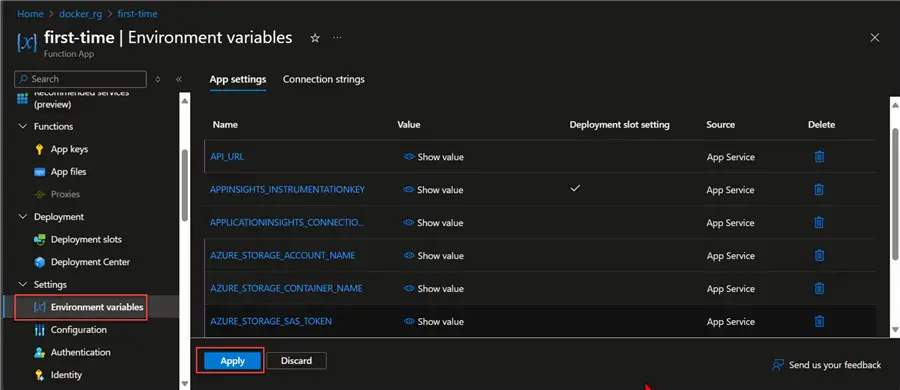
Click Apply to save all the variables created. This process will restart the Azure Function.
Step 4: Confirm Error Fix
With the error fixed, navigate to our Azure Function Log and confirm that we no longer have the same error.
In our storage account, you will notice all the new CSV files being generated.

Section B: Blob Trigger with Azure Function
In Azure Functions, a “blob trigger” is a feature that acts as an event-driven mechanism to trigger your function based on changes in blob storage. It automatically executes a function whenever a new blob is created or updated within a specified container in Azure Blob Storage. This feature enables you to process the content of that newly added or modified blob file without needing to manually start the process.
Mini Project with Blob Trigger Function
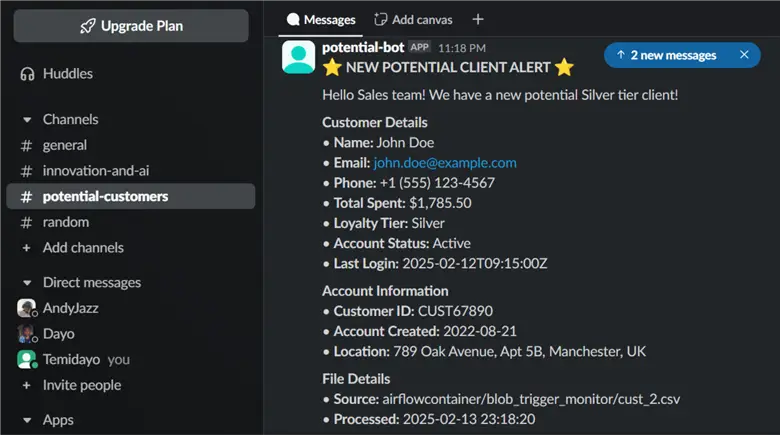
We will create an event-driven notification system that alerts the sales department in a particular channel on Slack of potential buyers. The idea will be to set up an automated notification system that sends information to a dedicated channel in Slack, telling them about potential buyers. This will occur whenever a file is uploaded to an Azure storage account.
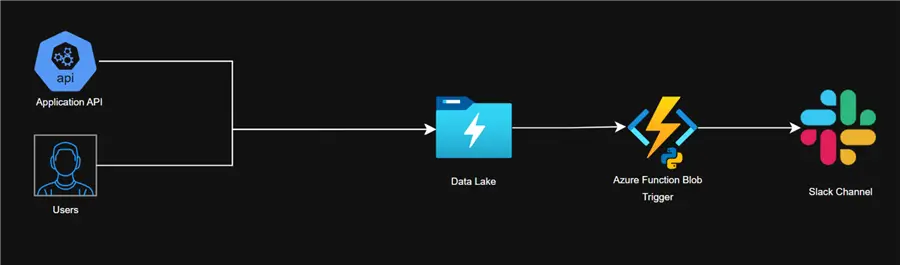
Project Architecture – Blob Trigger
Setup Slack Bot
First, we need to create a Slack BOT to send notifications to a dedicated channel.
The following steps should be followed to achieve this:
Step 1: Create Slack App
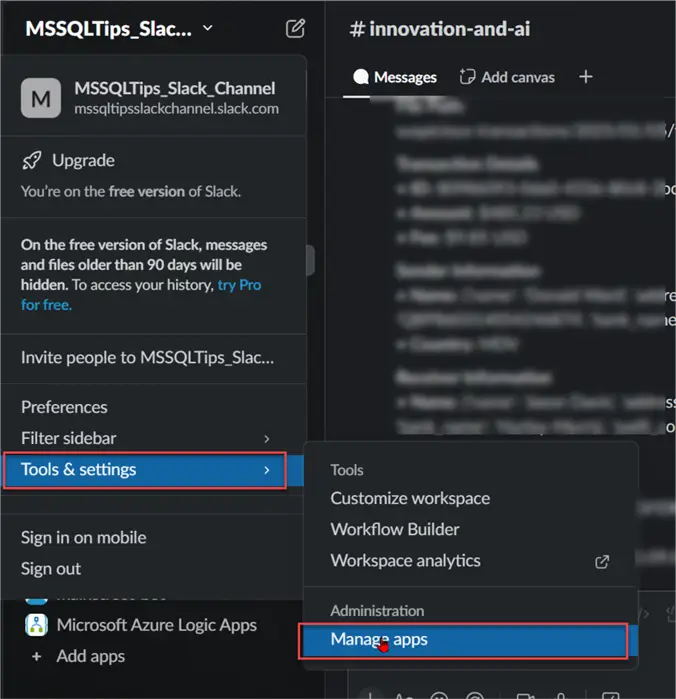
In your Slack workspace, click on your top panel and select Manage Apps to open your Slack API browser.
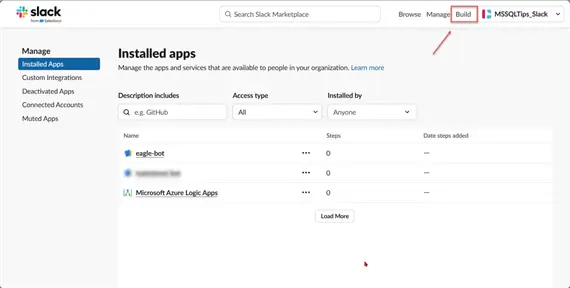
In the browser, click Build in the top right corner. Another window will appear where all necessary set-ups will be performed.
In the new window, click Create New Appand select Build from Scratch.
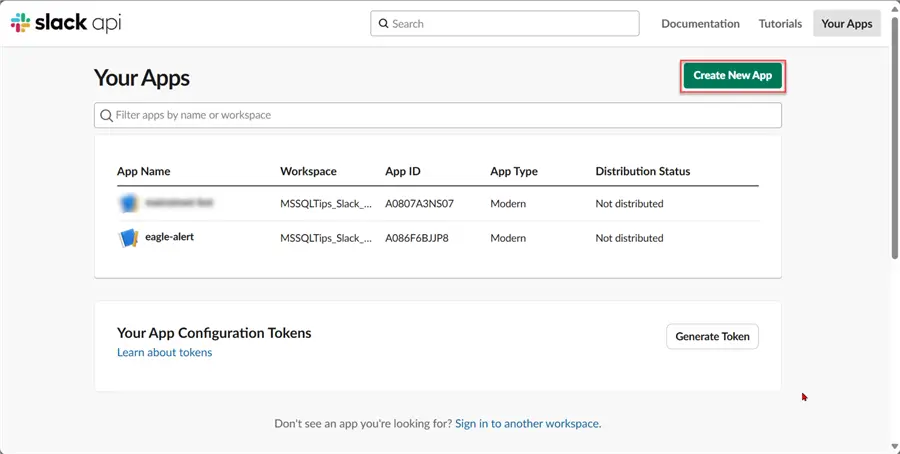
Provide a name for the app, then select Create App.

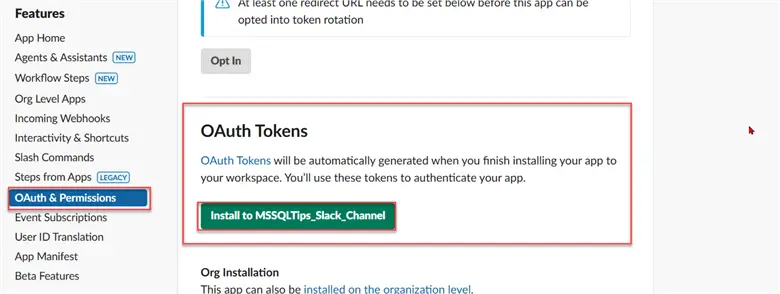
Step 2: OAuth & Permission
We need to set the scope for what the bot will do. Click Add an OAuth Scope. Select the permitted actions for the bot.

Step 3: Install the App in the Slack Channel
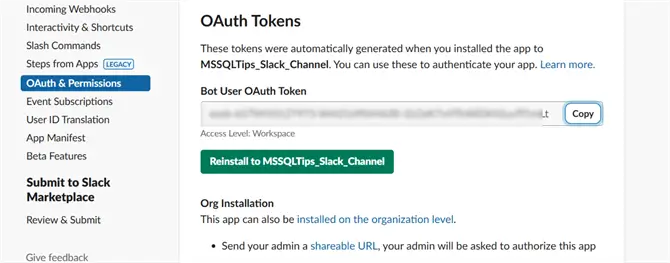
To get the OAuth Token, install the App in our Slack Workspace.
If this works as expected, you will have a new bot in your Slack Workspace.
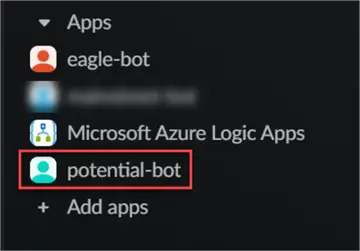
Copy the Slack token. This will be used for future connections for our solution.
Create Blob Trigger Notification to Slack Channel
Now that the Slack Bot is up and running, let’s create an Azure Function for the Marketing team for potential customers.
Step 1: Create an Azure Function App
Using the same ARM template used earlier, create an Azure Function App. But this time, let’s change the app name.
az deployment group create --resource-group docker_rg --template-file blob_trigger.json --parameters functionAppName=blob-trigger-mssqltips location=uksouth

Step 2: Create Blob Trigger Template
Start by creating a new Function in our Azure Widget in VSCode. Select the Blob trigger.
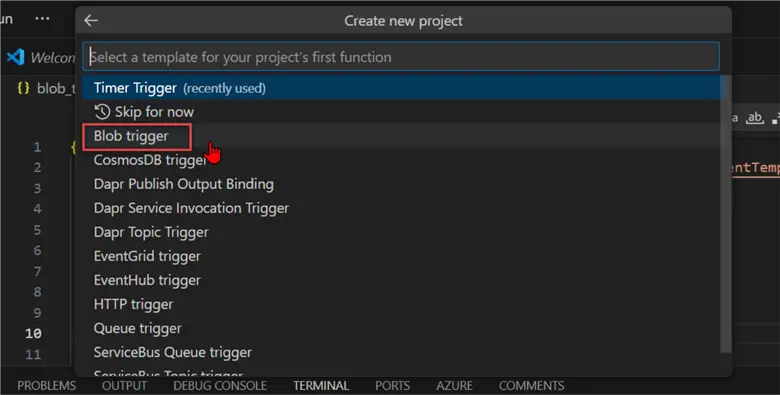
Provide the expected directory (Azure Storage Container).

We will use the Azurite emulator for local storage for the Storage Account type development.
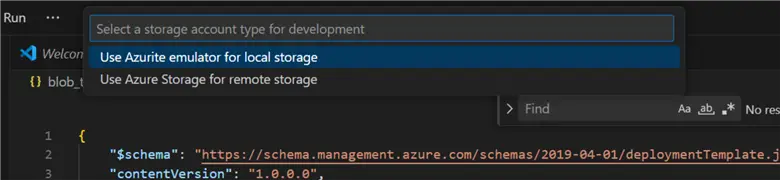
It will take a few minutes to generate the Blog Storage Trigger template for Azure Function.
import azure.functions as func
import logging

app = func.FunctionApp()

@app.blob_trigger(
    arg_name="myblob",
    path="airflowcontainer/blob_trigger_monitor/{name}",
    connection="c12fa4_STORAGE"
)
def blob_trigger(myblob: func.InputStream):
    logging.info(f"Python blob trigger function processed blob\n"
                f"Name: {myblob.name}\n"
                f"Blob Size: {myblob.length} bytes")
Step 3: Get Connection Access Key
The Access Key in the Azure Storage Account is needed to access the container in the Azure Storage Account.
In your Azure Storage Account, click on Access keys. Then, copy the Connection string. This will be used in our VSCode Blob Trigger Template.

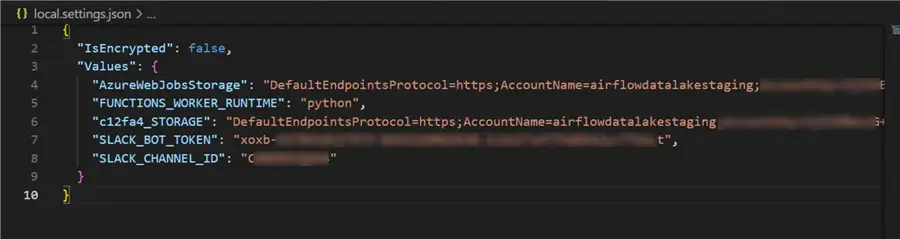
Step 4: Use Connection String in Credential Configuration
In your VSCode, select the local.settings.json file and paste the credential in the following code, as seen in the image below.

Step 5: Test Template
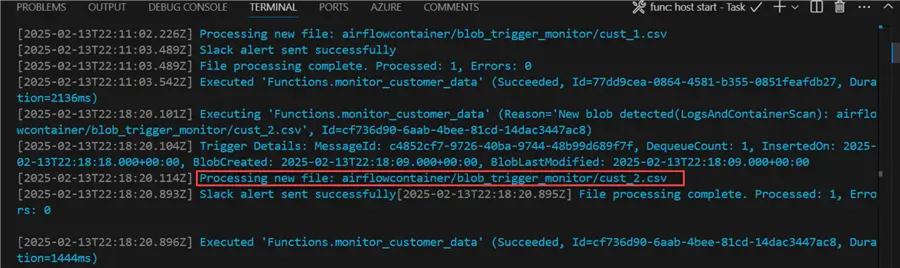
Click Run and start debugging. It will take a few minutes to install all necessary libraries and start. You will notice in the terminal that the script is working as expected, and it is waiting for a file to be uploaded to the Azure storage account.

In our Azure storage account, let’s upload a CSV file called cust_1.csv and test if the Azure Function Blob Trigger picks it.
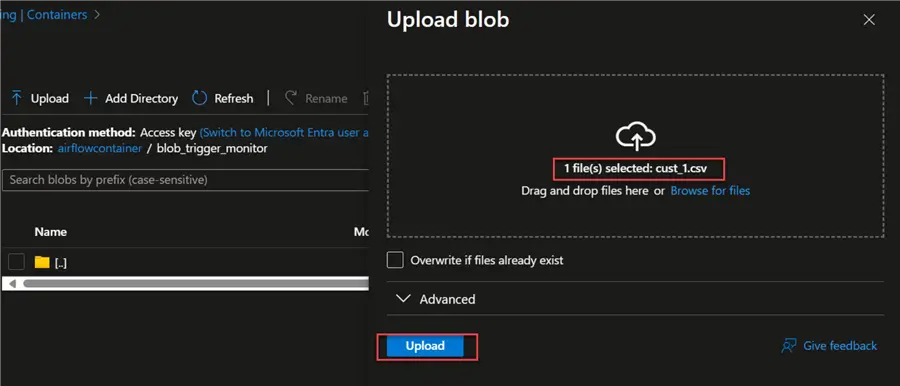
After uploading the file, you will see that the Azure Function picks the data uploaded to the storage account.

Step 6: Integrate Code with Slack BOT
Now that the Azure Blob Trigger works as expected, we need to integrate the code and send a message to the Slack Channel using the Slack Bot.
Before we get started, let’s add some necessary libraries in the requirements.txt file.
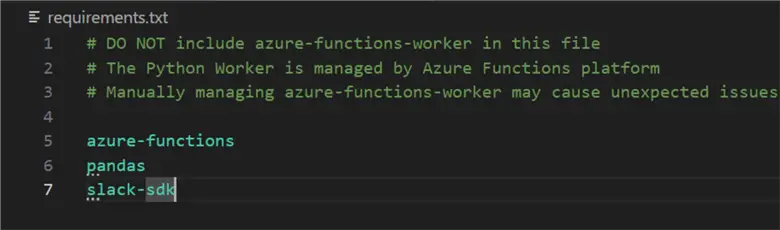
We also need to add extra credentials to the project in our local.settings.json.
Let’s first get the Slack Channel ID. In your Slack Workspace, right-click on the Channel and select channel settings. Navigate to the bottom and copy the Channel ID.

In your local.settings.json file, add the other credentials needed for the Slack bot.
With all the configurations in place, let’s update the generated blob trigger template code. This will trigger only when data gets to the storage account, capture all the necessary information, and send it to a dedicated channel on Slack.
import azure.functions as func
import logging
import pandas as pd
from datetime import datetime
import os
from slack_sdk import WebClient
from slack_sdk.errors import SlackApiError
import io

app = func.FunctionApp()

def create_slack_client():
    """Create and validate Slack client with proper error handling."""
    token = os.environ.get("SLACK_BOT_TOKEN")

    if not token or not token.startswith('xoxb-'):
        logging.error("Invalid Slack bot token format. Token should start with 'xoxb-'")
        raise ValueError("Invalid Slack bot token format")

    return WebClient(token=token)

def format_customer_message(customer: dict, file_path: str) -> str:
    """Format customer data into a Slack message."""
    try:
        # Calculate customer value metrics
        total_spent = float(customer.get('TotalSpent', 0))
        loyalty_tier = customer.get('LoyaltyTier', 'N/A')

        return (
            ":star: *NEW POTENTIAL CLIENT ALERT* :star:\n\n"
            f"Hello Sales team! We have a new potential {loyalty_tier} tier client!\n\n"
            f"*Customer Details*\n"
            f"• *Name:* {customer.get('FullName', 'N/A')}\n"
            f"• *Email:* {customer.get('Email', 'N/A')}\n"
            f"• *Phone:* {customer.get('Phone', 'N/A')}\n"
            f"• *Total Spent:* ${total_spent:,.2f}\n"
            f"• *Loyalty Tier:* {loyalty_tier}\n"
            f"• *Account Status:* {customer.get('AccountStatus', 'N/A')}\n"
            f"• *Last Login:* {customer.get('LastLogin', 'N/A')}\n\n"
            f"*Account Information*\n"
            f"• *Customer ID:* {customer.get('CustomerID', 'N/A')}\n"
            f"• *Account Created:* {customer.get('AccountCreated', 'N/A')}\n"
            f"• *Location:* {customer.get('Address', 'N/A')}\n\n"
            f"*File Details*\n"
            f"• *Source:* {file_path}\n"
            f"• *Processed:* {datetime.now().strftime('%Y-%m-%d %H:%M:%S')}"
        )
    except Exception as e:
        logging.error(f"Error formatting message: {str(e)}")
        return f"Error processing customer data from {file_path}: {str(e)}"

def send_slack_alert(message: str) -> bool:
    """Send alert to Slack with enhanced error handling."""
    try:
        client = create_slack_client()
        channel_id = os.environ.get("SLACK_CHANNEL_ID")

        if not channel_id:
            logging.error("Slack channel ID not configured")
            return False

        response = client.chat_postMessage(
            channel=channel_id,
            text=message,
            mrkdwn=True
        )

        if not response.get('ok'):
            logging.error(f"Slack API error: {response.get('error', 'Unknown error')}")
            return False

        logging.info("Slack alert sent successfully")
        return True

    except SlackApiError as e:
        logging.error(f"Failed to send Slack alert: {str(e)}")
        return False
    except Exception as e:
        logging.error(f"Unexpected error sending Slack alert: {str(e)}")
        return False

@app.blob_trigger(
    arg_name="myblob",
    path="airflowcontainer/blob_trigger_monitor/{name}.csv",
    connection="c12fa4_STORAGE"
)
def monitor_customer_data(myblob: func.InputStream):
    """Monitor and process customer data from blob storage."""
    logging.info(f"Processing new file: {myblob.name}")

    try:
        # Read CSV with proper encoding and error handling
        df = pd.read_csv(io.BytesIO(myblob.read()), encoding='utf-8')

        if df.empty:
            logging.warning(f"Empty file received: {myblob.name}")
            return

        processed_count = 0
        error_count = 0

        for _, row in df.iterrows():
            try:
                customer = row.to_dict()
                slack_message = format_customer_message(customer, myblob.name)

                if send_slack_alert(slack_message):
                    processed_count += 1
                else:
                    error_count += 1

            except Exception as e:
                error_count += 1
                logging.error(f"Error processing customer record: {str(e)}")
                continue

        logging.info(f"File processing complete. Processed: {processed_count}, Errors: {error_count}")

    except Exception as e:
        error_message = f":x: *ERROR PROCESSING FILE*\nFile: {myblob.name}\nError: {str(e)}"
        logging.error(f"File processing error: {str(e)}")
        send_slack_alert(error_message)
Click Run and Start Debugging, and upload another file to the storage account. You will see that the Azure Function picked up the changes.
In your Slack Workspace channel, you will notice that the bot has sent the same update to the dedicated channel for potential customers.
Deploy Function to Azure Portal
Let’s deploy the script from our VSCode deployment environment to the Azure Portal.
Step 1: Deploy Function
In your VSCode, select the Azure Widget and deploy. Pick the blob-trigger-mssqltips we created earlier for this purpose.
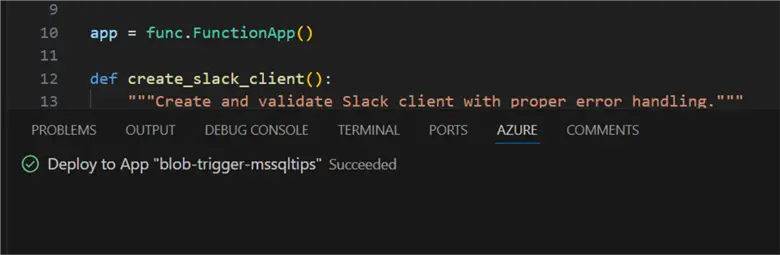
You will get a succeeded message if everything works as expected.
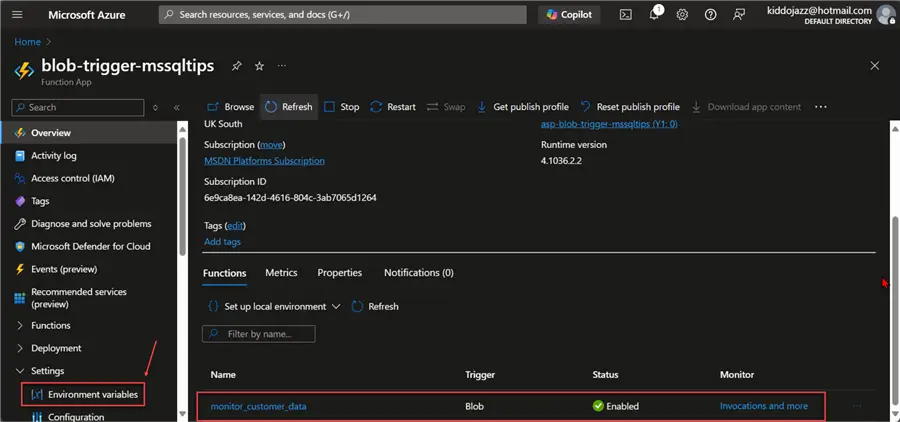
Step 2: Confirm Deployment
In our Azure Portal, navigate to our Azure Function App and select the function we created.
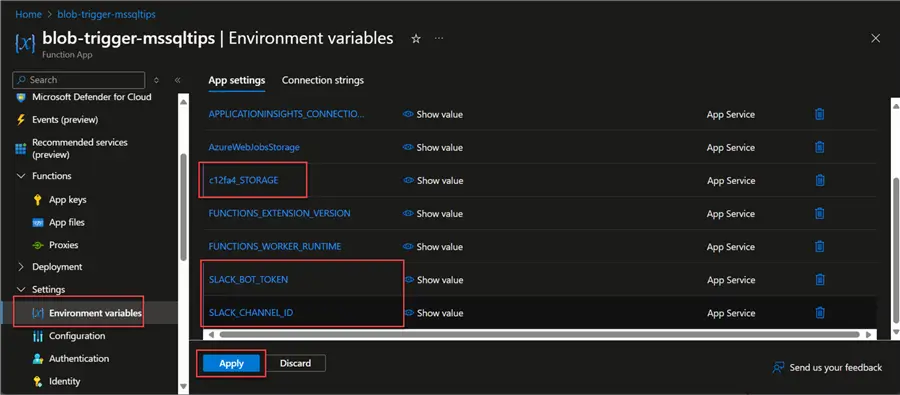
Step 3: Set Environment Variable in Azure Portal
We need to set environment variables to be used in our Local development in Azure Function App.
In the left tab, expand Settings and click on Environment variables. Update all the necessary variables and click Apply. This might take a few minutes to update, but when completed, your Azure Function App will restart.
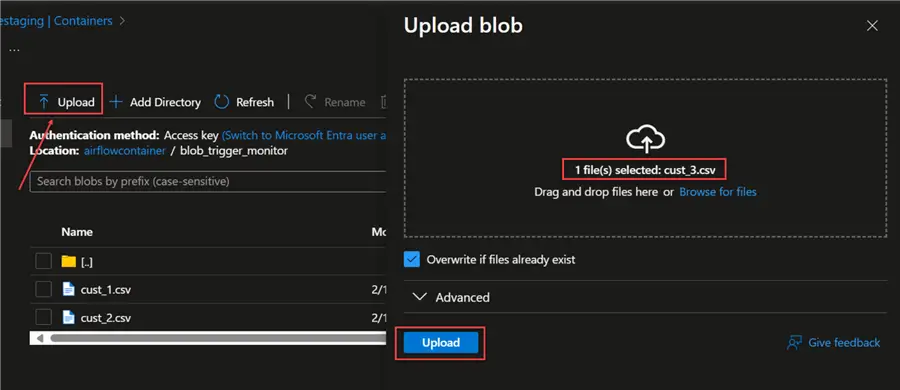
Step 4: Test Blob Trigger
Let’s test the Azure Blob trigger function by uploading a new file to the airflowconatiner/blob_trigger_monitor directory.
In your Azure Function Log tab, you will notice the new file has been captured.
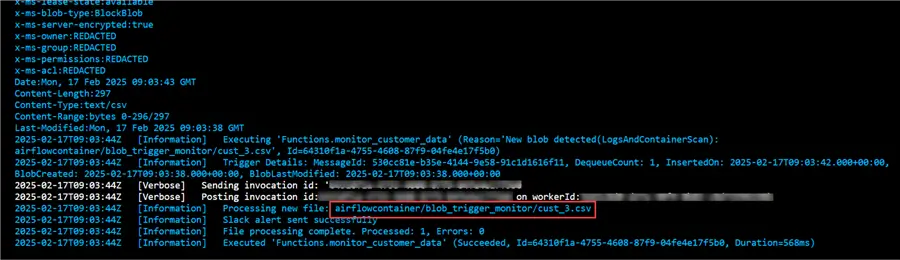
In your dedicated Slack channel for customers, you will notice the bot has also sent the necessary information from the Storage Account.

Conclusion
This article is the first part of a two-part series. We have broken down all the information about Azure Functions, when to use them, and the benefit of having serverless architecture.
We started by provisioning all necessary resources using the Azure Resource Manager Template (ARM), thereby providing a better automated approach to provisioning resources.
There are two sections in this article: using a Time Trigger with Azure Function and using the Blob Trigger in Azure Function.
Next Steps
