Problem
Data exploration is an important step in understanding and getting insights. I mentioned some of the exciting data exploration features coming with Azure Synapse Analytics in a previous article, so let’s dig into some of these features and learn how we can benefit from them.
Solution
In a previous article, I explained how to create Azure Synapse Analytics workspace and use Synapse Studio to navigate through its main interface. We will now look at how to use some of the features in Azure Synapse Analytics.
Explore data in the Data Lake
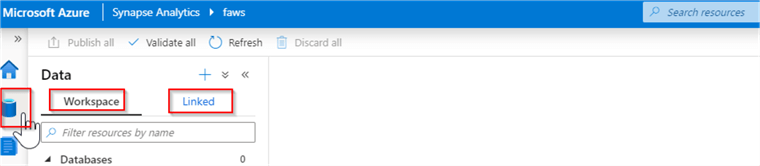
Let’s navigate to Synapse Studio and open the Data pane. This pane has the following two tabs:
- Workspace – This tab contains your internal objects, like the SQL DW clusters, Spark clusters and will be empty initially.
- Linked – This tab contains your external objects, like Data Lake accounts, Cosmos Db and will initially contain the default storage account, associated with your workspace (the one you specified while creating the workspace). In addition, this tab will also contain the datasets you created for the data integration purposes.
Here is the screenshot:
I will use an open source climate CSV file for the purpose of exploration, which you can download here.
Next, navigate to the Linked tab, open the default Data Lake account and the container we specified as a file system folder inside it. Create a folder inside it and upload the climate CSV file, using the top menu buttons:

Once the file is uploaded, right click on its name, and select New SQL script and Select TOP 100 rows, as follows:

As a result, Synapse opens a new tab and automatically generates a SELECT statement to read from this file. Click the Run button on the top menu to browse the results, as displayed below:

As you can see, Synapse has allowed to browse the content of your file, without even requiring its schema, which is great especially if you are dealing with files with an unknown schema.
Notice the Connect to dropdown list at the top of the query window displays the SQL on demand pool, which is a serverless pool provisioned when you created a workspace. This service allows executing your ad-hoc queries. Also, note that you can save a script in your workspace, using the Publish button-this reminds me of the change management tooling included with the Azure Data Factory.
Alternatively, you can persist or discard all your queries at once, using Publish all or Discard all buttons:

As you may have noticed, the results from auto generated script include the column names in the first row. So, let’s modify our query by specifying FIRSTROW=2 parameter, adding column aliases and filtering, as follows:
SELECT
    TOP 100 C6 AS LOCAL_DATE, C11 AS MEAN_TEMPERATURE , C13 as MIN_TEMPERATURE, C15 as MAX_TEMPERATURE
FROM
    OPENROWSET(
        BULK 'https://mysynapsestg.dfs.core.windows.net/myfs/test/climate-daily.csv',
        FORMAT = 'CSV',
        FIRSTROW=2,
        PARSER_VERSION='2.0'
    ) AS [result]
WHERE C6 between '2019-01-03' and '2019-01-30'
Next, run this query and change the output results from tabular to charts, using the Chart button located at the top of results pane. Also, let’s change the chart properties as follows:

Attaching multiple storage accounts to your workspace
You can attach more storage accounts to your workspace, but they must be Azure Data Lake Storage Gen2.
Here are the required steps:
Create a general purpose v2 account from the Azure Portal (see this article for details).
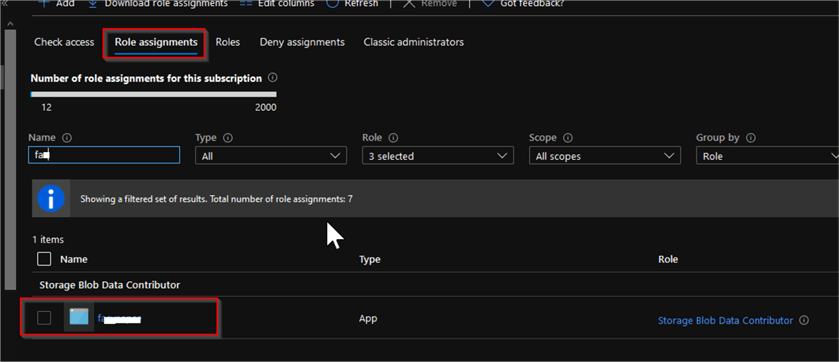
Next, we will need to grant access to the Synapse workspace’s managed identity on this storage account. So, open the Access control tab from the storage account page and use the Add button inside the Add a role assignment tab:

Select the Storage Blob Data Contributor role from the Role drop down list. Type your Synapse workspace name in the Select box and click Save button at the bottom of screen:

Open the Role assignments tab and confirm that Synapse’s managed identity has been granted the required access:
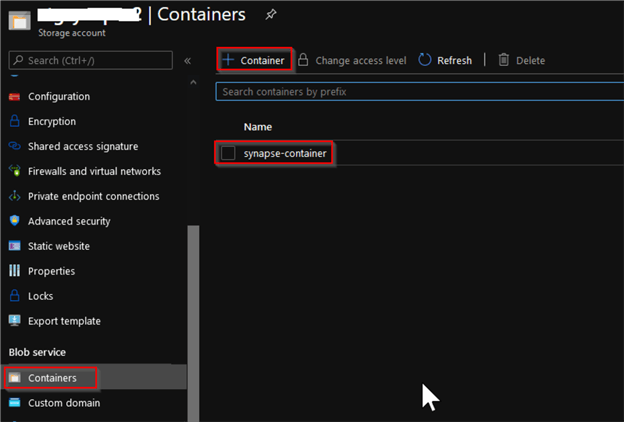
Scroll down and find the Containers button under the Blob service section and use +Container button at the top of the screen, to add a new container:
Next, we will need to create a linked service to storage account we just created. Return to Synapse Studio, select Add new resource button at the top left corner and select Connect to external data command, as follows:

Select the Azure Data Lake Storage Gen 2 option:

Provide the linked service name, select Azure subscription name and storage name from drop down list and validate connection using Test connection at the bottom of the dialog window, as follows:

Once the account is linked to your workspace, you can browse its contents and explore the data.

Next Steps

Fikrat Azizov (MCSE Data Platform and MCSE Azure Solutions Architect) has been working with SQL Server since 2002. Fikrat’s main passions are SQL Server performance optimization, cloud data technologies and machine learning. Fikrat is currently working as a Solutions Architect at Slalom Canada.
- MSSQLTips Awards: Author of the Year Contender – 2019-2022 | Rising Star (50+ tips ) – 2021