By: Hristo Hristov | Updated: 2024-01-02 | Comments (2) | Related: > Data Quality Services
Problem
Companies frequently ingest data directly without a lot of validation or sanitization. In some cases, only front-end validation, core preprocessing, or staging is performed. This mode of operation can be risky. A mistake, in the beginning, can easily propagate down the line and lead to problems, such as failed deliveries or biased decisions, among others. Let us consider a scenario where this risk must be avoided or mitigated. How do you ensure high-quality data representation for each current or prospective customer?
Solution
When you think data quality, Melissa Data should immediately come to mind - it's their specialty. Melissa's services can assist with any customer data intake process by ensuring high data quality and validation from the onset. Your customer data can be ready to use immediately without needing subsequent validations or post-processing. This high-quality data can be achieved with data verification and enrichment services such as the Melissa Personator Consumer and Melissa Personator Identity.
The solution to high-quality data involves two core Melissa Data services:
- Personator Consumer: Matches names, addresses, phones, and emails and returns a list of the closest matches according to the specified inputs.
- Personator Identity: Can handle international customer data. A real-time solution that verifies customers' details such as contact information, addresses, and other useful properties.
Most services are fully available in North America and select countries in Western Europe.
Personator Consumer (US/CAN) Service Overview
The Personator™ Web Service is an all-in-one contact checking, verification, move update, and enrichment web service. It allows you to pass in names, addresses, phone numbers, and email addresses, simultaneously parsing them, checking them for correctness, making conservative or aggressive corrections, getting the latest address, and even appending data. Each Personator request can be configured to perform one or more of the service's primary actions: Check, Verify, Move, and Append.
Check
The Check action allows you to pass in a name, address, phone number, and email address as one record. A record does not need to include all those inputs; any combination or even just one is sufficient to constitute a record and be checked. The Check action allows:
- Passing in a series of records, finding invalid addresses, phone numbers, or emails.
- Correcting errors within the data.
- Appending additional data to the records.
- Parsing out specific types of data from the input.
Verify
The Verify action finds correlations between different contact data elements by comparing diverse groups of data to the centric group or contact data type defined by the user. It verifies the record, letting you know if each group coincides with the centric piece of data in the Melissa Data Knowledge Base. You can define fields like address, phone number, or email as the centric data against which the other groups of data are compared. Auto-detection of the centric data is also available.
Move
The Move action allows you to update your U.S. contact records with data returned by the Personator Web Service. The service allows for retrieving the most current address of a person or business. Thus, if an old address is entered for a particular individual, Personator will return the latest address for that person, giving you the freshest and most up-to-date contact information.
Append
The Append action allows you to enrich your US contact records with data returned by the Personator Web Service. The service will return elements based on the selected point of centricity, which can either be the address, email, or phone.
Personator Identity (eIDV) Service Overview
Personator Identity is a high-value service that can validate and cross-check personal data against multiple international data sources in real-time. Some examples of what you can do with this service include but are not limited to:
- Verify individuals in real-time using the following matching options:
- Match against two sources using eIDV configurations for both sources
- Screen individuals against national watchlists
- Identify potential fraud by matching a name to an address to validate identity.
- Get real-time feedback if a name, address, dob, phone, email, or national ID matches one of Melissa's sources.
- Mitigate risk when onboarding new clients by satisfying all KYC (Know Your Customer) requirements.
- Customize matching rules to return different confidence levels.
- Prevent bad data from entering your systems with real-time address, email, phone, and name validation.
Additional Features include:
- Verify, correct, and standardize names, addresses, emails, and phones in real-time.
- Append latitude and longitude.
- Return address as parsed components.
- Return address in mailing label format according to the standards of each country.
- Append additional information like unique identifier, delivery indicator, and more depending on the country.
Personator Identity can match against numerous source types:
- Government
- Credit
- Utilities
- Postal
- Telco
- Consumer
- Commercial
These core benefits are available via dedicated API endpoints subject to licensed usage. Melissa Data has also provided a handy demo form to try out the functionality.
In the following sections, we will examine the functionality of the two services by integrating them with Power Apps in single mode (for handling one request) and Python in batch mode (for handling multiple requests). Read along to examine how straightforward it is to use the Melissa Personator Consumer and Personator Identity services.
Integration
Integrating with either Personator web services is straightforward with a GET request or POST request. With Power Apps, I found it easier to use GET with a REST URL because I do not have to construct a JSON object (it is technically possible, though). On the other hand, with Python, I would prefer and recommend making a POST request with a JSON body containing all necessary parameters. This way, I can submit one JSON at a time when handling a bigger data batch, as I will show in the Python section below.
Power Apps
Personator Consumer (US/CAN)
First, let's display how to check someone's identity in the U.S. from a Power App using the Check, Modify and Move API options. This fulfills a scenario where a potential customer or another subject of interest can be checked before their data proceeds to another business system.
I made one screen in my app that will accept a full name, address, city, and state. The Submit button submits the data to a Microsoft Power Automate flow that executes the call to Melissa's endpoint. The lower half of the screen contains a gallery that will display the results. More than one result will be returned in many cases, so a gallery is needed. I am testing Melissa's service with my name, which is rare in the U.S. For the address, I will try an old address where I lived more than 10 years ago:

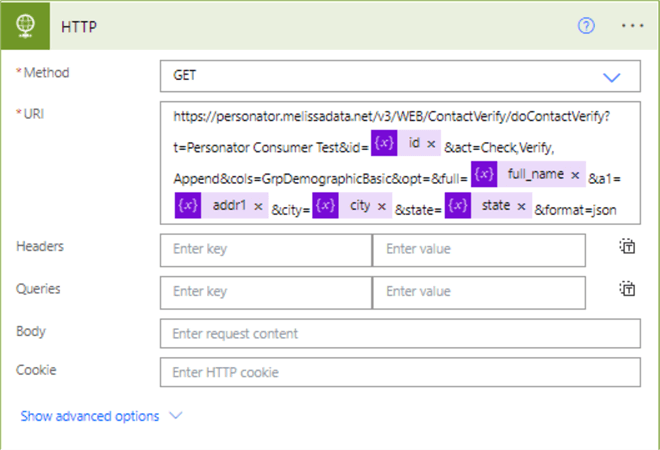
I get only one match, but this can be different with more popular U.S. names, addresses, or combinations thereof. The flow's core action, making an HTTP request, takes care of calling the Consumer API with the provided inputs:
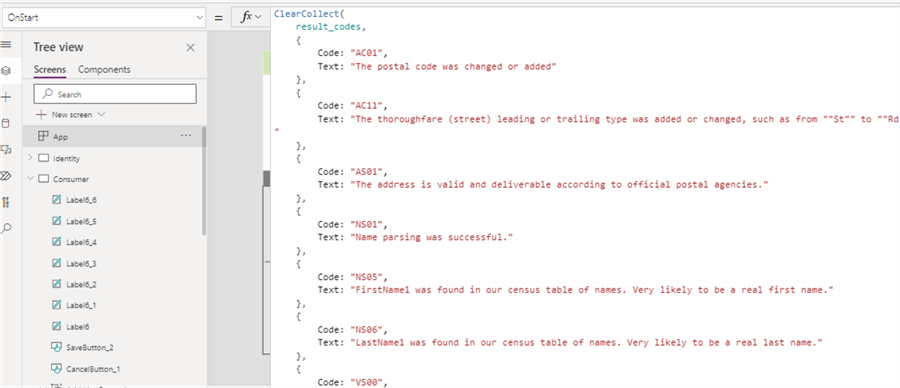
Additionally, Melissa's endpoint returns many result codes, which I displayed in the nested gallery. On the AppStart property, I configured a collection that maps a result code to text:
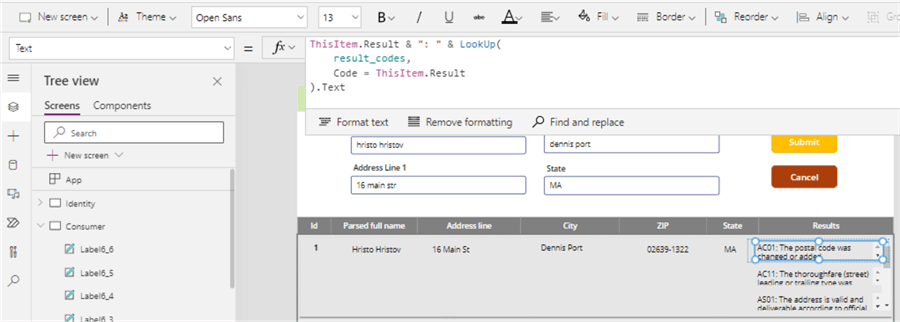
I then use the API response to look up the result code text and display it in the nested gallery, thus taking full advantage of the full validation check. The operator of the solution can take additional actions based on these codes. The nested gallery takes as Items an array of codes coming from the Results property of the JSON response:
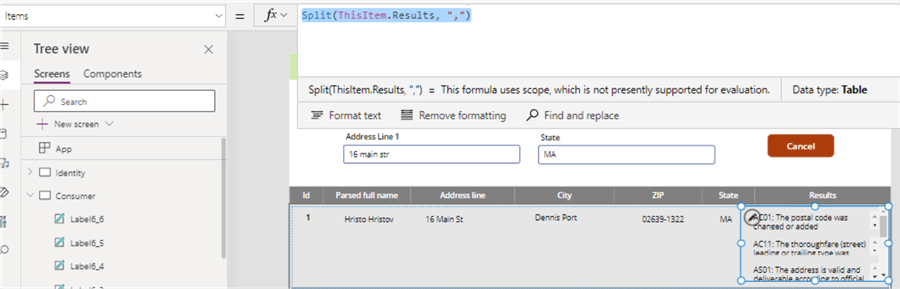
Then every item in the gallery is the lookup result of the result codes collection:
The result codes provide substantial feedback, e.g., the address is valid and deliverable according to official postal agencies, name parsing was successful, first and last names were found, etc. The result codes will depend on the input provided.
You can find both the power app and the flow in the resources section of this article. You can contact Melissa Data today for a trial API key and test the Power App. The example above uses only four inputs, but there are more supported. You can read about it in the complete documentation. Also, I used only the Check, Verify and Append actions in this example.
Personator Identity (eIDV)
The Personator Identity service sanitizes and enhances the data for a known real subject of interest, i.e., a client. The API provides two actions: Check and Verify, which represent two separate levels of subscription. The supported fields that can be submitted are, for example, full name, address line, email, date of birth, etc. A full list is available in the endpoint documentation.
Let's use a GET request to call the Personator API in single mode from a Power App. The app takes the following inputs: full name, company, phone number, email, address line, postal code, city, and country. In turn, the service will provide the following outputs: parsed first and last names, assumed gender, deliverability confidence score of the given email, time zone deducted from the address details, and a formatted address. Additionally, we will get, process, and display the Personator status codes for the personal, contact, and address details. In the screenshot below, you can see the input fields in red and the output fields in green:
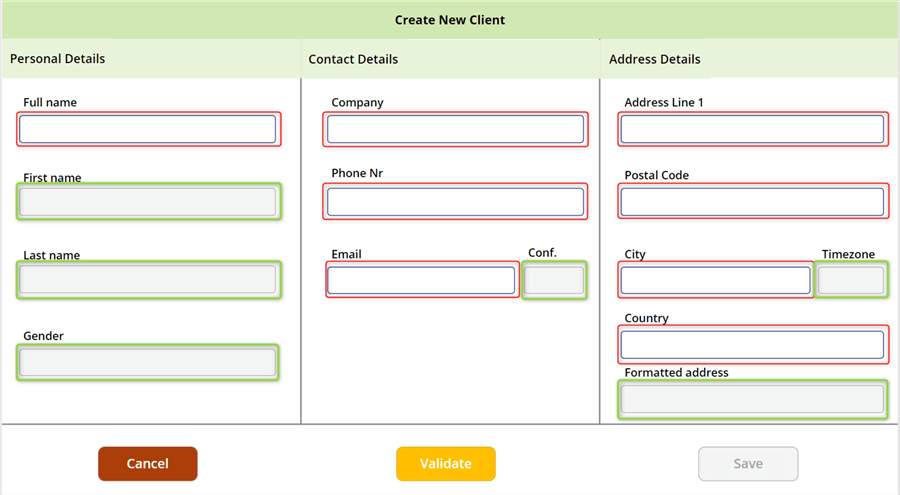
The customer details will be validated and enhanced with the extra info that the Personator API will output upon clicking the Validate button. The Save button is disabled; saving the form is subject to successful validation. This configuration shows where the Melissa Personator is positioned in the process of customer details intake. The data are checked live against Melissa's multiple data sources, such as global address database and U.S. phone data, among many others, before being saved.
To process the input data, there is another Microsoft Power Automate flow connected to the app, which is invoked with the Validate button. The results from the flow are assigned to a global variable process_result. We will use it in the output fields:

The flow's core action, making an HTTP request, takes care of calling the Personator API with the provided inputs:
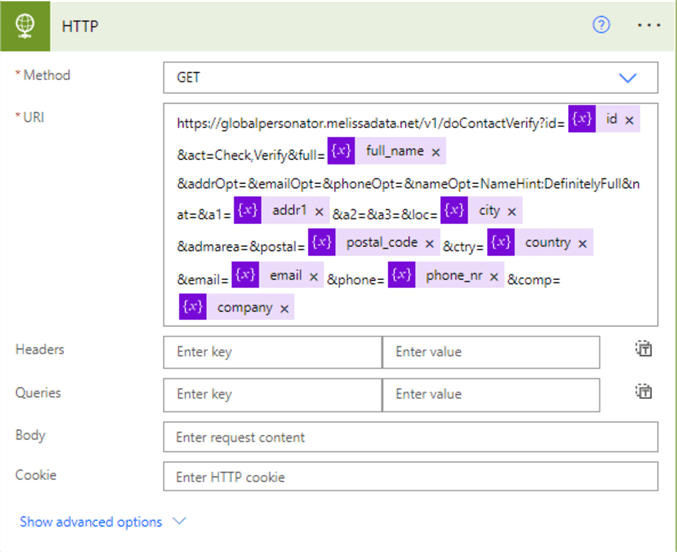
Previously in the flow definition, I initialized a variable for each input. The id variable holds the API license key you will get from your Melissa Data customer representative. The URL is easy to construct by passing arguments to the relevant fields. You can refer to the field names.
Notice in the endpoint URI that there are several fields for options. These options can be set accordingly for the name, phone, email, and address individually. For a complete list of these options, please consult the wiki page, Personator Identity Options. In this example, we are using a "vanilla" approach by leaving all options unspecified, which serves the demo purpose. Let's fill in the form and test the API:
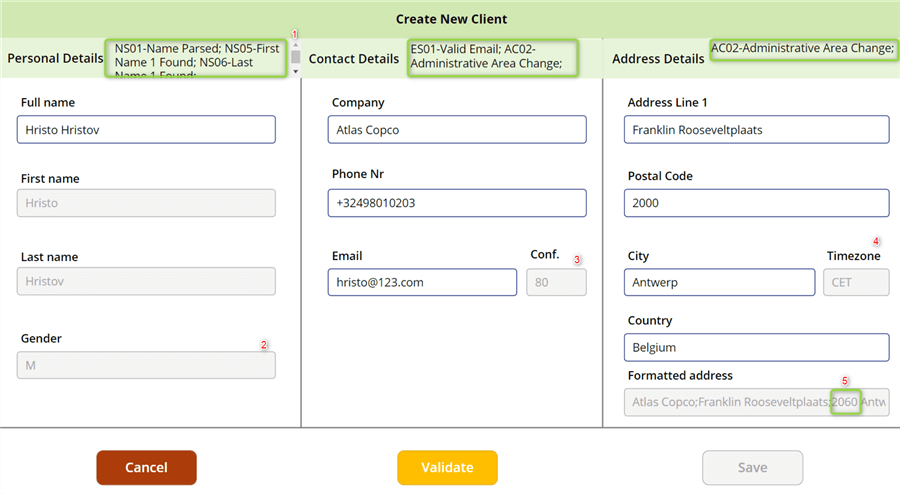
First, we have multiple result codes output in the designated areas (in green) at the top of the form. Like Personator Consumer, these codes provide a good overview of the overall data quality and results of the processing. Second, my gender was assumed correctly. I get an 80% confidence of deliverability for my email address, which Melissa determines based on their global email database (3). Next is the correctly set time zone based on the postal address details (4). Lastly, the service corrected the postal code to 2060, which is the correct one based on the address details (5).
In the Personator Consumer API section, I showed one way to handle the result codes – taking them directly from the JSON response and displaying them in a gallery. Here though, I hold them in the flow by first splitting by the comma and iterating over every element, e.g., NS01, NS05, and so on. Then I map each code to its verbose description. Finally, I build a string for each type of code (personal, contact, and address). Remember that the "Results" field containing all corresponding codes is a string, not an array. You can examine both approaches if you import the provided resources into your environment.
In order to get the real-time results from the data provider, the Personator Identity API returns a set of KV codes to determine the Verification Match. For example, the KV01 indicates that a complete match was found for the address. There are result codes that can be returned for Name matching (KV03 and KV04), DOB matching (KV07), Phone matching (KV05), and more. Additional identifiers can be returned to indicate the data source type (Credit, Government, etc.), and the eIDV service can also return matches from more than one source for each record.
Python
There are extensive options to integrate the Melissa API endpoints with Python or other popular languages, e.g., C# or JavaScript. Let us examine using Python to process more than one record with the Personator API endpoint. To display this integration, I have created the following example schema in an Azure SQL database:
CREATE TABLE [dbo].[CustomerDetails](
    [ID] [int] IDENTITY(1,1) NOT NULL,
    [CustomerID] [varchar](128) NULL,
    [FirstName] [varchar](128) NOT NULL,
    [LastName] [varchar](128) NOT NULL,
    [Company] [varchar](256) NOT NULL,
    [PhoneNumber] [varchar](128) NOT NULL,
    [Email] [varchar](512) NOT NULL,
    [DateOfBirth] [date] NOT NULL,
    [AddressLine1] [varchar](512) NOT NULL,
    [City] [varchar](128) NOT NULL,
    [PostalCode] [varchar](64) NULL,
    [Country] [varchar](128) NOT NULL
) ON [PRIMARY]
GO
ALTER TABLE [dbo].[CustomerDetails] ADD PRIMARY KEY CLUSTERED
(
    [ID] ASC
)WITH (STATISTICS_NORECOMPUTE = OFF, IGNORE_DUP_KEY = OFF, ONLINE = OFF, OPTIMIZE_FOR_SEQUENTIAL_KEY = OFF) ON [PRIMARY]
GO
This basic schema emulates a staging table loaded with 200 rows of dummy customer data. The scenario here is a subset of our main scenario, where customer data were already ingested in a raw form. Now the task is to cleanse and improve the quality of these data. There are two core differences here as compared to either Power Apps example:
- The data are being processed after ingestion in the source system. We use a staging table to pass rows of client data to Melissa. In the Power Apps example, we are making a live check, assuming the data will end up in an operational datastore.
- We will use the POST JSON method as outlined in the Melissa Data documentation (under JSON post). This approach requires structuring the input as a JSON object. With Power Apps, we used the GET method's simpler (more flexible, but equally effective) approach.
Here are the steps and script:
Step 1: We import the necessary libraries:
import pandas as pd
import requests
from sqlalchemy import create_engine
import json as j
Step 2: Next, we create an SQL connection instance. The usr_name and pwdare the variables I used for my database login credentials:
engine = create_engine(
    f'mssql+pyodbc://{user_name}:{pwd}@mssqltips2022.database.windows.net/MelissaPersonator?driver=ODBC+Driver+17+for+SQL+Server'
)
You can check my detailed article on how to do that here.
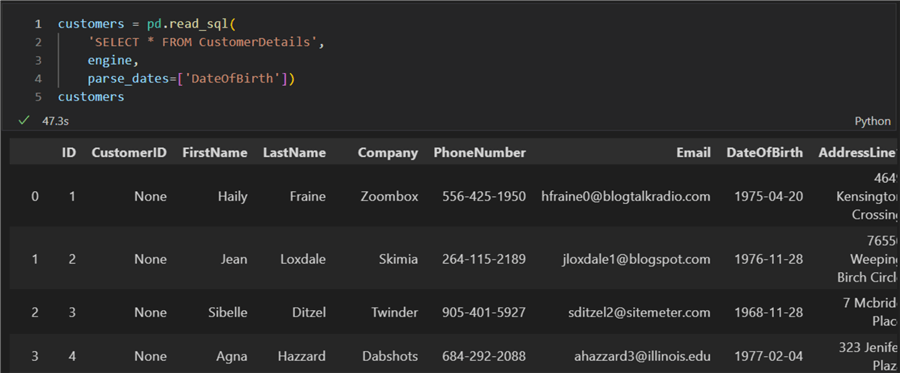
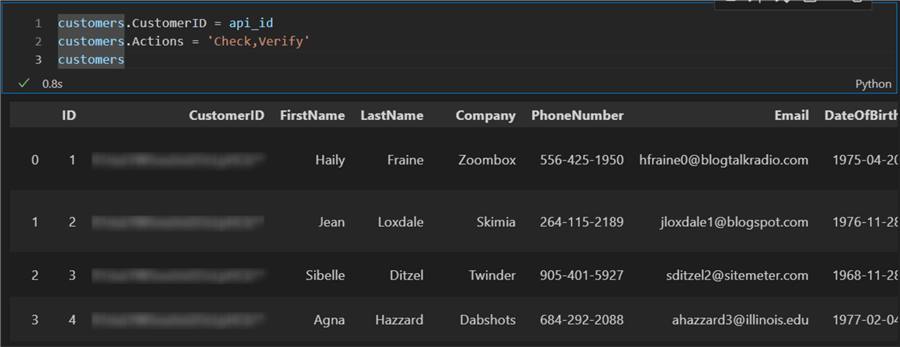
Step 3: Then we can pull the customer data into a pandas dataframe:
customers = pd.read_sql(
    'SELECT * FROM CustomerDetails',
    engine,
    parse_dates=['DateOfBirth'])
Step 4: This step is critical and required by the Melissa API. Two columns must be added to our dataframe: CustomerID, which holds the Melissa API key, and Actions, which defines what we want to do:
customers.CustomerID = api_id
customers.Actions = 'Check,Verify'
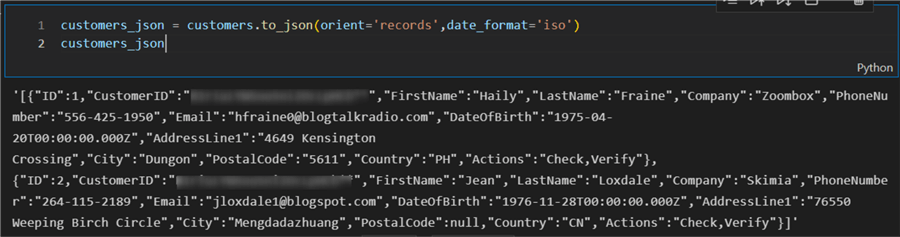
Step 5: Next, we must transform the pandas dataframe into a valid JSON object:
customers_json = customers.to_json(orient='records',date_format='iso')
Step 6: Finally, we can perform the API call. The formulation of this part of the code depends on the target application. In this case, we simply print out some of the results:
headers = {'Accept': 'application/json'}
body = j.loads(customers_json)

url = f'https://globalpersonator.melissadata.net/v1/doContactVerify'

for row in body:
    try:
        r = requests.post(url,
                    headers=headers,
                    json=row)
        results = r.json()
        result_id = row['ID']
        first_name = results['Name']['NameFirst']
        last_name =  results['Name']['NameLast']
        org = results['Address']['Organization']
        phone_r = results['Phone']['Results']
        carrier = results['Phone']['Carrier']
        phone_nr = results['Phone']['PhoneNumber']
        email_r = results['Email']['Results']
        email_score = results['Email']['DeliverabilityConfidenceScore']
        dob = results['Identity']['DateOfBirth']
        addr_r = results['Address']['Results']
        addr = results['Address']['FormattedAddress']
        print(f'Processing client nr {result_id}')
        print(f'        First name: {first_name}\n        Last name: {last_name}\n        Company: {org}\n        Phone results: {phone_r}\n        Carrier: {carrier}\n        Phone Nr: {phone_nr}\n        Email results: {email_r}\n        Email score: {email_score}\n        DoB: {dob}\n        Address results: {addr_r}\n        Address: {addr}')
        print(f'Client nr {result_id} successfully processed')
        print('---')
    except:
        print('There was an error with the request.')
Running this code provides cleaned and validated client information processed by the Melissa Personator service:
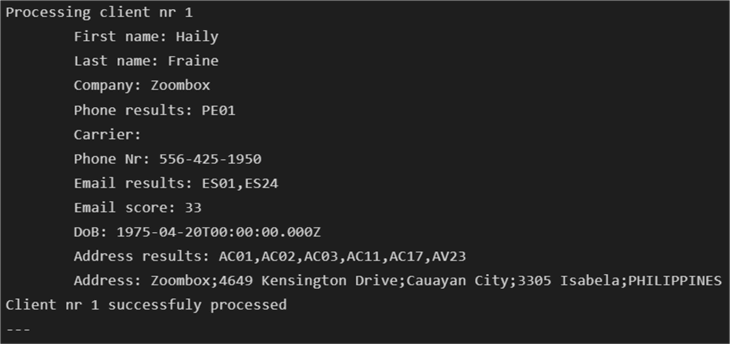
This output depends on how many rows you had in your staging table (subsequently in your dataframe and JSON input). I tested the service with 200 sequential calls. Processing speed will vary depending on the request payload. Overall, I found the service endpoint to be very responsive.
Conclusion
This article displayed how to use the Melissa Personator Consumer and Melissa Personator Identity services. Both provide extensive integration options over the O365 Power Platform with Power Apps and Power Automate or over a custom script with Python. While compiling this review, I found the support service and documentation helpful and on-point. Finally, both services provide easy-to-handle responses. Even more, due to the extensive result codes, more complex processing scenarios are feasible.
Resources
- Client check and entry power app
- Melissa Consumer Power Automate flow
- Melissa Identity Power Automate flow
- Python script
Next Steps
- Create a canvas app that can trigger a Power Automate flow
- Query SQL Server with Python and Pandas
- Python requests
About the author
 Hristo Hristov is a Data Scientist and Power Platform engineer with more than 12 years of experience. Between 2009 and 2016 he was a web engineering consultant working on projects for local and international clients. Since 2017, he has been working for Atlas Copco Airpower in Flanders, Belgium where he has tackled successfully multiple end-to-end digital transformation challenges. His focus is delivering advanced solutions in the analytics domain with predominantly Azure cloud technologies and Python. Hristo's real passion is predictive analytics and statistical analysis. He holds a masters degree in Data Science and multiple Microsoft certifications covering SQL Server, Power BI, Azure Data Factory and related technologies.
This author pledges the content of this article is based on professional experience and not AI generated.
View all my tips
Article Last Updated: 2024-01-02