Problem
Data, the new gold, gets processed in different forms—the most common being the batch process. Having a system that moves data from a source to a destination is essential in today’s data-driven economy. In this article, we cover different ways to incrementally load data using Azure Data Factory.
Solution
Microsoft Azure Data Factory allows us to achieve this by getting data based on the last modified date or comparing between databases.
This article is divided into three major sections—each showing the different abilities and use cases of performing incremental load with Azure Data Factory. This process can also be done in an Azure Synapse Pipeline and Fabric Pipeline.
The document contains the following:
- Section 1: Copy Data Based on Last Modified Date or Latest File
- Section 2: Incremental Copy Using Dataflow
- Section 3: Incremental Copy Using Lookup and Stored Procedure Activities
Section 1: Copy Data Based on Last Modified Date or Latest File
Depending on when the data was last modified, Azure Data Factory uses a technique called last modified date copying to transport data between various data stores (such as Azure Blob Storage, Azure SQL Database, etc.) quickly and effectively. By replicating only the date that has changed or been updated since the last copy operation, this method helps to minimize data transfer by preventing needless data movement.
We will be applying this technique between two Azure storage accounts, moving data from one storage account file system in Azure Data Factory to another.
What is Azure Data Factory?
Azure Data Factory is a fully managed, serverless data integration solution. By connecting to several data sources and translating data into a format appropriate for analysis, it enables you to orchestrate data flow and transformation at scale.
One of our previous articles discusses the basics of Azure Data Factory and how to set it up on Azure Portal.
Major Components of Azure Data Factory Pipeline
- Dataset: This is broken into two datasets, the source and sink. Attributes like paths, schema, and connection strings enable connections with several data stores (files, SQL databases, Azure Data Lake Storage, etc.).
- Linked Services: This can also be broken down into two types, the sink and source Linked services. Establish connections with external systems, such as file systems, databases, and apps. Give authorization and authentication information.
- Activities: The components of a pipeline that carry out functions.
Task
Data gets generated daily from a mobile application and sent to a particular storage account used by the core engineering team. You are expected to create an incremental pipeline that picks the new data and moves it to another storage account that would be used by the analyst and scientist in the organization.
Step 1: Create Sink and Source Dataset in ADLS.
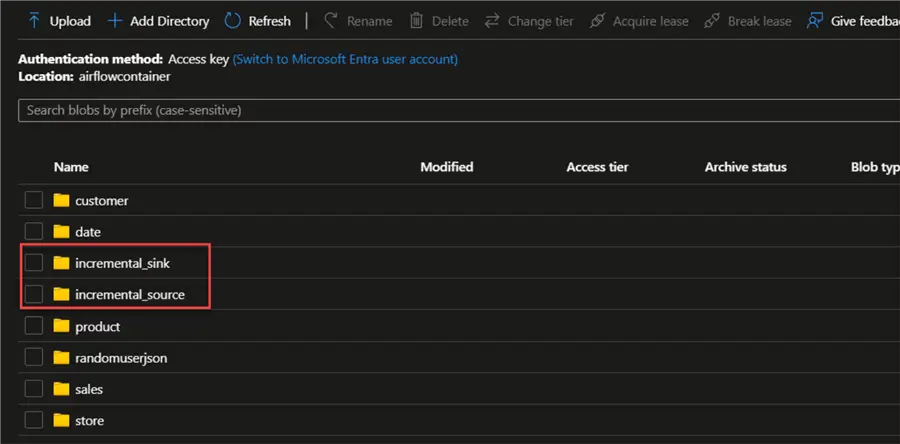
In our Azure Storage account (ADLS), let’s create a folder called incremental_sink and incremental_source.
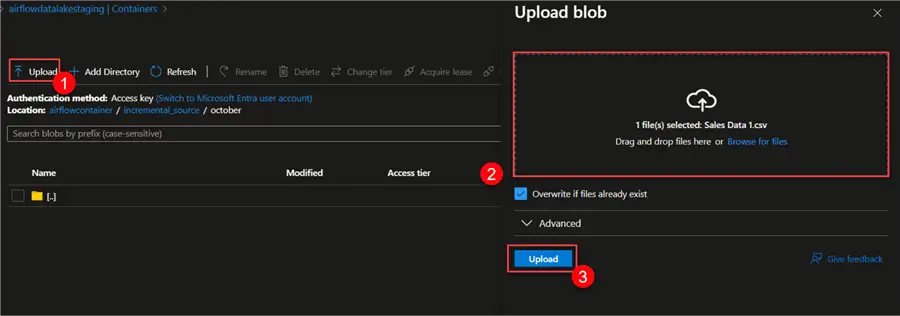
Now let’s upload a random file into our source folder. In your source, click on the upload icon and put in the file you want to perform an incremental load on. Click Upload.
Step 2: Create Pipeline Dataset and Linked Service
Now that we have our different folders created, head to Azure Data Factory. Here, click on the Manage tab, then select Linked services. Click New and search for Datalake Gen 2. Choose Azure Data Lake Storage Gen2 and click Continue.

In the new window, set all the necessary configurations and test the connection. This would be used for both the source and sink datasets.

Step 3: Create Sink and Source Dataset in ADF
In Azure Data Factory, we need to create a folder to house both the source and sink dataset.
In your Azure Data Factory, create a new dataset and select the Azure storage account. Click Continue.

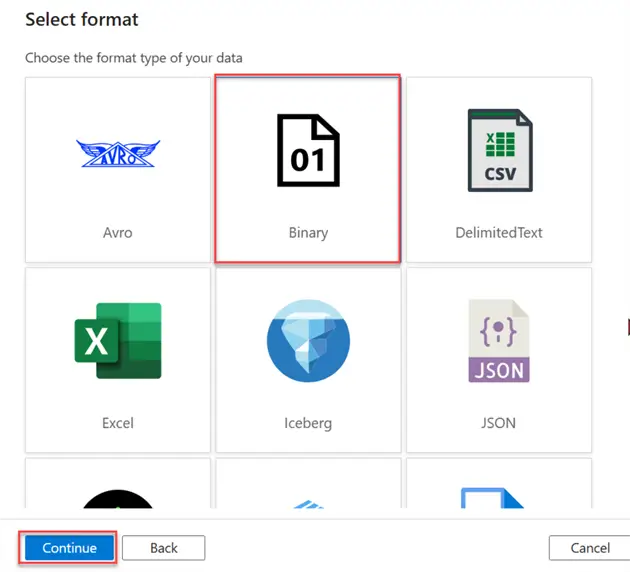
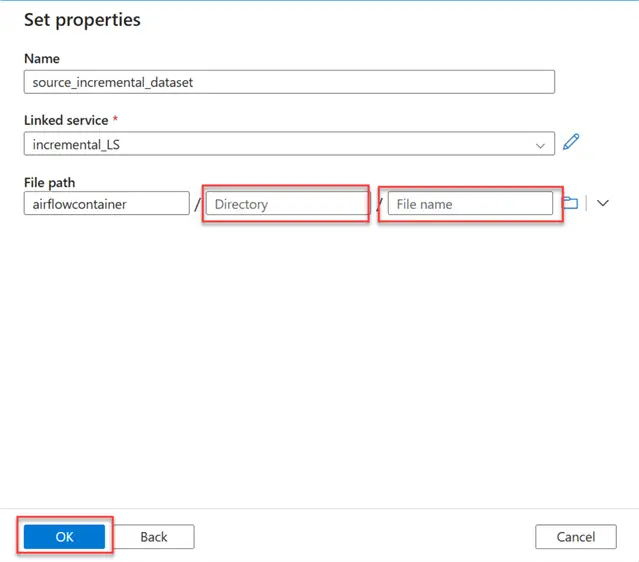
For the datatype, we will be using the Binary datatype, which is for one and zeros. Click Continue.
When setting the file path, leave the Directory and File name blank. We will create a dynamic content for that. Click OK.
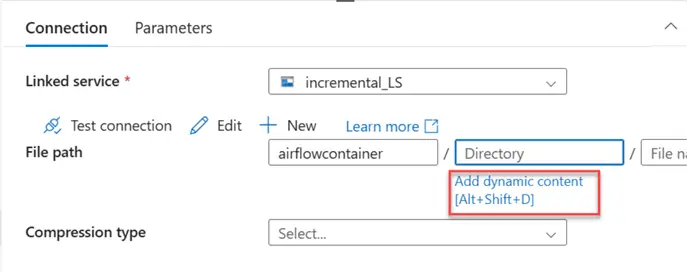
To create a Dynamic File Path system, click on Add dynamic content, which will open another window.
In the new window, add this file path to the directory. We expect the output below
incremental_source/2024/November/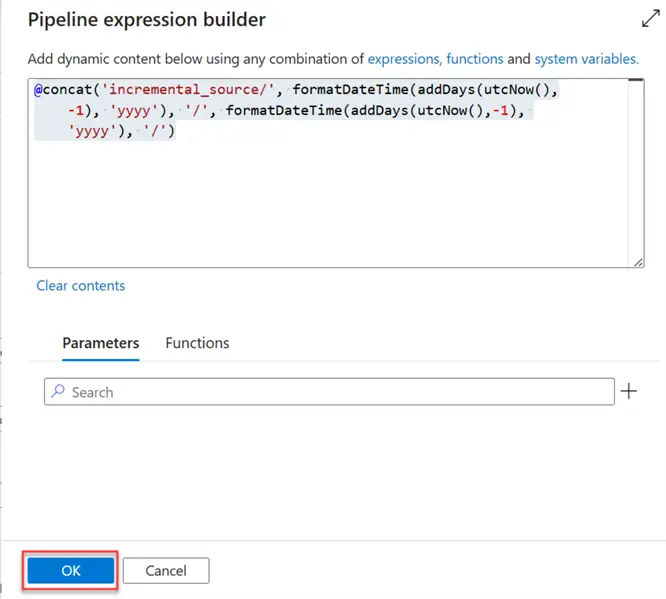
@concat('incremental_source/', formatDateTime(addDays(utcNow(),-1), 'yyyy'), '/', formatDateTime(addDays(utcNow(),-1), 'MMMM'), '/')Repeat the same process for the Sink dataset. We can move to the next stage.
@concat('incremental_sink/', formatDateTime(addDays(utcNow(),-1), 'yyyy'), '/', formatDateTime(addDays(utcNow(),-1), 'MMMM'), '/')Step 4: Create a Dynamic Sink File Path
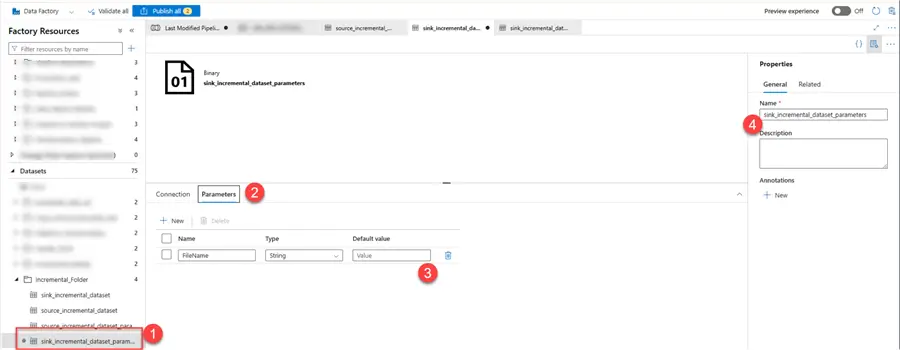
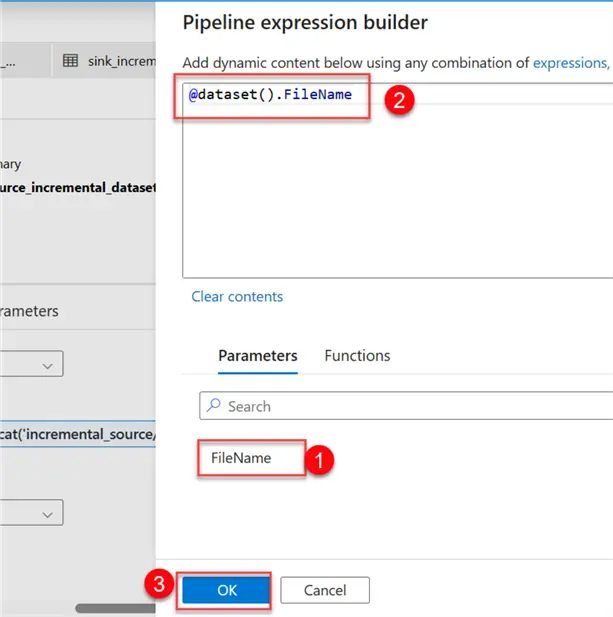
We need to create a dynamic sink file path that will be used in storing the value of the last modified date value as a parameter.
Create a new dataset, with the same file path as the previous source created. Then select Parameters and add a new Parameter called FileName.
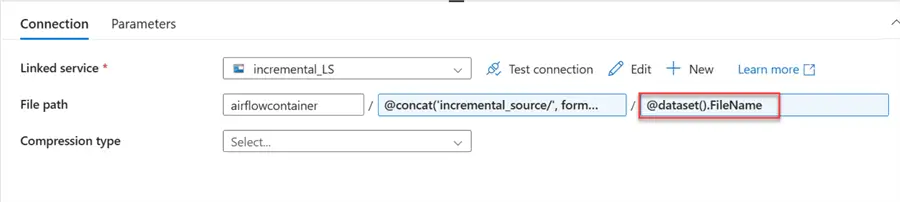
In your connection tab of your dataset, click on the dynamic content of the file type and select the parameter we created earlier called FileName.
Create Pipeline Activities
At this point, let’s create a logic needed for performing the incremental process of the pipeline.
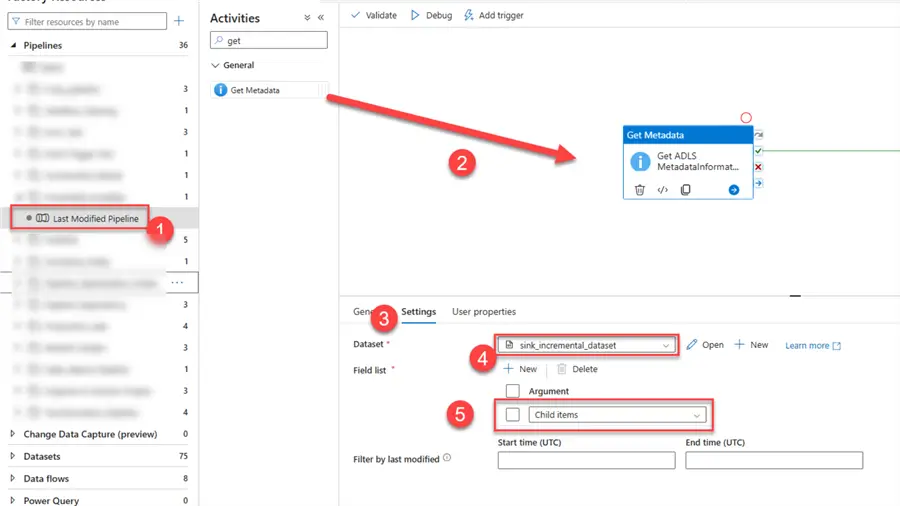
Step 1: Get Metadata Activities
This activity is an essential part of getting metadata information about different data sources, including files, directories, and database tables in Azure Data Factory. Through this action, users can collect crucial information that can be utilized in later stages of a data pipeline.
Create a new pipeline and add the activity in the Pipeline Canvas. Click on the Settings tab and pick the sink dataset. Add a field called Child items, which is required in counting the amount of data in the sink ADLS directory.
Step 2: Count Items in the ADLS Variable
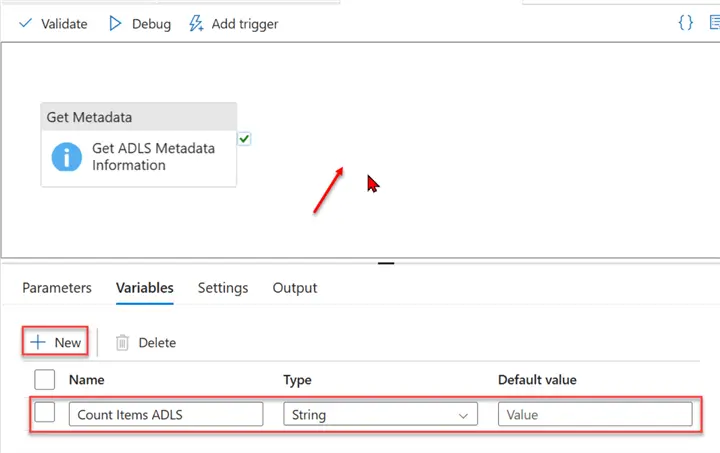
Let’s add another activity called Set Variable. We need to count the number of items in the Azure storage account using the Get Metadata Activities in the Azure Data Factory pipeline.
Let’s start by adding a variable to the pipeline. Click on the blank canvas, select Variables, and add a new variable called Count Items ADLS. This will be used to count the number of values in the ADLS account.
Now, add the Set variable activity to the pipeline, then connect the Get Metadata to it.

We need to set the dynamic content to be able to read the count of child items from the Get Metadata activities. Use the dynamic content expression to get the count of the total number of folders in our storage account.
@string(length(activity('Get ADLS MetadataInformation').output.childItems))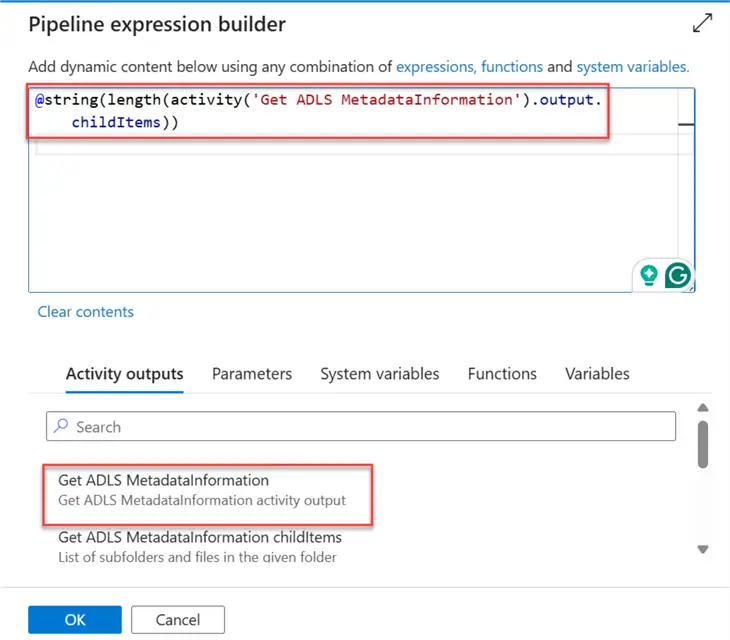
Step 3: Get the Last Item with ForEach Activity
You can iterate over a group of things and carry out a certain set of actions for every item using Azure Data Factory’s ForEach activity, which is a control flow activity. This is especially helpful in situations where you need to apply the same procedure to several files or datasets.
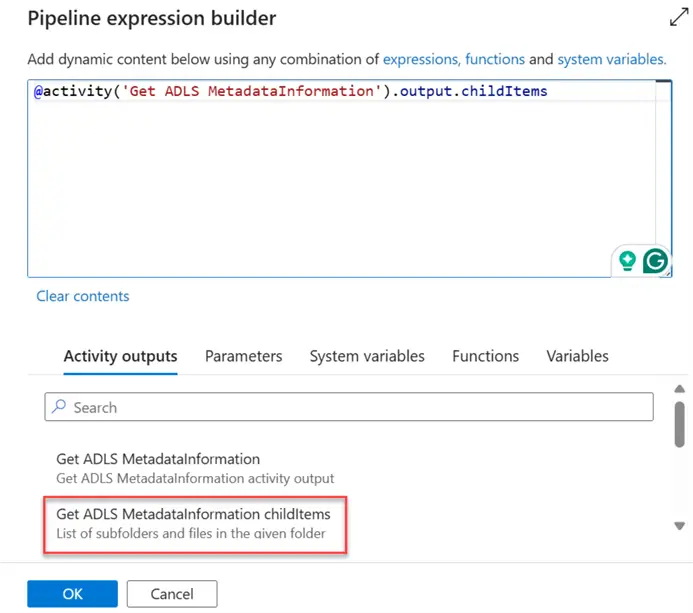
Add a new Activity to your Pipeline, the ForEach activity. Click the Settings tab, check the Sequential, then add the dynamic content.
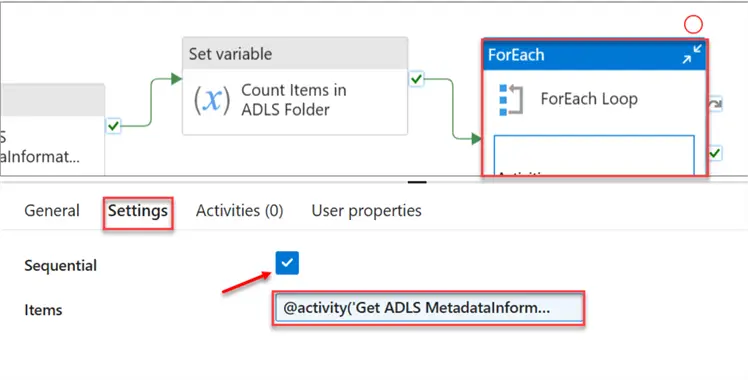
In the dynamic file content, we’re trying to get the Child Item of the source storage (Azure Storage Account ADLS).
Now double-click the ForEach activities. This should take you inside the pipeline itself to perform other actions.
Step 4: Actions for Loop
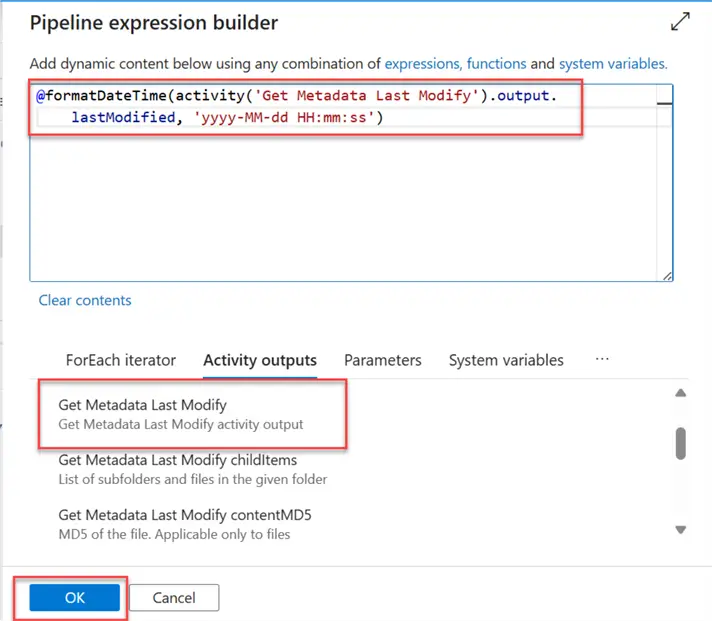
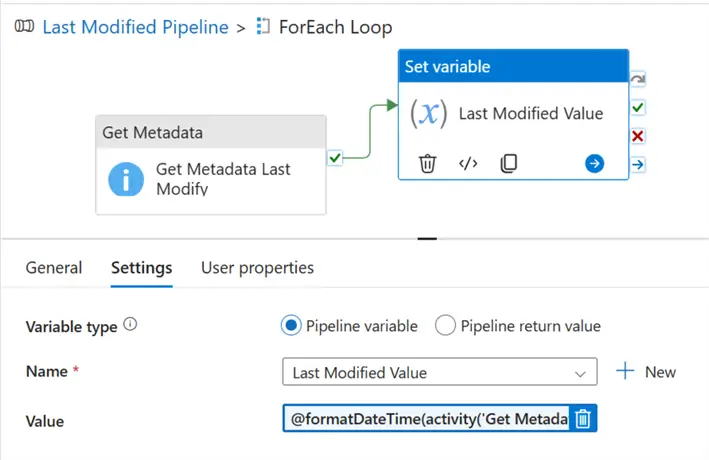
In the ForEach activity, add the activity Get Metadata,then select the Settings and add the dynamic sink dataset that had a parameter we created earlier. Then follow the instructions in the image below.
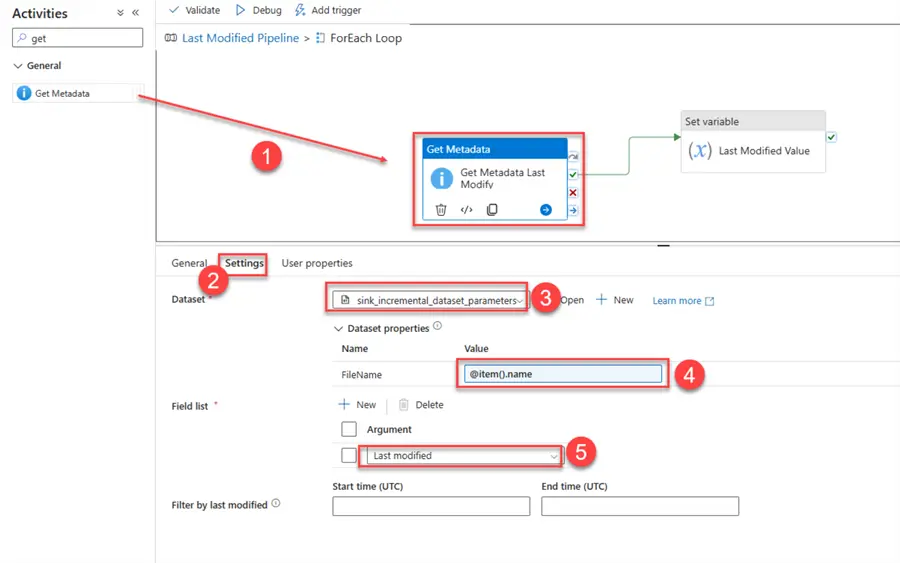
After adding the Get Metadata to get the Last modified, we need to capture the value/name of the last modified data. To achieve this, we will be using the Set Variable Activity.
Click on the blank canvas of your pipeline and add a new variable called Last Modified Value.

In your Set Variable, add the dynamic content expression to capture the last modified date value in our storage account. Click OK.
Prepare Copy Process
Now that we have all the necessary activities, let’s start by preparing for the copy process with the following steps.
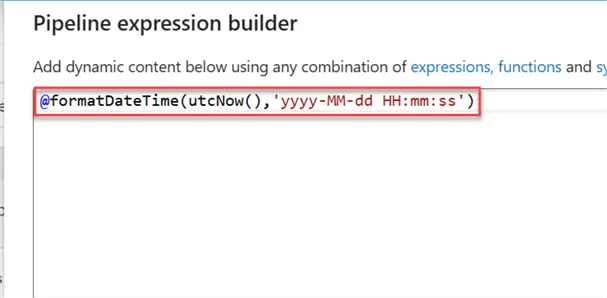
Step 1: Get the Current Datetime
Using the Set Variable activity, let’s get the current datetime and store it temporarily in a variable of our pipeline.
Add a new activity Set Variable and add the expression to get the current date time of the pipeline whenever it’s run.

Step 2: Get Days/Time Different
We are going to use a variable to subtract between the current date and the last date in the storage account source. Create a new Variable in the pipeline and set the Set variable dynamic content with the following settings:
@string(add(div(sub(ticks(variables('Last Modified Value')),ticks(variables('Current Date Value'))),864000000000), -1))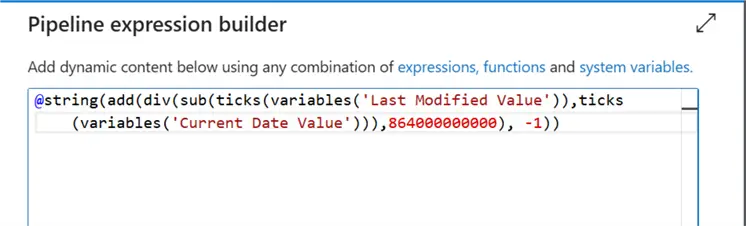
Step 3: Set Incremental Copy Activities
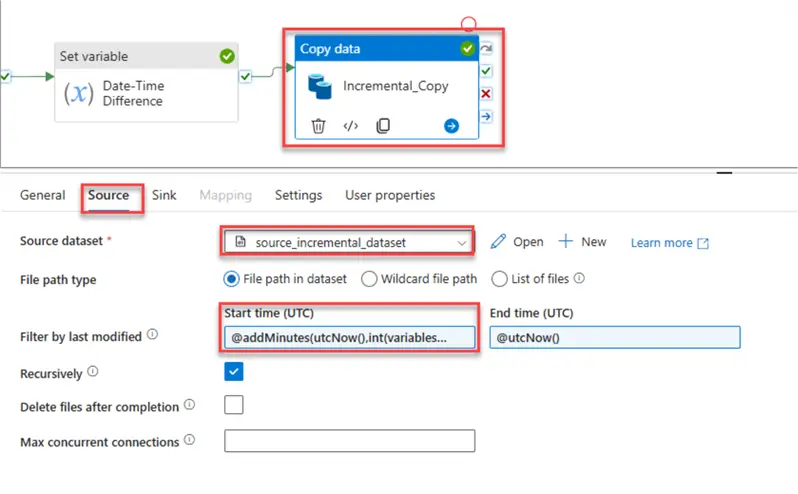
Add the copy activities to the pipeline and set the conditions for both the Sourceand Sink paths.
In the Source settings, the following setups are expected. Select the source dataset from the dropdown.
For Filter by the last modified, include @addMinutess(utcNow(),int(variables(‘Date-Time Difference’))).
We need to check the Source dataset based on the last-minute data entered.
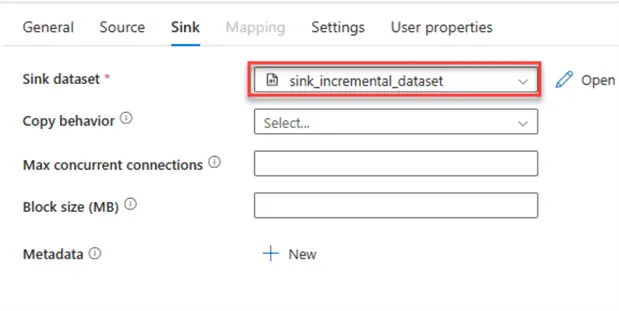
For the Sink, add the Sink dataset to the output, then save the entire process by updating the file.
Step 4: Test Incremental Copy
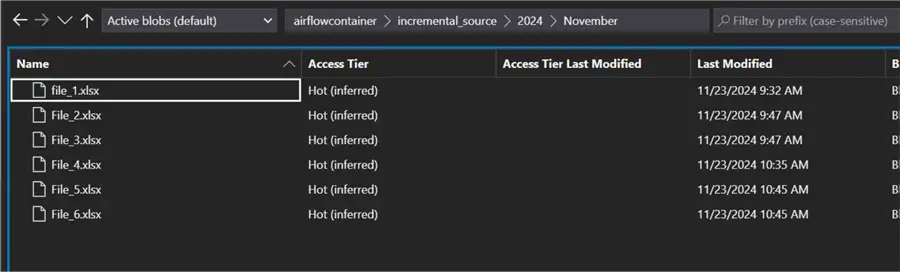
Before we get started, let’s first confirm the data in both the source and sink layer.
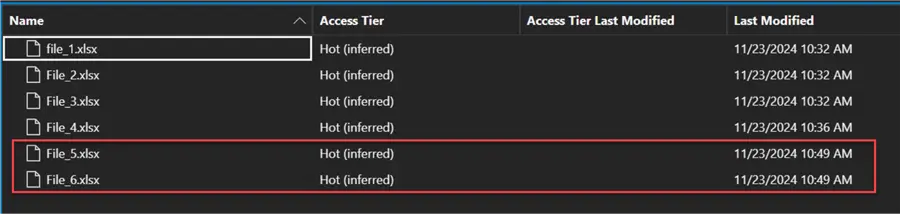
In the Source layer, you will notice a total of 6 files are in the source.
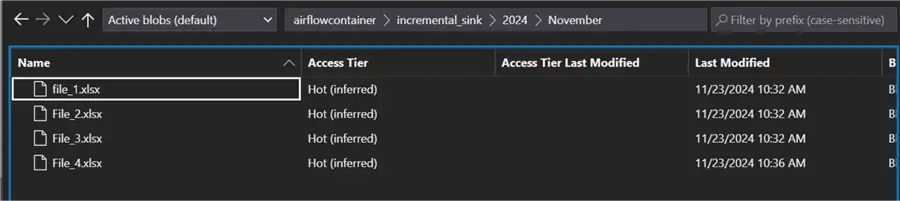
While in the destination, you will notice a total of 4 files are in the destination.
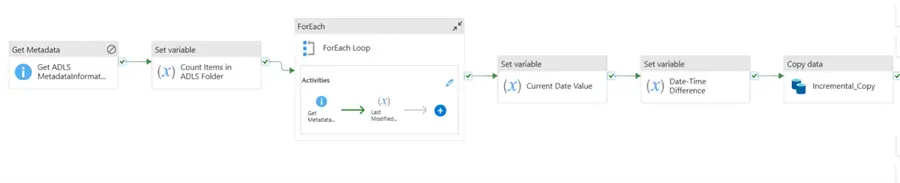
The full pipeline diagram shows the entire process and how data will be copied incrementally.
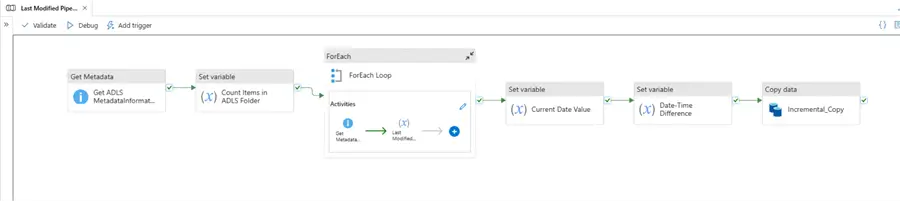
Click on the Debug tab to run the pipeline. You will notice the entire process ran as expected.

Step 5: Confirm Incremental Copy
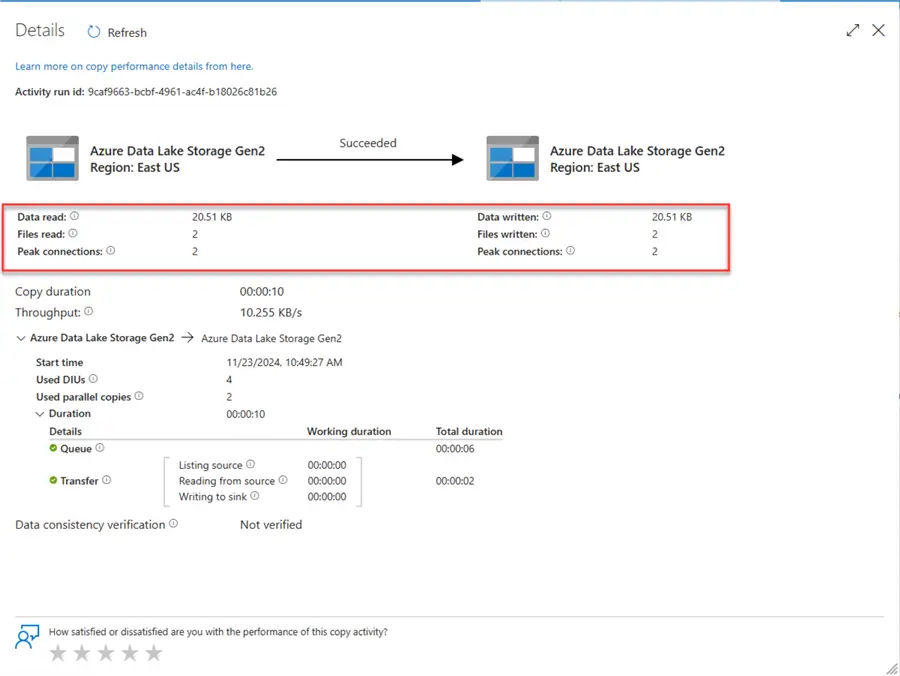
Check the incremental activities to see if the last two files were copied as expected. From the activity, you will notice the two new files were copied.
Head over to your Sink data lake Gen 2 to confirm the data load.
Note: We only set the incremental filter to minutes just for testing. In an actual production environment, this would be set to today.
@addDays(utcNow(),int(variables('Date-Time Difference')))Section 2: Incremental Copy Using Dataflow
What is Azure Dataflow?
It is an ETL (Extract, Transform, Load) tool that allows you to create and run data transformation pipelines without writing complicated code.
It offers a drag-and-drop interface to create data flows, which allows data engineers of various experiences the ability to use it.
Task
You are required to create an incremental copy process that takes data from Azure SQL Database to Azure PostgreSQL incrementally.
The Azure SQL Database is the source table acting as the database where data is being sent to while the Azure PostgreSQL Database is the database used by the analytics team.

Create Incremental Process
Using the Azure Data Factory Dataflow approach, the following steps should be followed to create the process.
Step 1: Create Dataset Source and Sink Database
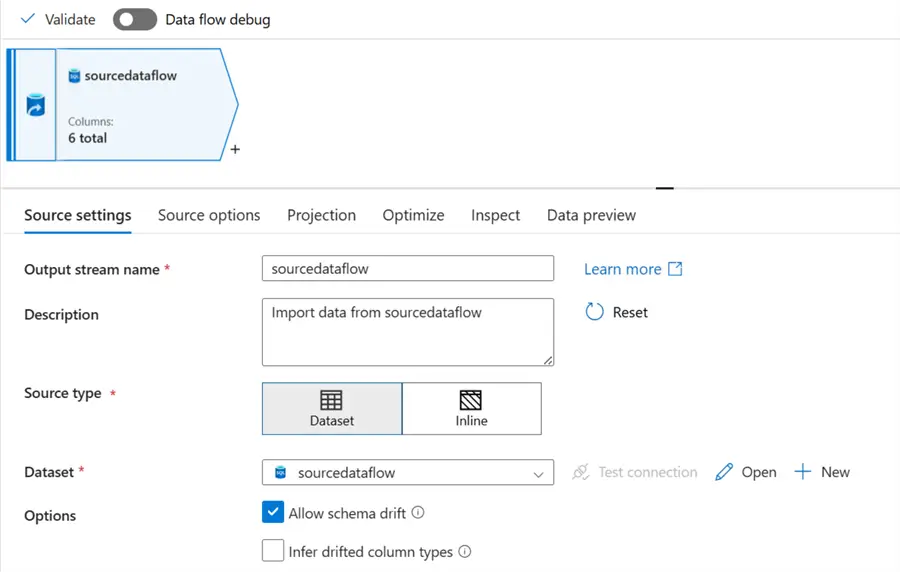
In your dataflow environment, add a new data source (the Azure SQL Database) to the source data and fill in the necessary information below.
Add the data source of the destination (the PostgreSQL database), then fill in the necessary information.
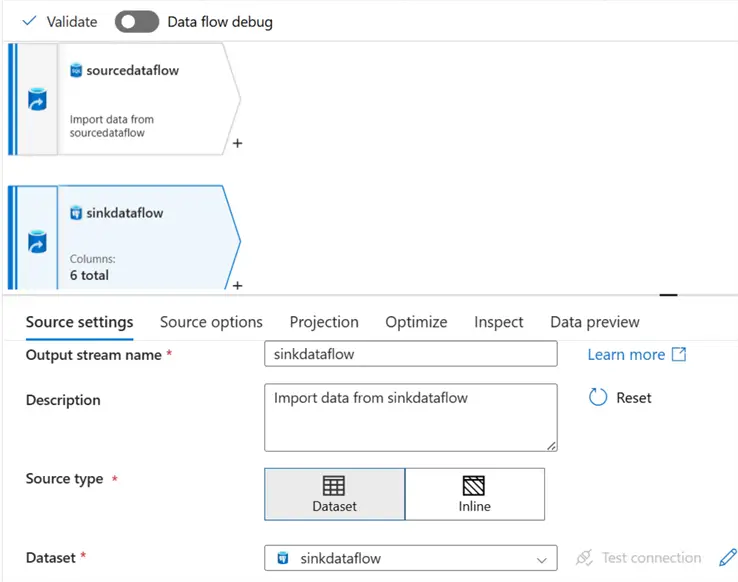
Step 2: Add Derived Column to Source
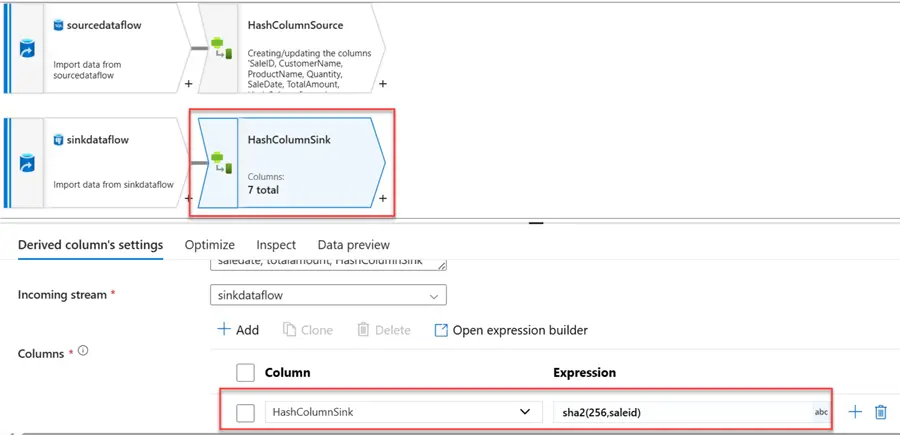
We need to add a unique identifier to help check for comparison. In your source data, click the + icon and select the Derived column. In the Derived column settings, give it a new name: HashColumnSource, then select the Expression builder.This should take you to another window.
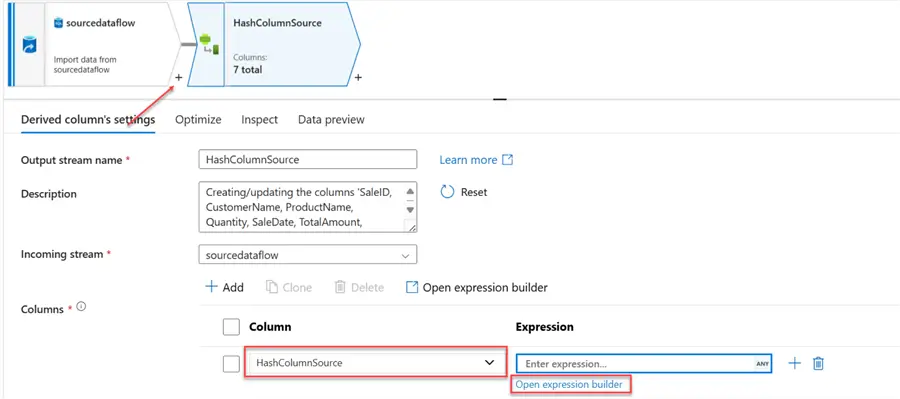
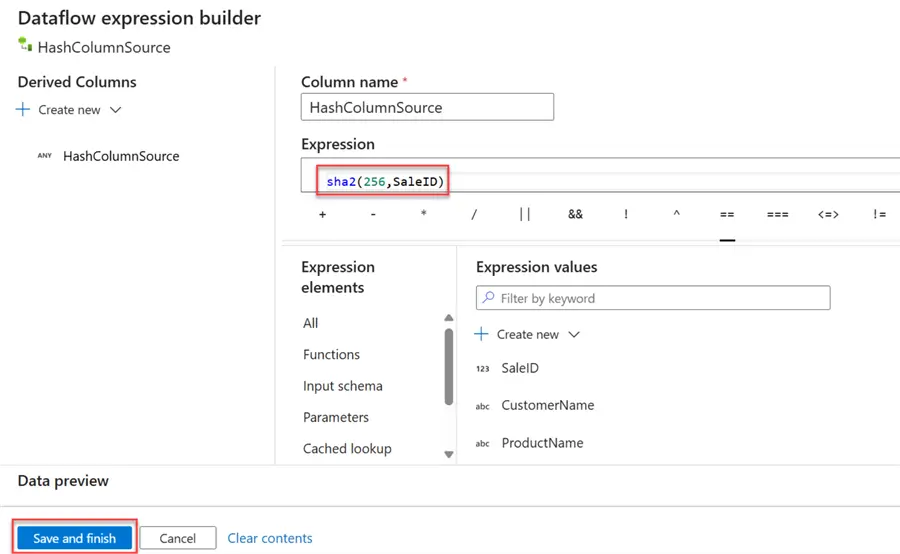
In the new expression builder, we will be using the Secure Hash Algorithm 256 (SHA-256) hashing. SHA-256 is a cryptographic hash function that generates a fixed-size, 256-bit (32-byte) hash value from an input of arbitrary length. A 64-character hexadecimal string is frequently used to represent this hash value.
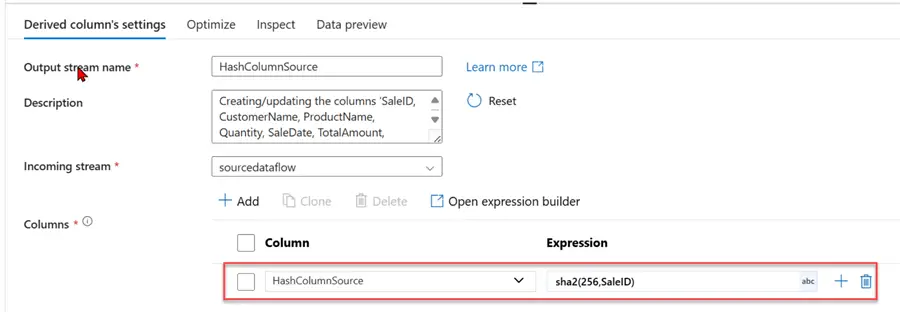
Step 3: Add Derived Column to Sink
Repeat the same process we just completed for the source in the sink. Use the Sha2(256, saleid) command in the expression builder.
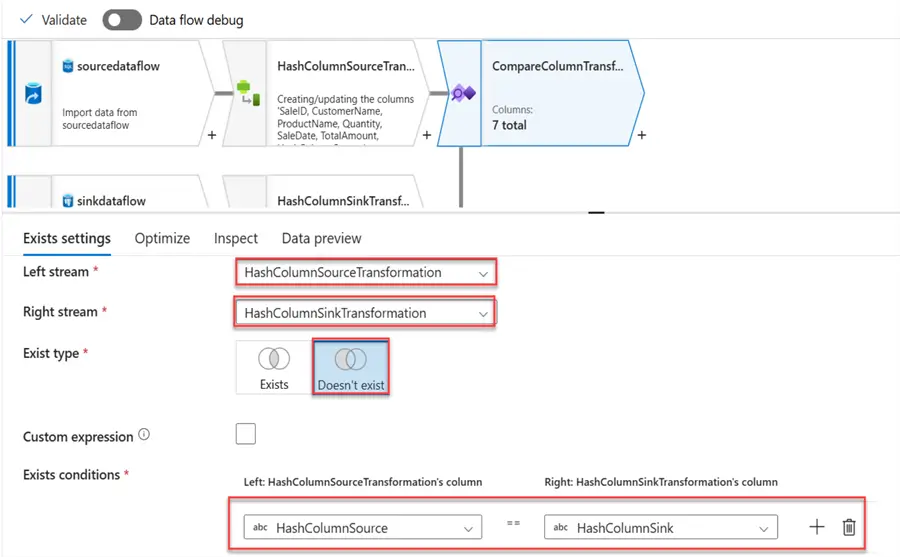
Step 4: Exists Transformation
The Exist transformation allows a user to filter rows based on whether they exist or not in another dataset stream. It is like the EXIST and NOT EXISTS clauses in SQL. We will use it to compare the Source Hash Column and the Sink Hash Column.
The following settings are needed:
- Left Stream: This is the source data derived from the column.
- Right Stream: This is the sink data derived from a column.
- Exist Type: For this, we will select Doesn’t Exist as we want to pull on the new records.
- Exist Conditions: We will use the Hash column we created for both the source and sink.
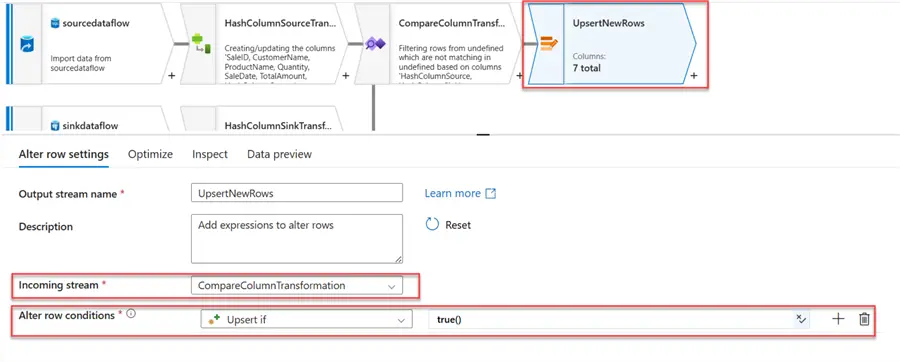
Step 5: Alter Row
This feature allows you to manipulate rows of data based on specific conditions. It enables you to perform various operations, including:
- Inserting new rows: Increase the number of rows in the output stream.
- Updating existing rows: Make changes to the output stream’s existing rows.
- Deleting existing rows: Existing rows can be deleted by taking them out of the output stream.
- Upserting rows: Using a key, add new rows or update existing rows.
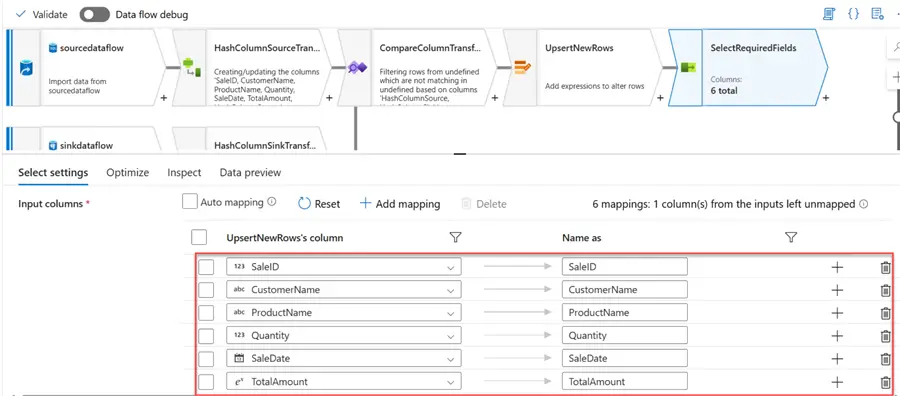
Step 6: Select Transformation
After getting the required new rows/records, we need to drop the Hash column as it would not be needed in the destination. Delete the Hash column and leave the rest the way it is.
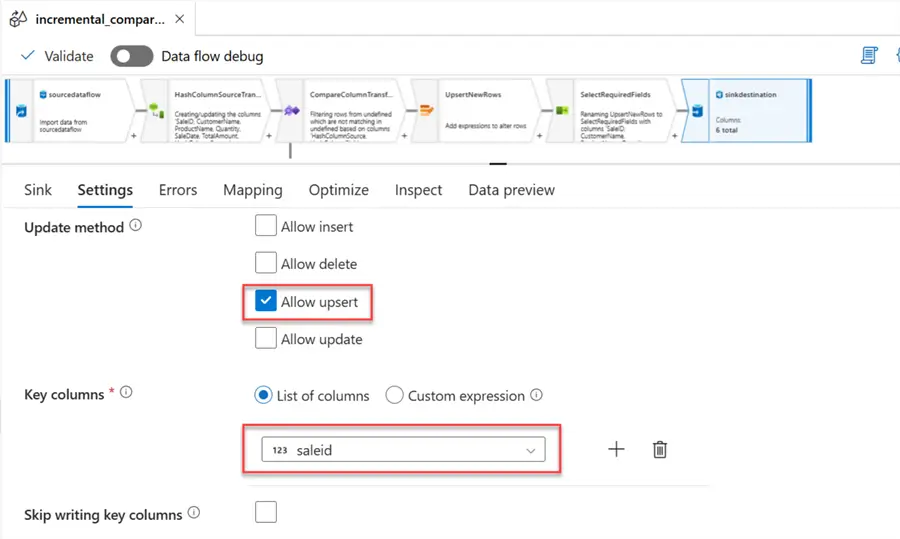
Step 7: Add Sink
This is the destination we want to load the data to incrementally.
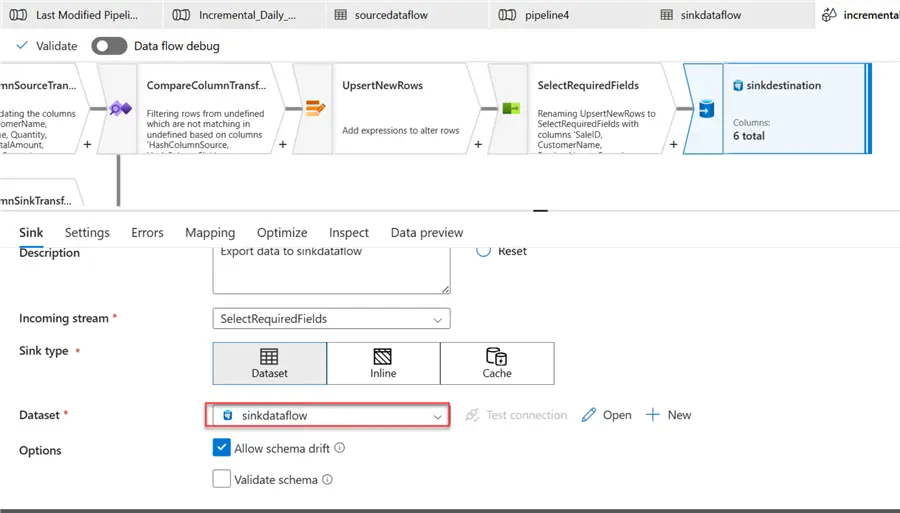
In the Settings tab, you have the option to select Insert or Upsert. Since we are only inserting new records, we will use the Upsert option. For the Key columns, pick the saleid field.
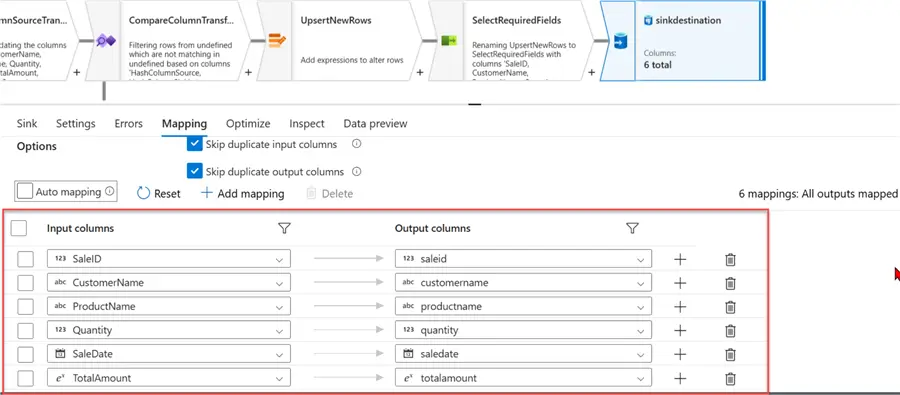
Confirm the final data output by turning off the auto-mapping function.
Test Incremental Logic
Let’s start by inserting additional records into the Azure SQL Database and counting the number of records.
Let’s also count the number of records in the Azure PostgreSQL database.

Activate Data Flow Debug
This feature allows users to interactively inspect and troubleshoot data transformation within the data flow. It offers a visual interface for navigating through each transformation, analyzing data at various points in time, and locating and fixing problems.
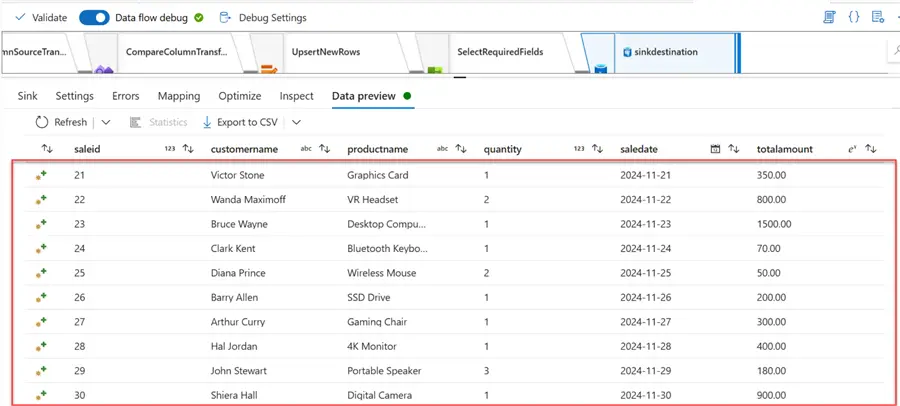
After activating the debug in dataflow, click on Data preview for a snapshot of the data as it flows through each transformation. You will notice only the 10 new records appear. This means this is the only record that would be inserted into the PostgreSQL database.
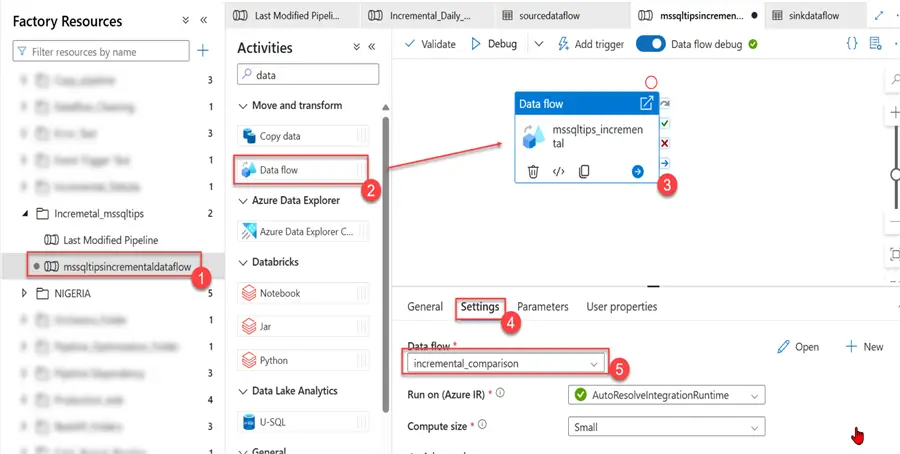
To make the dataflow production ready, head to your Author and create a new Pipeline. In your pipeline, select the Data Flow activities and the data flow we just created.
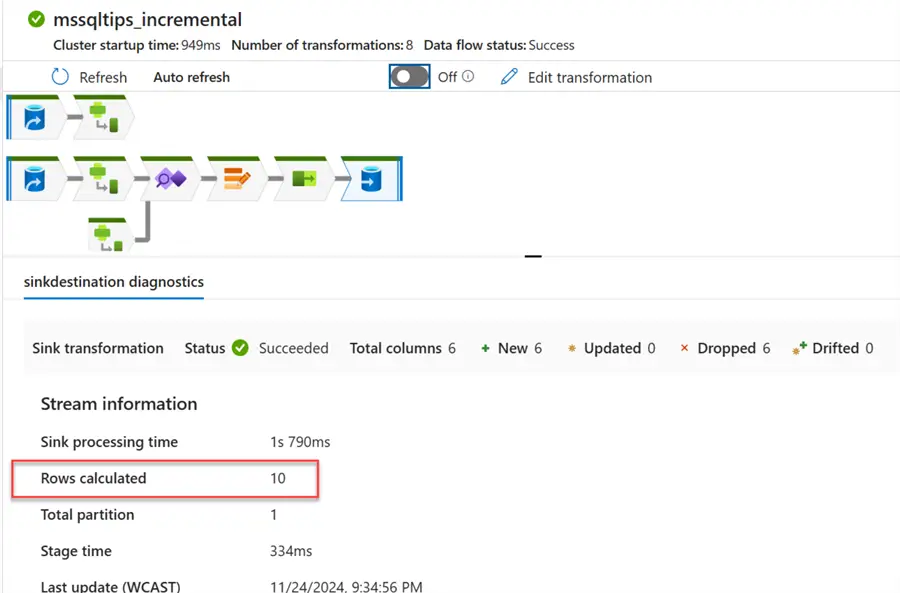
You will notice as soon as you run the pipeline, 10 new records are inserted into the Azure PostgreSQL database.
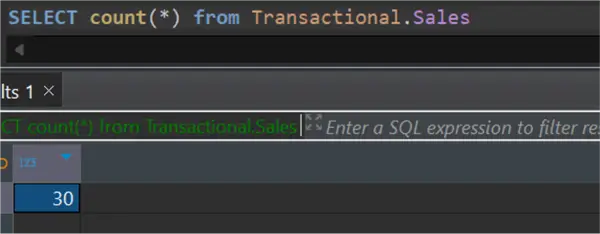
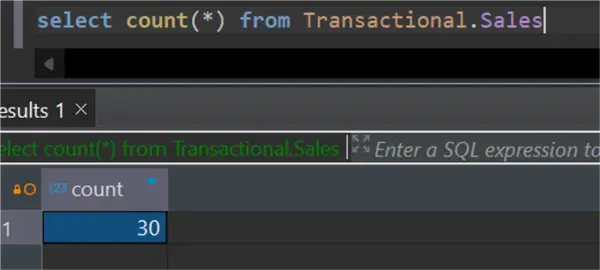
Head to your Azure PostgreSQL to check the number of new records inserted. You will notice the number of records has increased to 30 rows.
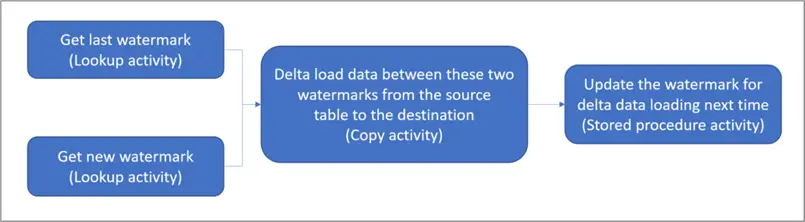
Section 3: Incremental Copy Using Lookup and Stored Procedure Activities
This approach is one of the most popular methods for incremental increase. It uses Lookup activities and stored procedures for storing time watermarks.
Incremental Load Using Lookup and Stored Procedures – Microsoft Learn
Project Requirements
You are required as a data engineer to move data incrementally for mssqltips_sales data from Azure SQL Database to PostgreSQL Database. You need to create a system to accommodate this process.

The following steps should be followed to achieve this goal:
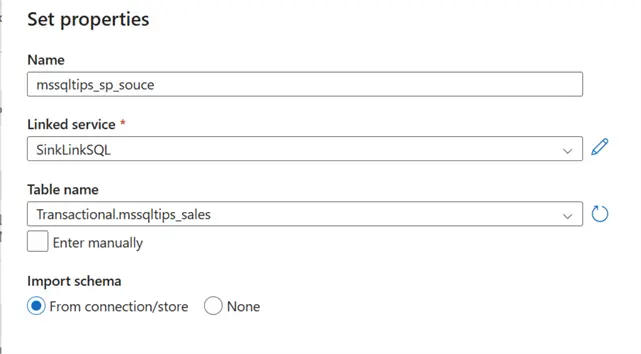
Step 1: Create Source and Sink Dataset
Let’s start by creating the mssqltips_sales table and inserting data into the source table.
CREATE TABLE Transactional.mssqltips_sales (
    SaleID INT IDENTITY(1,1) PRIMARY KEY,
    CustomerName NVARCHAR(100) NOT NULL,
    ProductName NVARCHAR(100) NOT NULL,
    Quantity INT NOT NULL,
    SaleDate DATE NOT NULL,
    TotalAmount DECIMAL(10, 2) NOT NULL,
    IngestionDate datetime
);
Insert records into the mssqltips_sales table. This will serve as the source table.
INSERT INTO Transactional.mssqltips_sales
(CustomerName, ProductName, Quantity, SaleDate, TotalAmount, IngestionDate)
VALUES
('Alice Johnson', 'Laptop', 1, '2024-11-01', 1200.50, '2024-11-12 12:00:00'),
('Bob Smith', 'Smartphone', 2, '2024-11-02', 1800.00, '2024-11-12 12:00:00'),
('Charlie Brown', 'Tablet', 1, '2024-11-03', 450.00, '2024-11-12 12:00:00'),
('Diana Prince', 'Smartwatch', 1, '2024-11-04', 250.00, '2024-11-12 12:00:00'),
('Evan Carter', 'Headphones', 2, '2024-11-05', 300.00, '2024-11-12 12:00:00'),
('Fiona Davis', 'Keyboard', 1, '2024-11-06', 50.00, '2024-11-12 12:00:00'),
('George Miller', 'Mouse', 3, '2024-11-07', 75.00, '2024-11-12 12:00:00'),
('Hannah Lee', 'Monitor', 1, '2024-11-08', 200.00, '2024-11-12 12:00:00'),
('Ian Wright', 'Printer', 1, '2024-11-09', 150.00, '2024-11-12 12:00:00'),
('Jackie Chan', 'Scanner', 1, '2024-11-10', 170.00, '2024-11-12 12:00:00'),
('Karen Taylor', 'Laptop Bag', 2, '2024-11-11', 80.00, '2024-11-12 12:00:00'),
('Leo King', 'External Hard Drive', 1, '2024-11-12', 120.00, '2024-11-12 12:00:00'),
('Maria Lopez', 'Router', 1, '2024-11-13', 90.00, '2024-11-12 12:00:00'),
('Nathan Drake', 'Gaming Console', 1, '2024-11-14', 400.00, '2024-11-12 12:00:00'),
('Olivia Green', 'Speakers', 2, '2024-11-15', 220.00, '2024-11-12 12:00:00'),
('Peter Parker', 'Webcam', 1, '2024-11-16', 100.00, '2024-11-12 12:00:00'),
('Quincy Adams', 'Microphone', 1, '2024-11-17', 80.00, '2024-11-12 12:00:00'),
('Rachel Moore', 'Projector', 1, '2024-11-18', 500.00, '2024-11-12 12:00:00'),
('Steve Rogers', 'Charger', 3, '2024-11-19', 60.00, '2024-11-12 12:00:00'),
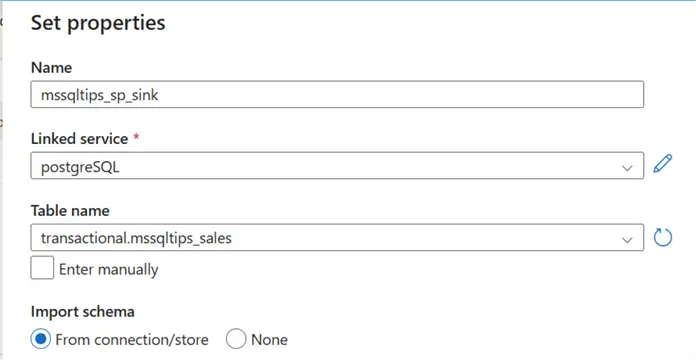
('Tony Stark', 'Power Bank', 2, '2024-11-20', 90.00, '2024-11-12 12:00:00');Create a sink table in Azure PostgreSQL Database, where the data will be loaded incrementally.
CREATE TABLE Transactional.mssqltips_sales (
    SaleID INT PRIMARY KEY,
    CustomerName VARCHAR(100) NOT NULL,
    ProductName VARCHAR(100) NOT NULL,
    Quantity INT NOT NULL,
    SaleDate DATE NOT NULL,
    TotalAmount numeric(10, 2) NOT NULL,
    IngestionDate timestamp
);
Step 2: Create a Table in the Source Database to Store the Last Watermark
Data warehousing and ETL procedures use Last Watermark as a tool to monitor the status of incremental loads. It indicates the most recent moment data was loaded into the target system.
create table Transactional.watermarktable_mssqltips
(
TableName varchar(255),
WatermarkValue DATETIME2(6),
);
After successfully creating the watermark, it set a default value for the last watermark.
INSERT INTO Transactional.watermarktable_mssqltips
VALUES ('data_source_table','1/1/2010 12:00:00 AM')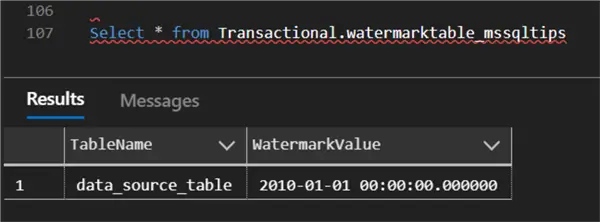
Step 3: Create a Stored Procedure in the Data Warehouse
The stored procedure will be used to update the lastmodified date of the watermark value after the last pipeline run.
CREATE PROCEDURE transactional.usp_write_watermark_mssqltips @LastModifiedtime datetime, @TableName varchar(50)

AS

BEGIN

UPDATE transactional.watermarktable_mssqltips
SET [WatermarkValue] = @LastModifiedtime
WHERE [TableName] = @TableName

END
Step 4: Add the Lookup Activities
Now that we are finished with the necessary settings, let’s head back to Azure Data Factory to create a new Pipeline and add the necessary activities.
Before we start, we need to create the necessary dataset for the source, sink, and watermark.
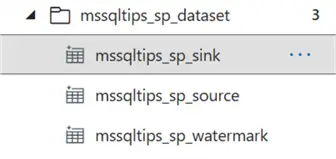
Let’s start by creating a new pipeline and adding the Lookup activities.
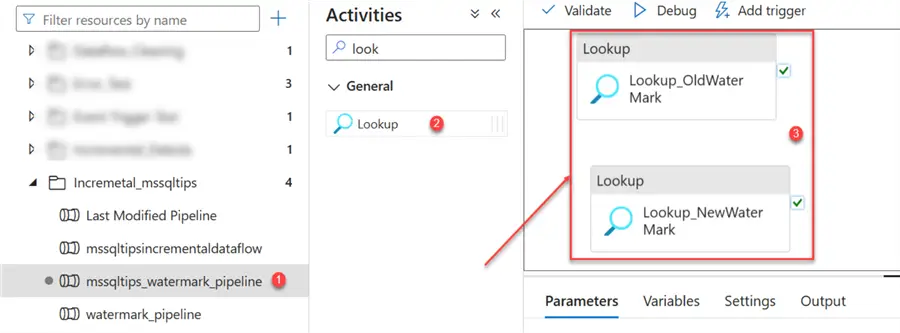
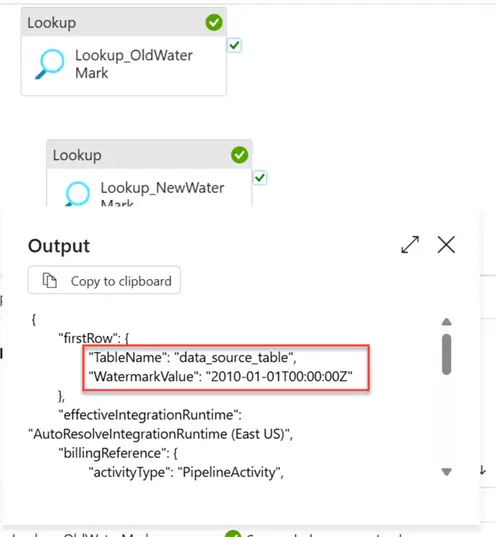
- Old Watermark Lookup. Select the Lookup_OldWatermark. In the settings tab, pick the watermark table we created earlier. In the Use query, select the Query button and write the query below.
SELECT TableName, WatermarkValue from Transactional.watermarktable_mssqltips
where TableName = 'data_source_table'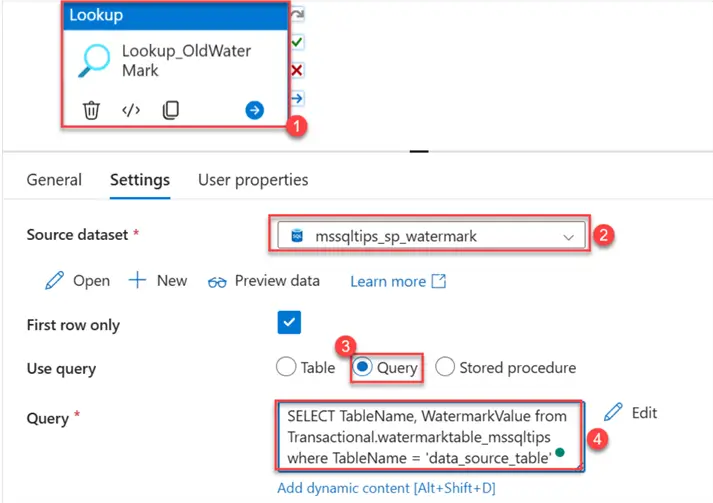
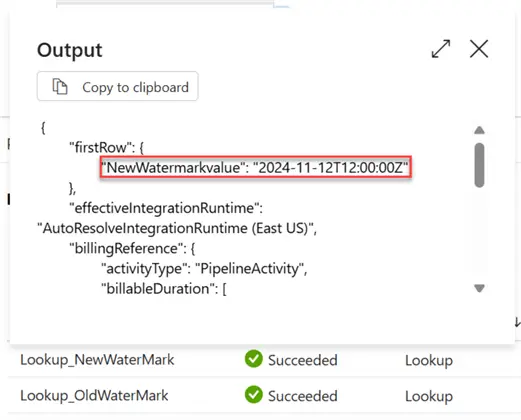
- New Watermark Lookup. Select the Lookup_NewWatermark. In the settings tab, pick the source dataset and write the query below to get the max value of ingested datetime.
SELECT max(IngestionDate) as NewWatermarkvalue from Transactional.mssqltips_sales 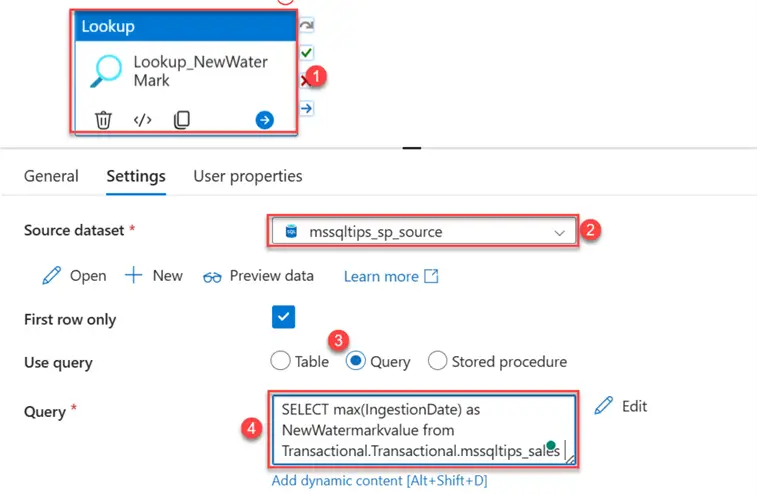
Test Lookup Logic
Let’s debug the pipeline and see how the Lookup activities logic works. You will notice that the Old Watermark shows the datetime 1/1/2010 12:00:00 AM that was inserted earlier.
For the New Watermark, you will notice it picked the max value of the source ingestiondate of the sales table.
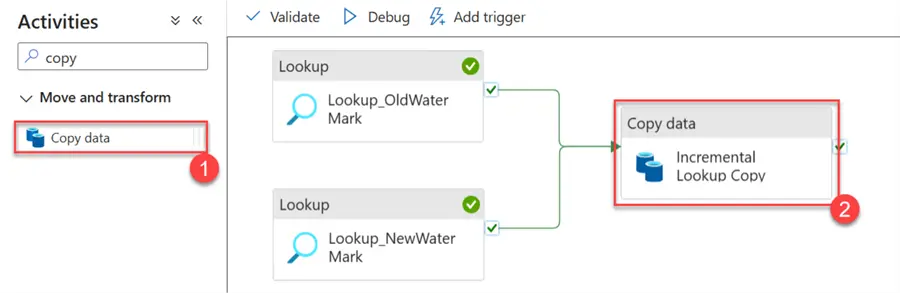
Step 5: Set Copy Activity
Add the Copy activity to the pipeline and join the New and Old WaterMark Lookups to the copy activity.
In the Source tab, click on Dynamic Content and put in the following:
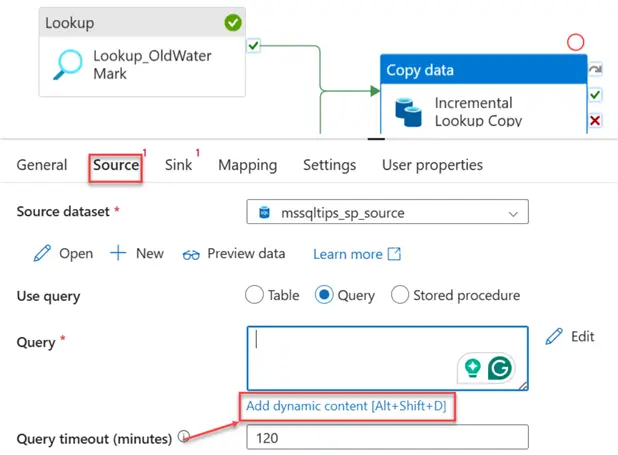
We will filter a range between the Old and New watermarks. This will serve as the source data being sent.
SELECT * FROM Transactional.mssqltips_sales
WHERE IngestionDate > '@{activity('Lookup_OldWaterMark').output.firstRow.WatermarkValue}'
AND IngestionDate <= '@{activity('Lookup_NewWaterMark').output.firstRow.NewWatermarkvalue}'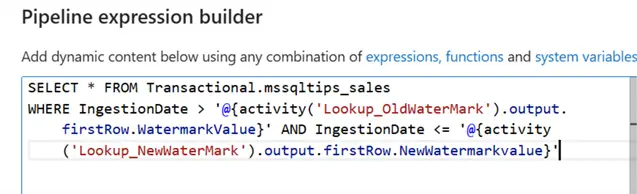
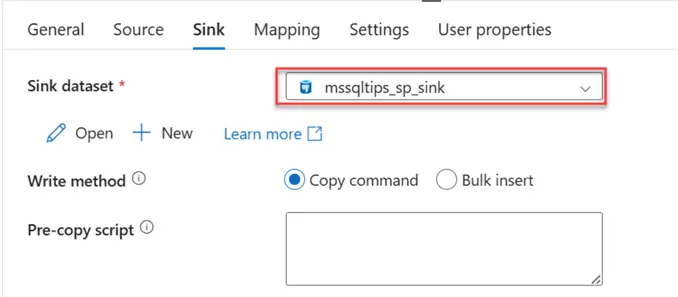
For the sink, pick the Azure PostgreSQL Database that will serve as our destination.
In the Mapping tab, click on import schema. This should open a new window. Put in the date from the watermark table:
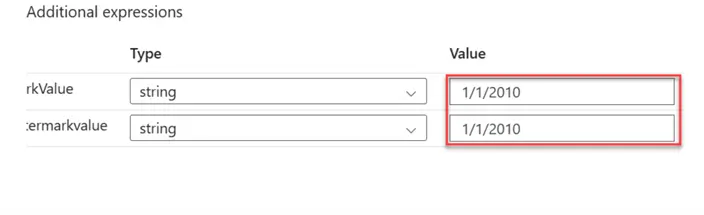

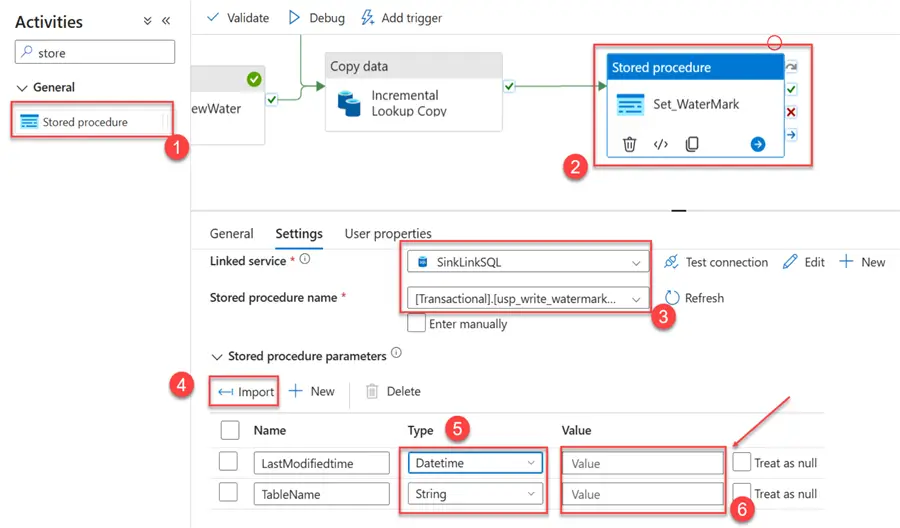
Step 6: Add Stored Procedure
As stated earlier, the stored procedure will be used in updating the lastmodified date of the watermark value after the last pipeline run.
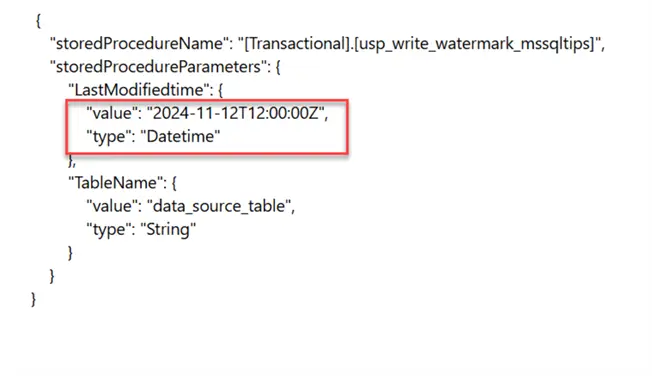
In the pipeline, add the Stored Procedure activities, select the stored procedure name we created, and click on Import to highlight the necessary fields. Click the Value tab and select Dynamic Content.
Click on Dynamic Content for LastModifiedtime and put this dynamic expression in the new window:
@activity('Lookup_NewWaterMark').output.firstRow.NewWatermarkvalue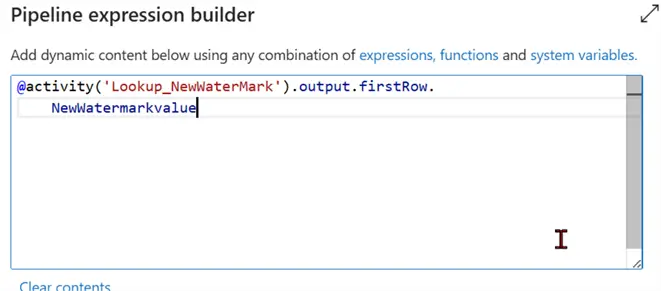
Repeat the same process for the TableName value by adding the value below.
@activity('Lookup_OldWaterMark').output.firstRow.TableName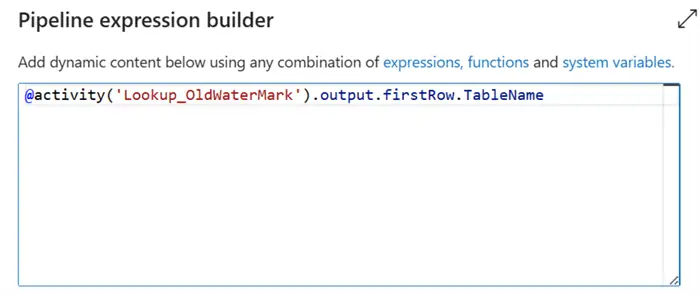
Test and Debug
Before testing, ensure you save all changes by Publishing All your work completed in the pipeline. After clicking on Debug, you will notice the entire pipeline ran as expected.
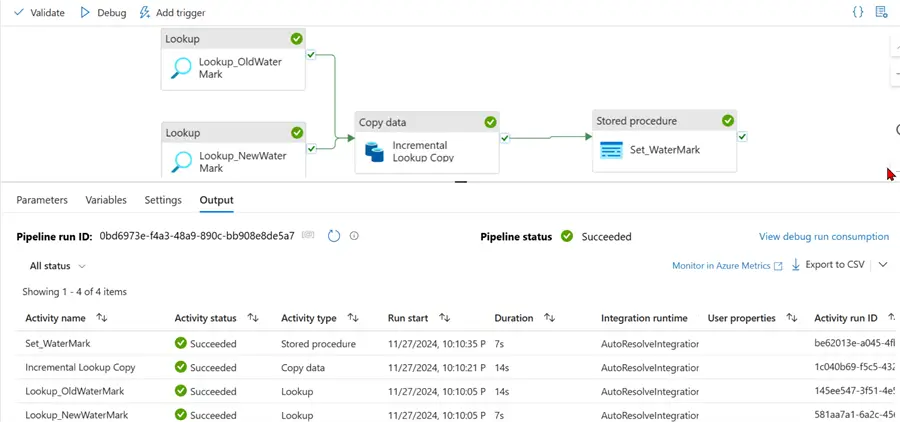
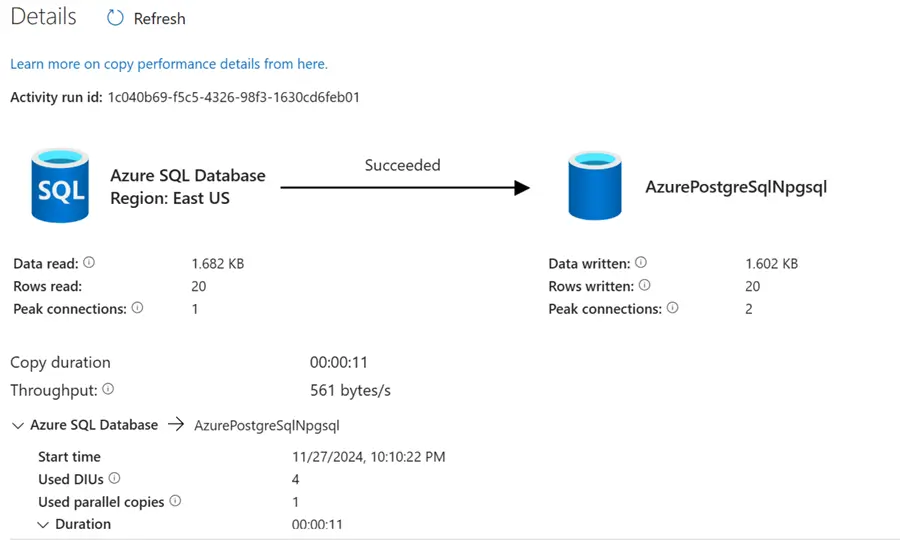
For the incremental_copy activity, you will notice that 20 rows of data were coped successfully from Azure SQL Database to Azure PostgreSQL Database.
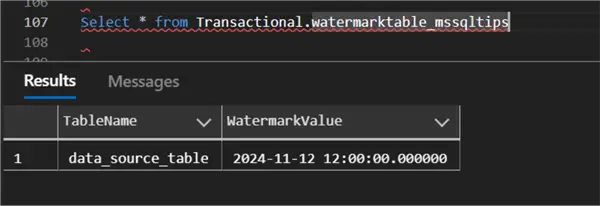
The new LastModifiedtime will be updated in the Watermark table:
Further Test
Let’s insert 10 more records into the Source Database and test to see if all the logic works as expected.
INSERT INTO Transactional.mssqltips_sales
    (CustomerName, ProductName, Quantity, SaleDate, TotalAmount, IngestionDate)
VALUES
    ('Alice Cooper', 'Desktop', 1, '2024-11-13', 950.00, '2024-11-13 14:00:00'),
    ('Brian Adams', 'Graphics Card', 1, '2024-11-14', 500.00, '2024-11-13 16:00:00'),
    ('Catherine Zeta', 'SSD Drive', 2, '2024-11-15', 300.00, '2024-11-14 09:30:00'),
    ('David Beckham', 'Gaming Chair', 1, '2024-11-16', 200.00, '2024-11-14 18:45:00'),
    ('Emma Stone', 'VR Headset', 1, '2024-11-17', 400.00, '2024-11-15 08:00:00'),
    ('Franklin D. Roosevelt', 'Surge Protector', 3, '2024-11-18', 45.00, '2024-11-15 11:30:00'),
    ('Gloria Estefan', 'Bluetooth Speaker', 2, '2024-11-19', 180.00, '2024-11-15 15:15:00'),
    ('Harry Potter', 'Laptop Stand', 1, '2024-11-20', 50.00, '2024-11-16 09:00:00'),
    ('Irene Adler', 'Power Strip', 4, '2024-11-21', 80.00, '2024-11-16 10:30:00'),
    ('Jack Sparrow', 'Camera', 1, '2024-11-22', 250.00, '2024-11-16 12:00:00');
The 10 records inserted in the Source database are now transferred to the Azure PostgreSQL Database.

You will notice the new timeframe for the watermark value has changed to the mark for the source.

Conclusion
In this article, we covered multiple ways of loading data incrementally using Azure Data Factory. This process can also be achieved using Azure Synapse Pipeline and Fabric Pipeline. We utilized the concept of the last modified date to load file data incrementally from one storage account to another. A similar process was done between databases using Dataflow transformation in Azure Pipeline to achieve the incremental process.
Lastly, we used the Lookup and Stored procedure approach by creating a watermark to store the mark value of the ingested data and creating logic around it to move data incrementally.
Next Steps
