By: Edwin Sarmiento | Comments (5) | Related: 1 | 2 | 3 | > SQL Server Configurations
Problem
Windows Server Core has been around since Windows Server 2008. I have been wanting to install SQL Server 2008 on Windows Server Core but could not do so because it wasn't officially supported. However, SQL Server 2012 now is. In this tip series we walk through the various steps to install SQL Server 2012 on Windows Server Core. For more background, refer to these two previous articles: Installing SQL Server 2012 on Windows Server Core Part 1 and Installing SQL Server 2012 on Windows Server Core Using PowerShell/.
Solution
To continue this series on Installing SQL Server 2012 on Windows Server Core, we will now proceed with installing SQL Server 2012. If you have done an unattended installation in the past using a configuration file and/or using the command-line parameters with setup.exe, then this would be a familiar territory for you. You can re-use the scripts and configuration files that you have created for your previous installations of older versions with minor tweaks on your parameters. Understand that since Windows Server Core does not have the full-blown GUI, SQL Server features that require a GUI are not supported, such as Reporting Services, SQL Server Data Tools (SSDT), Books Online and Management Studio. Managing the SQL Server installation will be done via management tools that you run from a remote machine.
There are two ways to install SQL Server 2012 on Windows Server Core - directly from the command-line or using a configuration file. Whether you are using one or the other, you need to use the Full Quiet (/Q) or Quiet Simple (/QS) switches since the SQL Server Installation Wizard is not supported on Windows Server Core.
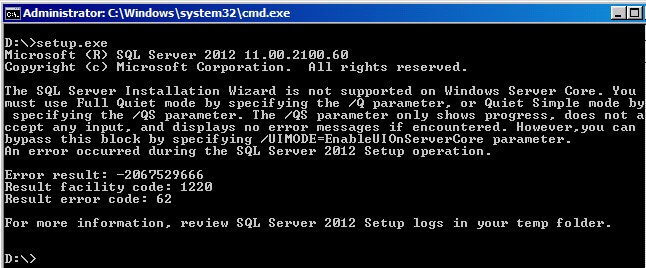
Alternatively, if you really want to see the familiar GUI-based installation that you have been accustomed with, you can use a new switch - /UIMODE=EnableUIonServerCore - that allows you to see the SQL Server Installation Wizard.
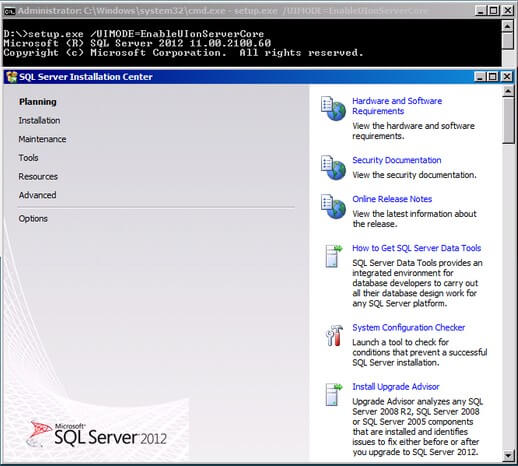
I won't cover that in this tip since it's something that most of us are very much familiar with.
Install Directly from the Command-line
To install the supported features using the command-line, we need to use the /FEATURES switch and specify the ones you want to install. The example below is what I use for my test deployments. The list of command-line switches can be found here.
C:\> Setup.exe /QS /ACTION=Install /FEATURES=SQLENGINE,REPLICATION,CONN,IS /INSTANCENAME=MSSQLSERVER
/SQLSVCACCOUNT=TESTDOMAIN\sqlservice /SQLSVCPASSWORD=mY$tr0nGpassw0rd
/SQLSYSADMINACCOUNTS=TESTDOMAIN\SQLDBAs
/AGTSVCACCOUNT=TESTDOMAIN\sqlservice /AGTSVCPASSWORD=mY$tr0nGpassw0rd /TCPENABLED=1
/IACCEPTSQLSERVERLICENSETERMS=1 /UPDATEENABLED=False

- I use the /ACTION switch to perform an installation. Note that the value Upgrade for the /ACTION switch is not supported because upgrade of previous versions to SQL Server 2012 on Server Core installations is not supported.
- Using the /FEATURES switch, I install the database engine, replication components, Integration Services and the connectivity components.
- Using the /INSTANCE switch, I use the default instance value MSSQLSERVER. You can use a different value if you intend to install a named instance.
- Using the /SQLSVCACCOUNT and /AGTSVCACCOUNT switches, I specify the SQL Server and SQL Server Agent service accounts, respectively.
- Using the /SQLSVCPASSWORD and /AGTSVCPASSWORD switches, I specify the SQL Server and SQL Server Agent service account passwords, respectively.
- Using the /SQLSYSADMINACCOUNTS , I specify the account or security group that I want to add to the sysadmin fixed-server role.
- Using the /TCPENABLED switch, I specify that TCP/IP is enabled as part of the installation. If you did not include this switch, you will have to manually configure it after installation to allow client applications to connect to the SQL Server instance remotely.
- Using the /UPDATEENABLED switch, I specify that my installation will not check for the latest service packs and updates. If your server does not have access to the Internet, be sure to add this switch with a value of False to avoid having a failed installation.
- Finally, I use the /IACCEPTSQLSERVERLICENSETERMS switch because I used the /QS switch for the installation. This switch is required if you are using either the /Q or /QS switches.
You can change the different switches provided here depending on the environment that you intend to install and configure.
Install Using a Configuration File
A previous tip to Standardize SQL Server Installations with Configuration Files has provided a sample configuration file that you can use to install a SQL Server instance. Do keep in mind that only a limited number of features are supported on Windows Server Core so make sure you remove the switches that install the unsupported features. The best way to create a configuration file is to use the SQL Server Installation Wizard on another machine and walk through the process, providing the appropriate parameter values. You can then copy the ConfigurationFile.ini file generated by the wizard and use it as a parameter in your installation. The example below shows installing using a configuration file.
C:\> SETUP /QS /ACTION=INSTALL /SQLSVCPASSWORD=mY$tr0nGpassw0rd /AGTSVCPASSWORD=mY$tr0nGpassw0rd
/IACCEPTSQLSERVERLICENSETERMS=1 /TCPENABLED=1 /ConfigurationFile=C:\ConfigurationFile.ini
/UPDATEENABLED=False

You are probably wondering why I still provided the passwords for both the SQL Server and SQL Server Agent service accounts in my command-line parameters. This is because the SQL Server Installation Wizard strips the configuration file of the passwords that you provide for security reasons. You wouldn't want anybody who has access to the configuration file to be able to see the credentials you used for the SQL Server service accounts.
Enable Windows Firewall to Allow SQL Server Traffic
Once the installation is complete, we need to configure the Windows Firewall to allow SQL Server traffic. As mentioned in the previous tip, you can disable the Windows Firewall entirely if you have internal firewalls that are managed by your network team. Here, we'll assume that you do not want to disable the Windows Firewall, so we will just create an exception to allow SQL Server traffic. And since we do not have the GUI available on the Windows Server Core machine, we will use the netsh.exe command to perform this task.
C:\> netsh advfirewall firewall add rule name="SQL Server 1433" dir=in action=allow
protocol=TCP localport=1433

A more comprehensive list of port numbers used by SQL Server and how we can configure the Windows Firewall is described in this MSDN article.
Configure Local Security Policy
Configuring the appropriate security rights assignment for the SQL Server service account is a recommended best practice. Most common of these permissions are the Lock pages in memory and Perform volume maintenance tasks to allow database instant file initialization. Since we do not have the Local Security Policy management console on a Server Core machine, we need to perform this configuration on another machine with a full-blown Windows installation. A previous tip walks us through configuring Windows Instant File Initialization using the Local Security Policy management console. The same process can be applied to grant the Lock pages in memory permission to the SQL Server service account. Once the permissions have been applied, we can export the security policies in a file by right-clicking on Security Settings and select Export.
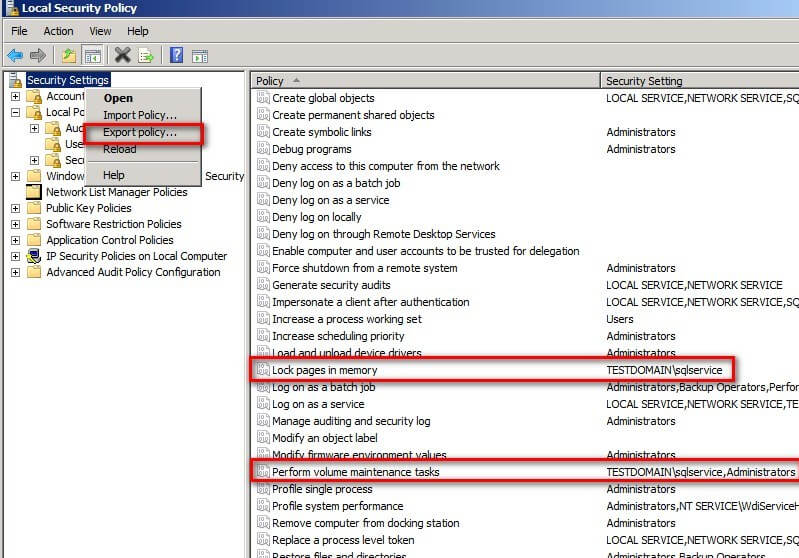
Once exported, we can copy this file to the Server Core machine and import the security policy using the secedit.exe command. In the example below, I saved the security policy in a file named SQLServer-SecurityPolicy.inf and copied the file to my Server Core machine. Be sure to create the security policy on a clean Windows machine and not one with an existing SQL Server installation to avoid having security policies that grant permissions to local Windows accounts. Otherwise, your security import process will complete with errors.
C:\> secedit /configure /cfg C:\SQLServer-SecurityPolicy.inf /db secedit.sdb

Manage SQL Server Remotely via Computer Management
Since we do not have GUI tools on a Server Core Machine, we need to have the appropriate management tools on a remote machine to manage SQL Server. While Management Studio can be used to perform most of out administrative tasks, there are some that we can't do with it. Few of those tasks are changing the TCP/IP port number, SQL Server startup parameters and enabling AlwaysOn High Availability - all of which require SQL Server Configuration Manager. Since SQL Server Configuration Manager does not allow us to connect to a remote SQL Server instance, we won't be able to use it to perform these tasks. We can, however, use the built-in Windows Computer Management Tool.
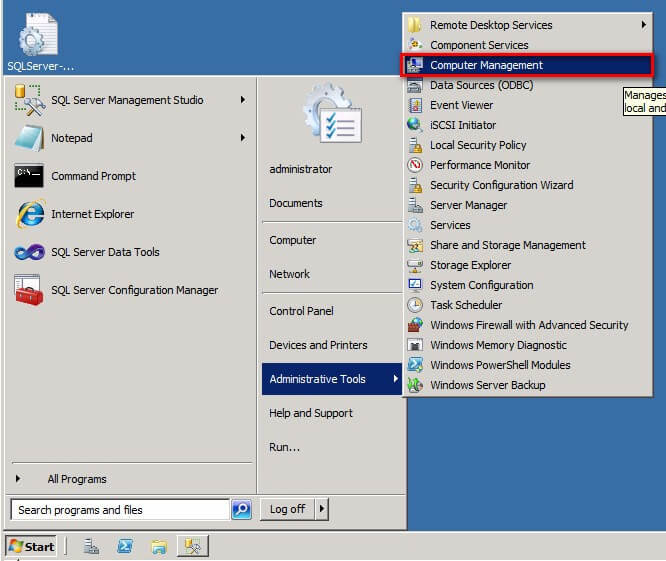
To open the Computer Management Tool on a remote machine, type compmgmt.msc from Start -> Run.
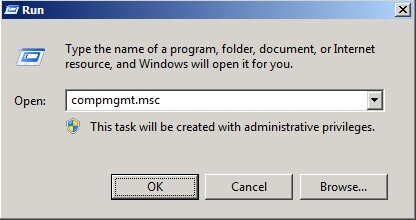
Alternatively, you can download and install the Remote Server Administration Tools (RSAT) on your workstation and open Computer Management from Administrative Tools.
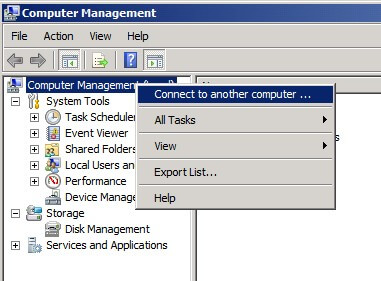
From within Computer Management, right-click Computer Management (Local) and click Connect to another computer... In the Select computer dialog box, type the hostname of the Server Core machine and click OK.
You now have access to SQL Server Configuration Manager via Computer Management under the Services and Application node.
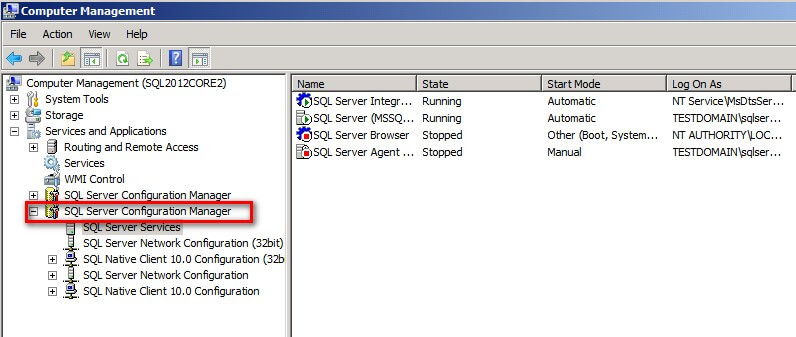
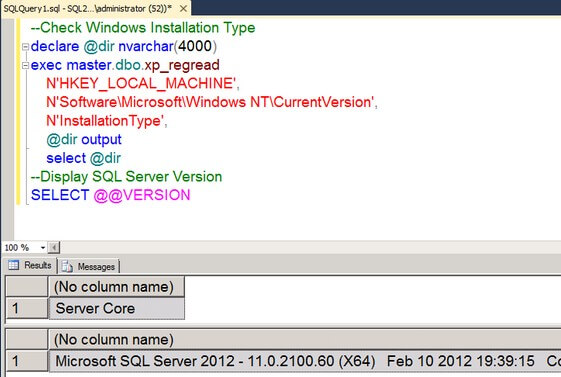
You can now perform administrative tasks on your SQL Server instance via familiar GUI tools such as Computer Management. You can also verify the installation on Server Core by using SQL Server Management Studio. This T-SQL query checks the registry to verify the installation type.
--Check Windows Installation Type
DECLARE
@dir NVARCHAR(4000)

EXEC MASTER.dbo.xp_regread
    N'HKEY_LOCAL_MACHINE',

N'Software\Microsoft\Windows NT\CurrentVersion',
   N'InstallationType',

   @dir output
   SELECT
@dir
--Display SQL Server Version
SELECT @@VERSION
Next Steps
- Install and configure a Windows Server 2008 R2 Server Core using Windows PowerShell commands
- Review the prerequisites for installing SQL Server 2012 on Windows Server Core
About the author
 Edwin M Sarmiento is a Microsoft SQL Server MVP and Microsoft Certified Master from Ottawa, Canada specializing in high availability, disaster recovery and system infrastructures.
This author pledges the content of this article is based on professional experience and not AI generated.
View all my tips


