Problem
So now we’ve got documents in SharePoint and we’ve got some nice looking views. What else can we do to leverage that information, particularly to get it into documents?
Solution
Let’s look at some of the possibilities.
In part 1, we touched on using document properties and Quick Parts in Word to bring in information from columns in the SharePoint library. We will explore that further, using the example of creating a cover page for a document.
We will also look at how to bring in some critical pieces of information which are not in the quick parts: the file name, modified date and file location (URL).
Finally, we will walk through creating a Quick Steps workflow that looks up information from another list and from the SharePoint user list, as an alternative way of getting more information relating to the document into its metadata.
Making more use of SharePoint data
In part 1, we saw how you can reference information from SharePoint library columns inside Office documents. For example, where we have a library with these columns (see Part 2 of the series for how we put the color coding into the view):

As we saw in part 1, you can display a panel showing the document properties linked to these columns using File -> Info -> Properties -> Show Document Panel in Word 2010, or Office -> Prepare -> Properties in Word 2007.

Let’s go ahead and use those properties to make a cover page for when the document is printed that shows how it has been classified in SharePoint.
- Word has a built-in gallery of cover pages which I will not use for this exercise. You could adapt them for your purposes. However, they are not designed to integrate with SharePoint so, as they stand, they do not use compatible document properties (see part 1 of this series).
Creating a cover page
To create a basic cover page:
- Position your cursor at the start of the document (Ctrl Home)
- If we just insert a new page here, it will inherit the Heading 1 format of the first paragraph of the sample document, so we need to do a bit of fiddling:
- Press Enter to insert a paragraph
- Press the up arrow to move up to the new paragraph
- Select Normal from the styles gallery on the Home tab of the ribbon
- Press Ctrl Enter to insert a page break
- Press Delete to remove the surplus paragraph at the top of the original first page
- Press Ctrl Home to go to the new page at the start of the document
- Select the Insert tab on the ribbon and use the Table button to insert a 2 column table (the exact number of rows doesn’t matter as it’s easy to add new ones)

We will use this table to show information about the document. Let’s start by filling in what we have.
(For this tip, I am not going to spend any time on formatting the page in Word to make it attractive and easy to read – I leave that as an exercise for the reader! However, it’s pretty easy to use the Table Tools -> Design tab on the ribbon to apply a style to the table.)
Using SharePoint library columns
Type in the name of the first property (“Title”) in the first column of the table then press Tab.
Select the Insert tab on the ribbon. In the Text group, select Quick Parts -> Document Property -> Title.

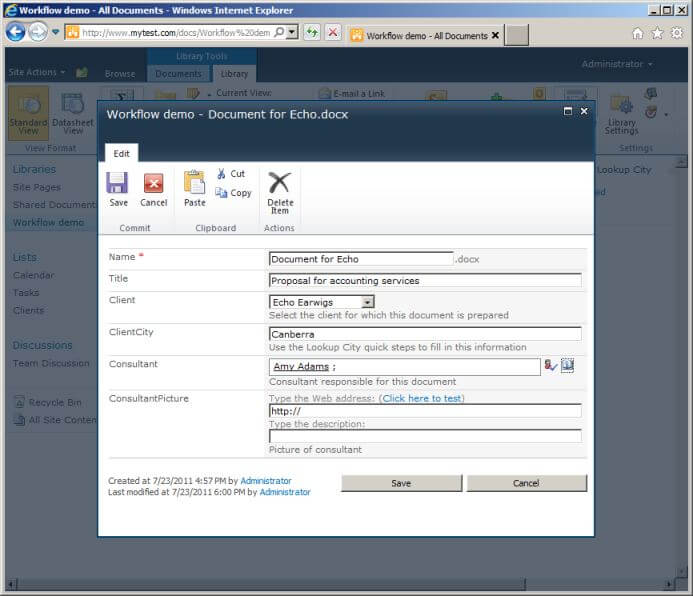
This cover page can be used to set property values for the document as well as print them. This document currently has no title, so we can type a title into the property in the document. As soon as we use the mouse to click into the next row of the document, what we typed will become the title for the document.
- Normally, you would press Tab to go to the next row of the table, but this does not work when you are typing into a property.
Repeat this process of typing the name of the property in the first column of the table and inserting the property into the second column for the remaining four properties shown.

As you can see though, this is only a subset of the columns from the library in Word. We can see the document type (a selection from a small range of options), client name (a lookup to a list of clients in SharePoint), consultant name (a lookup to the user list in SharePoint), and review status (another selection from some options). We can’t see system information (like the file name and date), calculated columns (like the Review by date), or additional columns from the lookup (like the Client:City).
Including system information
The file name and modified date are preserved by the interaction between Word and SharePoint (assuming the Office integration between Office and SharePoint is working correctly), so we can use normal Word functionality to show these in our cover page. Unfortunately, the process to include them is a little more involved, because it relies on traditional Word fields.
First, we need to add more rows to our table. Again, when the insertion point is inside a property, we can’t just press Tab as we normally would to add rows to the table, so from the Table Tools -> Layout ribbon tab, select the Insert Below button a few times. Then click to move the insertion point back to the first column of the first blank row.
In the first column, type “File name” and press the Tab key. In the second column, from the Insert ribbon tab, select Quick Parts -> Field… Locate “FileName” in the list of fields.

Select OK to insert the field. Tab to the next row, and type “Modified date”. Tab to the second column, and again select Insert -> Quick Parts -> Field… This time, select the “SaveDate” field. Optionally, select a date format in the Field properties area of the dialog. Select OK to insert the field.

Finally, let’s add the full path to the document in SharePoint. Type “SharePoint location” in the first column of the last row. In the second column, again insert the FileName field, but this time check the box under Field options on the right to add the path to the file name.

This cover page is the kind of cover page you would use for internal distribution or filing. The same approach can also be used to create nicely formatted presentation pages for documents. You can also use quick parts as a document automation tool, so users select or enter information once, and it can be repeated in multiple places through the body of a document, instead of using search and replace. Your imagination is the limit!
Another way to get more information from SharePoint
You will have noticed from the screenshot of the library near the top of the article that there is a Client:City column. Client is a lookup to a Clients list. When the user selects a client, SharePoint fills in the Client column with the title of the client and also the Client:City column with the city of the client from the Clients list. This kind of additional lookup is new in SharePoint 2010, and is very useful as a way of showing more information from another list. However, unfortunately it is not provided as property in Office on the desktop.
This is a shame, because there are scenarios where this could be very useful. For example, let’s say the Clients list included the client’s address. We could then have Word set up so that when you select the client for the document, the client’s address would be automatically filled in.
SharePoint calculated fields are great for classifying documents using rules based on values in other columns. However, they also are not available as Quick Parts in Word.
In part 1, we also included the consultant picture in a view by setting an option on the column in the list. However, this picture ended up in every view that included that column. We found a way to remove it from a view using SharePoint Designer, but that particular customization then causes an error if you ever need to change that view again in the browser. If that customized view is the default view of the library, that same error surfaces with other activities that try to customize the default view such as creating a column or running a new workflow.
So what approach can we use to get around these issues? Enter workflows.
A workflow can go and get the client’s city (and address and other information) from the other list and put it into a normal column that you can use in Word.
A workflow can act to set a value based on rules like a calculated column does, but do it to a normal column which you can reference in Word.
And a workflow can go and get the consultant’s picture or other information into a separate column, which you can then easily include or exclude as required in views.
Let’s create a “Quick Step” workflow which will be available on the toolbar in the library in SharePoint. First, we will get this workflow to retrieve the city for the selected client and put it into another column in the library.
- For production use, you could have a workflow that runs automatically whenever a document is changed, to save the user having to select the Quick Step button.
- A limitation of using workflows is that the information will not be available in Word until the document has been saved into SharePoint for the first time and the workflow has been run.
Let’s create a workflow to do this lookup in a fresh document library. Go to Site Actions -> View All Site Content. Select Create, then select Document Library. Call the library “Workflow demo” and select Create.
In the new document library, we will create two columns. The first will be a simple lookup to the Clients list. Select the Library tab in the ribbon and select Create Column. Name the column “Client”, type Lookup, description “Select the client for which this document is prepared”. Select to get information from the Clients list using the Title field.

Select OK. Now create a column in the document library to hold the client city. Name the column “ClientCity”, type Single line of text, description “Use the Lookup City quick steps to fill in this information”.

Select OK to create the column.
To create the Quick Step workflow, select New Quick Step in the Customize Library group on the Library tab of the ribbon.

This will launch SharePoint Designer (SPD) on your local computer, so the browser may give you a security warning. SPD will then display a form for you to enter information about the workflow. Leave the option “Start a new workflow” selected, and enter the button label “Lookup City”.
SharePoint Designer requires you to have an image to use for the button in the ribbon. Ideally this should be 32X32 pixels in size. I am going to cheat and use one of the built-in images that comes with SharePoint. On the server, they are located in the “C:\Program Files\Common Files\Microsoft Shared\Web Server Extensions\14\TEMPLATE\IMAGES” directory, but from the point of view of the browser they are in the site in the path “_layouts/images”. You can’t use the Browse button in SPD to find them, so you will have to manually select one on the server and type its name into the dialog with the browser path. In this case, I am using a server image called “ctom32.png”.

Select OK to create the Quick Step button and associated workflow.
SPD will now take you into the workflow designer.

This workflow needs to find the relevant information from the related list, then put it into the column we created ready for it in this list. You can do this in a single step, although it’s a complicated one!
From the Action drop down in the ribbon, select Set Field in Current Item. SPD will fill this into the workflow designer, with underlined placeholders for “field” and “value”.

Click on the placeholder for field. From the drop down, select the column we created for this purpose “ClientCity”.

Now click on the placeholder for value. The placeholder turns into an entry field, with two buttons next to it: an ellipsis (three dots), and a function sign (fx).

Select the function sign button.
(This is where it gets a bit complicated!)
First, SPD wants to know where the data is coming from (the Data source), and what column to retrieve. The Data source drop down shows various workflow-related options (such as current item and workflow variable), then lists the other lists in the site. Scroll down and select the Clients list as the Data source. As soon as you do, the dialog will expand with more options.
The second drop down “Field from source” will now show the fields in that list. Select the City field as the field you want to retrieve.

We now need to tell the workflow how to pick which entry in the clients list it should be using to find the city. To do this, we will use the lookup field in the document library that points to an entry in the clients list.
Lookup fields store both the ID of the item to which they are pointing and the text value. The ID is the best thing to use, because it is simple and guaranteed to be unique. So we will tell the workflow to find the entry in the clients list which has an ID which matches the ID stored in the Clients lookup column for the current document (item) in the library.
Under the Find the List Item heading, click the drop down for Field. Select the field “ID”, because this is the column in the Clients list we are matching. For the Value, click the function button next to the entry field. Another dialog pops up called “Lookup for Integer”. This is because SPD knows that ID is an integer, so we should be selecting something that returns an integer.
Leave “Current Item” selected as the data source and select the field Client. For Return field as, select “Lookup Id (as Integer)”.

Select OK. This now completes the lookup dialog.

Select OK to save the lookup information. After all that, the completed workflow step looks deceptively simple!

Click the Publish button in the ribbon to both save and publish the workflow. (When you save a workflow, it is like saving a draft. To run the workflow, it must be published.)
Go back to the document library, but leave SPD open with the workflow so we can add more steps to it later on. Upload a test document. When you are prompted for metadata, select a client, but don’t enter anything for the ClientCity column.

Back in the library, select the check box next to the new document in the list. On the Documents tab in the ribbon, you should see the new Lookup City quick step. (If you don’t, refresh the browser and try again.)
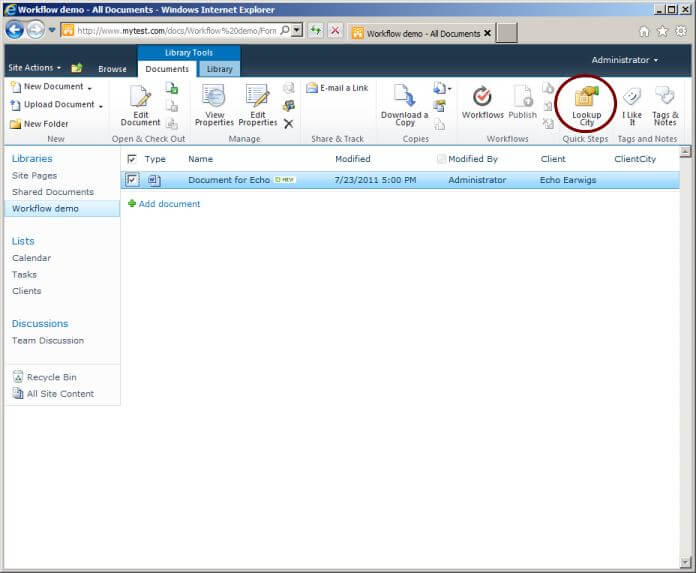
Let’s try running it! Click the Lookup City button. A workflow initiation form is displayed.

If we were building a more elaborate workflow, we could use this form to ask the user for information to use in the workflow. Click Start to launch the workflow on the selected document.


Voilà! The workflow has completed and filled in the city for the selected client into the document properties. You could now reference that city inside the document using Quick Parts as discussed earlier.
Let’s also add a column to the library for the consultant working on the document, and extend the same workflow to find the consultant’s picture and add it as another column in the library.
First, add a column to select the consultant for the document from the SharePoint user list: column name Consultant, type Person or Group.

Now add a column for the picture, name ConsultantPicture, type Hyperlink or Picture, Format URL as Picture.

Edit the properties of the document to select a consultant, but leave the ConsultantPicture column empty.
We now need to edit the workflow we previously created. Go back to SPD where the workflow is still open.
- If you closed SPD, re-open it, and open your site. Select Lists and Libraries on the left, then select the library you are working with from the list in the middle.
- You will then see a screen of information about the library, which includes a list of the workflows attached to the library, as well as the “Custom Actions” which includes the button we added to the ribbon to run the workflow.

- Select the workflow you want to edit from the workflows list, in this case called “Button – Lookup City”.
- You will then see a screen of information about the workflow. Select the link Edit workflow under the Customization heading.
- Yes, you could have used the Workflows heading on the left when you first opened the site to go straight to a list of workflows. However, you can have multiple workflows in the site with the same name attached to different lists, and you couldn’t tell them apart in that view. Going via the list ensures you get the right workflow!
In the workflow, again use the Actions drop-down to add an action Set Field in Current Item. It doesn’t matter if this new action goes above or below the existing one. They can both be in the same workflow step. This time, select ConsultantPicture as the field to be set.

Again, click on the value placeholder, then use the function button next to it to open the lookup dialog. This time, select User Profiles as the Data source and Picture as the field. (While you have the Field from source drop-down open, note the other information that we can retrieve from user profiles as well!)

Again, we need to tell SharePoint how to pick which user profile to use by matching against something in the current item. In this case, we need to match the user profile account name to the login name of the user selected in the consultant column for the current document.
Under Find the List Item, in the field drop down select Account Name (which is the only option). Click the function button for Value. Select the Current Item as Data source, Consultant as the field, and Return field as Login Name.

Select OK.

Select OK again.

Publish the revised workflow using the button in the ribbon. Then return to SharePoint and use the Lookup City button to run the workflow again for the document. (Later, you can use Custom Actions for the library in SharePoint Designer to rename this button to something more appropriate!) This time the workflow goes and gets the picture and adds it to the list as well.

Next Steps
- Think about what other information you could pull in from SharePoint to use in views or in documents.
- Experiment with using Quick Parts and Fields in Word to include information from SharePoint in documents.
- Experiment with workflows to add information into library columns for documents, for use in views or in the documents.
- Look at part 1 and part 2 of this series, if you haven’t already, for information about using metadata in views and customizing views in SharePoint Designer.

Knox is a Senior Technical Architect with an international professional services firm, where he has designed Intranet, Internet and Extranet systems based on SharePoint Portal Server 2001 and 2003, Content Management Server 2002, and Microsoft Office SharePoint Server 2007. He has an MBA as well as degrees in marketing and law.