Problem
When using Kubernetes on Windows 10/11, we cannot directly install Kubernetes because it does not provide Kubernetes control plane binaries for all required components such as the Kubernetes API Server. Therefore, we cannot run SQL Server with Kubernetes on Windows as we can on Linux.
Solution
Docker Desktop on Windows 10/11 has built-in support for Kubernetes. However, Docker Desktop is not supported on server versions of Windows, like Windows Server 2019, or Windows Server 2022. Further, Windows 10/11 must meet two requirements to be able to install Docker Desktop:
- Hardware Virtualization (VT-x/AMD-V) is enabled in BIOS/UEFI.
- Windows Subsystem for Linux (WSL 2), or Hyper-V architecture is installed. WSL is recommended and is the default.
In this article I will explain how to run SQL Server with Kubernetes on Windows using Docker Desktop.
Setting the Environment
Create a Docker account if you do not already have one. Download and install SQL Server Management Studio (SSMS) on your local machine, if not already installed.
WSL 2 depends on Hyper-V as the underlying architecture. Therefore, ensure Hyper-V architecture with the following command:
--MSSQLTips.com (CMD)
systeminfo
The output should list Hyper-V having been detected, with a line like the following:
--MSSQLTips.com (Text)
Hyper-V Requirements: A hypervisor has been detected. Features required for Hyper-V will not be displayed.
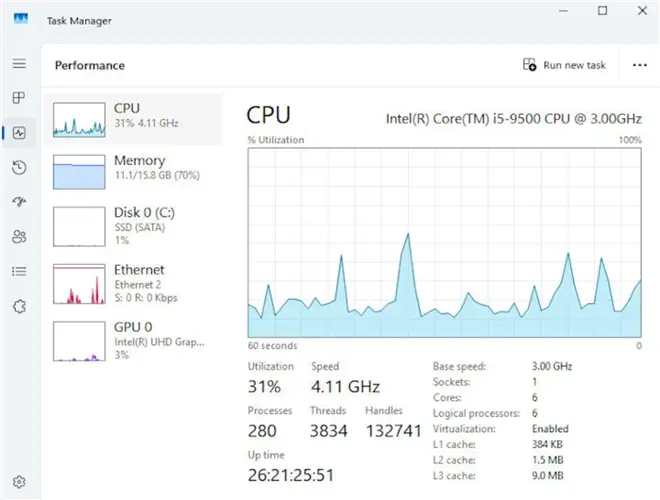
Let us ensure that Hardware Virtualization is enabled in the BIOS/UEFI by accessing the Task Manager. The Virtualization: Enabled means that hardware virtualization is enabled.
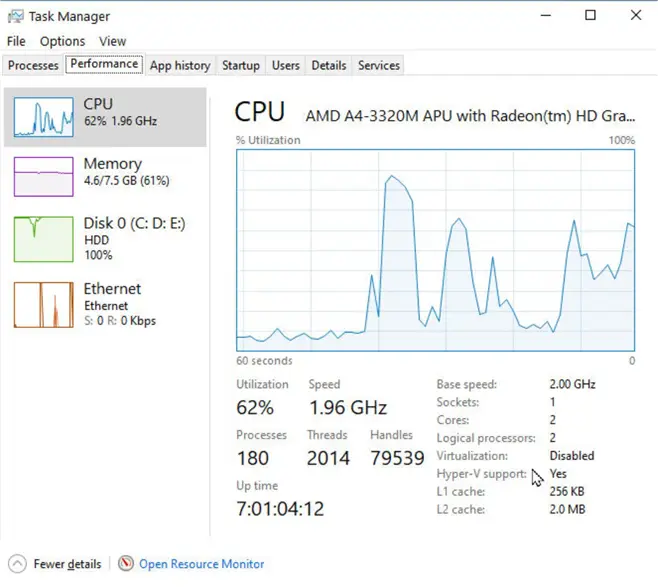
As an example of hardware virtualization not being enabled, the following Task Manager shows Virtualization: Disabled. However, Hyper-V Support: Yes means that hardware virtualization is supported in the BIOS/UEFI and can be enabled. Find for your specific machine how to enable hardware virtualization.
Setting Up Docker Desktop
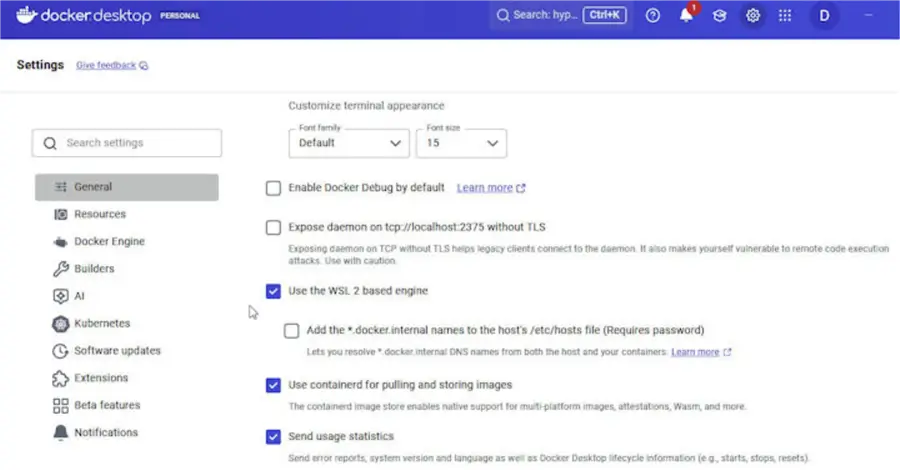
Once hardware virtualization being enabled is confirmed, let us download and install Docker Desktop on a Windows machine. Launch Docker Desktop, and navigate to Settings. Select General. Click the checkbox Use the WSL 2 based engine, if not already turned on. Select Use containerd for pulling and storing images.
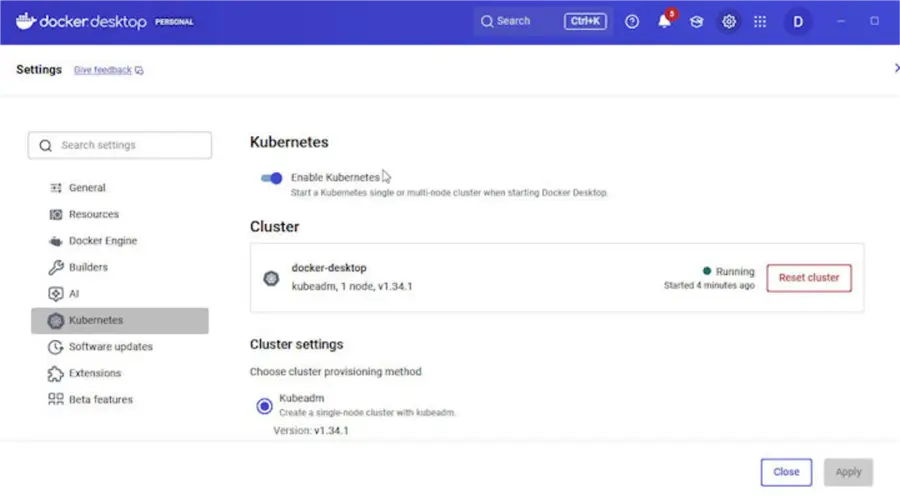
Select Settings > Kubernetes in the navigation margin. Turn on Enable Kubernetes, if not already on.
When we install Docker Desktop, the command-line client tool kubectl that we use to manage Kubernetes objects gets installed and added to path. Run the following command to verify that kubectl is installed, and to list its version:
--MSSQLTips.com (CMD)
PS C:\SQL2022> kubectl version
Client Version: v1.34.1
Kustomize Version: v5.7.1
Server Version: v1.34.1
Run the following command to discover its use.
--MSSQLTips.com (CMD)
PS C:\SQL2022> kubectl --help
kubectl controls the Kubernetes cluster manager.

Find more information at: https://kubernetes.io/docs/reference/kubectl/

Basic Commands (Beginner):
  create          Create a resource from a file or from stdin
  expose          Take a replication controller, service, deployment or pod and expose it as a new Kubernetes service
  run             Run a particular image on the cluster
  set             Set specific features on objects

…

Usage:
  kubectl [flags] [options]

Use "kubectl <command> --help" for more information about a given command.
Use "kubectl options" for a list of global command-line options (applies to all commands).
Creating a Kubernetes Cluster
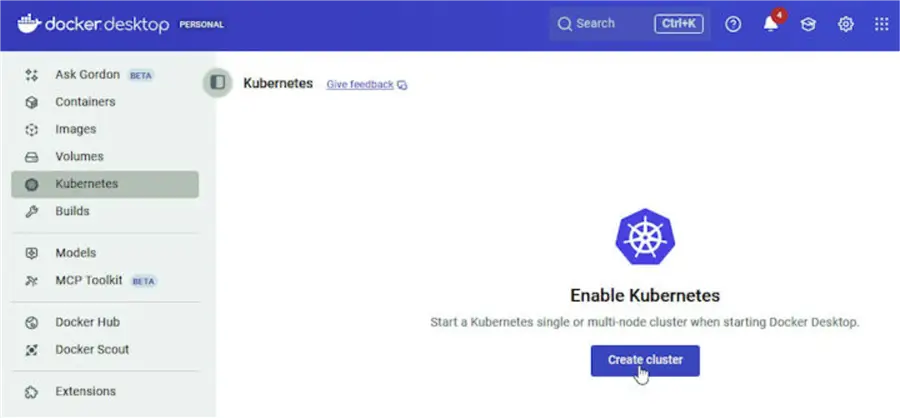
To create a Kubernetes cluster, select Kubernetes, and click Create cluster.
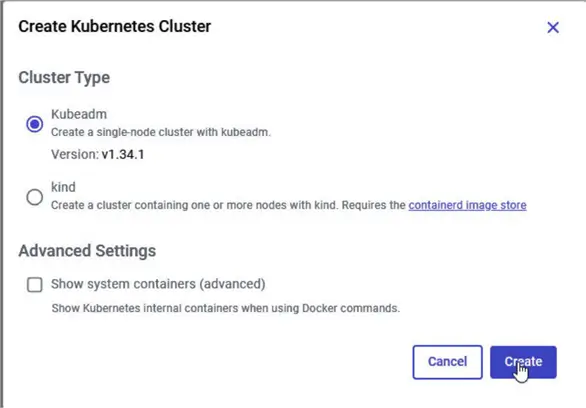
Select Cluster Type as kubeadm in the Create Kubernetes Cluster dialog. We use the cluster type as kubeadm for our example to provision a single node cluster, which is best for development. We can provision a multinode cluster by choosing the kind cluster type option. The kind (short for Kubernetes in Docker) is an open source tool that depends on kubeadm, and often used for testing.
Click Create.
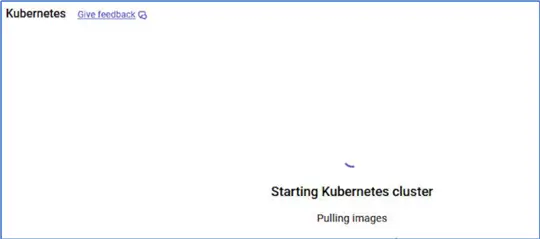
Click Install in the Kubernetes Cluster Installation dialog.

A message should indicate that it is starting the Kubernetes cluster, and pulling the required images.
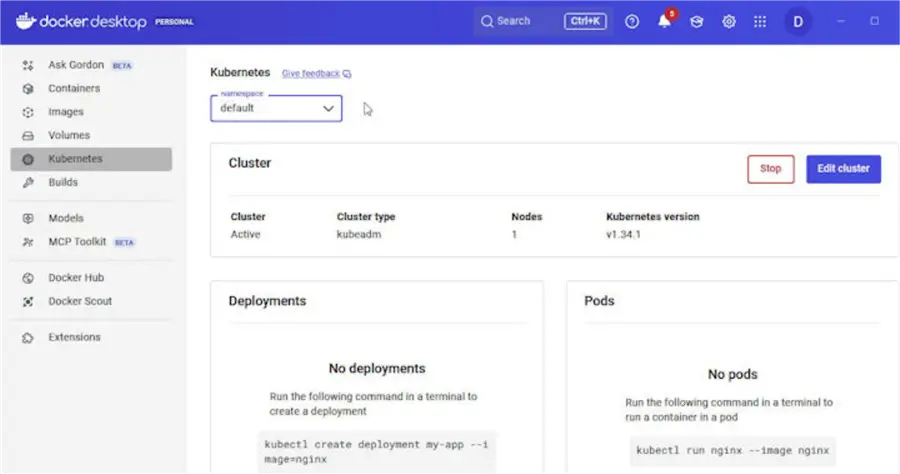
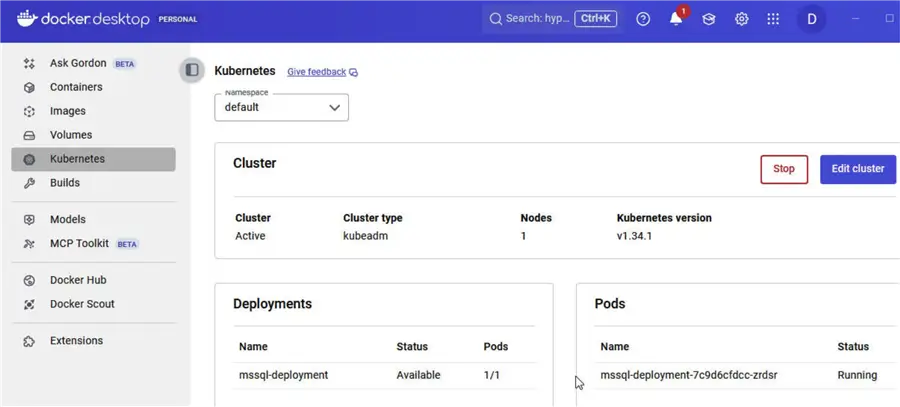
A new Kubernetes cluster should get provisioned within a few seconds. Cluster should be listed as Active, with Nodes as 1. The Kubernetes version is also listed. Note that no deployments, or pods are listed initially.
Configuring EKS Resources for SQL Server in a Configuration File
Having created a Kubernetes cluster, we will create the configuration file for running SQL Server pods on it next. We will create three new Kubernetes resources:
- A PersistentVolumeClaim abstract resource as a user request for specific resources for SQL Server.
- A Deployment abstract resourcefor SQL Server pods. We configure the Docker image mcr.microsoft.com/mssql/server:2022-latest, port 1433, and environment variables within this.
- A Service abstract resource of type LoadBalancer for the deployment.
We use the following configuration file (sqlserver-2022.yaml) to declare all these resources.
--MSSQLTips.com (YAML)
apiVersion: v1
kind: PersistentVolumeClaim
metadata:
  name: mssql-data-pvc
spec:
  accessModes:
    - ReadWriteOnce
  resources:
    requests:
      storage: 2Gi
---
apiVersion: apps/v1
kind: Deployment
metadata:
  name: mssql-deployment
spec:
  replicas: 1
  selector:
    matchLabels:
      app: mssql
  template:
    metadata:
      labels:
        app: mssql
    spec:
      containers:
      - name: mssql
        image: mcr.microsoft.com/mssql/server:2022-latest
        ports:
        - containerPort: 1433
        env:
        - name: ACCEPT_EULA
          value: "Y"
        - name: MSSQL_SA_PASSWORD
          value: "SqlServer@2022"
        - name: MSSQL_PID
          value: "Standard" # Sets the Product ID to Standard edition
        volumeMounts:
        - name: mssql-storage
          mountPath: /var/opt/mssql
      volumes:
      - name: mssql-storage
        persistentVolumeClaim:
          claimName: mssql-data-pvc
---
apiVersion: v1
kind: Service
metadata:
  name: mssql-service
spec:
  selector:
    app: mssql
  ports:
    - protocol: TCP
      port: 1433
      targetPort: 1433
  type: LoadBalancer
Applying the Configuration to Create Kubernetes Resources for SQL Server
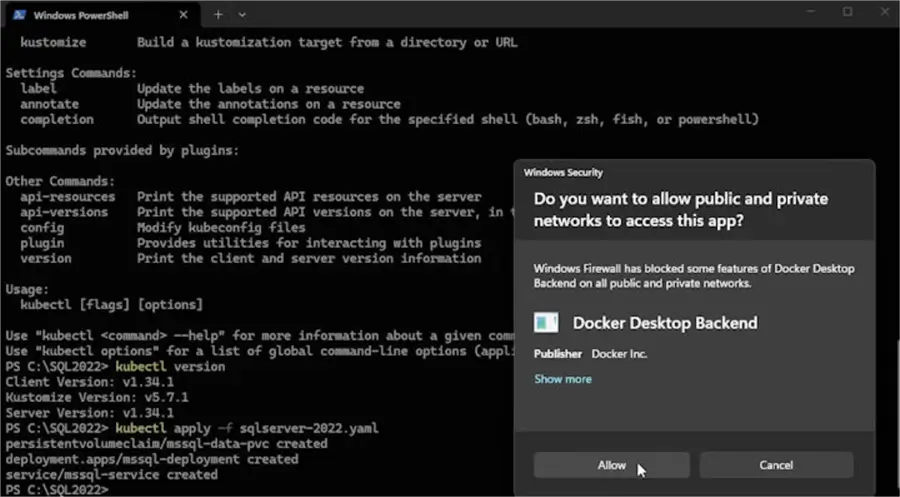
Let us run or apply this configuration file to create the Kubernetes resources for SQL Server. We apply with the following kubectl command. The output lists the resources created.
--MSSQLTips.com (CMD)
PS C:\SQL2022> kubectl apply -f sqlserver-2022.yaml
persistentvolumeclaim/mssql-data-pvc created
deployment.apps/mssql-deployment created
service/mssql-service created
We should run kubectl commands in PowerShell for the formatting and color coding it provides. When we run this command for the first time, Windows prompts the user to get permission for Docker Desktop to allow networks to access this app. Click Allow.
Get or list the pods with the following command.
--MSSQLTips.com (CMD)
PS C:\SQL2022> kubectl get pods
NAME                                READY   STATUS              RESTARTS   AGE
mssql-deployment-7c9d6cfdcc-zrdsr   0/1     ContainerCreating   0          32s
Note that the pod has been initialized; however, the container within the pod is still creating. After a few more seconds, run the same command again. This time, the pod’s STATUS is listed as Running.
--MSSQLTips.com (CMD)
PS C:\SQL2022> kubectl get pods
NAME                                READY   STATUS    RESTARTS   AGE
mssql-deployment-7c9d6cfdcc-zrdsr   1/1     Running   0          73s
To access the Kubernetes service, we need its external IP address. Run the following command to list the service. Note the value under the EXTERNAL-IP column. The external IP address is localhost, for this article.
--MSSQLTips.com (CMD)
PS C:\SQL2022> kubectl get services
NAME            TYPE           CLUSTER-IP       EXTERNAL-IP   PORT(S)          AGE
kubernetes      ClusterIP      10.96.0.1        <none>        443/TCP          22m
mssql-service   LoadBalancer   10.104.186.130   localhost     1433:31857/TCP   90s
Exploring the Kubernetes Resources in Docker Desktop
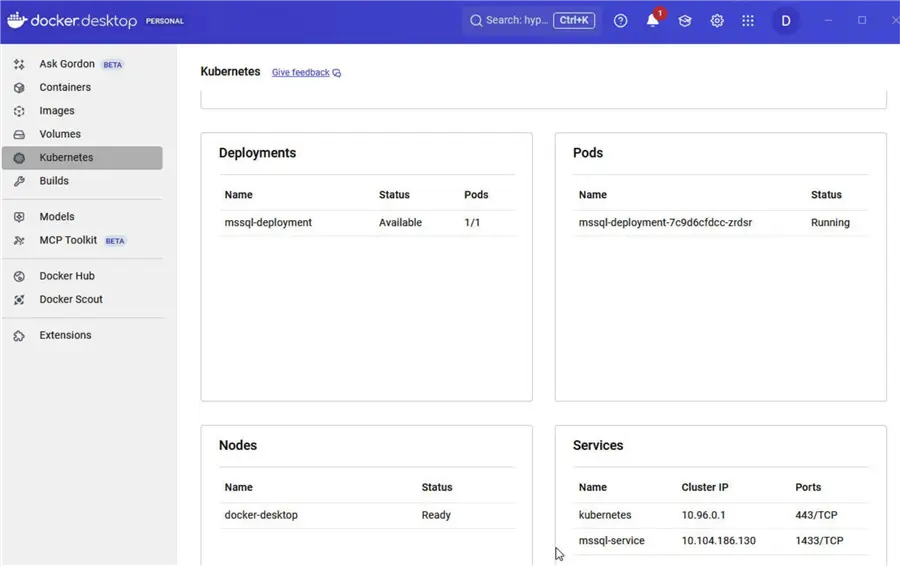
Docker Desktop should list the new deployment, and the SQL Server pod.
It should list Node status as Ready. The Services listed include the Kubernetes service itself, and the SQL Server service we create.
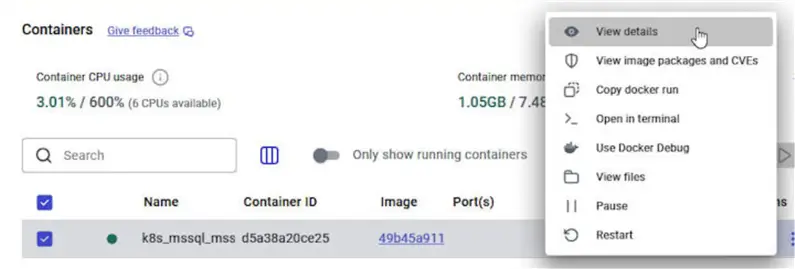
Click Containers in the navigation to list the container running within the pod.
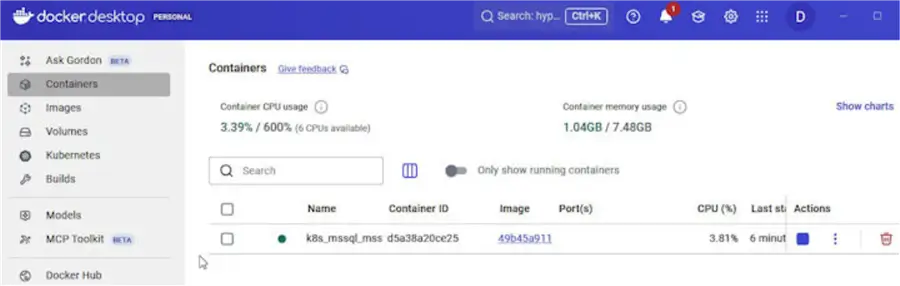
Select the container, click the three vertical dots icon, and select View details.
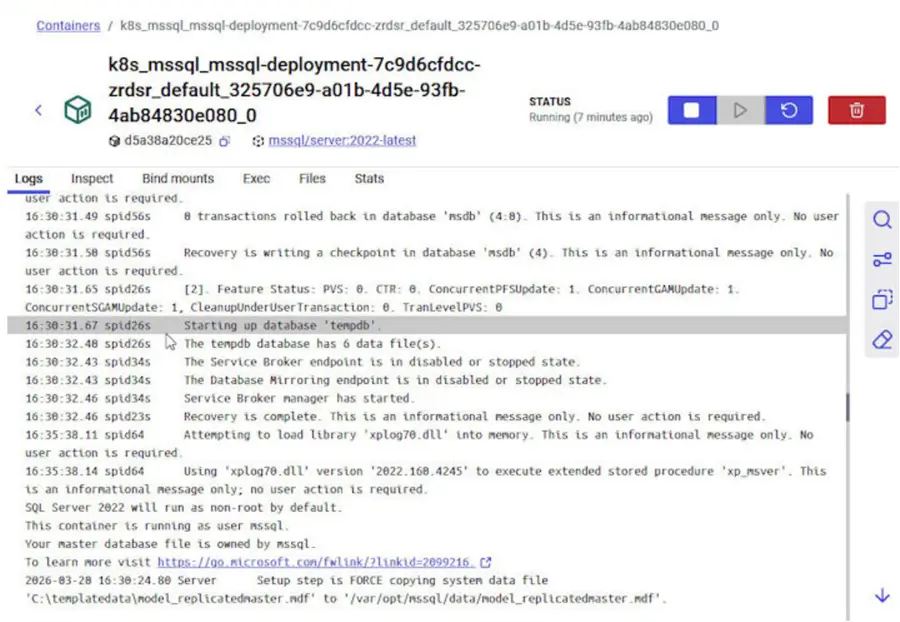
Explore the Logs to discover that the tempdb database is starting in addition to other details.
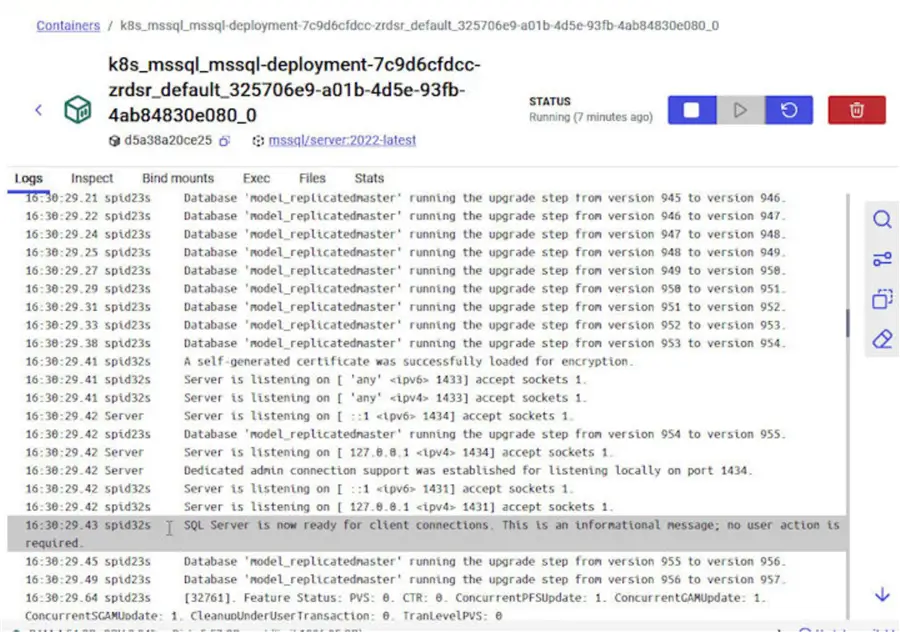
Before we can connect with the SQL Server, the message SQL Server is now ready for client connections should have been listed.
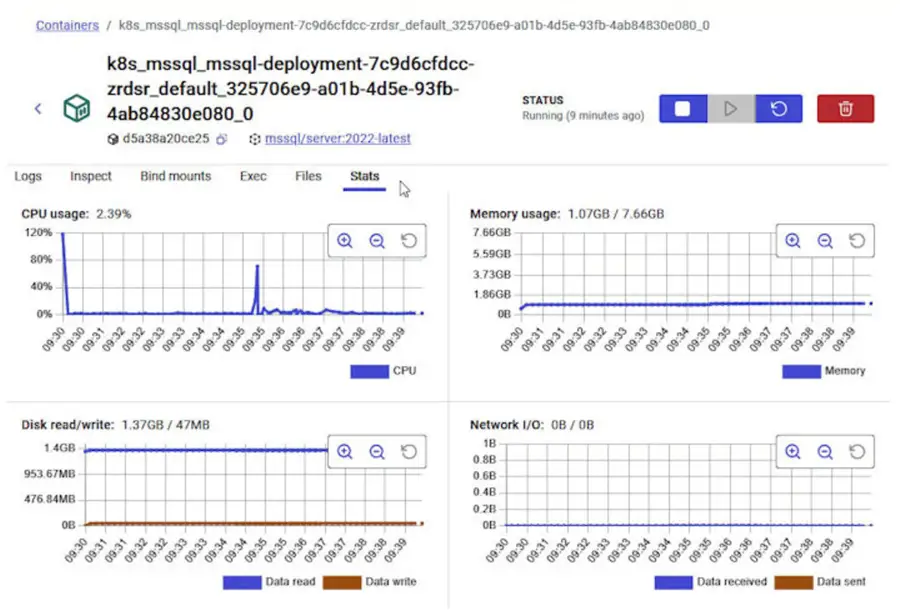
Select the Stats tab to explore the CPU, Memory, Disk read/write, and Network I/O usage.
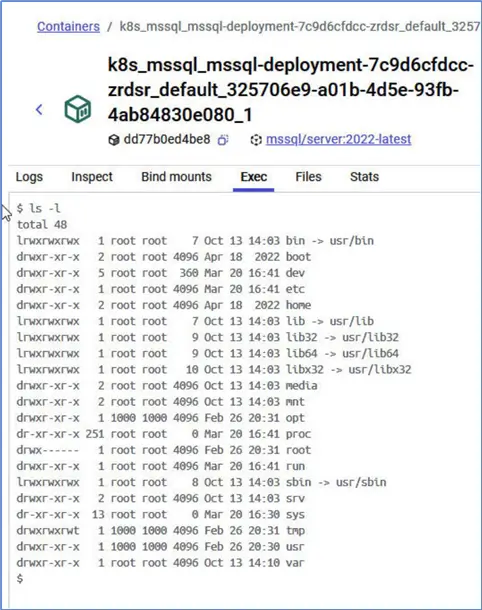
Select the Exec tab and run Linux commands to discover the file system. Run ls -l to list all files.
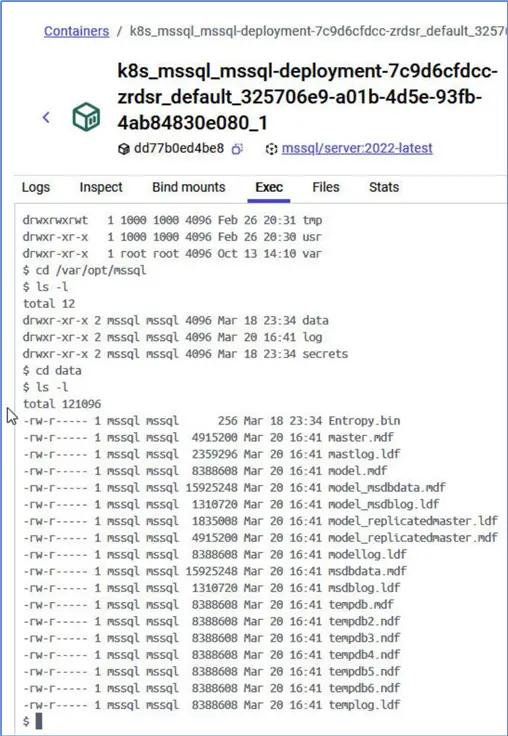
Chang directory to /var/opt/mssql/data to list the data files for each database.
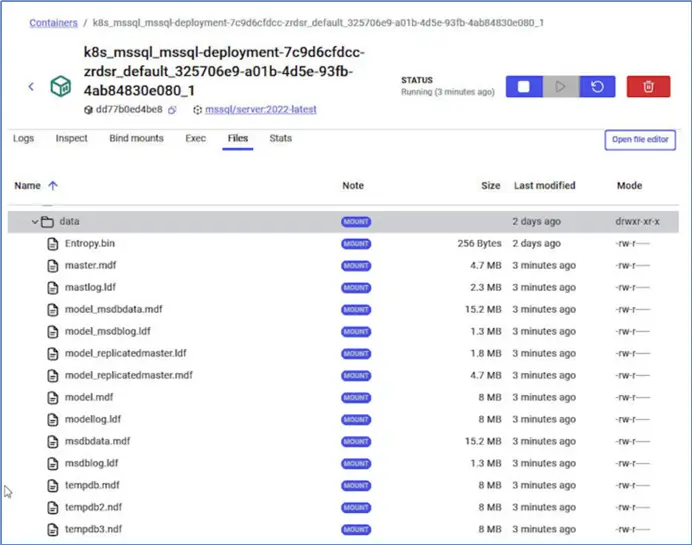
We can list the data files by selecting the Files tab as well.
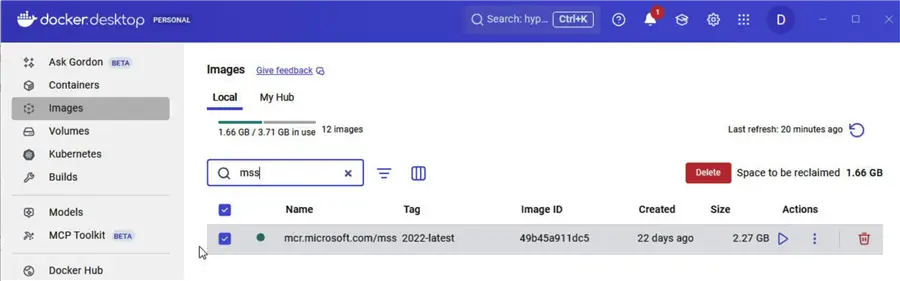
Select the Images in the navigation to list all the images that are downloaded. You can filter the images to list only the SQL Server image.
Connecting to SQL Server with SQL Server Management Studio
When the SQL Server pod is running we can connect to it with SQL Server Management Studio from a local machine. Let us launch SQL Server Management Studio. Select File > Connect Object Explorer. Specify connection details in Connect window. Notably, the Server Name is localhost, which is the external-ip we noted. Select Authentication as SQL Server Authentication. Specify Password for sa user, which should be what we set in the configuration file. Click Connect.

It connects to the SQL Server. A new connection should be added to the Object Explorer. Expand the Databases to list the databases created by default.
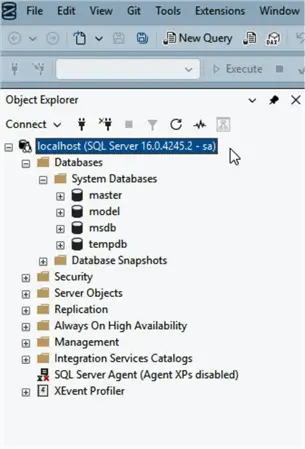
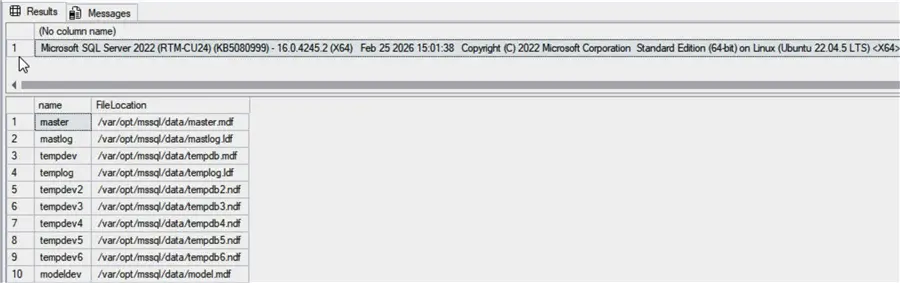
How do we know it is not some other SQL Server. Optionally, we can run the following SQL Script to verify version, etc.
--MSSQLTips.com (T-SQL)
SELECT @@VERSION;
SELECT name, physical_name AS 'FileLocation' FROM sys.master_files;
Copy the script to a query editor and click Execute.

It verifies the server version as the one that matches the Docker image. It lists the file system on the Docker container.
Creating an Example Database Table
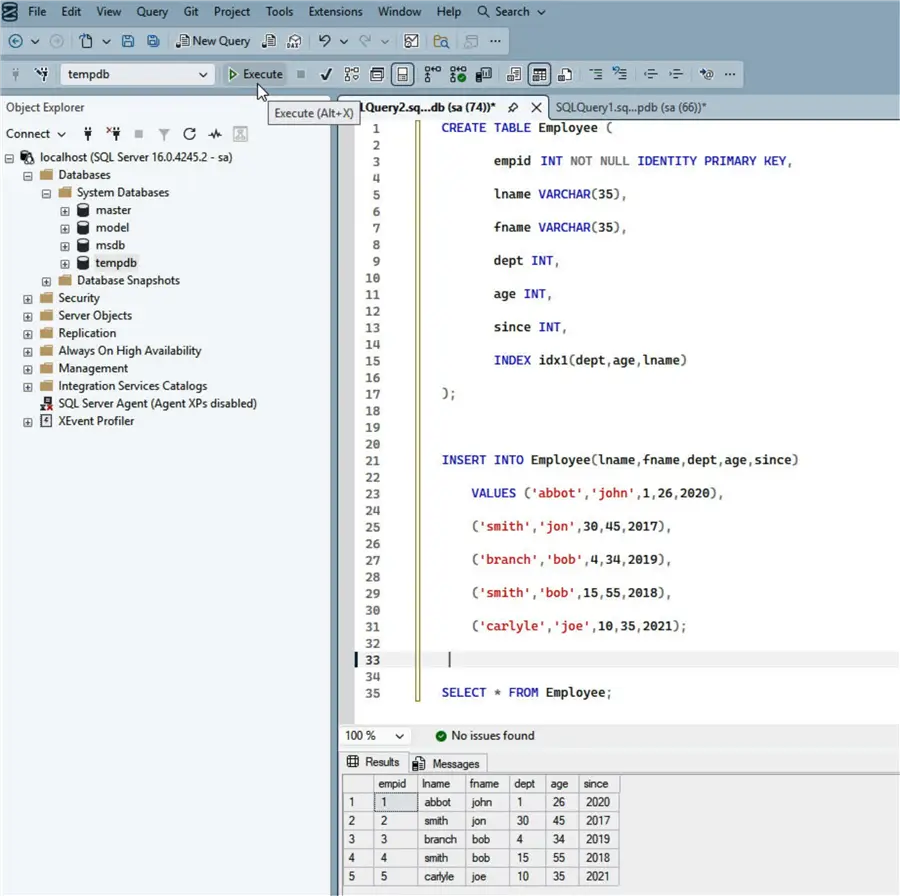
Let’s start to use the SQL Server running on a Kubernetes cluster on Docker Desktop. Create an example table with the following script:
--MSSQLTips.com (T-SQL)
CREATE TABLE Employee (
       empid  INT NOT NULL IDENTITY PRIMARY KEY,
       lname VARCHAR(35),
       fname VARCHAR(35),
       dept INT,
       age INT,
       since INT,
       INDEX idx1(dept,age,lname)
);

INSERT INTO Employee(lname,fname,dept,age,since)
    VALUES ('abbot','john',1,26,2020),
    ('smith','jon',30,45,2017),
    ('branch','bob',4,34,2019),
    ('smith','bob',15,55,2018),
    ('carlyle','joe',10,35,2021);

SELECT * FROM Employee;
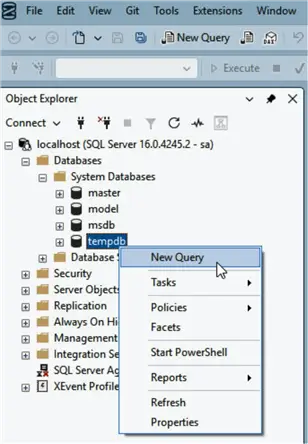
To run the script, open a new query editor by right clicking tempdb database and selecting New Query.
Click Execute to run the script to create the table, add table data, and select table data.
Deleting the Kubernetes Cluster
To delete the Kubernetes cluster including any deployments, pods, services and other objects running on it, click Stop in the Docker Desktop dashboard.
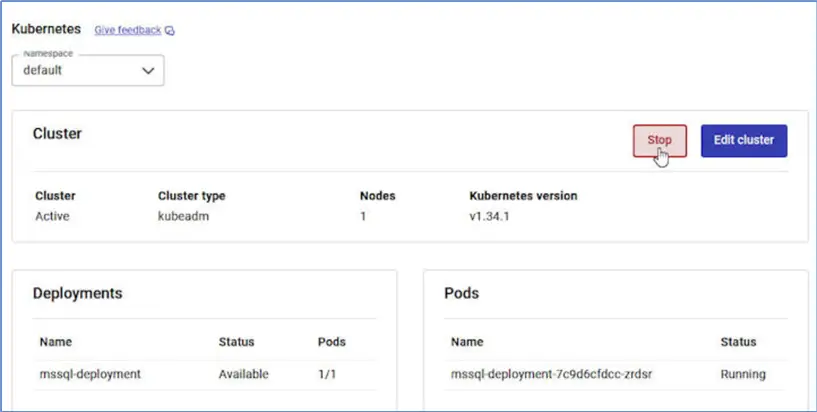
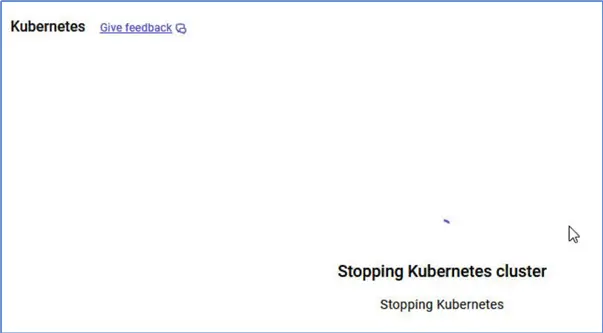
It should display a message that it is stopping the cluster. It calls it stopping, when in fact it deletes the cluster.
Summary
In this article, we explained the procedure to use the Docker Desktop for running an SQL Server instance on Windows. At the outset, one must ensure that the Windows version/edition supported hardware virtualization to be able to install Docker Desktop. We can provision a Kubernetes cluster and connect to the SQL Server running on it, all from a local machine with SQL Server Management Studio, without needing to create a Kubernetes cluster on a cloud service as one would typically need.
Next Steps
- Create a Docker Account
- Download and install Docker Desktop
- Download and install SQL Server Management Studio
- Explore the SQL Server Docker images
- Read up on related articles and documentation:

Deepak Vohra is an Oracle Certified Data Science Professional, and an author of more than 20 books. Hobbies include philately, golf, and cricket.