Problem
In this article, I’ll show how to create and schedule a SQL Server Agent Job. I’ll also show how to setup an Operator to receive notifications for failed or successful Job completions.
Solution
This tutorial is a step-by-step guide with screen shots on:
- How to create a SQL Agent Job using SQL Server Management Studio
- SQL Server versions that support SQL Jobs via SQL Server Agent
- How to create and schedule a SQL Agent Job
- How to setup an Operator to receive Job Alerts for fail or successful Job completions
I will be using SQL Server Management Studio version 21 in the demos.
SQL Editions that Support SQL Server Agent Jobs
Not all Editions of SQL Support SQL Agent Jobs, though most do. The following editions of SQL Server support SQL Agent Jobs:
- Enterprise
- Standard
- Developer (Free for development and testing)
- Web
- Azure SQL Managed Instance
The following editions of SQL Server do not support SQL Agent Jobs:
- SQL Express (Free)
- Azure SQL DB
SQL Server Agent Service – Start and Stop
SQL Agent runs as a separate Service from the SQL Server Service. The SQL Agent Service is dependent on the SQL Server Service running. There are several ways to start and Stop the SQL Agent Services including:
- SQL Server Configuration Manager
- SSMS
- Windows Services
- Command line Net Start
- PowerShell
SQL Server Configuration Manager
SQL Server Agent can be and is typically set to Auto start along with the SQL Server Service when the computer starts up. It is recommended to use SQL Configuration Manager to manage the Service properties.
To launch SQL Server Configuration Manager in Windows, press the Windows Start button, then type “config”. One of the options that comes up will be SQL Server Configuration Manager. Launch it.
Then click “SQL Server Services”. You will see the Service: SQL Server Agent. Right Click and press Start. See the picture below.

Start and Stop SQL Server Agent from SQL Management Studio
From Object Explorer in SQL Server Management Studio, right-click on SQL Server Agent. From the right-click menu you will have the option to Start, Stop or Restart SQL Server Agent.

Creating and Scheduling Jobs using SQL Server Management Studio
Step 1: Create Job
Now that you have SQL Server Agent running, let’s create a Job and schedule it to run. From SQL Server Management Studio go to the SQL Server Agent in Object Explorer. Right click and select the New Job option.

Step 2: New Job
Enter your Job Name and then click on Steps in the left pane.

Step 3: Add a Job Step
- Click New.
- Give your Step a name.
- Select the Job Type. For this we will select Transact-SQL script (T-SQL)
- Select the Database Name
- Add T-SQL Code. For this I’m keeping it simple – Select Getdate()
- Press OK

Note: Under Types you have the following Options:
- Operating system (CmdExec)
- PowerShell
- SQL Server Analysis Services Command
- SQL Server Analysis Services Query
- SQL Server Integration Services Package
- Transact-SQL scripts (T-SQL)
These are the different Job types that SQL Server Agent can run. For this example, we are creating a Transact-SQL scripts (T-SQL) job which is typically the most common job type.
Step 4: Set the Schedule

- Click Schedules
- Click New
- Set a Schedule Name
- Set a Schedule Type
- Set a Frequency
- Set the Frequency Options
- Set an end date or No End Date.
- Press OK to save.
Step 5: Review The Job Schedule
Here you see the Job Schedule. You can add additional schedules if desired. Most jobs typically only have one schedule, but you have options for additional schedules.

Step 6: Review or Add additional Job Steps
Often SQL Jobs will have multiple steps. Though in this example I only created the first step. If you have multiple steps, you can use the dialogue at the bottom to set the Start Step and you can use the Move Steps arrows to reorder job steps.

Step 7: Review the Step Advanced Settings
Here note the “On success action”. If you have multiple steps, be sure on the advance tab of the previous step it is set to “Go to Next step”. Since I only have 1 step and on the last step of a multi-step job you will want to be sure it is set to “Quit the job reporting success”. For the “On failure actions” you would likely want to be sure “Quit the job reporting Failure”. Press OK to save the settings. At the end of this article, I have a link to another article I wrote explaining the Advance logging options.

Step 8: Optional – Script the SQL Server Agent Job
This is optional. You can press the Script button which will create a T-SQL script to manually create the job, which is beneficial to keep in your source control system as well as promote from Dev to Test to Production.

Step 9: Finish
Here you can press OK to Save the Job. That is, it. As long as the SQL Agent Service is running the Job will run based on the schedule that was setup.
Job Activity Monitor for SQL Server Agent Jobs
Job Activity Monitor is where you see actively running jobs, successful and failed jobs.
The Job Activity Monitor shows all running and idle jobs. It shows the Enables, Status, Last Run Outcome, Last Run (date), Next Run (date), Category, Runnable, Scheduled and a Category ID. All these columns are sortable if you click on the header. Also, from here you can Start and Stop jobs and disable jobs by right clicking on the Job. You can also drill into Job history when you right click.

SQL Server Agent Job History View
Right-click the job in the Job Activity Manager and select View History. This shows the job execution history. Here you can see if the job is successful or failed. You can see the job run duration. You can expand the Job showing each step and if the step was successful or a failure. In the box at the bottom, you can see job output or error details.

SQL Server Agent Advance Features
So far, we have covered the basics for SQL Server Agent Jobs. Now we will delve into some more advanced topics covering setting up Operators and configuring Job notifications.
SQL Server Agent Operators
Operators can be set up and configured with an email address to an individual, group email or a text email address so job success and/or failures can be emailed to the operator or mobile phone. In Object Explorer, expand SQL Server Agent and right click on Operators. Select New Operator. Give the Operator a name and set the email address or Pager email name. The Pager label name was carried over from the “olden days”. You can also set a pager on duty schedule to only send pages during certain days or hours.

New operator properties.

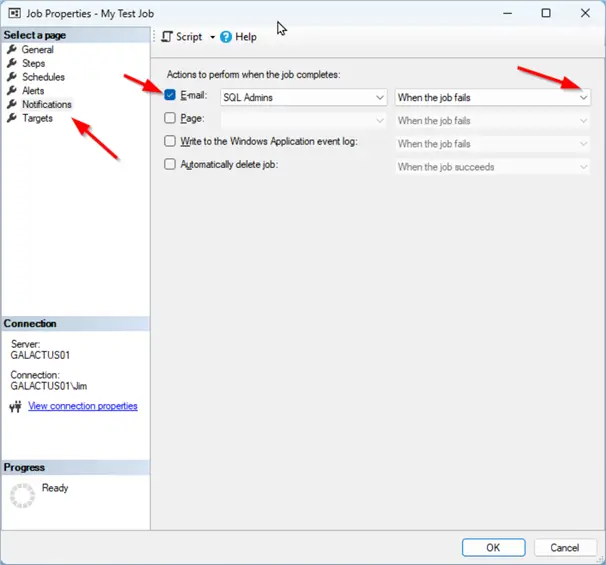
Set Job Notification
To setup a Job notification you will associate an Operator to the job’s outcome. Navigate to the Job under SQL Server Agent, Jobs and double click the Job or right click and select Properties. In the Job Properties select the Notifications tab. Here you will associate the Operator we created with the Job outcome. Check the E-mail (and/or Pager). In the right pick list, we will select “When the job fails”. You may also select “When the job succeeds” or “When the job completes”, which will notify on success or failure. Press OK to save the settings.

Job notifications properties.
Wrap Up
That wraps up creating a simple SQL Scheduled Job. We covered the SQL Agent Service and how to start or ensure it is running. Then we showed how to create a SQL Job, add a step, and schedule the job. Last we covered creating a Job Operator and setting the Job notification to email or text the Operator. We also covered SQL Agent Job Monitor to check the Job runs and review the Job history and see success and failed job errors.
Next Steps
Review other MSSQLTips articles and learn more tips for managing SQL Jobs.
- SQL Agent Job Output Options for Troubleshooting
- Query SQL Agent Job Info
- Failed SQL Server Agent Jobs
- SQL Server Agent Job Management
- Review other articles author Jim Evans has written
- Microsoft Learn – Create a SQL Server Agent Job with SSMS

Jim Evans is an IT professional who has worked with SQL Server since 1995. He has a passion for SQL Servers and working with the people who utilize it. As a C++ programmer early in his career he was mentored to learn T-SQL with optimizing for performance always a goal. He has supported many corporate business units and application, taken part in designing many databases, managed DBAs, BI Developer and Data Management teams. He is always up for a challenge, embraces new features and functionalities as they are rolled out and enjoys sharing his knowledge. When not working on SQL Server he has spends time coaching youth sports, coaching in a disability softball league and volunteering with Black Dagger Military Hunt Club providing outdoor activities for veterans.
- MSSQLTips Awards: Trendsetter (25+ tips) – 2022 | Author Contender – 2021 | Rookie Contender – 2019

