By: Edwin Sarmiento | Comments (41) | Related: > PowerShell
Problem
In a previous tip on using Using PowerShell with SQL Server Management Objects (SMO), you've seen how you can use Windows PowerShell and SMO to administer SQL Server databases. I would like to translate some of the Transact-SQL scripts that I use every day, starting with the simple ones like retrieving a list of databases and their properties for auditing purposes.
Solution
One of the things that we do as DBAs is to retrieve a list of databases and their properties for auditing and reporting purposes. We check for properties such as recovery model, available free space, autoshrink, etc., and generate action items based on them. We've already seen how to access the Server object - its properties and methods - using SMO. We will dig into the object hierarchy and look at the different members of the Server object. A SQL Server instance can be described using different properties like instance name, logins, settings, all of which are members of the Server object.
What would be of main interest for this tip is the Databases property. This property represents a collection of database objects defined on a SQL Server instance, regardless whether they are system or user databases. Let's start by retrieving all the members of the Databases property. The script below is the same as the one in the previous scripts with the addition of a Get-Member cmdlet to retrieve the list of members for the Databases property, specifying Property as the MemberType which just means to retrieve all the database properties. Be sure not to get confused with the terms - the Databases property of the Server object is a collection of database objects and the database objects themselves have their own properties.
[System.Reflection.Assembly]::LoadWithPartialName('Microsoft.SqlServer.SMO') | out-null
$s = New-Object ('Microsoft.SqlServer.Management.Smo.Server') "LOCALHOST\SQL2000"
$dbs=$s.Databases
$dbs | Get-Member -MemberType Property
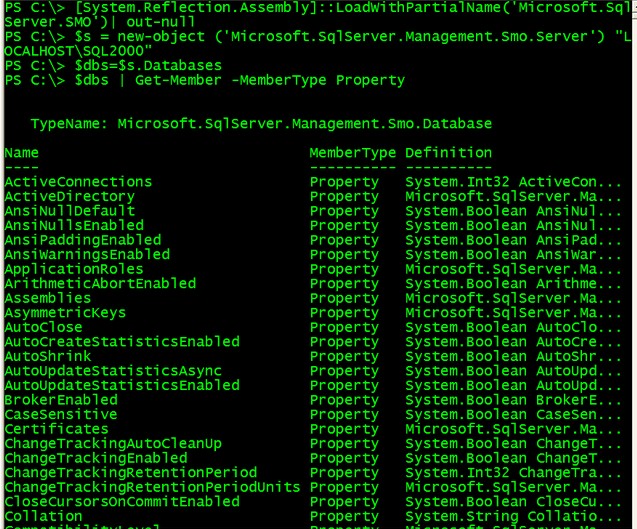
From the list of properties from the Database object, let's select the most common ones - Name, Collation, CompatibilityLevel, AutoShrink, RecoveryModel, Size and SpaceAvailable
$dbs | SELECT Name, Collation, CompatibilityLevel, AutoShrink, RecoveryModel, Size, SpaceAvailable
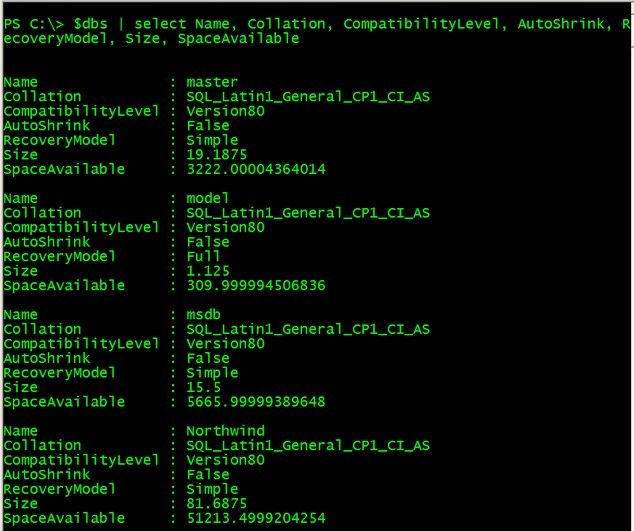
Notice that it is pretty simple and straight-forward. Since the $dbs variable contains a collection of database objects, you can now pipe the results so a Select-Object cmdlet, which we just refer to as SELECT. You can then make this script dynamic by introducing variables and saving it as a PowerShell script which we have done in previous tips.
Reading from a Text File
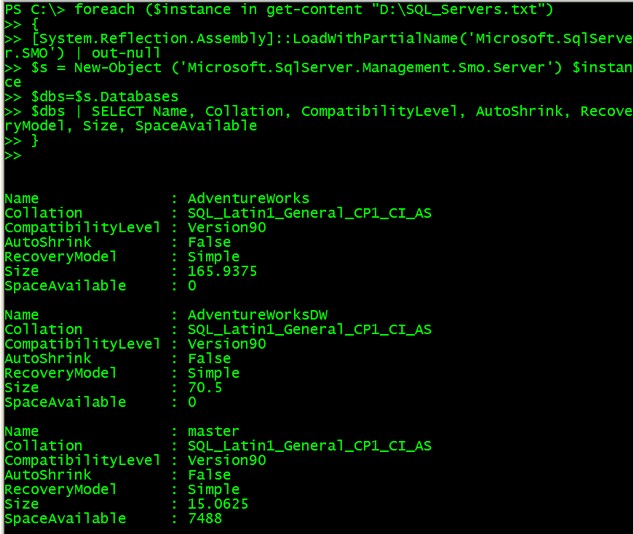
There are a couple of ways to list the servers that you manage, but for simplicity's sake, we'll use a simple text file. What we will do is store the names of the SQL Server instances that you administer in a text file named SQL_Servers.txt and pass the contents in a variable named $instance. We will use the Get-Content cmdlet to read thru the contents of the text file and the ForEach-Object cmdlet to iterate thru the collection. The script would look something like the one below. You can either write it in a script file or type it directly in the PowerShell console
ForEach ($instance in Get-Content "D:\SQL_Servers.txt")
{
     [System.Reflection.Assembly]::LoadWithPartialName('Microsoft.SqlServer.SMO') | out-null
     $s = New-Object ('Microsoft.SqlServer.Management.Smo.Server') $instance
     $dbs=$s.Databases
     $dbs | SELECT Name, Collation, CompatibilityLevel, AutoShrink, RecoveryModel, Size, SpaceAvailable
}
Generate Fancy Reports - Enter Microsoft Excel
Let's admit it, Microsoft Excel happens to be the most popular application to generate spreadsheets and reports so it does make sense to make the most out of it with any reports that we need to generate. IT Managers and key stakeholders would like to see either graphs with colors instead of just numerical values within reports. What we will do is to use PowerShell to automate report creation for our database audit report with Excel. There are a few key things that we need to understand about the process. First, we will be calling Excel thru COM automation and not as a .NET application. We used the New-Object cmdlet to create an instance of the Excel object, the -ComObject parameter to create a new COM object of type Excel.Application which is the ProgID of the object we want to create and assign it the variable $Excel.
$Excel = New-Object -ComObject Excel.Application
You might be interested to find out what other COM components are available on a Windows machine for you to use. To retrieve their ProgID values, you can query the registry with a one-liner like the one below.
dir "REGISTRY::HKEY_CLASSES_ROOT\CLSID" -include PROGID -recurse | foreach {$_.GetValue("")}
So much for COM objects as we only need the Excel.Application at this point. Next, we set the Visible property of the Excel object to True so we can see what is happening
$Excel.visible = $True
Next, we use the Add() method to add a new workbook to the instance of the Excel object and use the Item property to create an object reference to the first worksheet in the workbook. The variable $Sheet will hold that pointer to the worksheet and will be referred to in most of the code
$Excel = $Excel.Workbooks.Add()
$Sheet = $Excel.Worksheets.Item(1)
You can add as many workbooks as you want, but one would be enough for our purpose. Now, to actually work with Excel we need to reference row and column numbers. To do that, we call the Cells property of the Excel object to return the cell or cells in the active sheet. We can then modify the cells like providing a value, changing the Font properties, etc. An example to assign a value to a cell in row 1, column 1 and change the Font property to Bold is shown below.
$Sheet.Cells.Item(1,1) = "SQL SERVER INSTANCE NAME:"
$Sheet.Cells.Item(1,1).Font.Bold = $True
Saving the code and running it in PowerShell will open up an Excel spreadsheet that will look something like the one below
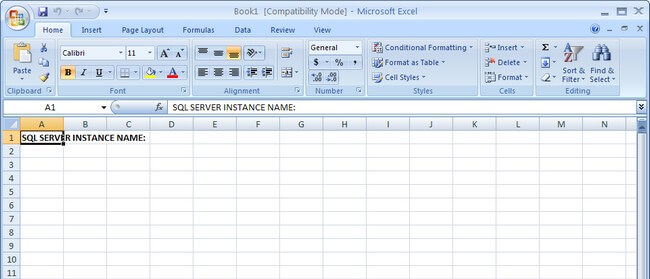
You can either call the SaveAs() method of the Worksheet object $Sheet to save the Excel spreadsheet or just leave it as it is.
Imagine dealing with row and column values that are dynamic since there would be a fair amount of databases on each of your SQL Server instances. Below is a PowerShell script that takes into account what we have just covered with SMO and Excel to create a fancy report
#Create a new Excel object using COM
$Excel = New-Object -ComObject Excel.Application
$Excel.visible = $True
$Excel = $Excel.Workbooks.Add()
$Sheet = $Excel.Worksheets.Item(1)

#Counter variable for rows
$intRow = 1

#Read thru the contents of the SQL_Servers.txt file
foreach ($instance in get-content "D:\SQL_Servers.txt")
{

     #Create column headers
     $Sheet.Cells.Item($intRow,1) = "INSTANCE NAME:"
     $Sheet.Cells.Item($intRow,2) = $instance
     $Sheet.Cells.Item($intRow,1).Font.Bold = $True
     $Sheet.Cells.Item($intRow,2).Font.Bold = $True

     $intRow++

     $Sheet.Cells.Item($intRow,1) = "DATABASE NAME"
     $Sheet.Cells.Item($intRow,2) = "COLLATION"
     $Sheet.Cells.Item($intRow,3) = "COMPATIBILITY LEVEL"
     $Sheet.Cells.Item($intRow,4) = "AUTOSHRINK"
     $Sheet.Cells.Item($intRow,5) = "RECOVERY MODEL"
     $Sheet.Cells.Item($intRow,6) = "SIZE (MB)"
     $Sheet.Cells.Item($intRow,7) = "SPACE AVAILABLE (MB)"

     #Format the column headers
     for ($col = 1; $col -le 7; $col++)
     {
          $Sheet.Cells.Item($intRow,$col).Font.Bold = $True
          $Sheet.Cells.Item($intRow,$col).Interior.ColorIndex = 48
          $Sheet.Cells.Item($intRow,$col).Font.ColorIndex = 34
     }


     $intRow++
      #######################################################
     #This script gets SQL Server database information using PowerShell


     [System.Reflection.Assembly]::LoadWithPartialName('Microsoft.SqlServer.SMO') | out-null

     # Create an SMO connection to the instance
     $s = New-Object ('Microsoft.SqlServer.Management.Smo.Server') $instance

     $dbs = $s.Databases

     #$dbs | SELECT Name, Collation, CompatibilityLevel, AutoShrink, RecoveryModel, Size, SpaceAvailable

     #Formatting using Excel

     ForEach ($db in $dbs)
     {

          #Divide the value of SpaceAvailable by 1KB
          $dbSpaceAvailable = $db.SpaceAvailable/1KB

          #Format the results to a number with three decimal places
          $dbSpaceAvailable = "{0:N3}" -f $dbSpaceAvailable

          $Sheet.Cells.Item($intRow, 1) = $db.Name
          $Sheet.Cells.Item($intRow, 2) = $db.Collation
          $Sheet.Cells.Item($intRow, 3) = $db.CompatibilityLevel

           #Change the background color of the Cell depending on the AutoShrink property value
           if ($db.AutoShrink -eq "True")
          {
               $fgColor = 3
          }
          else
          {
               $fgColor = 0
          }

          $Sheet.Cells.Item($intRow, 4) = $db.AutoShrink
          $Sheet.Cells.item($intRow, 4).Interior.ColorIndex = $fgColor

          $Sheet.Cells.Item($intRow, 5) = $db.RecoveryModel
          $Sheet.Cells.Item($intRow, 6) = "{0:N3}" -f $db.Size

          #Change the background color of the Cell depending on the SpaceAvailable property value
          if ($dbSpaceAvailable -lt 1.00)
          {
               $fgColor = 3
          }
           else
          {
               $fgColor = 0
          }

          $Sheet.Cells.Item($intRow, 7) = $dbSpaceAvailable
          $Sheet.Cells.item($intRow, 7).Interior.ColorIndex = $fgColor

          $intRow ++

     }


$intRow ++

}

$Sheet.UsedRange.EntireColumn.AutoFit()
cls
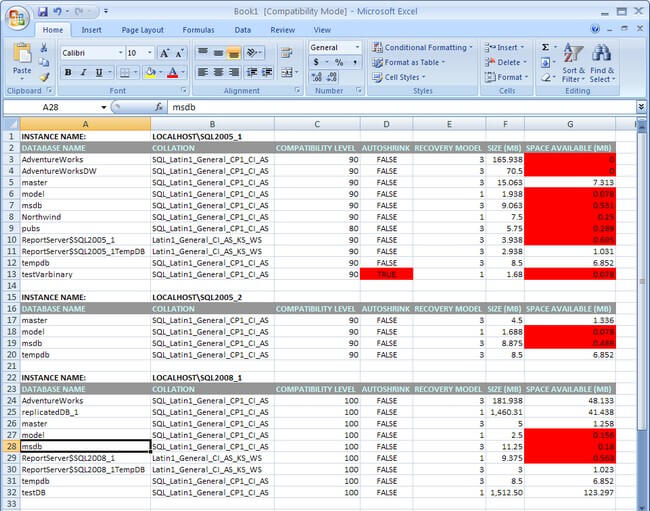
Running the script in PowerShell will generate an Excel spreadsheet similar to the one below, highlighting those properties that need immediate attention using some fancy colors from the definitions available here.
Next Steps
- Download and install Windows PowerShell
- Read more on the SMO Class Library to translate SQL Server objects that we are already familiar with to SMO objects
- Find out more about the Excel 2003 Object Model to incorporate it in your automated report generation
About the author
 Edwin M Sarmiento is a Microsoft SQL Server MVP and Microsoft Certified Master from Ottawa, Canada specializing in high availability, disaster recovery and system infrastructures.
This author pledges the content of this article is based on professional experience and not AI generated.
View all my tips


