By: Siddharth Mehta | Comments | Related: More > Integration Services Data Flow Transformations
Problem
The Conditional Split transform is one of the most common transforms used in package development. Although using this transform is very simple from a technical perspective, there are some very simple points which are easy to overlook which could cause issues with data. In this tip we will discuss two of these common mistakes.
Solution
These are two of the most commonly made mistakes when adding conditions to a conditional split transformation:
1) Order of the filtering logic
2) Reordering existing filtering logic
To discuss the issues in question, follow the steps below which will help simulate the issue and solution.
1) Create a new SSIS project and a new package.
2) Add a Data Flow task to the package.
3) We will be using the Employee table from the AdventureWorks database to test the issue. Edit the Data Flow task, add a OLE DB Source Adapter. Configure the adapter such that it reads data from the Employee table.
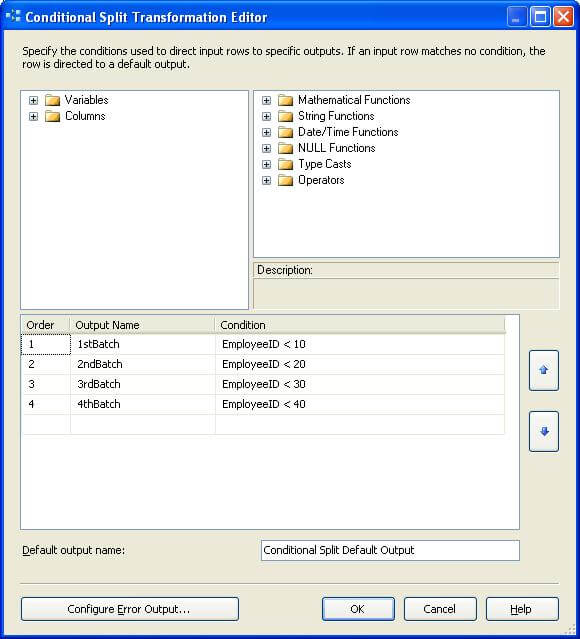
4) Add a Conditional Split transform and configure the as shown below.

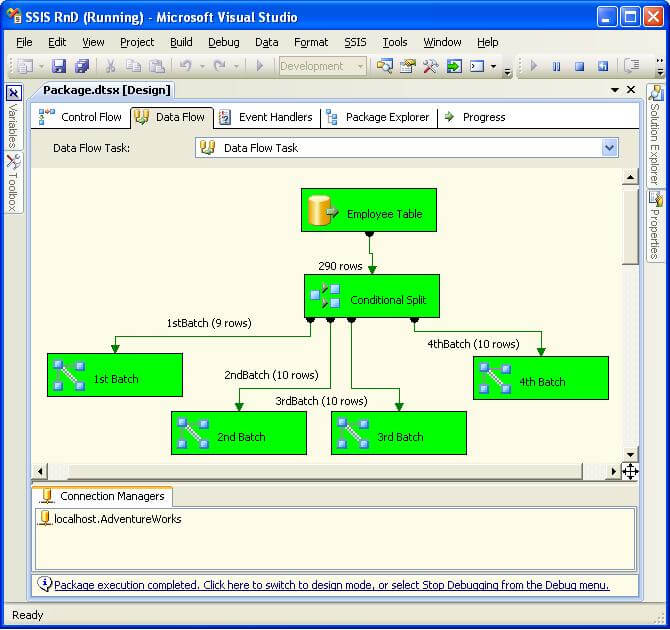
5) Add four multicast transforms and join the corresponding outputs from the conditional split to the respective transforms as shown below. After all these steps, your package should look like the below figure. Here we can see the number of rows that went to each batch.

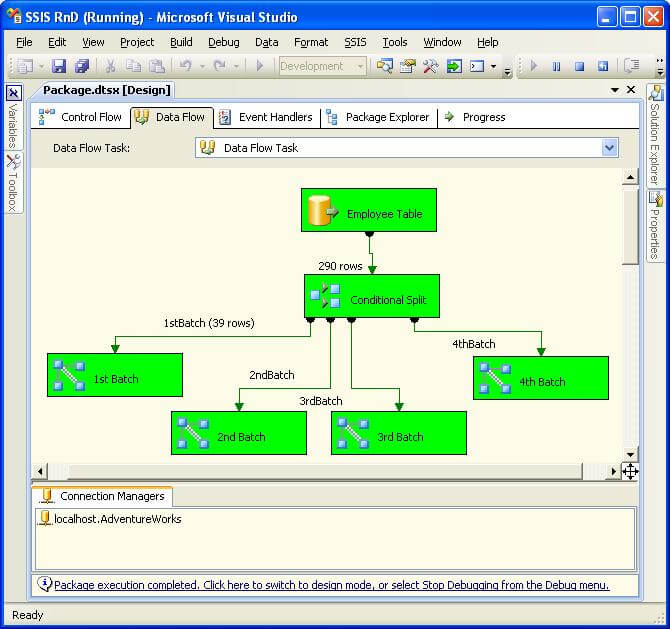
As you can see from the above figure, all the rows are going to each path correctly. Now edit the Conditional Split and make the first condition as "EmployeeID < 40" and last condition as "EmployeeID < 10". Execute the package after making the changes and the result should look something like the below figure.

The reason is that the first condition is big enough to route all the records in the first path. The order in which these conditions are evaluated is top to bottom. So the most specific ones should be kept on the top in the order of increasing scope of the logic. This is similar to the way we code exception handling using try - catch, in which we place the most narrow or most specific type of exception at the top, followed by the broader ones.
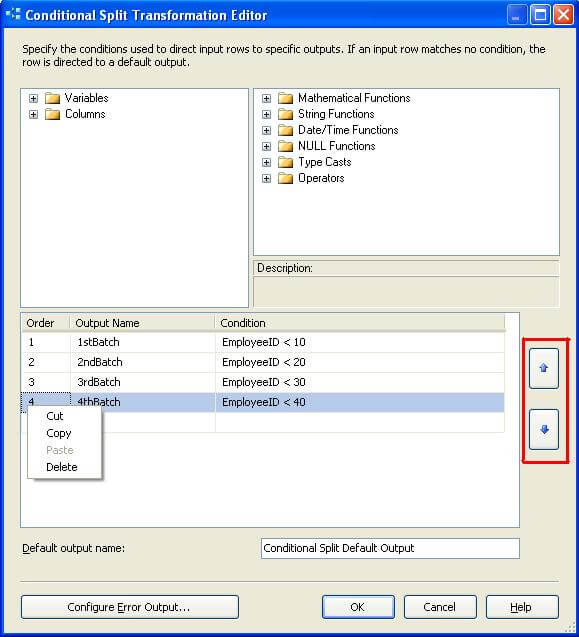
Another issue developers face is changing the order of the logic, when a new condition is added or existing order needs to be changed. As the user interface for working with conditions is grid-like, we feel like we can right click and insert conditions at a particular point, but as of the latest release of SQL Server 2008 this option is not available.
To deal with this, if you look at the right side of the user interface, you will find two buttons which can change the order of any condition by moving it up or down in the order. So to re-order any existing or new conditions, use these re-ordering buttons as shown in the below figure. The order can also be changed using the Advanced Editor, but this interface makes it pretty easy.

Next Steps
- Test your existing order of the conditions, to ensure that the logical order of the conditions routes the records to the correct path.
- Try adding a new condition, and using the ordering buttons move the same higher in order of evaluation.
- Read this related tip: Intelligent Conditional Split in an SSIS Package
About the author
 Siddharth Mehta is an Associate Manager with Accenture in the Avanade Division focusing on Business Intelligence.
This author pledges the content of this article is based on professional experience and not AI generated.
View all my tips


