By: Sherlee Dizon | Comments (10) | Related: > Application Development
Problem
You are assigned the task of creating an application to maintain the data for a new application from a data administration perspective. The application should be able to add new records, but first check to see if the record already exists. If the record already exists, it should update the record. The user should also be able to list and delete the selected records. Typically the approach is to build separate stored procedures for inserting, updating, deleting and selecting all the records in the table. What if you are asked to create just one stored procedure for all this functionality per table to lessen the number of stored procedure to maintain in a project from a data administration perspective? What would you do? Is there a way to incorporate all of this functionality in one stored procedure? How would you call the stored procedure in your application? Check out this tip to learn more.
Solution
On some of my projects, there is a lot of data maintenance that occurs by the technical team to either correct issues or adjust the data to meet the business needs. Historically, these data maintenance tasks have been fulfilled by separate stored procedures for adding, editing, deleting or displaying a list of records for each table. From my experience, this approach generates a large number of stored procedures. I have learned that we have another approach where we will create just one stored procedure to meet all of these needs per table. With this approach, the number of stored procedures will be far less. All we have to do is give a significant name for our stored procedure and use a parameter that will determine the value for inserting, updating, deleting or viewing of records. Let's work through one example stored procedure and the associated .NET code.
Sample SQL Server Table
For this example, I will use the MSSQLTIPS Tip Categories for my sample data maintenance. Let's create a sample table first for the tip categories. Let's say we already have the MSSQLTIPS database. Here is the script for creating the tip category table:
USE [MSSQLTIPS]
GO
SET ANSI_NULLS ON
GO
SET QUOTED_IDENTIFIER ON
GO
SET ANSI_PADDING ON
GO
CREATE TABLE [dbo].[TipCategories](
 [Category_ID] [int] IDENTITY(1,1) NOT NULL,
 [Category_Desc] [varchar](200) NOT NULL,
 [InActive] [nchar](10) NOT NULL,
 [CreatedBy] [varchar](50) NULL,
 [DateCreated] [datetime] NULL,
 [DateUpdated] [datetime] NULL,
 [UpdatedBy] [varchar](50) NULL
) ON [PRIMARY]
GO
SET ANSI_PADDING OFF
GO
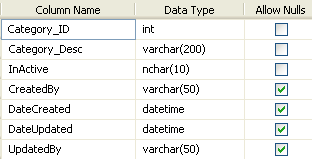
Here is a graphical view of the dbo.TipCategories table.
SQL Server Stored Procedure to Perform SELECT, INSERT, UPDATE and DELETE Commands
Below is the sample stored procedure I've created and it uses the following parameters:
- @Mode is used to identify what process i.e. SELECT, INSERT, UPDATE or DELETE will be performed when the stored procedure is executed.
- @CategoryDesc is used to identify the category name.
- @UserName is used to identify who created or updated the record.
- @Status is used to identify whether the category is still active or deactivated.
- @CategoryID is used to unique identify the record. We will use this parameter in our WHERE clause when we check if the record already exists as well as when we update or delete the record.
Run this code in SQL Server Management Studio:
USE [MSSQLTIPS]
GO
SET ANSI_NULLS ON
GO
SET QUOTED_IDENTIFIER ON
GO
CREATE PROCEDURE [dbo].[CategoryMaintenanceSp]
(
  @Mode     VARCHAR(5),
  @CategoryDesc    VARCHAR(200),
  @UserName    VARCHAR(50),
  @Status    int,
  @CategoryID    int
)
 AS
   BEGIN
      --IF Mode = 1 LIST ALL RECORDS
        IF (@Mode = 1)
    BEGIN
  SELECT * FROM TipCategories
    END
      --IF Mode = 2 INSERT or UPDATE RECORD
        IF (@Mode = 2)
           BEGIN
         IF NOT EXISTS
                     (SELECT 1 FROM TipCategories WHERE Category_ID = @CategoryID)
    BEGIN
       INSERT INTO TipCategories
       (Category_Desc, InActive, CreatedBy, DateCreated)
       VALUES (@CategoryDesc, @Status, @UserName, GETDATE())
    END
  ELSE
    BEGIN
       UPDATE TipCategories
          SET Category_Desc = @CategoryDesc,
       InActive = @Status,
       DateUpdated =  GETDATE(),
       UpdatedBy = @UserName
        WHERE Category_ID = @CategoryID

        SELECT * FROM TipCategories
    END
         END

      --IF Mode = 3 DELETE SELECTED RECORD
        IF (@Mode = 3)
           BEGIN
  DELETE FROM TipCategories WHERE Category_ID = @CategoryID

                SELECT * FROM TipCategories
           END
    END
    GO
Building the .NET code
Once we have our stored procedure built, we will move into Visual Studio to run the next sets of code. In the first set of code, I have create a class to set my connection string to the database. This code also includes the CategoryMaintenance function I call in my web application to be able to save a new record, update a record, delete a record and list the category records. The MyTips.Data class handles calling the stored procedure I need for my web application. From my example, I supply all of the parameters needed for this function and I call the CategoryMaintenanceSp stored procedure.
using System;
using System.Collections.Generic;
using System.Linq;
using System.Text;
//add the following namespace
using System.Data.SqlClient;
using System.Configuration;
using System.Data;
namespace MyTips.Data
{
    public class Category : Sql
    {
        private string MyTips_ConnectionString =
                          ConfigurationManager.ConnectionStrings["MSSQLTIPSConn"].ToString();
        public List CategoryMaintenance(string Mode, int CategoryID, string CategoryDesc,
                                                      int InActive, string UserName,
                                                      ref string strErrMsg)
        {
            List result = new List();
            try
            {
                SqlCommand cmd = new SqlCommand();
                //here we assign the name of our created stored procedure for the
                //category file maintenance
                cmd.CommandText = "CategoryMaintenanceSp";
                cmd.CommandType = System.Data.CommandType.StoredProcedure;
                //here we pass the values to our sql parameters
                cmd.Parameters.AddWithValue("@Mode", Mode);
                cmd.Parameters.AddWithValue("@CategoryID", CategoryID);
                cmd.Parameters.AddWithValue("@CategoryDesc", CategoryDesc);
                cmd.Parameters.AddWithValue("@UserName", UserName);
                cmd.Parameters.AddWithValue("@Status", InActive);

                DataTable dt = this.ExecuteDataTable(cmd, MyTips_ConnectionString);
                if (Mode == "1")    //Display list of categories
                {
                    foreach (DataRow row in dt.Rows)
                    {
                        DTO.Category item = new DTO.Category();
                        item.Category_ID = row["Category_ID"].ToString();
                        item.Category_Desc = row["Category_Desc"].ToString();
                        item.InActive = row["InActive"].ToString();
                        item.CreatedBy = row["CreatedBy"].ToString();
                        item.UpdatedBy = row["UpdatedBy"].ToString();
                        if (row["DateCreated"] != DBNull.Value)
                            item.DateCreated = DateTime.Parse(row["DateCreated"].ToString());
                        else
                        {
                            item.DateCreated = null;
                        }
                        if (row["DateUpdated"] != DBNull.Value)
                            item.DateUpdated = DateTime.Parse(row["DateUpdated"].ToString());
                        else
                        {
                            item.DateUpdated = null;
                        }
                        result.Add(item);
                    }
                }
            }
            catch (Exception ex)
            {
                strErrMsg = ex.Message;
            }
            return result;
        }
    }
}
SQL Abstract Class
This class contains the functions I call from my Category class ExecuteDataTable(). This class handles the execution of my SqlCommand. The MyTips.Data class will use all of the functions I have in this code when needed.
using System;
using System.Collections.Generic;
using System.Linq;
using System.Text;
using System.Data.SqlClient;
using System.Data;
namespace MyTips.Data
{
    public abstract class Sql
    {
        protected object ExecuteScalar(SqlCommand cmd, string connectionString)
        {
            object result = null;
            using (SqlConnection cn = new SqlConnection(connectionString))
            {
                try
                {
                    cn.Open();
                    cmd.Connection = cn;
                    result = cmd.ExecuteScalar();
                }
                catch (Exception ex)
                {
                    throw ex;
                }
                finally
                {
                    if (cn.State != System.Data.ConnectionState.Closed)
                        cn.Close();
                }
            }
            return result;
        }
        protected void ExecuteNonQuery(SqlCommand cmd, string connectionString)
        {
            using (SqlConnection cn = new SqlConnection(connectionString))
            {
                try
                {
                    cn.Open();
                    cmd.Connection = cn;
                    cmd.ExecuteNonQuery();
                }
                catch (Exception ex)
                {
                    throw ex;
                }
                finally
                {
                    if (cn.State != System.Data.ConnectionState.Closed)
                        cn.Close();
                }
            }
        }
        protected DataTable ExecuteDataTable(SqlCommand cmd, string connectionString)
        {
            DataTable dt = new DataTable();
            using (SqlConnection cn = new SqlConnection(connectionString))
            {
                try
                {
                    cn.Open();
                    cmd.Connection = cn;
                    SqlDataAdapter da = new SqlDataAdapter(cmd);
                    da.Fill(dt);
                }
                catch (Exception ex)
                {
                    throw ex;
                }
                finally
                {
                    if (cn.State != System.Data.ConnectionState.Closed)
                        cn.Close();
                }
                return dt;
            }
        }
        protected DataSet ExecuteDataSet(SqlCommand cmd, string connectionString)
        {
            DataSet ds = new DataSet();
            using (SqlConnection cn = new SqlConnection(connectionString))
            {
                try
                {
                    cn.Open();
                    cmd.Connection = cn;
                    SqlDataAdapter da = new SqlDataAdapter(cmd);
                    da.Fill(ds);
                }
                catch (Exception ex)
                {
                    throw ex;
                }
                finally
                {
                    if (cn.State != System.Data.ConnectionState.Closed)
                        cn.Close();
                }
                return ds;
            }
        }
    }
}}
Build the Solution in Visual Studio
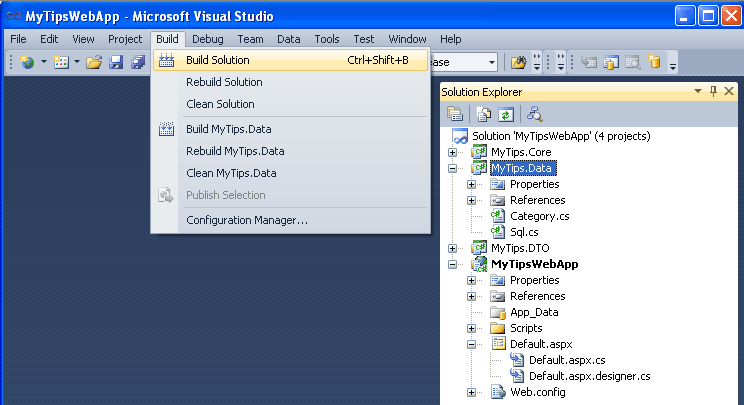
In this portion of the code, we will build the MyTips.DTO file then add a reference to the MyTips.DTO.dll and System.Configuration. To build MyTips.DTO class, click on MyTips.DTO in the Visual Studio Solution Explorer then select "Build" from the menu followed by the "Build Solution" solution or use the shortcut Ctrl+Shift+B. See screen shot below as a point of reference.
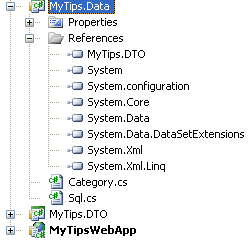
Once completed, Solution Explorer in Visual Studio will look like this:
Creating the Business Layer
Now let's move onto our business layer which will call our data class methods. In Visual Studio, add a new project and select class library again. Noticed that the parameters we need to pass for this class method are Mode, CategoryID, CategoryDesc, InActive for the status and UserName. strErrMsg will return the exception error message if encountered.
The MyTips.Core object class will manage the calling of our data objects class. It will handle catching of exceptions and validations that are required before calling the data object class. Our core object methods or functions will be the one to call the method from MyTips.Data object class. I discuss this just to make sure the readers are aware of how I call my object classes.
using System;
using System.Collections.Generic;
using System.Linq;
using System.Text;
namespace MyTips.Core
{
    public class Category
    {
        public List GetCategories(string Mode, int CategoryID, string CategoryDesc,
                                                int InActive, string UserName,
                                                ref string strErrMsg)
        {
            List results = new List();
            Data.Category categories = new Data.Category();
            try
            {
                results = categories.CategoryMaintenance(Mode, CategoryID, CategoryDesc,
                                                         InActive, UserName, ref strErrMsg);
            }
            catch (Exception ex)
            {
                strErrMsg = ex.Message;
            }
            return results;
        }

    }
}}
Add References to the Solution in Visual Studio
Build your MyTips.Data and then add reference to the MyTips.DTO.dll and MyTips.Data.dll. MyTips.Data should be selected before selecting Build | Build Solution from the menu.
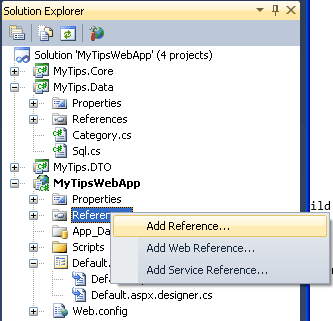
When the solution was built or compiled the system will create the *.dll file that we can add as a Reference to the other Solution we have. Below are the steps to add a reference to the solution.
1. Right click on the 'References' and select 'Add Reference'.
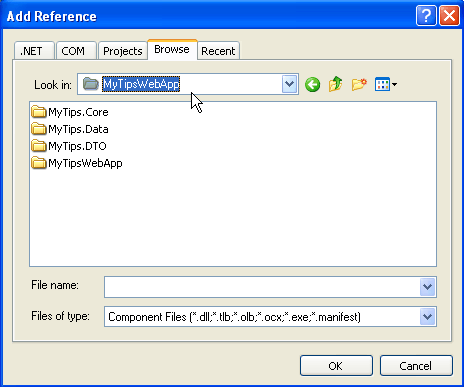
2. Click Browse tab on the 'Add Reference' window and select the 'MyTipsWebApp' folder.
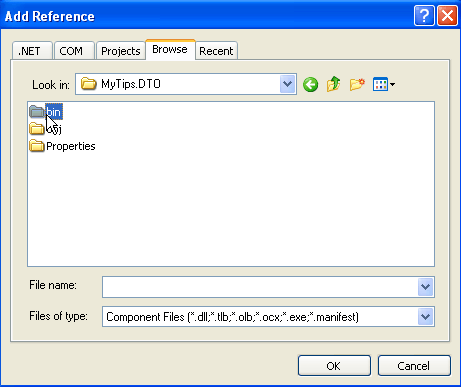
3. Select folder 'MyTips.DTO' then click the 'bin' folder.
4. Then select 'MyTips.DTO.dll' and click the 'OK' button.
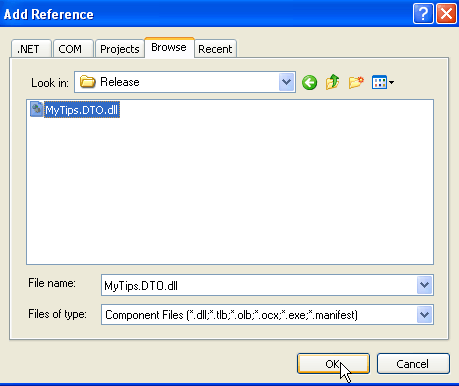
Now you have added MyTips.DTO.dll as Reference. Then follow the same steps to add MyTips.Data.dll by selecting the appropriate folder of the .dll file.
Build Web Application
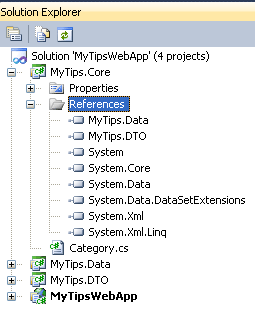
Now that we have our table, stored procedure, data objects and classes, let's start coding our web application. In Visual Studio, build your MyTips.Core and then add references to the MyTips.Core.dll, MyTips.DTO.dll, MyTips.Data.dll and System.Configuration. Your solution explorer will look like this.
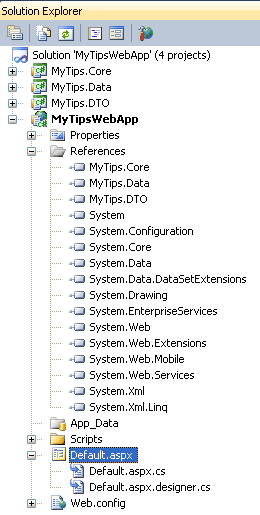
Notice here in the MyTipsWebApp how I used the classes I've created.
using System;
using System.Collections.Generic;
using System.Linq;
using System.Web;
using System.Web.UI;
using System.Web.UI.WebControls;
namespace MyTipsWebApp
{
    public partial class _Default : System.Web.UI.Page
    {
        //generic list collection for list of category
        private List<MyTips.DTO.Category>CategoryList;
        //assumed current user
        private string UserName = "Sherlee";

        protected void Page_Load(object sender, EventArgs e)
        {
            if (!Page.IsPostBack)
            {
                //perform if not page postback
                DisplayRecords();
            }
        }
    }
}
Display Records Logic
The DisplayRecords() method will be used to process the population of records into the grid view. We use the GetCategories class method to get all of the records and that is why we passed the value "1" for the Mode parameter, "0" to category id and status parameter, empty string to category description and userName. If there are error encountered during execution of the stored procedure the exception error message will be return to the strErrMsg variable.
private void DisplayRecords()
{
    //method to display all records in the grid view
    MyTips.Core.Category category = new MyTips.Core.Category();
    string strErrMsg = "";
    //list all category record
    CategoryList = category.GetCategories("1", 0, "", 0, UserName, ref strErrMsg);
    if (strErrMsg == "")
    {
        //display your record to gridview
        this.gvCategory.DataSource = CategoryList;
        this.gvCategory.DataBind();
        if (CategoryList.Count == 0)
        {//no records
            lblNoRecords.Text = "* There are no category records.";
        }
        else
        {//with record
            lblNoRecords.Text = "";
        }
    }
    else
    {//with error
        lblErrMsg.Text = "  *** Error Message: " + strErrMsg;
    }
    //set active view to display all categories
    mvwRequest.SetActiveView(vwCategory);
}
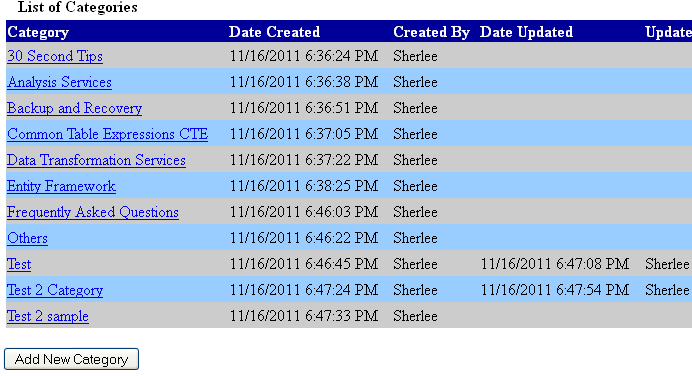
Add New Category Logic
I placed the 'Add New Category' button on this interface to add a new record below the grid view. When the button was click it will initialize all the controls for adding new record. It will hide the status details because by default the status of the category is Active. Since I use the multi view control that is why I need to set the active view to "vwCategoryDetails" to hide the list of the category windows.
Below is the code for the button onClick event:
protected void btnAdd_Click(object sender, EventArgs e)
{
    lblTitle.Text = "   Add New Category";
    //initialize controls
    txtCategory.Text = "";
    hfCategoryId.Value = "";
    //hide status detail
    lblStatus.Visible = false;
    rblStatusList.Visible = false;
    //set active view
    mvwRequest.SetActiveView(vwCategoryDetails);
}
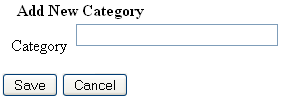
When Category details window was active the user can now input the new category name. I have a 'Save' button to be able to save the record. I have 'Cancel' button to be able to close the current window and go back to the list of category window without saving any data.
Below is the code for the 'Save' button onClick event:
protected void btnSave_Click(object sender, EventArgs e)
{
    MyTips.Core.Category category = new MyTips.Core.Category();
    string strErrMsg = "";
    //validate if the text box is not empty and trim spaces before saving or updating record
    if (txtCategory.Text.Trim () != "")
    {
        //validate if the category id is not empty
        if (hfCategoryId.Value.ToString() != "")
        {//update record
            CategoryList = category.GetCategories("2", Convert.ToInt32
            (hfCategoryId.Value.ToString()), txtCategory.Text.Trim(),
            rblStatusList.SelectedIndex, UserName, ref strErrMsg);
        }
        else
        {//add new record
            CategoryList = category.GetCategories
            ("2", 0, txtCategory.Text.Trim(), 0, UserName, ref strErrMsg);
        }
    }
    if (strErrMsg == "")
    {//no error
        DisplayRecords();
    }
    else
    {//with error
        lblErrMsg.Text = "  *** Error Message: " + strErrMsg;
    }
}
Below is the code for the 'Cancel' button onClick event:
 protected void btnCancel_Click(object sender, EventArgs e)
{
    //set active view to display all categories
    mvwRequest.SetActiveView(vwCategory);
}
Update Category Details
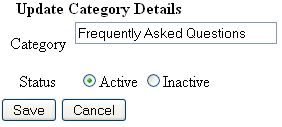
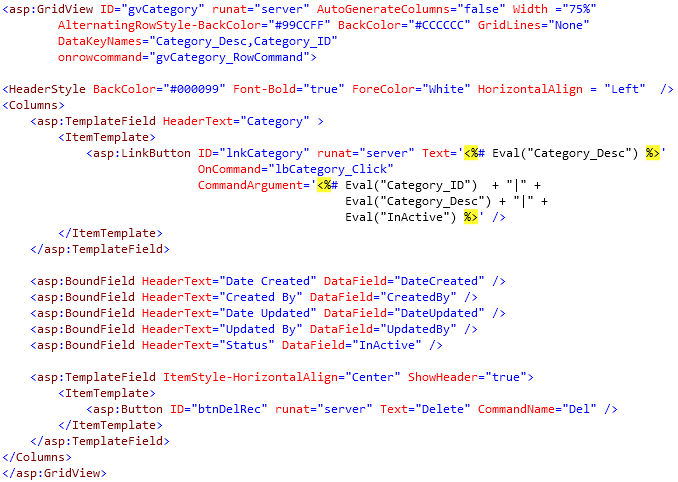
The category description in the grid view is a link. When it was clicked the category details window will be displayed. From that window it can be edited/updated by the user. Status detail is now visible to be able to deactivate the status. I split the value assigned from the link command argument to assign the category id to the hfCategoryId hidden field, the category description to the txtCategory text box and the status to the rblStatusList selected index.
//category description link button OnCommand method
protected void lbCategory_Click(object sender, CommandEventArgs e)
{
    string[] arrCatRec = e.CommandArgument.ToString().Split('|');
    //split values
    hfCategoryId.Value  = arrCatRec[0];
    txtCategory.Text = arrCatRec[1];
    rblStatusList.SelectedIndex = Convert.ToInt32(arrCatRec[2]);
    lblTitle.Text = "   Update Category Details";
    //show status detail to be able to change the category status
    lblStatus.Visible = true;
    rblStatusList.Visible = true;
    //set active view to display category details
    mvwRequest.SetActiveView(vwCategoryDetails);
}
Deleting a Record
For deleting the record I used the grid view row command event method. From the GridViewCommandEventArgs we can get the command name assigned on the delete button. If it equals to "Del" it will execute the deletion process to the selected record. Here we pass the value "3" to the mode parameter and the category id of the selected record from the grid view to be able to delete the record. Below is the code behind for the grid view row command.
protected void gvCategory_RowCommand(object sender, GridViewCommandEventArgs e)
{
    //instantiate core category class
    MyTips.Core.Category category = new MyTips.Core.Category();
    string strErrMsg = "";
    //get row index
    int rowIndex = ((GridViewRow)(((Control)e.CommandSource).NamingContainer)).RowIndex;
    //validate grid view command event argument
    if (e.CommandName == "Del")
    {
        //delete selected record by calling the GetCategories method with mode equals to 3
        CategoryList = category.GetCategories("3", Convert.ToInt32(gvCategory.DataKeys[rowIndex]["Category_ID"]), "", 0, UserName, ref strErrMsg);
        if (strErrMsg == "")
        {
            //no error
            DisplayRecords();
        }
        else
        {
            //with error
            lblErrMsg.Text = "  *** Error Message: " + strErrMsg;
        }
    }
}
The code in this example uses Visual Studio 2010 ASP with C# .NET and SQL Server 2008.
Next Steps
- I hope this tip may become useful to the other developers like me and give you some suggestions on how to maximize the use of your stored procedures and lessen the number of stored procedures you used in a project.
- Try to use this approach when your needs require it to maximize the usage of your stored procedure and to avoid creating multiple stored procedure that can be put as one. This approach can also save your development time and minimize the number of stored procedure you need to maintain per project.
- Here is the Visual Studio Solution to download and to explore other possibilities.
About the author
 Sherlee Dizon is an IT consultant and web application developer with over 14 years of experience as a software and web developer.
This author pledges the content of this article is based on professional experience and not AI generated.
View all my tips


