Problem
As DBAs, we don’t only have the responsibility to backup databases on regular basis, but also to ensure that backup drives and tapes are secure so databases can be restored when needed. I heard that SQL Server 2012 supports backups and restores using a Windows Azure Blob Storage account. How does this work and how do I get started?
Solution
In addition to DISK and TAPE, which have been supported by SQL Server for a long time, now you can backup and restore your database directly from Windows Azure Blob Storage.
SQL Server 2012 Service Pack (SP) 1 Cumulative Update (CU) 2 introduced support for creating backups and restores of your databases using Windows Azure storage services using T-SQL and SMO. SQL Server 2012 Service Pack 1 Cumulative Update 4 adds support for SQL Server backup and restore with Windows Azure Blob Storage using PowerShell by enhancing existing PowerShell cmdlets and by adding new PowerShell cmdlets. With this enhancement, you can backup SQL Server databases on an on-premises instance or SQL Server running on a Windows Azure Virtual Machine. It can be an offsite storage option for the on-premises database backups (reducing the overhead of maintaining and securing DISK and TAPE), or used when you migrate an on-premises database to an instance of SQL Server running in a Windows Azure Virtual Machine.
In my last tip, “Backup and Restore with Cloud services (Windows Azure Blob Storage Service) using TSQL” I talked about how to create a Windows Azure Storage account and hence I will jump into how you can use SMO to create a backup of your databases to Windows Azure Blob Storage and restore from there when needed. If you are new to SMO, you can refer this tip to learn more about SMO.
Backing up a database to Windows Azure Blob Storage Account using SMO
Before you can start using SQL Server classes or SMO you need to first refer to these assemblies in your projects (more about these assemblies are available in this tip):
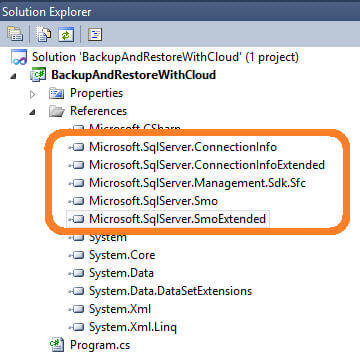
If you are new to SMO, you can refer tthis tip to learn more about SMO.
Before you can take a backup of your database you need to first create a credential (a credential contains the authentication information that is required to connect to a resource outside of SQL Server; in our case a Windows Azure Storage account) and use that credential with the backup command to connect to the Windows Azure Storage account for storing the backup file:
Server server = new Server(@"ARALI-LP\SQL2012");string dbName = "AdventureWorks2012";
string urlBackupFile = @"https://mydatabasebackstore.blob.core.windows.net/adventureworks/AdventureWorks2012.bak";
// Create a Credential to connect to Windows Azure Storage Account
string credentialName = "mydatabasebackstorecredential";
string identity = "mydatabasebackstore";
string secret = "953VVI+PWHEpLLtKOatR/P+bJ4VavrvJLAMxgtcwHras***************68ovkImeYNLeHaeA==";
if (server.Credentials["mydatabasebackstorecredential"] == null)
{
Credential credential = new Credential(server, credentialName);
credential.Create(identity, secret);
}
BackupDatabase(server, dbName, urlBackupFile, credentialName);
Once you have a credential created, you can now create an instance of Backup class, set the required properties for this object instance and then kick-off the backup operation as shown below:
private static void BackupDatabase(Server server, string dbName, string urlBackupFile, string credentialName)
{
// Backup to URL - Windows Azure Storage Account
Backup bkpDBFull = new Backup();
bkpDBFull.Action = BackupActionType.Database; //Take full backup of the database
bkpDBFull.Database = dbName;
bkpDBFull.CompressionOption = BackupCompressionOptions.On; //Compress the backup file
bkpDBFull.Devices.AddDevice(urlBackupFile, DeviceType.Url); //Add URL where the backup file is to be placed
bkpDBFull.CredentialName = credentialName; //specify the credential to use when connecting to Windows Azure Storage Account
/* Wiring up events for progress monitoring */
bkpDBFull.PercentComplete += CompletionStatusInPercent;
bkpDBFull.Complete += Backup_Completed;
bkpDBFull.SqlBackup(server); //Start taking backup
}
Depending on the network speed and database size it might take some time for the backup to complete and this is how your console screen should look after completion of the backup operation:

Now if you go to the Azure Storage Explorer, you will notice the availability of the backup file that was created in the container specified as shown below: P>

Restoring a database backup from Windows Azure Blob Storage Account using SMO
Before we restore, let me truncate the SalesOrderDetail table with the following commands:
USE AdventureWorks2012
SELECT COUNT(*) FROM [Sales].[SalesOrderDetail]
TRUNCATE TABLE [Sales].[SalesOrderDetail]
SELECT COUNT(*) FROM [Sales].[SalesOrderDetail]
After truncation, you will notice no records exist in the SalesOrderDetail table.

As with the backup operation, for restoring a database you need to have a credential created for connecting to the Windows Azure Storage account. The code below is used for a restore. This first creates an instance of Restore class, sets the required properties and then kicks off the restore operation:
private static void RestoreDatabase(Server server, string dbName, string urlBackupFile, string credentialName)
{
// Restore a database and move files
string newDataFilePath = @"D:\D Drive\SQL Server 2012\SampleDatabases\AdventureWorks2012_Data.mdf";
string newLogFilePath = @"D:\D Drive\SQL Server 2012\SampleDatabases\AdventureWorks2012_log.ldf";
Restore restoreDB = new Restore();
restoreDB.CredentialName = credentialName; //specify the credential to use when connecting to Windows Azure Storage Account
restoreDB.Database = dbName;
restoreDB.Action = RestoreActionType.Database; //Restore full database
/* You can specify ReplaceDatabase = false (default) to not create a new
* database, the specified database must exist on SQL Server
* instance. If you can specify ReplaceDatabase = true to create new
* database image regardless of the existence of specified database with
* the same name */
restoreDB.ReplaceDatabase = true;
/* If you have a differential or log restore after the current restore,
* you would need to specify NoRecovery = true, this will ensure no
* recovery performed and subsequent restores are allowed. It means it
* the database will be in a restoring state. */
restoreDB.NoRecovery = false;
restoreDB.Devices.AddDevice(urlBackupFile, DeviceType.Url); //Add URL from where the backup file is to be used
restoreDB.RelocateFiles.Add(new RelocateFile(dbName + "_Data", newDataFilePath)); //Move the data file to the specified location
restoreDB.RelocateFiles.Add(new RelocateFile(dbName + "_Log", newLogFilePath)); //Move the log file to the specified location
/* Wiring up events for progress monitoring */
restoreDB.PercentComplete += CompletionStatusInPercent;
restoreDB.Complete += Restore_Completed;
restoreDB.SqlRestore(server); //Start restoring from the backup
}
Again depending on your network speed and size of the database, the restore operation may take some time, but this is how it looks after completion of the database restore:

After the restore, we can verify the SalesOrderDetail table now contains data with the following command:
USE AdventureWorks2012
SELECT COUNT(*) FROM [Sales].[SalesOrderDetail]
GOGO
As you will notice, we have data in the SalesOrderDetail table again after the database restore completed:

Note: to restore a database, SQL Server needs to acquire an exclusive lock on the database being restored. If you try to restore a database which is in use, SQL Server will throw the following exception:

Monitoring progess of SQL backup and restore operations
Here is a set of methods you can use for monitoring progress of the backup and restore operations:
private static void CompletionStatusInPercent(object sender, PercentCompleteEventArgs args)
{
Console.Clear();
Console.WriteLine("Percent completed: {0}%.", args.Percent);
}
private static void Backup_Completed(object sender, ServerMessageEventArgs args)
{
Console.WriteLine("Hurray...Backup completed.");
Console.WriteLine(args.Error.Message);
}
private static void Restore_Completed(object sender, ServerMessageEventArgs args)
{
Console.WriteLine("Hurray...Restore completed.");
Console.WriteLine(args.Error.Message);
}
Connecting to Azure Storage to explore files using SQL Server Management Studio (SSMS)
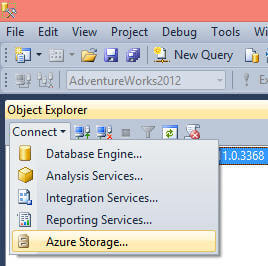
SQL Server Management Studio (SSMS) adds support to connect to a Windows Azure Storage account to explore files. If you have a BACPAC file, you can directly restore a database from this BACPAC file using the SSMS wizard (you can find more about this in the tip here). To connect to a Windows Azure Storage account from SSMS, click on Connect as shown below and then click on Azure Storage:
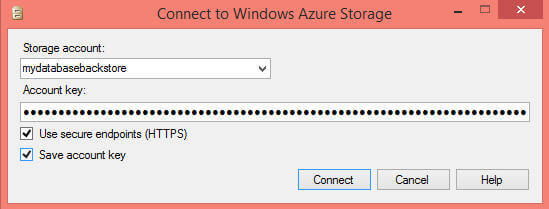
In order to connect to a Windows Azure Storage account you need to specify the storage account name and account access key. Click on Connect to connnect to the specified storage account.
Once you are connected to the storage account, you can browse through different containers and the files in the container. As I said before, if you have a BACPAC file, you can directly restore a database from this BACPAC file using the SSMS wizard, you can find more about this here.

More information about backups and restores with Windows Azure Blob Storage
- Taking a backup on the Windows Azure Storage provides several benefits like high availability (you can even use geo-replication to provide an extra layer of protection in the event of a disaster that could affect the whole region), off-site storage (no overhead of hardware management and to ensure protection from hardware failure) and ease of migration as backups are available from anywhere and at any time and can easily be accessed for restores.
- It is recommended to use compression while taking backups, so the network traffic and storage requirement can be minimized.
- The largest backup file size supported is 1 TB (1024 GB) as of now.
- You can back up to and restore from the Windows Azure Blob Storage service be it either FULL, DIFFERENTIAL or TRANSACTION LOG.
- Though the SQL Server Management Studio wizard, in the current release, does not support backup to and restore from the Windows Azure Blob Storage service, you can still use T-SQL, SMO and PowerShell.
- You cannot append to an existing backup file (you can use date or datetime as part of the file name to create multiple files); you can overwrite a file by using the WITH FORMAT option.
- Specification of MAXTRANSFERSIZE, RETAINDAYS, EXPIREDATE and block size is not supported.
Next Steps
- Review Backup and Restore enhancements in SQL Server 2012.
- Review Getting started with SQL Server Management Objects (SMO) tip.
- Review Backup and Restore SQL Server databases programmatically with SMO tip.
- Review Windows Azure Storage Explorer.
- Review Move an On-Premises SQL Server Database to the SQL Azure Cloud tip.
- Review other SQL Azure related tips
- Review my previous tips

Arshad specializes in Database, Data Warehousing and Business Intelligence application design, development and deployment, at enterprise level, with SQL Server, SSIS, SSRS, SSAS, Service Broker, MDS, DQS, SharePoint and PPS. He is a Microsoft Certified IT Professional in Microsoft SQL Server. He also has experience developing applications in VB/ASP/.NET/ASP.NET/C#, and is a Microsoft Certified Application Developer and Solution Developer for the .NET platform in Web/Windows/Enterprise. Arshad has Master’s degrees in Computer Applications and Business Administration in IT.
Disclaimer: Arshad worked for Microsoft and helped people and businesses make better use of technology to realize their full potential. The opinions mentioned in his tips and articles herein are solely his and do not reflect those of his current or previous employers.
- MSSQLTips Awards: Champion (100+ tips) – 2014


