By: Dallas Snider | Comments (12) | Related: > Reporting Services Security
Problem
After a successful installation of SQL Server Reporting Services 2012 on a personal computer such as a laptop, a permissions error is received when accessing the Report Manager site for the first time. The message typically states the following: "User DOMAIN_NAME\userID does not have required permissions. Verify that sufficient permissions have been granted and Windows User Account Control (UAC) restrictions have been addressed." This error can occur even though you the user, installer and database administrator have full administrative rights on your device.
Solution
Depending on your situation there are two methods that will typically resolve this problem. We will start with the easier solution first before moving to the more complicated solution. The goal of both solutions is to get the Site Settings to display in the top right corner as shown below. Site Settings is not displayed in the image above containing the error message.
1. The first method involves starting Internet Explorer by using the Run as administrator option as shown below.
2. If Site Settings is not displayed, please skip to step 8. If Site Settings is displayed in the top right corner, click on Site Settings. Click on the Security tab on the left. Next, click on New Role Assignment.
3. On the New System Role Assignment page, enter your group or user name and then select the System Administrator checkbox. Click on OK.
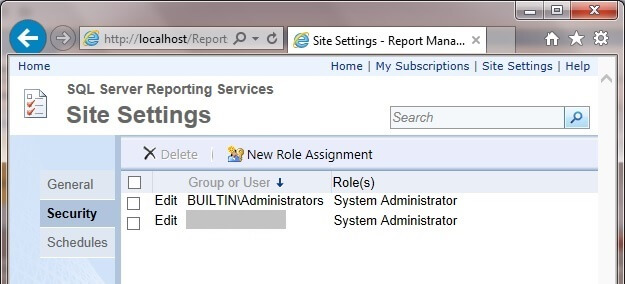
4. After clicking on OK, the system role assignments will be shown.

5. Next, click on Home in the top right and then click on Folder Settings.
6. Click on New Role Assignment. Add your group or user name and then choose the desired roles to be assigned. Click on OK when finished.
7. If you have made it this far, then the problem should be resolved. Exit from Internet Explorer and reopen Internet Explorer normally without running as administrator and navigate to your local Report Manager site.
8. The second method involves temporarily changing the User Access Control settings.
9. Change the settings from the default level as shown above to "Never notify" shown below. After clicking OK and rebooting your computer, attempt steps 1 through 7 above. When successfully making these changes, make sure to set the User Access Control settings back to the default level and reboot.
Next Steps
About the author
 Dr. Dallas Snider is an Assistant Professor in the Computer Science Department at the University of West Florida and has 18+ years of SQL experience.
This author pledges the content of this article is based on professional experience and not AI generated.
View all my tips


