By: Tibor Nagy | Comments (11) | Related: > Security
Problem
I read in a PCI security tip that I should configure Secure Sockets Layer (SSL) encryption on our SQL Servers, but this requires a trusted certificate. Could you please help me on how to complete this task?
Solution
The Secure Sockets Layer (SSL) can be used to encrypt data transferred on your network between your SQL Server instance and a client application. SSL uses certificates to validate the server and the client should verify the certificate using the chain of trust where the trust anchor is the root certificate authority. This requires that the client computer should trust the root authority of the certificate used by your SQL Server. SQL Server can do this using 128-bit encryption.
The following steps should be completed to setup SSL connections:
- Obtain a certificate which fulfills the requirements (see below).
- Install the certificate on the server.
- Enable encrypted connections in SQL Server.
- Enable encryption on the client.
- Pay extra attention for a clustered environment (see below).
SQL Server Certificate Requirements
The first step to secure the connections is to obtain a
security certificate. There are several requirements which should be
fulfilled by
the certificate:
- It must be valid thus the current system date and time should be between the Valid From and Valid To properties of the certificate.
- The Common Name (CN) in the Subject property of the certificate must be the same as the fully qualified domain name (FQDN) of the server computer.
- It must be issued for server authentication so the Enhanced Key Usage property of the certificate should include 'Server Authentication (1.3.6.1.5.5.7.3.1)' (see below).
- It must be created by using the KeySpec option of 'AT_KEYEXCHANGE'.
- It must be placed in the certificate store of the local
computer or current user (see below for details).

It is possible to use self-signed certificates, but I recommend only doing this for test purposes because this significantly lowers the level of security.
Install the SQL Server certificate using Microsoft Management Console
If you obtained a certificate which fulfills the above requirements then you should import it to the certificate store on your server. Follow these steps:- Open the Microsoft Management Console (MMC): click Start, then click Run and in the Run dialog box type: MMC
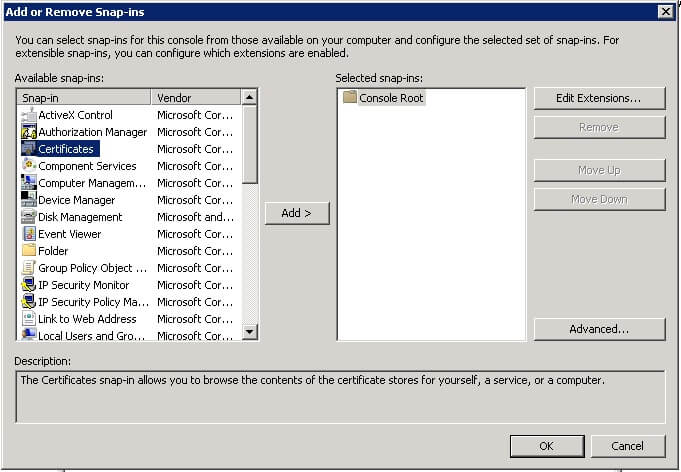
- On the File menu, click Add/Remove Snap-in...
- Select Certificates, click Add.
- You are prompted to open the snap-in for your user account, the service account, or the computer account. Select the Computer Account.
- Select Local computer, and then click Finish.
- Click OK in the Add/Remove Snap-in dialog box.
- Click to select the Personal folder in the left-hand pane.
- Right-click in the right-hand pane, point to All Tasks, and then click Request New Certificate...
- Click Next in the Certificate Request Wizard dialog box. Select certificate type 'Computer'.
- You can enter a friendly name in text box if you want or leave it blank, then complete the wizard.
- Now you should see the certificate in the folder with the fully qualified computer domain name.

Configuring SQL Server to accept encrypted connections
You can configure SSL using the SQL Server Configuration Manager. First, you should run SQL Server Configuration Manager under the SQL Server service account. The only exception is if the service is running as LocalSystem, NetworkService, or LocalService, in this case you can use an administrative account.
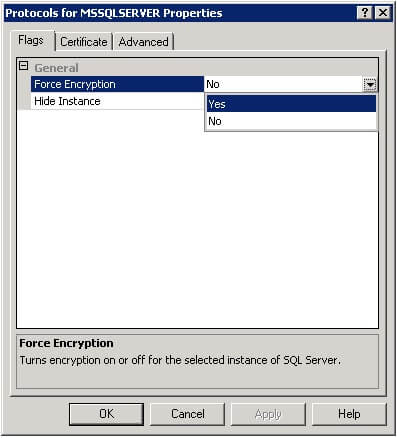
- Expand SQL Server Network Configuration and right-click on Protocols for <YourMSSQLServer>, then click Properties.
- On the Certificate tab, select the certificate you would like to use.
- On the Flags tab, select Yes in the ForceEncryption box, then click OK.
- Restart the SQL Server service.

Configuring the SQL Server clients to use encrypted connections
You should export the certificate from your SQL Server and install it
on the client computer to establish the encryption.
- Open the MMC Certificates Snap-in as described above.
- Right-click the Certificate, point to All Tasks, and then click Export.
- Complete the Certificate Export Wizard, storing the certificate file in a selected location.
- Copy the certificate to the client computer.
- Use the MMC Certificates Snap-in on the client computer to install the exported certificate file.
- In the SQL Server Configuration Manager right-click SQL Server Native Client Configuration, and then click Properties.
- On the Flags tab, select Yes in the ForceEncryption box, then click OK.
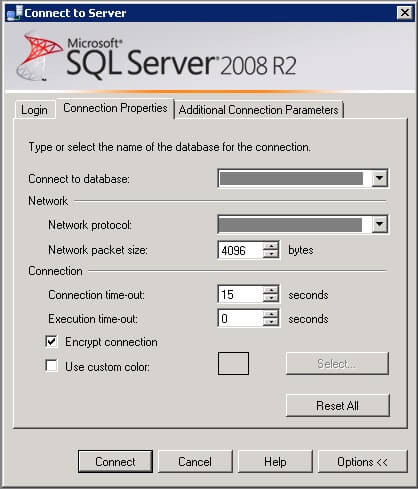
You can also encrypt the connection from SQL Server Management Studio:
- Click Options in the Connect to Server dialog.
- On the Connection Properties tab, tick the Encrypt connection checkbox.

SSL encryption for failover clustering in SQL Server
If you would like to use encrypted connections in a clustered environment then you should have a certificate issued to the fully qualified DNS name of the failover clustered instance and this certificate should be installed on all of the nodes in the failover cluster. Additionally, you will have to edit the thumbprint of the certificate in the registry because it is set to Null in clustered environment.
The following steps should be performed on all of the nodes in the cluster:
- Navigate to the certificate in the MMC Certificates Snap-in and double click to open the certificate.
- Copy the hex value from the Thumbprint property on the Details tab to Notepad and remove the spaces.
- Start Regedit and copy the hex value to this key: HKLM\SOFTWARE\Microsoft\Microsoft SQL Server\<YourSQLServerInstance>\MSSQLServer\SuperSocketNetLib\Certificate
- You will have to reboot your node, so it is recommended to failover to another node first.
Next Steps
- Obtain a certificate and try to configure it in your test
environment.
- You can find more articles in the Security category.
- Read more tips by the author here
About the author
 Tibor Nagy is a SQL Server professional in the financial industry with experience in SQL 2000-2012, DB2 and MySQL.
This author pledges the content of this article is based on professional experience and not AI generated.
View all my tips


