By: Scott Murray | Comments (10) | Related: > Reporting Services Development
Problem
Can I run a SQL Server Reporting Services (SSRS) report from Windows applications? If yes, what are the pro's and con's of doing so?
Solution
SSRS functionality is certainly available in a Windows application; Visual Studio .Net is actually the key component needed to develop a fully functioning report application. The Visual Studio application actually uses the ReportViewer control for processing a report. The .Net ReportViewer control actually comes in two flavors; one of the controls is used for Windows Forms applications while the second control focuses on Web Forms. For this particular tip we will focus on the Windows Forms control. A few additional items need to be noted when dealing with the ReportViewer control. First, you can run the report in local processing mode or remote processing mode. Local processing mode renders the report all within the local machine / application and can be used when SSRS is not installed. However, with local processing, not all the SSRS functionality is available, and, as such, reports can only render a report in PDF, Excel, Word, or Image formats. To the contrary, remote processing provides the best of both worlds. You must have SSRS installed (not necessarily on the machine running the application) for remote processing mode. Furthermore, the SSRS server handles the report run and processing, and thus any functionality available in SSRS is available in remote processing mode of the control. The ReportViewer employs the power of the Report Server to achieve the display of a report. For this particular tip, we are going to focus on using the remote processing mode for a windows form.
Windows Form ReportViewer
To get started with our example, we first need to setup our various tools. As we have used in many of my other tips, we will again use the AdventureWorks 2012 SQL Server database; the database is available on Codeplex at http://msftdbprodsamples.codeplex.com/releases/view/55330. Once you download and install the SQL Server database, we will subsequently use the SSRS 2012 sample reports which can be downloaded at http://advworks2012sssrs.codeplex.com/releases/view/106799. We will assume that you have installed and initialized the SSRS instance and it is up and running. For this example, we will use the Customers Near Stores report, which I have already deployed to the report server as shown below.

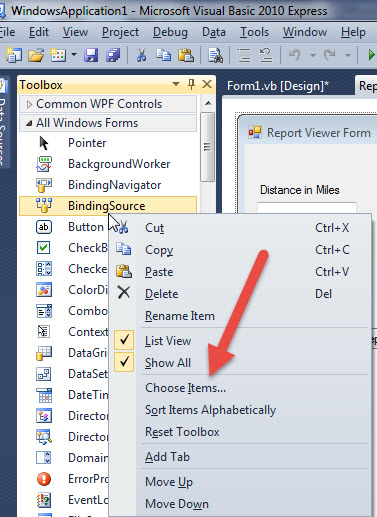
Our first step is to open up Visual Studio. For this example, we will use Microsoft Visual Basic 2010 Express although you could use many of the various Visual Studio flavors to complete this task. However, in order to use the ReportViewer control we normally need to add a reference to the control in the toolbox. To achieve this step, as shown below, right mouse click on any part of the toolbox and select Choose Items.
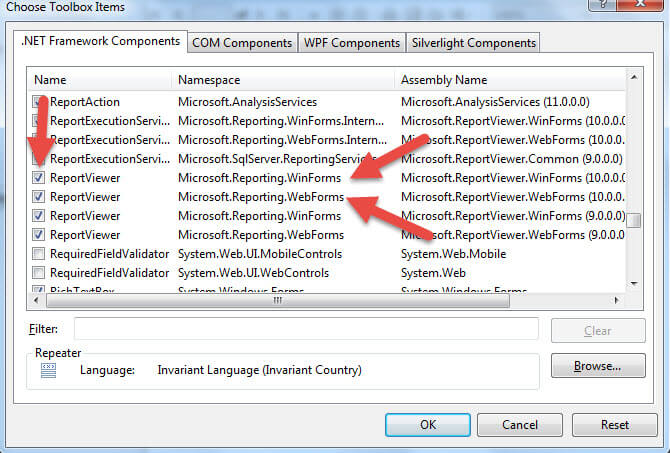
Next, you will need to scroll down the list of controls on the .Net Framework Components tab until you get to the ReportViewer components. You will notice that two controls exist; one is for WinForms and one for WebForms. You will also notice that there are multiple versions of the control. For use here, we only need the 10.0.0 version. However, depending on your Visual Studio version, you may have to select an alternate version.
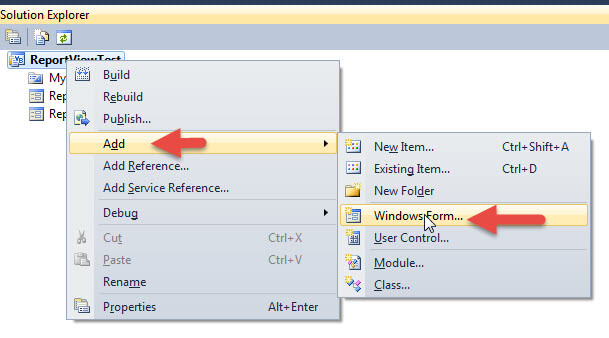
Once we have the controls in place we are ready to design our form. So within VB Express, Open a New Project, and then add a new Windows Form, as shown below, by right mouse clicking on your project in the Solution Explorer and then Selecting Add > Windows Form.
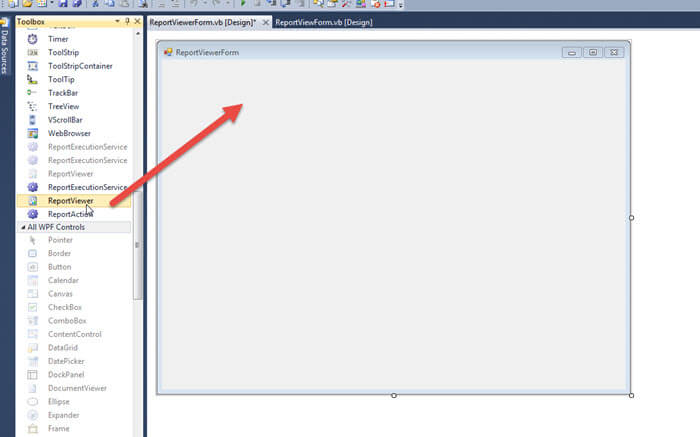
As illustrated in the next screen shot, once you have the Windows Form created, next open up the toolbox, scroll to the ReportViewer control, and then drag it onto your form.
We now need to set the ReportViewer Tasks settings. To get the Tasks setting box to show up, you will need to click on the very small arrow in the upper right corner of the control. Next, you need to Select <Server Report> under Choose Report; in the Report Server URL, enter the URL for your Report Server. For my example, this URL is http://localhost/reportserver_SQL2012; of course, your URL will be different. Finally, under Report Path, you will enter the full path to the report including folders, sub folders, and report name. Be sure to enter the leading slash "/".
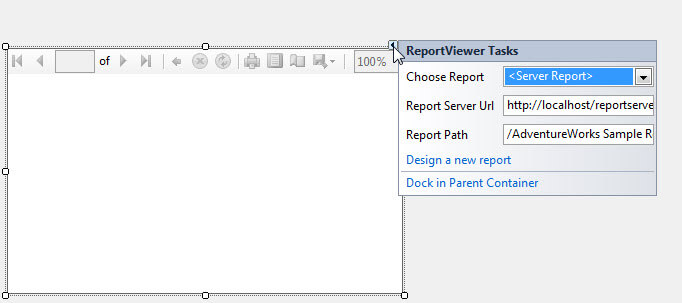
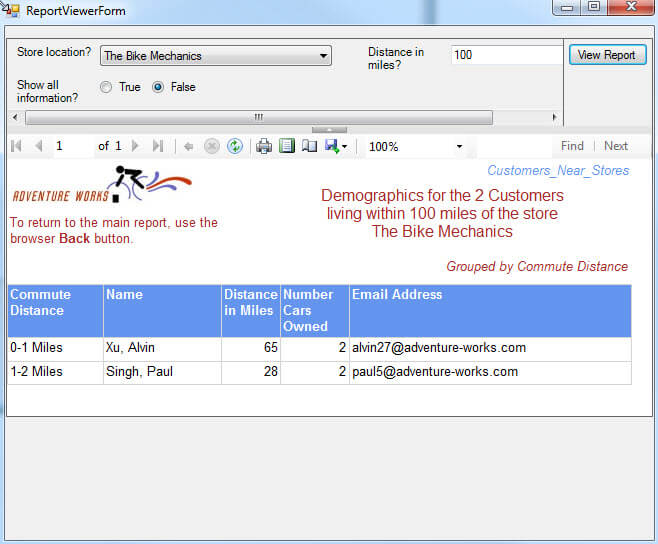
As you can see in the above screen print, you can actually design a report directly from the Task settings, although I prefer to have a report already completed. The very bottom option on the Tasks settings, Dock in Parent Container, will actually have the ReportViewer control maximize over top and cover the entire space of the Windows Form. It probably would be a good idea to resize the ReportViewer control to an appropriate size; otherwise, the report consumer may have to do a lot of scrolling. At this point, we have a full working ReportViewer implementation. If we build and run the project, we will get the following report. One item I should note is that this report had default values for each of the report parameters. Thus upon running the form, the report execution takes place and the report runs.
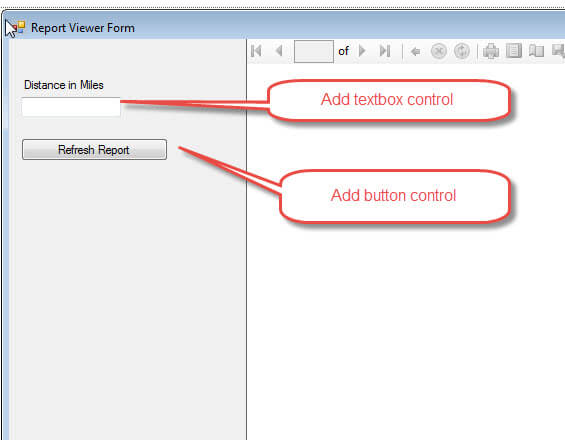
We can adjust the form to pass a parameter value to the ReportViewer control. In order to set the parameter and then re-run the report, we can add a simple textbox and then a button to refresh the report as shown below. For this particular report, we are going to adjust the Distance in miles parameter. In order to pass the parameter value, we need to find the exact parameter name from the report. For this report, the parameter name is "Radius".
In order to fully utilize the textbox and button, we do need to complete some quick coding to pass the parameter to the report. As shown in the below code box, first we need to make sure we add a reference to Microsoft.Reporting.WinForms.
Imports Microsoft.Reporting.WinForms

Public Class ReportViewer Form

    Private Sub ReportViewer1_Load(sender As System.Object, e As System.EventArgs) Handles ReportViewer1.Load

        Dim Dist As New ReportParameter
        Dist.Name = "Radius" 'RDL Parameter Name
        TextBoxDistance.Text = "200"
        Dist.Values.Add(TextBoxDistance.Text)
        ReportViewer1.ServerReport.SetParameters(New ReportParameter() {Dist})  'ReportViewer1.LocalReport.SetParameters(New ReportParameter() {Param1})

    End Sub

    Private Sub Button1_Click(sender As System.Object, e As System.EventArgs) Handles RefreshReportButton.Click
        Dim Dist As New ReportParameter
        Dist.Name = "Radius" 'RDL Parameter Name
        Dist.Values.Clear()
        Dist.Values.Add(TextBoxDistance.Text)
        ReportViewer1.ServerReport.SetParameters(New ReportParameter() {Dist})
        Me.ReportViewer1.RefreshReport()
    End Sub
End Class
Next, in the Reportviewer1_Load Sub, we need to add the above
noted code. An explanation of each line of code is as follows:
- Line 1 - Create the ReportParameter variable named Dist.
- Line 2 - Set the name of the Dist variable to "Radius". Note this name needs to be the actual name of the parameter in the report.
- Line 3 - Set the "default" number that shows in the text box to 200 (i.e. the Distance in Miles will default to 200 miles).
- Line 4 - Set the Dist variable value to 200 (value in the textbox).
- Line 5 - Sets the parameter value for the report to the Dist variable value.
Running the report with this first Sub would always set the Parameter for the Radius to 200. If we want to make the report interactive, we can add a second Sub attached to a button control which reads the textbox and refreshes the report when the button is clicked. This second sub does the following:
- Line 1 - Create the ReportParameter variable named Dist.
- Line 2 - Set the name of the Dist variable to "Radius". Note this name needs to be the actual name of the parameter in the report.
- Line 3 - Clears the default or previous value of the Dist variable.
- Line 4 - Set the Dist variable value to the value in the textbox.
- Line 5 - Set the parameter value for the report to the Dist variable value.
- Line 6 - Refreshes the report.
Now, we have a working Windows application that calls the report and allows for setting the Distance parameter, as illustrated below. The second screen shot shows setting the parameter to 312.
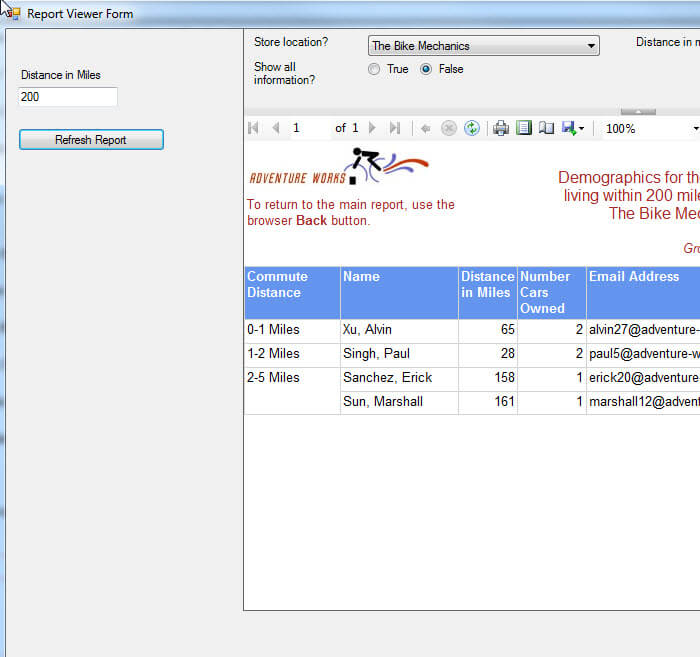
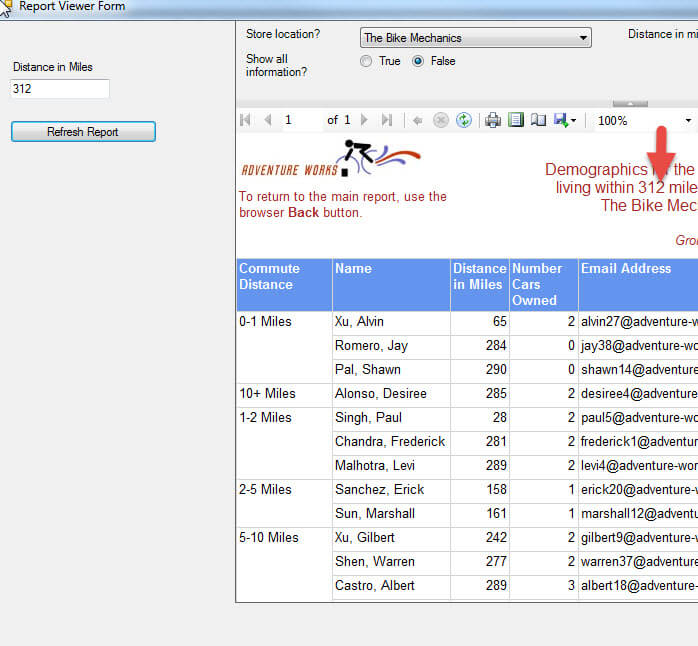
Our Windows Form now includes a fully functioning report server report. Of course, we could add list boxes and other controls to further enhance the report processing.
Conclusion
SSRS reports can be initiated from a Windows Form using the ReportViewer controls available in Visual Studio. The form can process in remote mode where the processing is handed over to an existing SSRS server or in local mode. Local mode had limited functionality whereas remote processing provides full SSRS functionality. In order to use the ReportViewer control, it most often must be added to your Visual Studio toolbox; once in your toolbox, it can be added to a form where you then set the URL of the report server, report folder and file location. Additionally, the report's parameters can be initiated, set, and passed programmatically to the report itself.
Next Steps
- ReportViewer Local Processing Mode - http://msdn.microsoft.com/en-us/library/ms251704(v=vs.110).aspx
About the author
 Scott Murray has a passion for crafting BI Solutions with SharePoint, SSAS, OLAP and SSRS.
This author pledges the content of this article is based on professional experience and not AI generated.
View all my tips


