Problem
Sometimes there are requirements in a Variated Multi-Lingual SharePoint portal which require having a unified single source document library/list, along with its folder structure, to be displayed across all webs (Sub Sites : ex: English, Arabic, French, …etc), but when trying to achieve this you will face two serious problems. We’ll discuss these two issues in detail in this two part article series.
Part 1 – How can we differentiate/filter between the folder structures in the same list/library for the variated multiple-languages? (covered in Part 1)
Part 2 – How can we display/view the specified unified single source list/library across all webs? (We will cover this in this article.) [We know that in MOSS 2007 Variated Multi-Lingual Portals, if we create a list/library in the root top-level site collection (Parent) we couldn’t display it easily via OOTB (out-of-the-box) with the list/library list view web part, because it would not be displayed at the variated webs (children)].
Solution
We fixed our first issue in Part 1, but we still need to display and apply our filtered folders structure list/library across all variated webs. So let’s follow the below steps for fixing the second issue:
Before going deeply into the solution, we know that in order to display/show a cross list/library across all webs we can use either SharePoint OOTB CQWP (Content Query Web Part) or Customized “Data View Web Part” (DVWP) or develop and wrap our custom cross list/library. In this tip I’ll be using the “Data View web Part”, because I’ll show some tips and tricks that anyone can use via DVWP and SharePoint Designer without needing to have solid experience in XSL and XSLT formatting which you need to have to deal with CQWP.
(I’ll apply the customization on a variated “English” web and you can roll out and continue for the other webs)
- Open SharePoint Designer , File > Open Site > (Type your Full Site address URI) :
- Double Click on “en” (“English” variated web label) in order to open the English web (Sub Site) in a new window :
- Let's drop our customized DVWP in the default home page
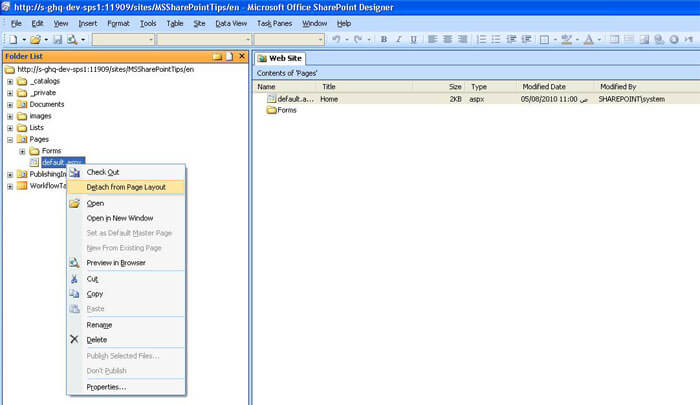
- Expand “Pages”
- Right Click “default.aspx”
- Select “Detach from page layout” in order to be able to customize this page individually without needing to update its initial page layout
- Click “Yes”
- Then “OK” for check out
- Then wait until you receive this notification, “The page was detached successfully and can now be edited”
- Then click “OK"
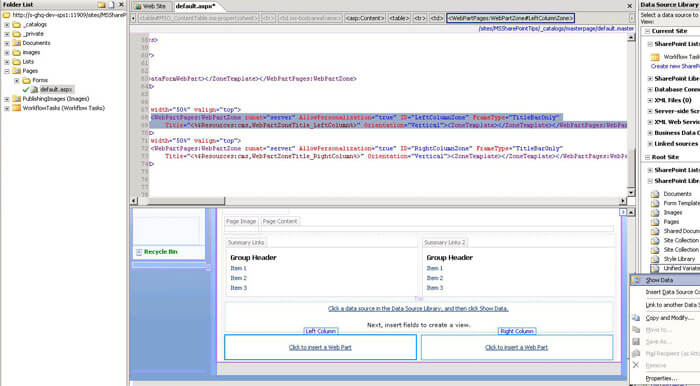
- Double click on the checked out “default.aspx” page in order to open it:
- Select any web part zone from the design view then insert a new data view control:
- Insert (Menu)
- SharePoint Controls
- Data View
- Note the trick now. As I mentioned above that we can't see our targeted list/library "" which settled in the root top-level site collection (Parent) here in the child ("English") web. So in order to see and add it do the following.
- Click on “Connect to another library” link under the “Data Source Library View” pane
- Click “Add”
- Type in the Display Name and Location (ex: "Root Site" for the Display Name and type the root top level site collection full address at the Location) then click "OK"
- Now we can see the “Root Site” section added to the “Data Source Library View” pane:
- Expand “Root Site” > “SharePoint Libraries” > Click on the context menu of “Unified Variated Library” > Select “Show Data”:
- Select your desired fields and drag and drop them in the deign view or click on “Insert Selected Fields as…” context menu and choose “Multiple Items View”:
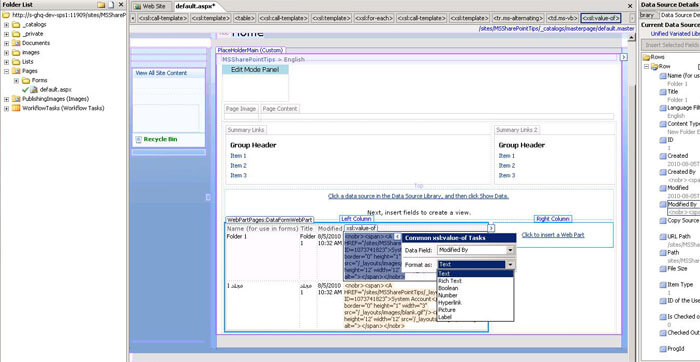
- We can set the Chrome property to None to remove the borders and DVWP title. We can see that the “Modified By” column data rendered as HTML format, so in order to display it correctly (another trick), click on the context menu of the first generated HTM format tag of the "Modified By" column data and select “Label” instead of “Text” for the “Format as:” field:
- Here's the result after applying the trick (you can easily rename the Columns as you wish)
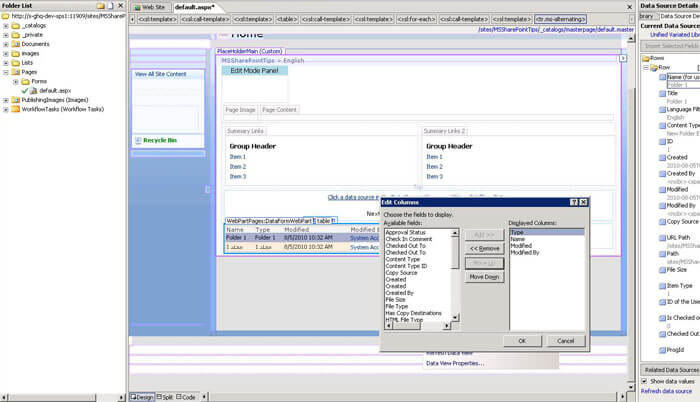
- There should be a folder icon beside the Name column which is not provided when using DVWP or converting a list view web part into DVWP via XSLT conversion. So another trick to show the folder icon. I’ll rename the “Title” Column to be “Type” (as shown in the previous image) then re-order the Columns by clicking on the context menu of DVWP and select “Edit Columns” then select the “Type” column and click on “Move Up” then click “OK".
- Click on the Split view > Select any field value under “Type” column, then replace the below tag:
- <xsl:value-of select=”@Title”/>
- with the following tag:
- <IMG BORDER=”0″ alt=”Folder: {@FileLeafRef}” title=”Folder: {@FileLeafRef}” SRC=”/_layouts/images/folder.gif” />
- Now you can see the folder icon displayed:
- Also another trick is that we can change the Folder Name to be a hyperlink instead of a label. Select any field value under the “Name” column and then replace the below tag:
- <xsl:value-of select=”@FileLeafRef”/> with the following tag:
- <a href=”{@FileRef}”><xsl:value-of select=”@FileLeafRef”/></a>
- Save and Check In the page as a Major version.


Voila! Now go to the default.aspx page to see the cross targeted library added as a customized DVWP.
Next Steps
- Check out these other SharePoint tips

Hesham is a Senior Software Engineer and SharePoint Specialist at ITWorx. Hesham holds the “MCTS: MOSS 2007 Configuration”, “MCTS: MOSS 2007 Application Development”, “MCTS: Microsoft SharePoint Server 2010 Configuration” and “MCPD” certifications. He focuses on administering, consulting, developing, customizing, managing and supporting portals as well as software applications using Microsoft technologies for the government and enterprises. Hesham holds a B.Sc. in Computer Sciences from Ain Shams University and a Computer Science Master’s from AAST.
Contact Hesham:
– Face book Page: http://www.facebook.com/people/Hesham-Saad-Aly/663555945