Problem
The idea behind the SharePoint Recycle Bin is the same as Windows, but we have more granular control in SharePoint. So how does the Recycle Bin work in SharePoint? How do you configure it? What are the different stages of the Recycle Bin (item deletion) in SharePoint?
Solution
SharePoint 2010 provides different levels of protection for recovering deleted or overwritten documents. On a broader level, you can restore the complete web farm or web application, on a granular level you can restore a site collection backup or use unattached database recovery to export and then import the required documents. These recovery methods have administrative overheads, so as to minimize it you can enable versioning of critical documents (by default its not enabled and you need to enable for your library wherever required) in which case SharePoint creates multiple versions of your document when you make any changes to them. But what if you delete a document with all of its associated versions or a document for which you have not enabled versioning; the deleted documents (along with all its associated versions if there are any) go to the Recycle Bin (by default its enabled and you can disable it if required though its recommended to keep it enabled).
The Recycle Bin keeps track of deleted items and it works in two different stages and hence provides protection at two different levels:
First Stage Recycle Bin – When you delete an item from a site or sub-site it goes to the Recycle Bin (also called the user’s Recycle Bin) of that particular site and stays there until you restore it back or the retention policy expires (deleted after a set number of days, by default it stays for 30 days) or you delete it from there, in that case it goes to the Site Collection Recycle Bin. You can view a site’s Recycle Bin by clicking on the Recycle Bin link in the Quick Launch.
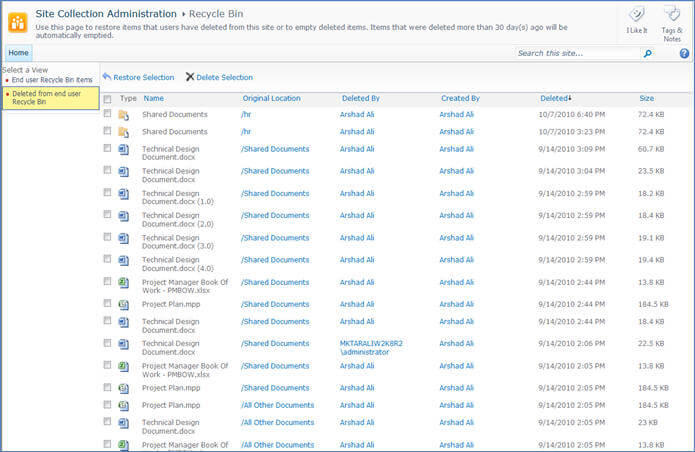
Second Stage Recycle Bin – When an item is deleted from a site’s Recycle Bin it goes to Site Collection Recycle Bin and stays there until you restore it or the retention policy expires (deleted after a set number of days, by default it stays for 30 days) or you delete it from there also in which case it gets deleted permanently. The items from the Site Collection Recycle Bin can be restored by a Site Collection Administrator. You can view the Site Collection Recycle Bin by clicking on the Recycle Bin link under Site Collection Administration on Site Settings page. This page has two views: End User Recycle Bin Items view displays all the contents of all the recycle bins of all the sites under that particular site collection whereas Deleted From End-User Recycle Bin view displays all the items which have been deleted from the sites recycle bins and now exist in site collection recycle bin.
Though the demonstration shown here is based on SharePoint 2010, the Recycle Bin feature is not specific to SharePoint 2010 and it is in earlier SharePoint versions too. If you are using earlier versions, you can still use the Recycle Bin although there are some slight changes in options/UI to configure and view it.
Configuring Recycle Bin
Two staged (both first and second stages) Recycle Bin is already enabled by default for site collection, you can disable second stage recycle bin or disable recycle bin altogether.
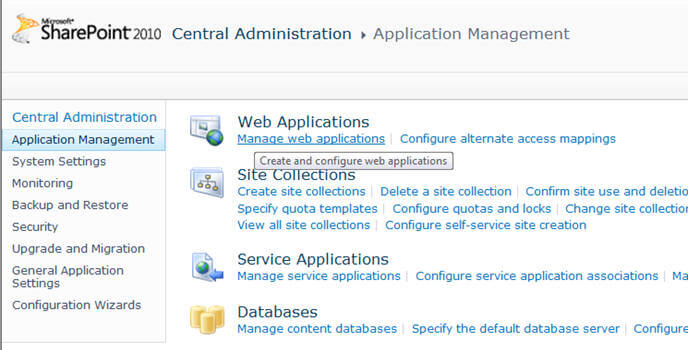
Go to START -> All Programs -> Microsoft SharePoint 2010 Products -> SharePoint 2010 Central Administration, on the left side click on Application Management link and in right side, in detail pane, click on Manage Web Applications under Web Applications as shown below:
On the Manage web applications page, select the required web application in the detail pane and click on General Settings under General Settings in the ribbon above as shown below:

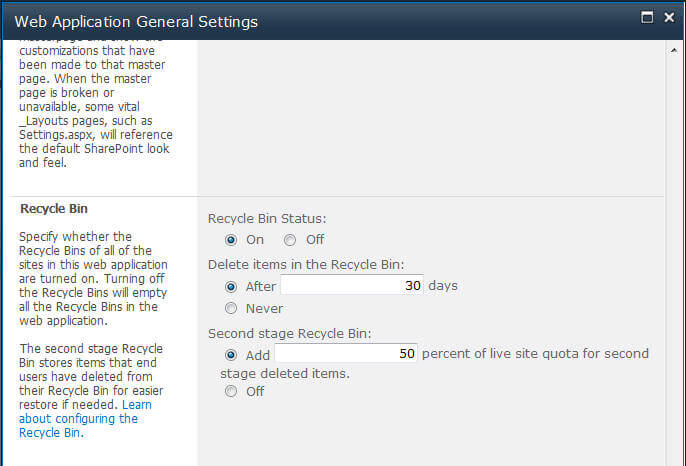
On the Web Application General Settings page you can enable or disable the Recycle Bin feature. Notice it is already enabled by default. When you disable the Recycle Bin feature, all the items existing in it will be removed permanently. Next you can specify the contents sent to Recycle Bin and retention policy to remove items after certain number of days or never. Next you can specify the site quota for the second stage.
Viewing contents of Recycle Bin
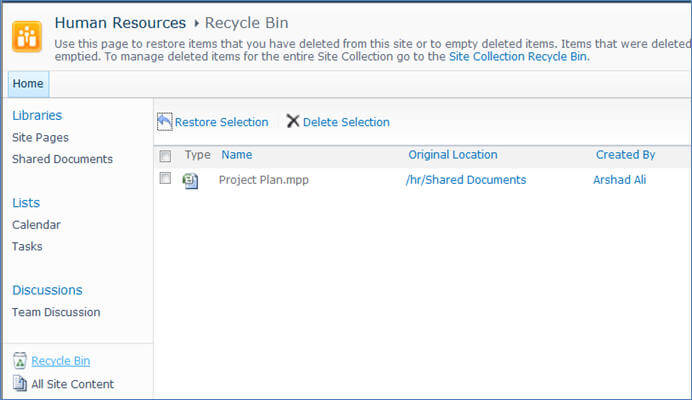
On the Quick Launch of the site, you will notice the Recycle Bin link, click on it to view all the site’s deleted items in the Recycle Bin. You can restore the items to their original location or delete them from here. In this case they will move to the Site Collection (Second stage) Recycle Bin as shown below:
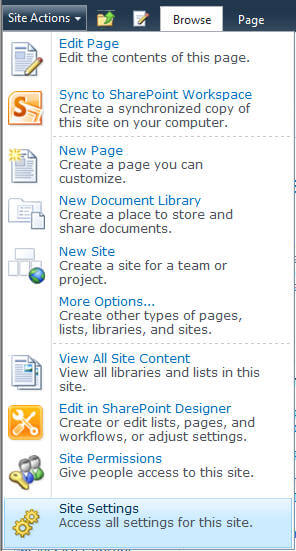
Notice in the above image, there is a link on the top of the page to go to the Site Collection Recycle Bin. You can click on it to go directly to Site Collection Recycle Bin (depending on your permission level) or else you can go to the Site collection, click on Site Actions and then Site Settings as shown below:
On the Site Settings page of the site collection/web application, click on the Recycle Bin link under Site Collection Administration as shown below:
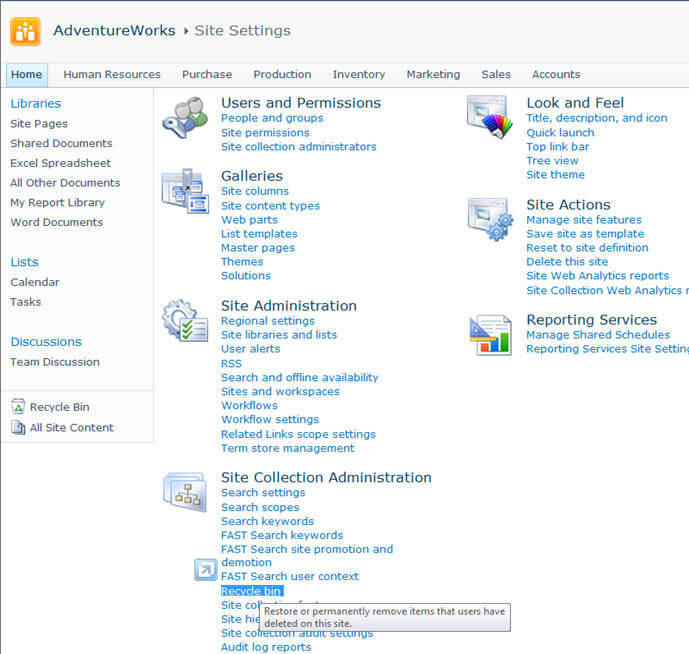
The Site Collection’s Recycle Bin has two views:
The End User Recycle Bin Items view displays all the contents of all the recycle bins of all the sites under that particular site collection as shown below:

The Deleted From End-User Recycle Bin view displays all the items which have been deleted from the sites’ recycle bins and now exist in the site collection recycle bin. In either of these views, you can select the items and click on Restore Selection to restore items to their original location.
Notes
- To configure Recycle Bin settings, you need to be a member of the Farm Administrators SharePoint group.
- The Recycle Bin is specific to a site and the user who deletes the items. In other words, each sub-site has its own Recycle Bin apart from a top level Site Collection Recycle Bin. Also a client who deletes an item will be able to see it in the site’s Recycle Bin (no other clients will be able to see it), but at the Site Collection Recycle Bin level all the items deleted are shown.
- The total retention period applies to both times spent in site’s recycle bin and Site Collection recycle bin, in other words how long items remain in both the Recycle Bins together. For example, by default it is 30 days, in this case if an item stays for 20 days in site’s recycle bin and then is moved to Site Collection recycle bin then after 10 days it will be removed permanently.
- When you disable the Recycle Bin feature, all the items existing in it will be removed permanently.
Next Steps
- Review Backup and Restore in SharePoint 2010 which talks about farm/web applications backup and restore.
- Review Granular Backup and Restore in SharePoint 2010 which talks about site collection backup and restore.
- Review Exporting/Importing Site/Library/List in SharePoint 2010 which talks about exporting and importing site/library/list contents.
- Review Unattached Content Database Recovery in SharePoint 2010 which talks about restoring a content from a backed up file without actually attaching the same to any web farm/application.
Review Configure Recycle Bin settings article on technet.

Arshad specializes in Database, Data Warehousing and Business Intelligence application design, development and deployment, at enterprise level, with SQL Server, SSIS, SSRS, SSAS, Service Broker, MDS, DQS, SharePoint and PPS. He is a Microsoft Certified IT Professional in Microsoft SQL Server. He also has experience developing applications in VB/ASP/.NET/ASP.NET/C#, and is a Microsoft Certified Application Developer and Solution Developer for the .NET platform in Web/Windows/Enterprise. Arshad has Master’s degrees in Computer Applications and Business Administration in IT.
Disclaimer: Arshad worked for Microsoft and helped people and businesses make better use of technology to realize their full potential. The opinions mentioned in his tips and articles herein are solely his and do not reflect those of his current or previous employers.
- MSSQLTips Awards: Champion (100+ tips) – 2014