By: Manvendra Singh | Comments (3) | Related: More > Database Administration
Problem
You have a SQL Server database with multiple data files and you want to remove one of the data files. This tip will demonstrate the method to remove a data file from a SQL Server database without losing data.
Solution
I described how data is stored in SQL Server data files and how to migrate data from one data file to another in my last two tips. I would suggest reading both tips to get indepth knowledge of these topics. In this tip, I will describe how to remove a SQL Server data file for a multi-file database.
Let's start with creating a database that has three data files with one filegroup and a log file and insert some data into the database. Finally we will remove one data file to show you the step by step method.
Create a Sample SQL Server Database
First we will create a database named "DataFileRemoval" with three data files (1 primary and 2 secondary data files) in one filegroup and one log file by running the below T-SQL code. You can change the name of the database, file path, file names, size and file growth according to your needs.
CREATE DATABASE [DataFileRemoval]
CONTAINMENT = NONE
ON  PRIMARY
( NAME = N'DataFileRemoval', FILENAME = N'E:\MSSQL\DATA\DataFileRemoval.mdf',SIZE = 5MB , MAXSIZE = UNLIMITED, FILEGROWTH = 10MB ),
( NAME = N'DataFileRemoval_1', FILENAME = N'E:\MSSQL\DATA\DataFileRemoval_1.ndf',SIZE = 5MB , MAXSIZE = UNLIMITED, FILEGROWTH = 10MB ),
( NAME = N'DataFileRemoval_2', FILENAME = N'E:\MSSQL\DATA\DataFileRemoval_2.ndf' ,SIZE = 5MB , MAXSIZE = UNLIMITED, FILEGROWTH = 10MB )
LOG ON
( NAME = N'DataFileRemoval_log', FILENAME = N'E:\MSSQL\DATA\DataFileRemoval_log.ldf',SIZE = 10MB , MAXSIZE = 1GB , FILEGROWTH = 10%)
GO
Next step is to create a table in which we will insert data. Run the below command to create a table.
USE Manvendra;
GO
CREATE TABLE [Test_Data] (
    [Sr.No] INT IDENTITY,
    [Date] DATETIME DEFAULT GETDATE (),
    [City] CHAR (25) DEFAULT 'Bangalore',
 [Name] CHAR (25) DEFAULT 'Manvendra Deo Singh');
Now we will insert some rows into the above created table, so data can be saved in each data file. Run the below command to insert 10,000 rows to table "Test_Data".
USE Manvendra
go
INSERT INTO Test_DATA DEFAULT VALUES ;
GO 10000
Check the row count by running the below T-SQL code to validate the data insert operation.
--Check the row count.
USE [DataFileRemoval];
GO
SELECT COUNT(*) [No. of Rows] FROM Test_DATA
Now we will check the number of pages/extents allocated from each of the data files. Here we can also validate that data has been stored on each data file by looking at the used extents.
DBCC showfilestats

The primary data (filedid=1) file has used 42 extents and the secondary data files (fileid=3 and fileid=4) have used 13 extents (6 and 7).
Removing a SQL Server Data File Fails
Now we will remove one of the SQL Server data files by running the below T-SQL code.
ALTER DATABASE [DataFileRemoval] REMOVE FILE [DataFileRemoval_2]

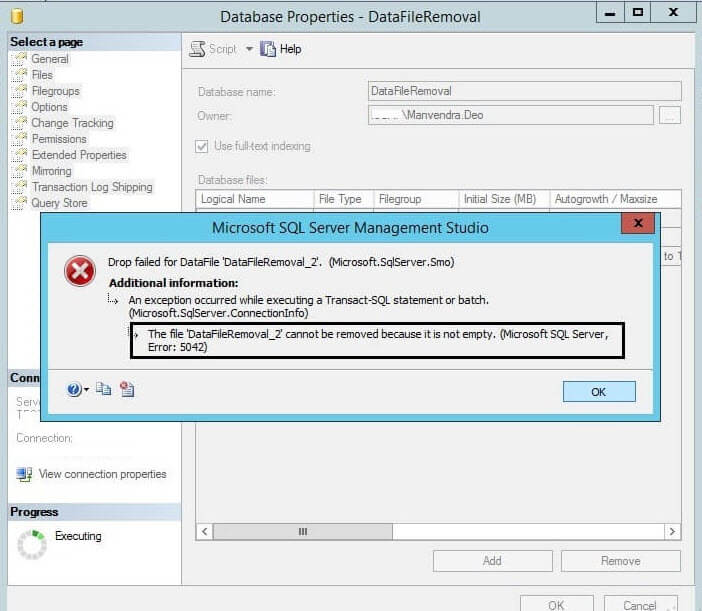
We can also try to remove data file in SQL Server Management Studio as shown in the below screenshot. Right click on the database, choose Properties and a database property window will open. Choose Files from the left side pane, click on the file you want to remove from the right side pane and click the Remove button at the bottom of the window.

The error states that the file needs to be empty. To do this, we will move data from this data file to the other data files and then we can try to remove this data file. To achieve this, we will use DBCC SHRINKFILE with the EMPTYFILE option to move data between files as we have done in our last tip.
Moving SQL Server Data between Data Files
As you know, data is stored on all data files, so as per the requirement we have to migrate data from one data file to the others before we can remove this data file. We will use the DBCC SHRINKFILE command to migrate the data. DBCC SHRINKFILE command shrinks the size of the specified data or log file for the current database, or empties a file by moving the data from the specified file to other files in the same filegroup. We need to pass the logical file name of data file from which we want to migrate our data along with the argument "EMPTYFILE" which will empty the given file and migrate all data from the specified file to other files in the same filegroup. Run the below command to get this done.
USE [DataFileRemoval];
go
DBCC SHRINKFILE ('DataFileRemoval_2', EMPTYFILE);
We can see the "UsedPages" value shows zero which means all the data pages allocated to this data file have been migrated to the other data files.
Now we will validate whether the data is really migrated to the other data files. We will check the allocated pages/extents of each data files by running the below DBCC command.
DBCC showfilestats

We can see only one extent is allocated to DataFileRemoval_2 data file where earlier it was 7. This means the rest of all extents from this file have been migrated to the other two data files, so their allocated extents have increased. The one extent remaining in this data file contains the data file header information.
SQL Server Data File Removal Post Data Migration
Now that we have migrated and validated the data migration, we should be able to remove data file datafileremoval_2. This can be removed easily either using the GUI or by running the ALTER statement which we ran in the sections above.
ALTER DATABASE [DataFileRemoval] REMOVE FILE [DataFileRemoval_2]

We can see data file has been removed, this also validates that data movement was done successfully otherwise this operation would have failed. Now we can run the below command to check the available data files in the database.
DBCC showfilestats

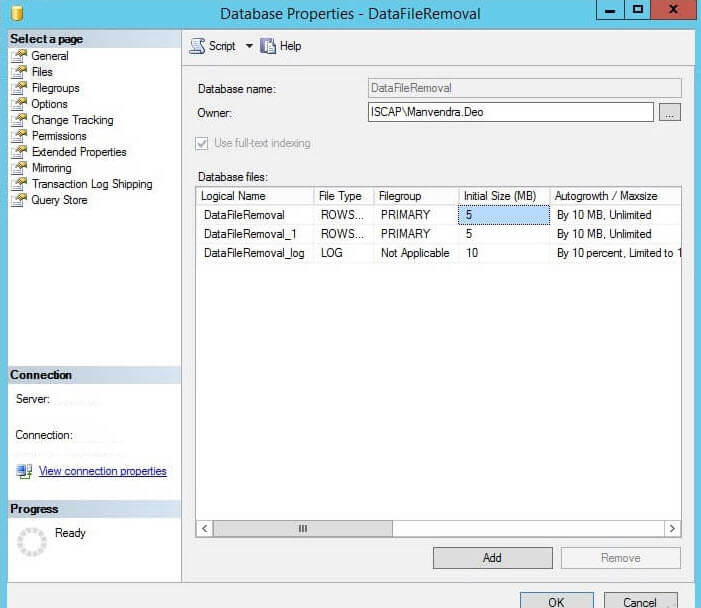
You can see [DataFileRemoval_2] data file no longer exists in the database and database has only two data files. We can also check the total row count of the table in which we inserted 10,000 rows to make sure we still have all of the data.
USE [DataFileRemoval];
GO
SELECT COUNT(*) [No. of Rows] FROM DATA

We can see table test_data still has the same number of rows with just the two data files post removal of data file datafileremoval_2.
We can also validate the data file removal by looking at the database property page in SSMS. Right click on the database, click on Properties and select Files from the left side pane.

Next Steps
- Do not remove any data file of your production database until it is required.
- First test this process in to lower life cycle environments and then replicate the change in to production post approval process.
- Explore more knowledge with these SQL Server Database Administration Tips
About the author
 Manvendra Singh has over 5 years of experience with SQL Server and has focused on Database Mirroring, Replication, Log Shipping, etc.
This author pledges the content of this article is based on professional experience and not AI generated.
View all my tips


