Problem
We are currently building Extract, Transform, and Load (ETL) processes with SQL Server Integration Services (SSIS). We would like to execute these SSIS packages from SQL Server Agent jobs. Can you provide the details on the best practices for developing SSIS packages that we want to execute from SQL Server Agent?
Solution
SSIS is indeed a good choice for implementing ETL processes. The typical process is scheduled to run on a periodic basis. SQL Server Agent is a good tool for executing SSIS packages as well as scheduling jobs to run at the appropriate times.
How to Execute SSIS Packages from SQL Server Agent
In this tip I will focus on the following key considerations for executing SSIS packages from SQL Server Agent:
- Design decisions when developing SSIS packages
- Deploying SSIS projects to the SSIS Catalog
- Creating Environments in the SSIS Catalog
- Configuring SQL Agent job steps to execute an SSIS package
Design Decisions
When you are developing SSIS packages, the first thing you should do is to figure out what data you need to be able to change when you execute the package. There are two built-in options: Project parameters and Package parameters.
Choose Project parameters for values that tend to be used in every package in an SSIS project; e.g. Connection Strings or the Server Name property of the Connection String. As you move SSIS packages through the development, testing and production environments, the values in each environment tend to be different. Project parameters provide the mechanism for you to set and change the values based on the target environment.
Choose package parameters for values that are specific to a single SSIS package. As an example, I want to implement an SSIS package that clears out history data older than 60 days. By using a package parameter for the number of days of history to retain, I can easily change the value in the future without having to change the SSIS package.
Setup a Project Parameter
In this section I will walk through the setup of a connection manager and how to create a Project parameter for the ServerName property. There are several properties that you can parameterize in a connection manager but the ServerName is the one that you will most likely choose as the value changes for development, testing and production deployment.
Right-click in the Connection Managers area of the screen in Visual Studio or SQL Server Data Tools (SSDT) and select New OLE DB Connection… as shown below:

The following window will be displayed:

Click New… and enter the details as show below:
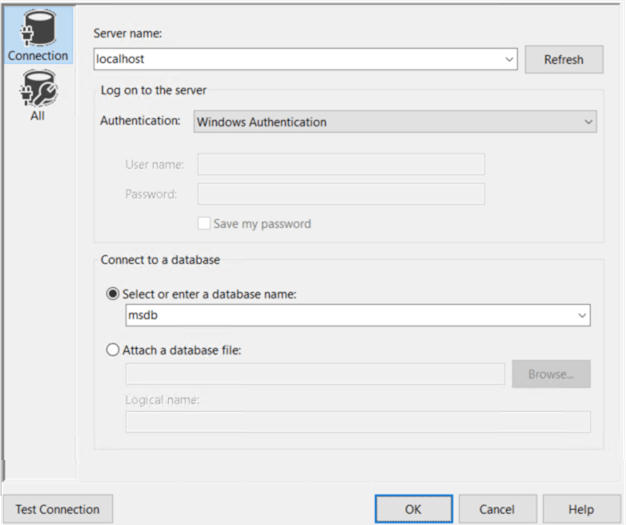
Click OK. The following window will be displayed:

Click OK. The new Connection Manager will be shown in the Connection Managers area of the SSIS package designer:

Right click on the localhost.msdb Connection Manager, choose the following (one at a time) from the context menu, and perform the action as detailed below:
- Rename: Change the name to msdb; the database server name is different in our development, test and production environments so it is a good idea to just use the database name without the server name.
- Convert to Project Connection: This allows every SSIS package in the project to share this Connection Manager.
- Parameterize: This allows you to specify properties of the connection manager that you want to parameterize using Project parameters. Fill in the dialog as shown below:

The following are the main points for the Parameterize dialog:
- Select the ServerName property from the dropdown list. Generally, that is the one part of the database connection string that varies depending on the target environment.
- Click Create new parameter. The default value of Database name and property name is a good choice.
- The Value of localhost is good; it will be stored in the SSIS project and used in the development environment.
- The Scope defaults to Project.
- Click the Required checkbox. When you deploy you will be required to enter a value for this parameter.
- Click OK to complete the dialog.
Double-click Project.params in the Visual Studio Solution Explorer to view the new project parameter as shown below:

You can change the value if necessary. I like to keep the Project parameter values as the ones used in the development environment so localhost is good. The JOB_STATE_ID is not used in this tip.
Setup a Package Parameter
A Package parameter has a value that we may want to change at runtime but typically is specific to a single SSIS package. The following is an example of a package parameter:

The following are the steps to setup the package parameter:
- Click the Parameters tab.
- Click the left most icon above Name to add a new parameter.
- Fill in the Name, Data type, and Value as shown above.
- Sensitive defaults to false; if you change it to True the value will be encrypted.
- Required defaults to False; if you change it to True, you will have to supply a value when you add the package to a SQL Agent job step.
As an example of how to use the package parameter, I have the following stored procedure that clears out data older than the number of days specified in the @RETAIN_HISTORY_DAYS stored procedure parameter:
CREATE PROCEDURE [dbo].[PURGE_SQL_AGENT_HISTORY]
   @RETAIN_HISTORY_DAYS INT
AS
BEGIN
   DECLARE
      @MIN_DATE DATE
   ,  @INT_DATE INT
   SET @MIN_DATE = DATEADD(day, @RETAIN_HISTORY_DAYS * -1, GETDATE());
   SET @INT_DATE = FORMAT(@MIN_DATE, 'yyyyMMdd'
   DELETE [dbo].[JOB_HISTORY]
   WHERE [run_date] < @INT_DATE
END
The main points for the above stored procedure are:
- The @RETAIN_HISTORY_DAYS parameter has the number of days of history that you want to retain.
- Set the @MIN_DATE variable by subtracting 60 days from the current date.
- Set the @INT_DATE variable as an integer formatted as shown; the [run_date] column in the source table is formatted the same way and stored as an INT. In this case the source table is loaded from the msdb sysjobhistory table.
- Delete the rows that are older than the @INT_DATE.
To execute this stored procedure in an SSIS package, use the Execute SQL Task with the following query:
EXEC [dbo].[PURGE_SQL_AGENT_HISTORY] @RETAIN_HISTORY_DAYS = ?
The question mark is a placeholder for the value. Select the Parameter Mapping page on the Execute SQL Task Editor and fill in the values as shown below:

The Variable Name uses the SSIS package parameter RETAIN_HISTORY_DAYS. The value will be passed as the value for the @RETAIN_HISTORY_DAYS stored procedure parameter.
Deploy SSIS Project to the SSIS Catalog
In this section I will walk through the deployment of the SSIS project to the SSIS Catalog. When you deploy SSIS projects to the SSIS Catalog, the projects are stored in the SSISDB database. The SQL Server Management Studio (SSMS) Object Explorer uses the name Integration Services Catalogs for what I refer to as the SSIS Catalog.
Right-click the SSIS project in the Visual Studio Solution Explorer and select Deploy from the context menu as shown below:

The familiar step-by-step wizard interface will be displayed starting with the Introduction as shown below:

Click Next to display the Select Deployment Target dialog as shown below:

Accept the default value of SSIS in SQL Server and click Next to display the Select Destination dialog as shown below:

Perform the following steps to complete the dialog:
- Enter the Server name where you want to deploy the SSIS project. In my example I will enter localhost.
- Click Connect.
- Click Browse to select and/or create the deployment folder in the SSIS Catalog. To create a new folder, click the SSISDB node and New folder as shown below:

Enter the Name and Description and click OK. Click Next on the Select Destination dialog to advance to the Review dialog as shown below:
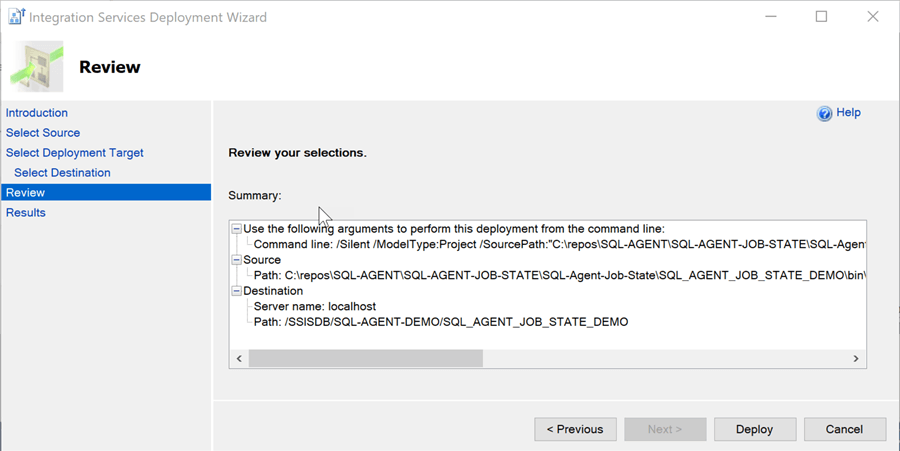
Click Deploy to deploy the SSIS project to the SSIS Catalog.
When the deployment completes, open SSMS, expand the Integration Services Catalogs, and navigate to the Project as shown below:

Right-click on the project and the following context menu options will be displayed:

The first option I want to call out is Versions which gives the deployment history as shown below:

I call this one out because one mistake I often make is when I’m running an SSIS package from a SQL Agent job and I find a problem, I make changes to the SSIS package and immediately test the changes without deploying the project to the SSIS Catalog. It’s a good idea to check the Project Versions to see when you last deployed so you are sure you are testing your latest changes.
One other option I want to mention is Reports. You can use it to get detailed execution information on SSIS packages while they are running as well as after they have completed.
Create an Environment in the SSIS Catalog
Once you have deployed an SSIS project to the SSIS Catalog, the next step is to create an Environment primarily for any Project parameters in the SSIS project. I have the following Project parameters in the sample SSIS project:

To create an Environment, navigate to the project folder in the SSIS Catalog, right-click Environments, and select Create Environment as shown below:

The Create Environment dialog will be display; fill it in as shown below:

I use a naming convention that includes the target environment (e.g. DEV, TEST, PROD) followed by the project folder name. Click OK to create the environment.
Right-click on the new Environment name and select Properties as shown below:

Click on Variables and fill in the dialog with the Values as shown below:

While the dialog uses “Value” you are entering the values for the Project parameters in this case.
The last step in setting up the Environment is to go back to the project in the SSIS Catalog, right-click on the Project name, and select Configure from the context menu as shown below:

The following dialog will be displayed:

Note that the project parameters do not have a value while the one package parameter does have a value. In the case of the package parameter, the value of 60 is specified in the SSIS package with the Required property set to False so it gets set automatically. To set the project parameters to the values in the Environment, click the button next to the Value text box and specify Use environment variable to use the Value from the Environment as shown below:

After manually mapping the Parameter values to the Environment variables, the following dialog will be shown:

Configure SQL Agent Job Step to Execute an SSIS Package
The last step is to show how to configure a SQL Agent job step to execute an SSIS package. I will use the SSIS package PURGE_SQL_AGENT_HISTORY as my example.
To create a SQL Agent job, right-click on Jobs in the SSMS Object Explorer and select New Job as shown below:

Specify a name for the job as shown below:

Select the Steps page, and the fill in the dialog as shown below:

The following are the main points for adding the job step:
- Select SQL Server Integration Services Package as the Type.
- Enter the Server name where the SSIS packages are deployed. I am using localhost since I am running SQL Server on my laptop.
- Select the SSIS package to run by clicking the button to the right of the package path, navigating to the package folder, and selecting the package.
To complete the configuration of the job step, click the Configuration tab. The following dialog will be displayed:

The following are the main points for the Configuration tab:
- The RETAIN_HISTORY_DAYS package parameter has been set to 60. This was the value specified in the SSIS package with the Required property set to False which allows the value to be set automatically. If the Required property was set to True, you would have to enter a value.
- The Project parameters do not have a value yet. You can manually set the values by clicking the button to the right of the red icon, but the preferred method is to set the values from the Environment.
Click the Environment checkbox and select the Environment from the dropdown list. You can create multiple environments but I only created one. Now the dialog will be displayed as shown below:

Note that the Project parameters are now configured to get their values from the Environment variables. If you click the Environment checkbox and the Project parameters do not automatically map to the Environment variables, you probably did not complete the step in the Create Environment in the SSIS Catalog section above where you add a reference to the Environment to the SSIS project and set each Project parameter to use an Environment variable. I know I have missed this step myself.
Sample Code
The sample code that I used in this tip came from my earlier tip How to Maintain State in a SQL Server Agent Job. I used the sample code in that tip as my starting point. I added the SSIS package used in this tip, Project and Package parameters, the steps to deploy the project, create the Environment, and create a SQL Agent job that executes an SSIS package. The link to the sample code is in the Next Steps section below.
Next Steps
- I think executing SSIS packages from SQL Agent job steps is a great way to implement processes.
- Deploying SSIS projects to the SSIS Catalog along with leveraging Project and Package parameters makes runtime configuration changes easy.
- Creating an SSIS Environment provides a nice container for persisting the Environment variable values.
- Take a look at the sample code EXECUTE-SSIS-PACKAGE-FROM-SQL-AGENT-SAMPLE-CODE and test in your environment. Refer to the DEMO_CODE_SETUP file for the details for setting up the sample code.
- Take a look at the many other interesting tips available in the SQL Server Agent and Integration Services categories.

Ray is a Principal Architect at IT Resource Partners focused on SQL Server and Business Intelligence. He is a Microsoft Certified Solutions Expert (MCSE) in Business Intelligence, a MSSQLTips.com BI Expert and Ambassador. He is also a co-author of the book: SharePoint 2010 Business Intelligence Unleashed.
- MSSQLTips Awards: Champion (100+ tips)