By: Diana Moldovan | Comments | Related: More > Import and Export
Problem
Automating a data import routine from Excel can be difficult. Unfortunately, sometimes you won't have a better source, such as a .csv file. In this tip, I will show you how to import the data from an Excel file when there is no Excel installation on your machine.
Solution
This is the second tip from a series about importing Excel files. In the first one, I explained how to import Excel data using the Excel COM objects. This tip will focus on importing an Excel file using Active X Data Objects and a PowerShell script. You can still manually import the file, but we will focus on the procedures you can schedule using SQL Server Agent or Windows Scheduler.
Import Excel Data into SQL Server with PowerShell and ADO
My working environment consists of:
- Windows Server 2012 R2 Standard virtual machine with SQL Server 2016 SP2-CU7 (13.0.5337.0) x64 default instance. My windows account is a member of the administrators of the machine. Because you'll need to install the Microsoft ACE OLEDB provider on your machine, it will be helpful if you have access to a local administrative account.
- There is no Excel installation on the virtual machine.
- PowerShell 5.1.18362.752
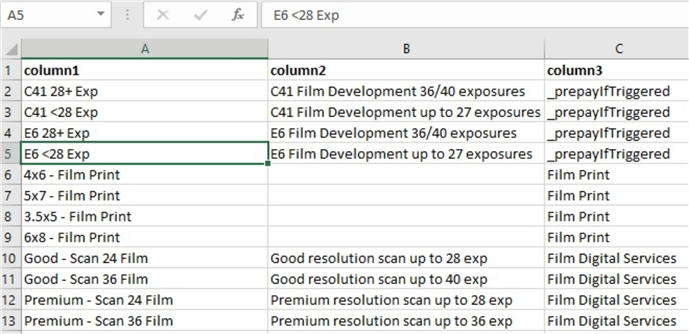
- An Excel file with string, numeric and datetime columns. My file looks like this:

Connecting to Excel with ActiveX Data Objects (ADO)
Similar to the preceding tip, this is a 2-step procedure. In the first step (see below), I export the Excel source file into a .csv file.
This method will not require you to install Excel on your machine. However, you will have to install either Microsoft.ACE.OLEDB.12.0 or Microsoft.ACE.OLEDB.16.0. I've written in detail about how to download and install these providers in my tip about reading an Excel File in SQL Server with OPENROWSET or OPENDATASOURCE. You will also find information about how to check if one of the providers is already installed on your machine. To be able to install any of the providers you will need access to a local admin account. You will also need the access to read/write the files.
The example below uses a simple Excel 2016 file (see the image above), i.e. a file which contains only "plain" data and no other form elements or hidden cells. I'll connect to the Excel file with an OleDB connection:
$Connection = New-Object System.Data.OleDb.OleDbConnection($ConnString)
If the ACE.OLEDB provider is not installed, $Connection.Open() will return an error message, i.e., for example, "The 'Microsoft.ACE.OLEDB.12.0' provider is not registered on the local machine."
Please check the connection string format. If the string is not properly formatted, you may encounter an error message, i.e. "Could not find installable ISAM". The connection string should look like
Provider=Microsoft.ACE.OLEDB.12.0;Data Source=<Excel file location on disk>;Extended Properties=Excel 12.0 Xml
Notice the query (SELECT * FROM [$SheetName]) that selects the data from the source sheet. Based on this query I build a $Reader that will transfer its contents to a .csv file through a System.IO.SreamWriter in a While Loop. Finally, I close the stream, the connection and the reader. The output will be a .csv file located at $OutFile.
$ErrorActionPreference = "Stop"

[string] $ExcelPath = <Excel file location on disk>
[string] $OutFile = <.csv file location on disk>
[string] $DataSource = "Data Source=$ExcelPath"
[string] $SheetName = "Sheet1$"
[string] $Provider = "Provider=Microsoft.ACE.OLEDB.12.0"
[string] $ExtendedProp = "Extended Properties=Excel 12.0 Xml"
[string] $ConnString = [string]::Join(";", $Provider,$DataSource,$ExtendedProp)
[string] $Query = "SELECT * FROM [$SheetName]"

try{
    $Stream = [System.IO.StreamWriter] $OutFile

    $Connection = New-Object System.Data.OleDb.OleDbConnection($ConnString)
    $SQLCommand = New-Object System.Data.OleDb.OleDbCommand($Query)
    $SQLCommand.Connection = $Connection
    $Connection.Open()
    $Reader = $SQLCommand.ExecuteReader()

    While ($Reader.Read()){
        [string] $Row = [string]::Join(",",$Reader[0].ToString(),$Reader[1].ToString(),$Reader[2].ToString())
        $Stream.WriteLine($Row)
    }

}
catch{
    Write-Host -ForegroundColor Magenta $Error[0].Exception
}
finally{
    $Stream.Close()
    $Connection.Close()
    $Reader.Close()
}
The second step of the procedure consists of bulk inserting the .csv file already obtained. I wrote in detail how to do this in my previous tip. Don't forget to create the target table before bulk inserting.
Next Steps
- You can schedule a PowerShell script either using the SQL Agent or using the Windows Task Scheduler.
- If you use SQL Agent, please be aware of the error logging issues.
About the author
 Diana Moldovan is a DBA and data centric applications developer with 6 years of experience covering SQL 2000, SQL 2005 and SQL 2008.
This author pledges the content of this article is based on professional experience and not AI generated.
View all my tips


