Problem
The beauty of 21st-century technology is the alternative provision to every technology on the market today. Reliance on a single platform of technology has been reduced to a minimum, with developers globally always producing better or similar alternatives to a particular technology. This can be seen in the cloud market today, where developers have a variety of options for developing their products—Azure, AWS, GCP, Heroku, OCI, and Huawei Cloud—the list is endless. We look at how to use Redpanda vs. Kafka in this article.
Solution
The advent of streaming technology is on the rise and multiple players are in the market today. This includes Confluence Kafka, being a major player in streaming technology for most developers. Having a streaming platform that delivers similar functionality is of high importance for all developers in today’s market, especially those in the Open-Source environment.
Project Architecture
As a senior data engineer in the United States, you work for one of the biggest metro organizations in New York City. You have been tasked to create a Streaming Platform that captures all necessary information about passengers as they board the train. The data is to be stored in a storage account and later visualized by the analytics team.

What is Redpanda?
Redpanda is a cutting-edge streaming data platform made for developers that streamlines the complexity of conventional streaming frameworks with its Kafka-compatible environment. Because of its lightweight and quick design, Redpanda can process and analyze data in real time for a wide range of applications. It is adaptable to various operational requirements because it supports both on-premises and cloud deployment.
Key Components of Redpanda
Kafka Compatibility. Redpanda’s complete compatibility with the Apache Kafka API enables customers to take advantage of pre-existing Kafka tools and libraries without having to change the code of their applications. The smooth integration into the Kafka environment is guaranteed by this compatibility.
Serverless Offering. The Redpanda Serverless model allows developers to quickly set up and scale their streaming applications without managing infrastructure. Pay-as-you-go in nature, it automatically adapts resources to workload demands, which is especially useful when managing variable data streams.
High Performance. Redpanda can process hundreds of terabytes of data per day since it is built for high throughput and low latency. Its special architecture improves performance and streamlines operations by doing away with the requirement for ZooKeeper.
Tiered Storage. By dividing hot (often accessed) and cold (infrequently accessed) storage, this feature helps users manage data effectively while maximizing both performance and cost.
Connectors and Integrations. Redpanda offers an expanding network of connectors that make it easier to integrate with different services and data sources. Support for databases and stream processing engines is part of this, allowing for extensive data pipelines.
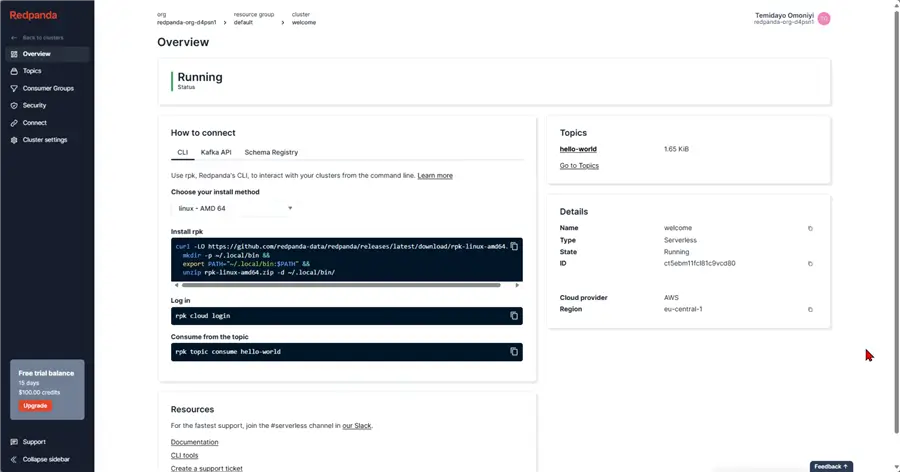
Creating a Free Tier Account
Open your browser and go to this URL: https://cloud.redpanda.com/. We will use a 15-day free tier for this project to see how everything works. For the production use case, you might need to purchase a more premium tier.
Provision Storage Account with PowerShell
Windows PowerShell
Windows PowerShell is a powerful automation and configuration management framework developed by Microsoft. Because it integrates a scripting language with a command-line shell, it is a flexible tool for developers, system administrators, and IT specialists.
Provision Storage Account
The PowerShell script below is used to create the necessary Azure Storage Account with the resource group.
The following steps should be followed to achieve this:
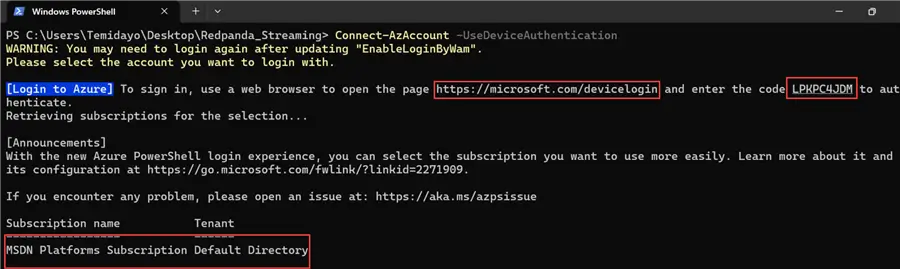
Step 1: Multi Factor Authentication (MFA) or Conditional Access Policies
Note: This is an important step in situations when MFA or conditional access policies are enforced. Use the UseDeviceAuthentication parameter for Connect-AzAccount.
Open your PowerShell CLI environment and write the script below:
Connect-AzAccount -UseDeviceAuthenticationYou will be expected to open the link provided below in the Command Prompt and then input the generated code to log in to your Azure Subscription and Tenant.
Step 2: Create a PowerShell Script to Create the Necessary Resources
Open your notepad (or any editor) and paste the PowerShell script blow. Ensure to save your file with the .ps1 extension.
# Login to Azure
Write-Output "Logging in to Azure..."
Connect-AzAccount

# Variables
$resourceGroupName = "redpanda-rg"  # Replace with resource group name
$location = "EastUS"                   # Replace with Azure region
$storageAccountName = "redpandastorage"  # Replace with a globally unique name for the storage account

# Create Resource Group
Write-Output "Creating resource group: $resourceGroupName in location: $location"
New-AzResourceGroup -Name $resourceGroupName -Location $location

# Create Storage Account
Write-Output "Creating storage account: $storageAccountName"
New-AzStorageAccount -ResourceGroupName $resourceGroupName `
                     -Name $storageAccountName `
                     -Location $location `
                     -SkuName Standard_LRS `
                     -Kind StorageV2 `
                     -EnableHierarchicalNamespace $true

Write-Output "Provisioning completed successfully!"
Script Breakdown
Login to Azure
Write-Output "Logging in to Azure..."
Connect-AzAccount- Purpose: This section initiates a login to Azure using the Connect-AzAccount cmdlet. This cmdlet prompts the user to authenticate, typically through a web interface, where they enter their credentials.
- Output: Login process has started message.
Set Variables
$resourceGroupName = "redpanda-rg"  # Replace with resource group name
$location = "EastUS"                   # Replace with Azure region
$storageAccountName = "redpandastorage" # Replace with a globally unique name for the storage account- Purpose: Three variables are defined in this section:
- $resourceGroupName: The resource group’s name that will be generated.
- $location: The Azure region in which the deployment of resources will take place.
- $storageAccountName: The storage account’s distinctive name, which needs to be globally distinct across Azure.
Create Resource Group
Write-Output "Creating resource group: $resourceGroupName in location: $location"
New-AzResourceGroup -Name $resourceGroupName -Location $location- Purpose: The goal of this section is to use the New-AzResourceGroup cmdlet to create a new resource group in Azure. Related resource management is contained within the resource group.
- Output: A notification that the creation of the resource group is underway.
Create Storage Account
Write-Output "Creating storage account: $storageAccountName"
New-AzStorageAccount -ResourceGroupName $resourceGroupName `
                     -Name $storageAccountName `
                     -Location $location `
                     -SkuName Standard_LRS `
                     -Kind StorageV2 `
-EnableHierarchicalNamespace $true- Purpose: The goal of this section is to use the New-AzStorageAccount cmdlet to create a new storage account within the designated resource group. Important parameters consist of:
- ResourceGroupName:The resource group to be used.
- Name: The storage account’s distinctive name.
- Location:The storage account’s region.
- SkuName: The storage account’s SKU (price tier); Standard_LRS denotes locally redundant storage.
- Kind StorageV2: A general-purpose V2 account. Specifies the type of storage account.
- EnableHierarchicalNamespace: Allows directory-like structures by enabling hierarchical namespace for Blob storage.
Step 3: Run PowerShell Script
After successfully creating the PowerShell script and saving it with the .ps1extension, run the script with the command below. This should take a couple of minutes to login to Azure and provision all necessary resources.
.\CreateAzureDataLakeWithLogin.ps1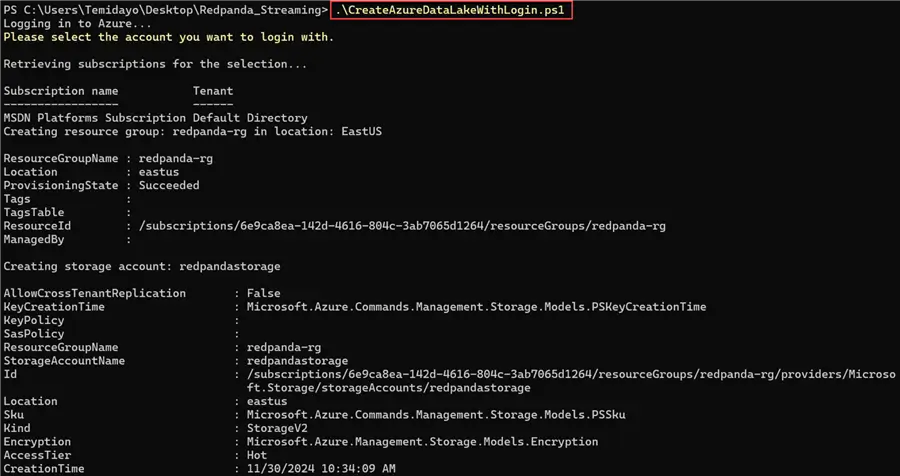
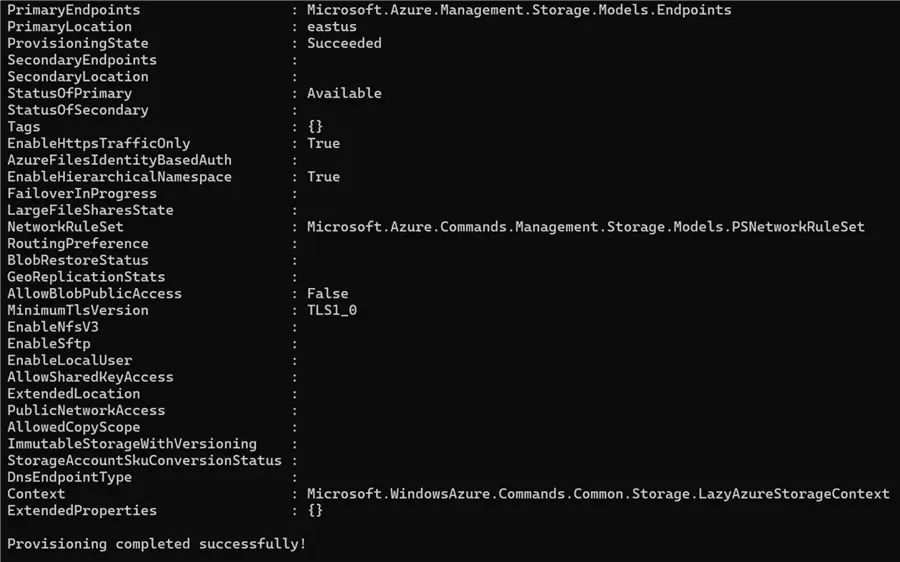
After the success message, login to your Azure Portal to confirm creation.

Prepare Docker-Compose.yml File
The resource provisioning is complete. Let’s start by creating a docker-compose file with the images needed for this project.
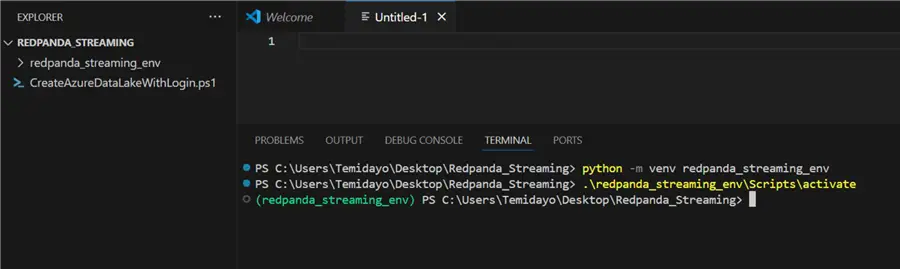
Before we get started, let’s create an isolated environment for all our Python projects.
Create Docker-Compose File
For this project, we need the following images: Kibana and ElasticSearch.
version: '3.8'
networks:
  elastic_network:
    driver: bridge

services:
  elasticsearch:
    image: docker.elastic.co/elasticsearch/elasticsearch:7.14.0
    environment:
      - discovery.type=single-node
      - ES_JAVA_OPTS=-Xms512m -Xmx512m
    ports:
      - "9200:9200"
      - "9300:9300"
    volumes:
      - elasticsearch-data:/usr/share/elasticsearch/data
    networks:
      - elastic_network

  kibana:
    image: docker.elastic.co/kibana/kibana:7.14.0
    environment:
      - ELASTICSEARCH_HOSTS=http://elasticsearch:9200
    ports:
      - "5601:5601"
    depends_on:
      - elasticsearch
    networks:
      - elastic_network

volumes:
  elasticsearch-data:
    driver: local
Docker-Compose.yml Breakdown
The services section defines two main services: Elasticsearch and Kibana.
Elasticsearch Service
elasticsearch:
  image: docker.elastic.co/elasticsearch/elasticsearch:7.14.0
  environment:
    - discovery.type=single-node
    - ES_JAVA_OPTS=-Xms512m -Xmx512m
  ports:
    - "9200:9200"
    - "9300:9300"
  volumes:
    - elasticsearch-data:/usr/share/elasticsearch/data
  networks:
- elastic_network- Image: Utilizes the official Elasticsearch image version 7.14.0.
- Variables in the Environment:
- discovery.type=single-node: Sets up Elasticsearch to run in a single-node configuration.
- ES_JAVA_OPTS: Optimizes memory use by setting Java heap size settings for Elasticsearch.
- Ports: Assigns the corresponding ports for the container to host ports 9200 (HTTP) and 9300 (transport).
- Volumes: To ensure data longevity, data is stored in a Docker volume called elasticsearch-data.
- Networks: Establishes a connection with the specified elastic_network.
Kibana
kibana:
  image: docker.elastic.co/kibana/kibana:7.14.0
  environment:
    - ELASTICSEARCH_HOSTS=http://elasticsearch:9200
  ports:
    - "5601:5601"
  depends_on:
    - elasticsearch
  networks:
- elastic_network- Image: Utilizes Kibana’s official picture version 7.14.0.
- Environment Variables:
- ELASTICSEARCH_HOSTS: The URL to connect to the Elasticsearch service.
- Ports:To access Kibana’s web interface, Maps host port 5601.
- Depends On: Makes sure Kibana doesn’t start before the Elasticsearch service does.
- Networks: Associated with elastic_network as well.
Create Producer
As we plan to build a metro streaming infrastructure, we first need to create a ticketing application that contains information about passengers with their necessary fields for capturing.
Required Libraries
Before getting started, let’s pip install all the necessary libraries. Create a requirements.txt file in the same directory as your project directory folder.
# Kafka and Streaming
confluent-kafka==2.3.0
requests==2.31.0

# Data Generation
Faker==24.1.0

# Environment Management
python-dotenv==1.0.0

# Async Processing
aiohttp==3.9.3

# Optional: For type hinting (already included in Python 3.9+)
typing==3.7.4.3

# Optional: For better async support
asyncio==3.4.3
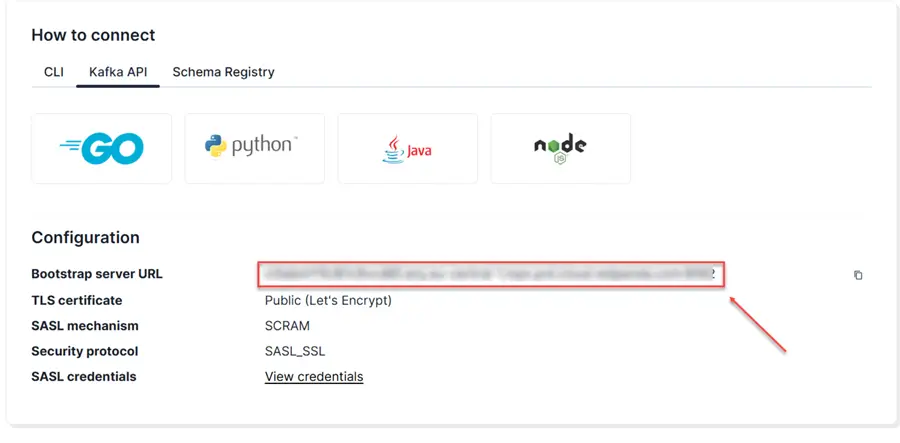
Get Bootstrap Server URL
The Bootstrap Server URL is crucial in establishing initial connections between the Redpanda clients (producers and consumers) with the Redpanda cluster.
In your Redpanda Overview, click on Kafka API and copy the bootstrap server URL.
Set Username and Password
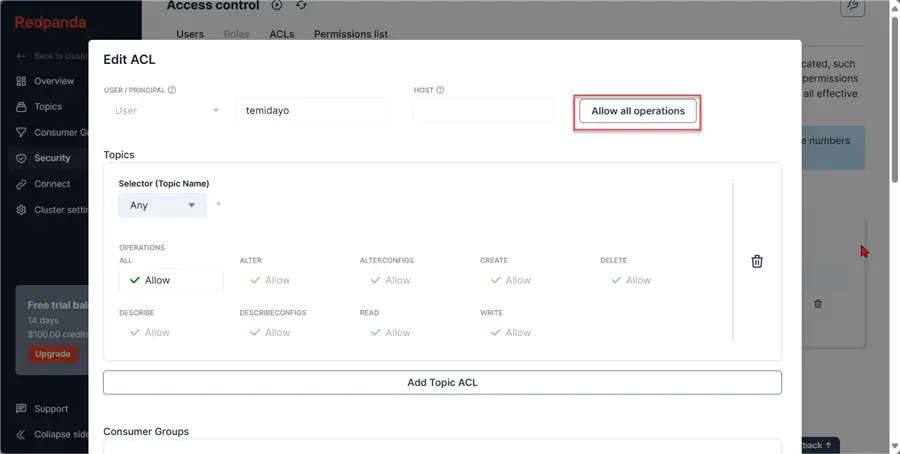
Click the Security tab, select Create a new user, and enter the necessary credentials. Click Create.
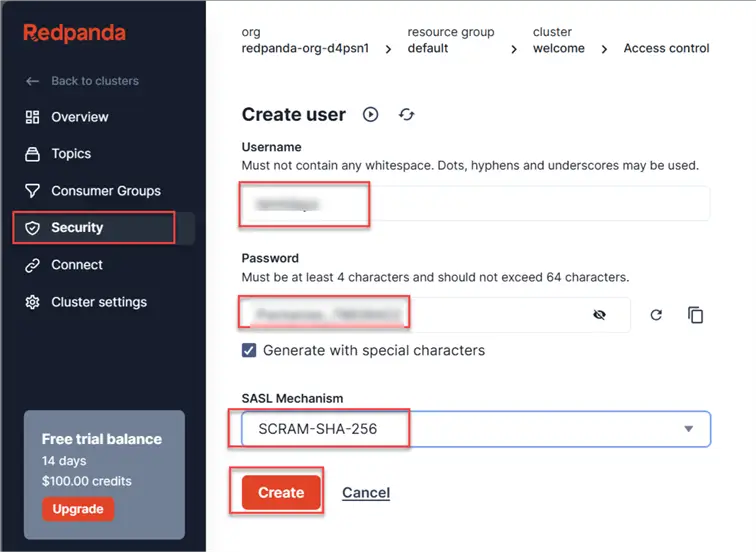
After creating the user, we need to set the Access Control List (ACLs). This is a critical component for managing authorization and securing access to resources within a Redpanda cluster.
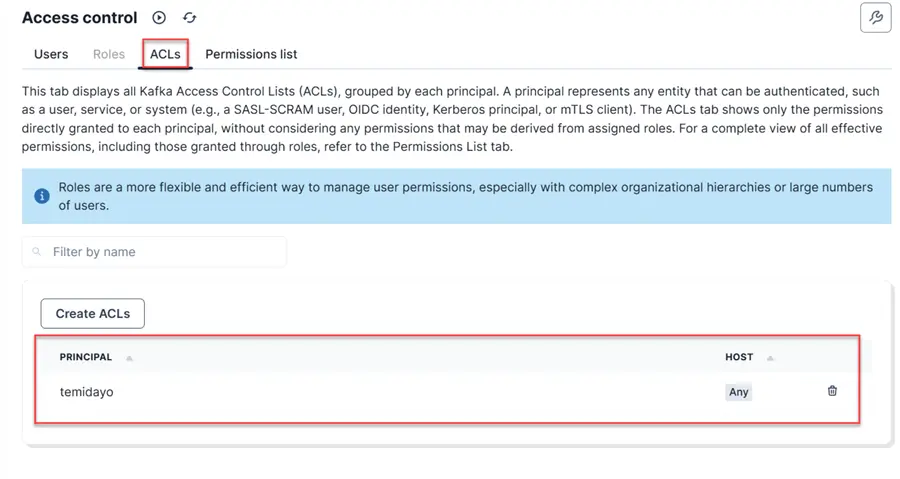
In a production scenario, you should not Allow all operations; for testing purposes, I allowed all for the project.
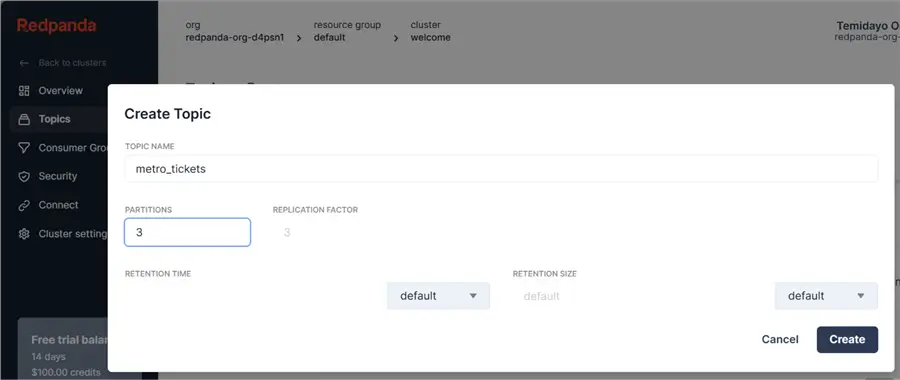
Create Topic
In the Topics tab, select Create new topic and enter the topic name and other necessary information. Click Create.
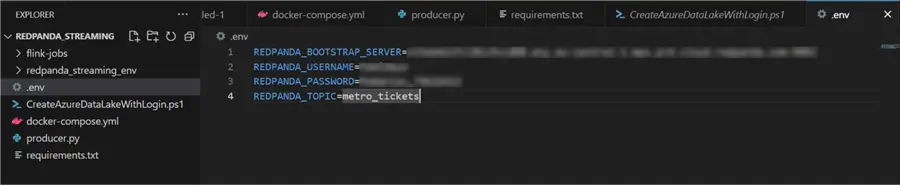
Set Environment Variable File
All necessary credentials will be kept in the .env file.
Producer Script
Create a new Python script in our project folder to serve as our producer for the Redpanda topic.
import asyncio
import json
import os
import signal
import sys
import time
from typing import Dict, Any

import aiohttp
from confluent_kafka import Producer
from dotenv import load_dotenv
from faker import Faker

# Load environment variables
load_dotenv()

# Initialize Faker
fake = Faker()

def create_kafka_producer() -> Producer:
    """
    Create and return a Kafka producer configuration.

    Returns:
        Producer: Configured Kafka producer
    """
    conf = {
        'bootstrap.servers': os.getenv('REDPANDA_BOOTSTRAP_SERVER'),
        'security.protocol': 'SASL_SSL',
        'sasl.mechanism': 'SCRAM-SHA-256',
        'sasl.username': os.getenv('REDPANDA_USERNAME'),
        'sasl.password': os.getenv('REDPANDA_PASSWORD')
    }
    return Producer(conf)

def generate_metro_ticket_data() -> Dict[str, Any]:
    """
    Generate comprehensive fake data for a metro ticket transaction.

    Returns:
        Dict[str, Any]: Generated metro ticket data
    """
    ticket_types = [
        'Single Ride', 'Day Pass', 'Weekly Pass',
        'Monthly Pass', 'Student Concession', 'Senior Citizen Pass'
    ]
    payment_methods = [
        'Credit Card', 'Debit Card', 'Mobile Wallet',
        'Cash', 'Apple Pay', 'Google Pay'
    ]
    stations = [
        'Central Station', 'North Terminal', 'South Terminal',
        'East Hub', 'West Gate', 'University Campus Station'
    ]

    return {
        'transaction_id': fake.uuid4(),
        'timestamp': fake.date_time_this_year().isoformat(),
        'passenger': {
            'id': fake.uuid4(),
            'name': fake.name(),
            'age': fake.random_int(min=12, max=85),
            'passenger_type': fake.random_element(elements=('Adult', 'Child', 'Senior', 'Student'))
        },
        'ticket': {
            'ticket_id': fake.uuid4(),
            'type': fake.random_element(elements=ticket_types),
            'price': round(fake.random.uniform(2.50, 75.00), 2)
        },
        'journey': {
            'origin_station': fake.random_element(elements=stations),
            'destination_station': fake.random_element(elements=stations),
            'line': fake.random_element(elements=('Red', 'Blue', 'Green', 'Yellow'))
        },
        'payment': {
            'method': fake.random_element(elements=payment_methods),
            'amount': round(fake.random.uniform(2.50, 75.00), 2),
            'status': fake.random_element(elements=('Successful', 'Pending', 'Failed'))
        },
        'additional_services': {
            'luggage_count': fake.random_int(min=0, max=3),
            'bike_allowed': fake.boolean(),
            'accessible_services_used': fake.boolean()
        }
    }

def delivery_report(err, msg):
    """
    Callback function for message delivery reports.

    Args:
        err: Error message if delivery fails
        msg: Delivered message metadata
    """
    if err is not None:
        print(f"Message delivery failed: {err}")
    else:
        print(f"Message delivered to {msg.topic()} [{msg.partition()}] at offset {msg.offset()}")

async def produce_metro_ticket_data(producer: Producer, topic: str):
    """
    Asynchronously produce metro ticket data to Redpanda topic.

    Args:
        producer (Producer): Kafka producer
        topic (str): Redpanda topic name
    """
    try:
        # Generate and serialize ticket data
        ticket_data = generate_metro_ticket_data()
        serialized_data = json.dumps(ticket_data, default=str)

        # Produce message to topic
        producer.produce(
            topic,
            serialized_data,
            callback=delivery_report
        )
        producer.poll(0)

    except Exception as e:
        print(f"Error producing message: {e}")

async def continuous_data_generation(producer: Producer, topic: str, duration: int = 15, pause: int = 5):
    """
    Continuously generate and produce metro ticket data.

    Args:
        producer (Producer): Kafka producer
        topic (str): Redpanda topic name
        duration (int): Duration of data generation
        pause (int): Pause between generation cycles
    """
    try:
        while True:
            start_time = time.time()
            print("Starting metro ticket data generation...")

            while time.time() - start_time < duration:
                await produce_metro_ticket_data(producer, topic)
                await asyncio.sleep(1)  # Small delay between messages

            print(f"Pausing for {pause} seconds...")
            await asyncio.sleep(pause)

    except asyncio.CancelledError:
        print("Data generation stopped.")

def handle_termination(producer: Producer):
    """
    Handle graceful termination of the producer.

    Args:
        producer (Producer): Kafka producer to flush
    """
    print("\nTermination signal received. Flushing producer...")
    producer.flush()
    print("Producer flushed. Exiting.")
    sys.exit(0)

async def main():
    """
    Main async function to set up and run metro ticket data generation.
    """
    # Create Kafka producer
    producer = create_kafka_producer()

    # Get topic from environment
    topic = os.getenv('REDPANDA_TOPIC')

    # Set up termination handling
    def sigint_handler(signum, frame):
        handle_termination(producer)

    signal.signal(signal.SIGINT, sigint_handler)

    print("Metro Ticket Data Generation Started. Press Ctrl+C to stop.")

    try:
        await continuous_data_generation(producer, topic)
    except Exception as e:
        print(f"An error occurred: {e}")
    finally:
        producer.flush()

if __name__ == "__main__":
    asyncio.run(main())
Run the producer script with the run command below. You will notice from the terminal that the event is being produced and sent to the Redpanda topic.
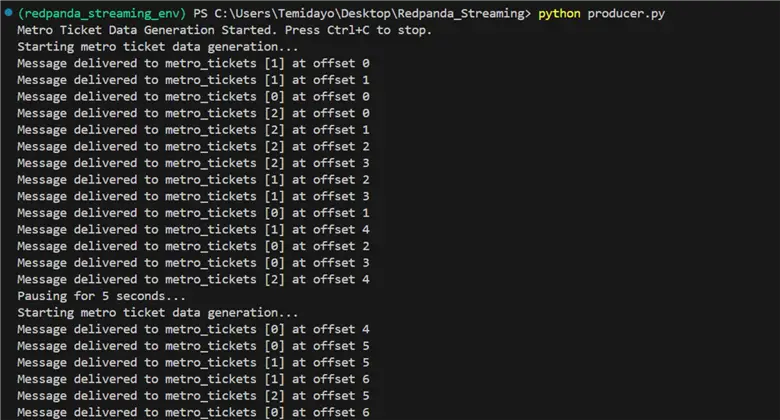
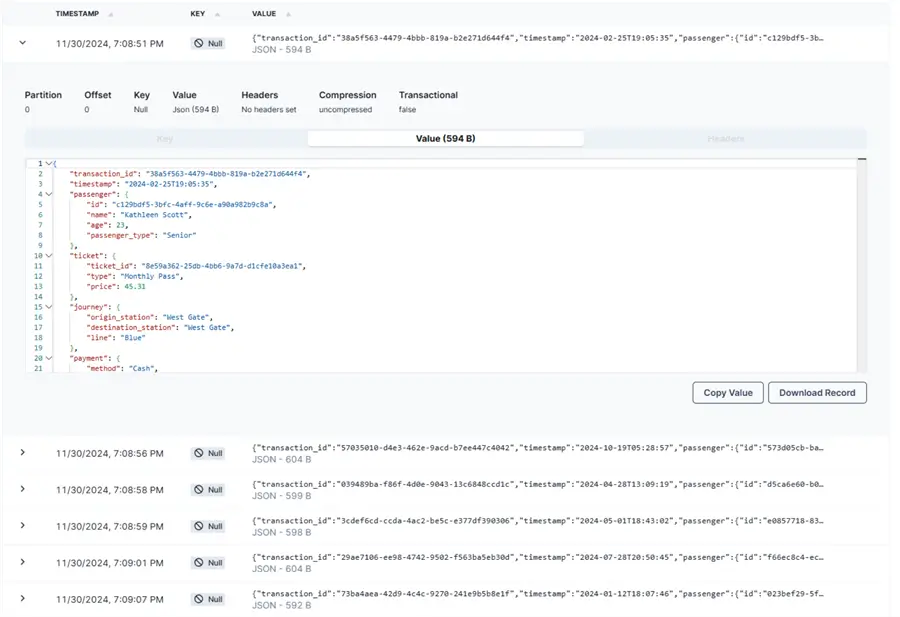
In your Redpanda terminal, you will notice the event is being sent to the Redpanda topic and information is being stored.
Create Consumer for ElasticSearch
Create ElasticSearch Index
In the ElasticSearch Index, there are logical namespaces that are used in storing information. Consider it more scalable and flexible than a database table.
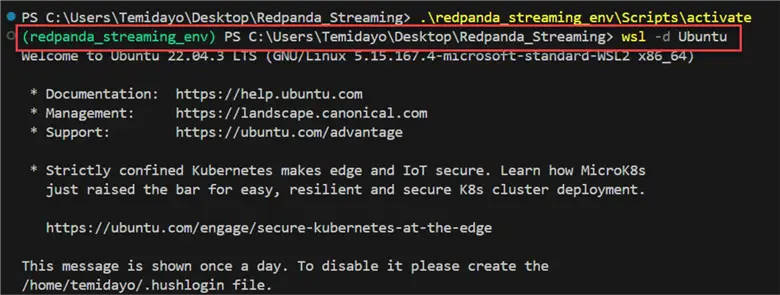
In your VSCode terminal, write the line of code below to enter the Ubuntu environment.

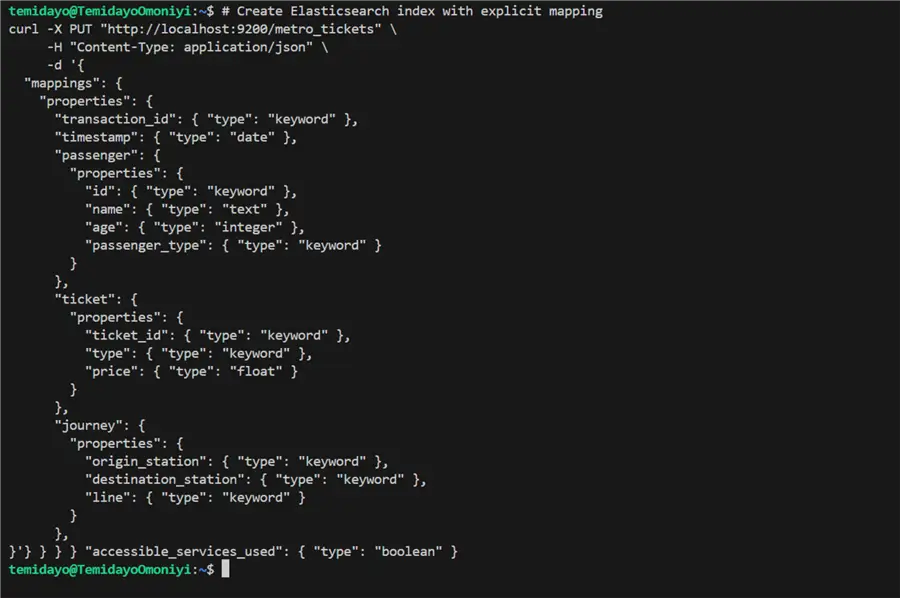
# Create Elasticsearch index with explicit mapping
curl -X PUT "http://localhost:9200/metro_tickets" \
     -H "Content-Type: application/json" \
     -d '{
  "mappings": {
    "properties": {
      "transaction_id": { "type": "keyword" },
      "timestamp": { "type": "date" },
      "passenger": {
        "properties": {
          "id": { "type": "keyword" },
          "name": { "type": "text" },
          "age": { "type": "integer" },
          "passenger_type": { "type": "keyword" }
        }
      },
      "ticket": {
        "properties": {
          "ticket_id": { "type": "keyword" },
          "type": { "type": "keyword" },
          "price": { "type": "float" }
        }
      },
      "journey": {
        "properties": {
          "origin_station": { "type": "keyword" },
          "destination_station": { "type": "keyword" },
          "line": { "type": "keyword" }
        }
      },
      "payment": {
        "properties": {
          "method": { "type": "keyword" },
          "amount": { "type": "float" },
          "status": { "type": "keyword" }
        }
      },
      "additional_services": {
        "properties": {
          "luggage_count": { "type": "integer" },
          "bike_allowed": { "type": "boolean" },
          "accessible_services_used": { "type": "boolean" }
        }
      }
    }
  }
}'
To test if the index was created as expected, type this line of code below.
curl -X GET -x "" "localhost:9200/metro_tickets?pretty"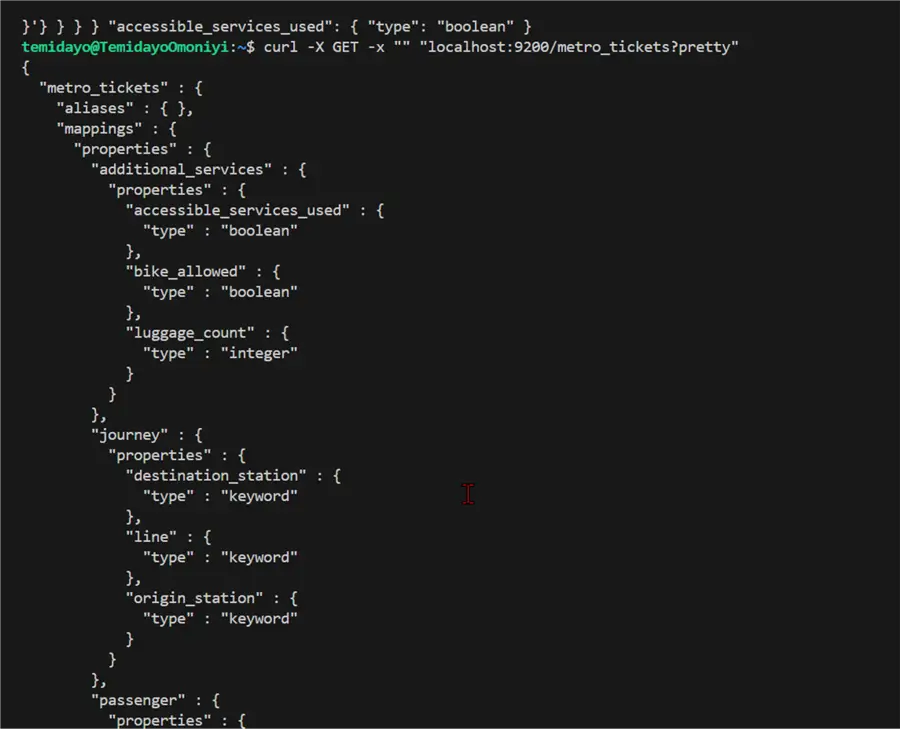
Python Consumer Script – ElasticSearch Index
After successfully setting up all the necessary parameters, let’s create a Python script to consume data from the Redpanda topic and insert into ElasticSearch Index.
import json
import logging
import os
from datetime import datetime

from confluent_kafka import Consumer, KafkaError
from elasticsearch import Elasticsearch
from dotenv import load_dotenv

# Configure logging
logging.basicConfig(
    level=logging.INFO,
    format='%(asctime)s - %(name)s - %(levelname)s - %(message)s'
)
logger = logging.getLogger(__name__)

# Load environment variables
load_dotenv()

class RedpandaElasticsearchConsumer:
    def __init__(self):
        # Redpanda Consumer Configuration
        self.consumer_config = {
            'bootstrap.servers': os.getenv('REDPANDA_BOOTSTRAP_SERVER'),
            'security.protocol': "SASL_SSL",
            'sasl.mechanism': "SCRAM-SHA-256",
            'sasl.username': os.getenv('REDPANDA_USERNAME'),
            'sasl.password': os.getenv('REDPANDA_PASSWORD'),
            'group.id': 'metro-tickets-consumer-group',
            'auto.offset.reset': 'earliest'
        }

        # Elasticsearch Configuration
        self.es_host = os.getenv('ELASTICSEARCH_HOST', 'http://localhost:9200')
        self.es_index = os.getenv('ELASTICSEARCH_INDEX', 'metro_tickets')

        # Initialize Kafka Consumer
        try:
            self.consumer = Consumer(self.consumer_config)
            self.consumer.subscribe([os.getenv('REDPANDA_TOPIC')])
            logger.info(f"Subscribed to topic: {os.getenv('REDPANDA_TOPIC')}")
        except Exception as e:
            logger.error(f"Failed to create Kafka consumer: {e}")
            raise

        # Initialize Elasticsearch Client
        try:
            self.es_client = Elasticsearch(
                hosts=[self.es_host],
                verify_certs=True  # Add SSL verification
            )
            logger.info("Elasticsearch client created successfully")
        except Exception as e:
            logger.error(f"Failed to create Elasticsearch client: {e}")
            raise

    def validate_message(self, message):
        """
        Validate the incoming message structure against the expected schema.
        This method can be expanded to include more detailed validation.
        """
        required_fields = [
            'passenger',
            'journey',
            'ticket',
            'payment',
            'timestamp'
        ]

        for field in required_fields:
            if field not in message:
                logger.warning(f"Missing required field: {field}")
                return False
        return True

    def process_message(self, message):
        """
        Process and transform the message to match Elasticsearch index structure.
        Includes type conversion and default value handling.
        """
        try:
            # Ensure timestamp is in correct format
            if isinstance(message.get('timestamp'), str):
                try:
                    datetime.fromisoformat(message['timestamp'])
                except ValueError:
                    message['timestamp'] = datetime.now().isoformat()

            # Add additional services with faults if not present
            if 'additional_services' not in message:
                message['additional_services'] = {
                    'accessible_services_used': False,
                    'bike_allowed': False,
                    'luggage_count': 0
                }

            return message
        except Exception as e:
            logger.error(f"Error processing message: {e}")
            return None

    def index_document(self, doc):
        """
        Index a document into Elasticsearch with error handling.
        """
        try:
            response = self.es_client.index(
                index=self.es_index,
                document=doc
            )
            logger.info(f"Indexed document with ID: {response['_id']}")
            return response
        except Exception as e:
            logger.error(f"Elasticsearch indexing error: {e}")
            return None

    def consume(self):
        """
        Main consumption loop to poll messages and process them.
        """
        try:
            logger.info("Starting Redpanda message consumption...")
            while True:
                msg = self.consumer.poll(1.0)

                if msg is None:
                    continue

                if msg.error():
                    if msg.error().code() == KafkaError._PARTITION_EOF:
                        logger.info('Reached end of partition')
                    else:
                        logger.error(f'Kafka error: {msg.error()}')
                    continue

                # Decode and parse message
                try:
                    message_data = json.loads(msg.value().decode('utf-8'))
                    logger.info(f"Received message: {message_data}")

                    # Validate message
                    if not self.validate_message(message_data):
                        logger.warning("Message validation failed")
                        continue

                    # Process message
                    processed_message = self.process_message(message_data)
                    if processed_message is None:
                        continue

                    # Index document
                    self.index_document(processed_message)

                except json.JSONDecodeError:
                    logger.error("Failed to decode JSON message")
                except Exception as e:
                    logger.error(f"Unexpected error processing message: {e}")

        except KeyboardInterrupt:
            logger.info("Consumer stopped by user")
        except Exception as e:
            logger.error(f"Unexpected error in consume method: {e}")
        finally:
            self.consumer.close()
            logger.info("Kafka consumer closed")

def main():
    consumer = RedpandaElasticsearchConsumer()
    consumer.consume()

if __name__ == "__main__":
    main()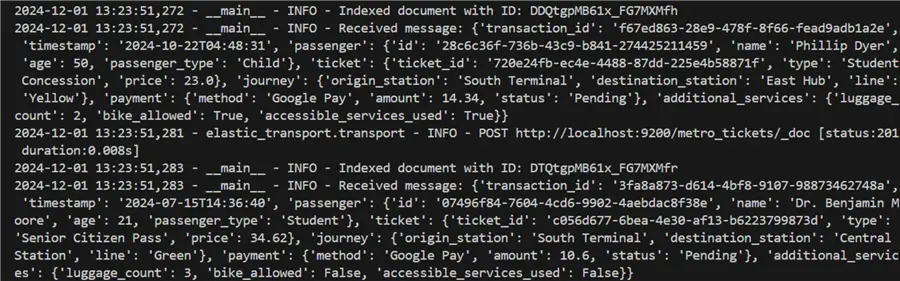
With the Consumer script working as expected, let’s visualize the data using ElasticSearch.
Visualize Consumed Data in ElasticSearch and Kibana
To see the consumed data, open your browser and go to the localhost site: http://localhost:5601/.
Total Count of Data in Index
In your dev_tools console, write the command below to get the total number of records in the ElasticSerach index.
GET /metro_tickets/_count?pretty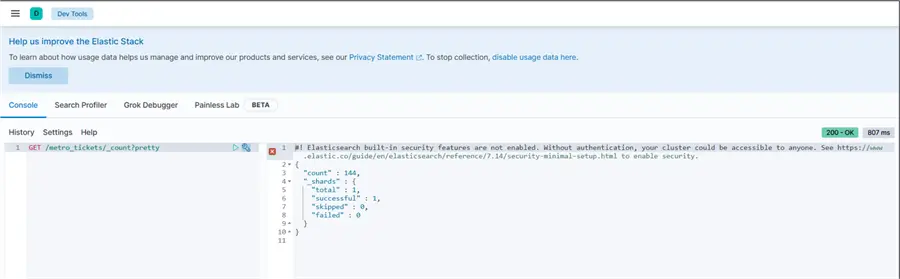
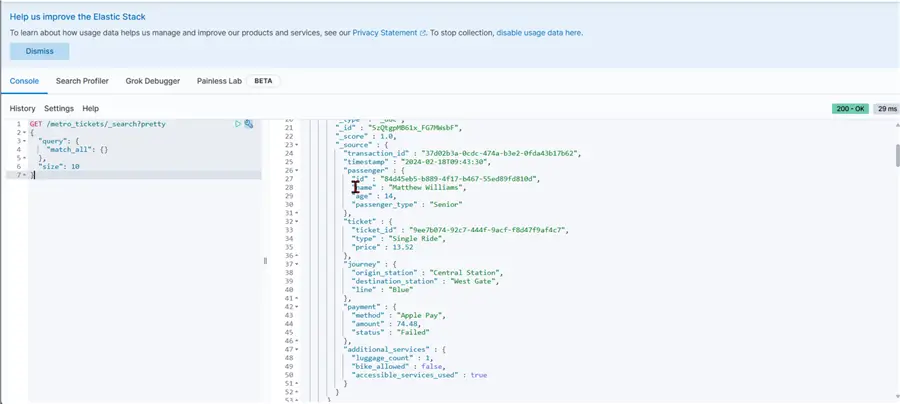
Top 10 Records
Write this script below to get the top 10 records from the Index.
GET /metro_tickets/_search?pretty
{
  "query": {
    "match_all": {}
  },
  "size": 10
}
Discover Tab
The Discover tab in ElasticSearch is a user-friendly interface within the Kibana platform that allows you to Explore Data, Visualize Data, and perform Time-based Analysis.
If you are performing this for the first time, in the Discover tab, you will be prompted to create an Index Pattern.
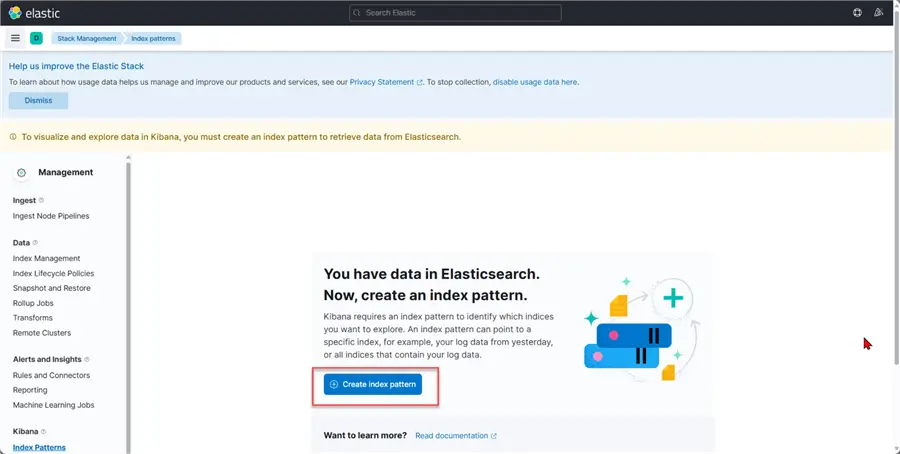
Provide a pattern that can easily be understood by another user.
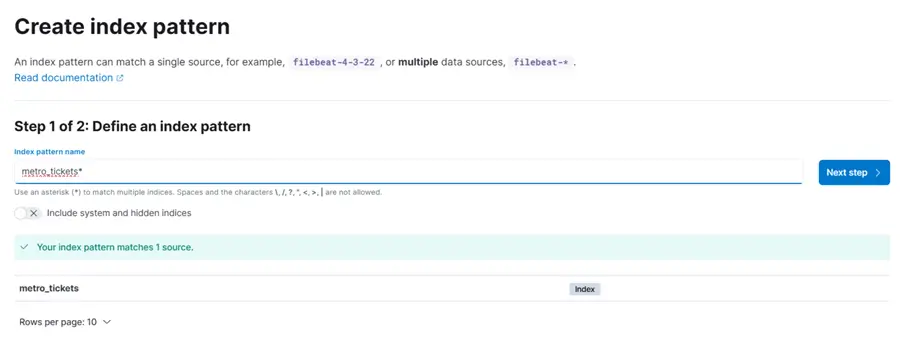
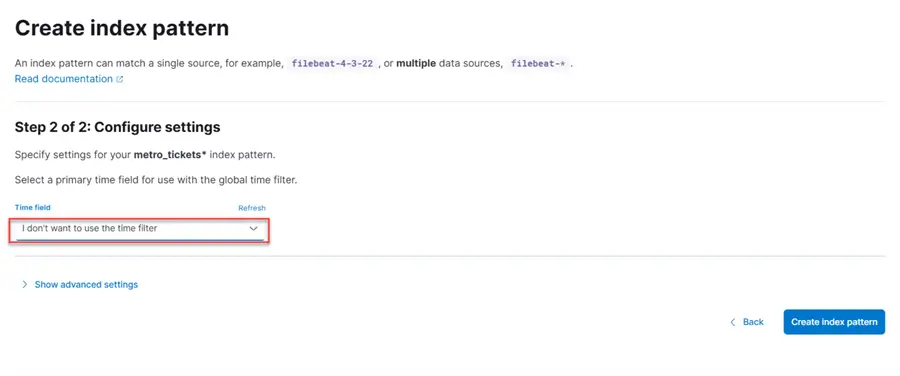
In the Configuration settings, select “I don’t want to use the time filter,”then click Create index pattern.
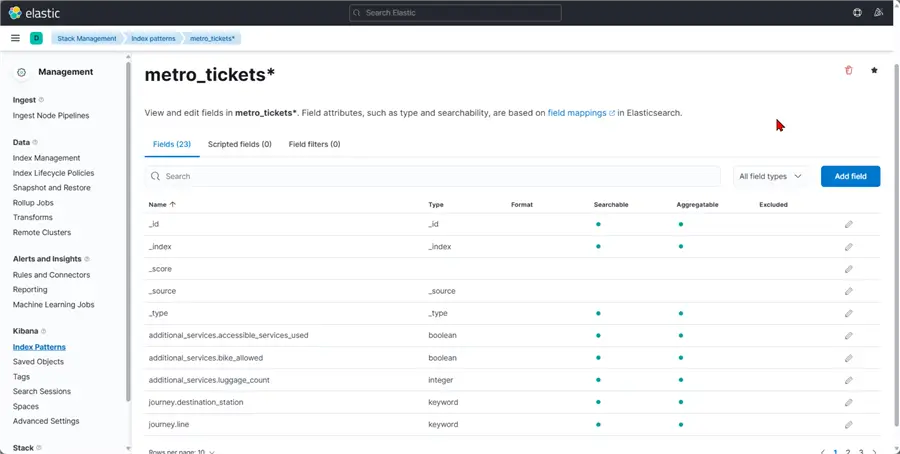
After creating the Index Pattern, you should get a window like this:
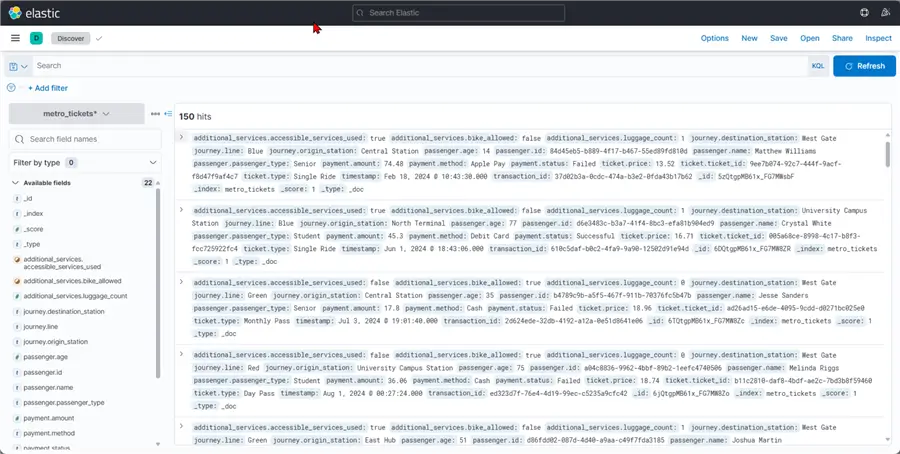
Now in the Discover tab, you will see all the data in your ElasticSearch Index.
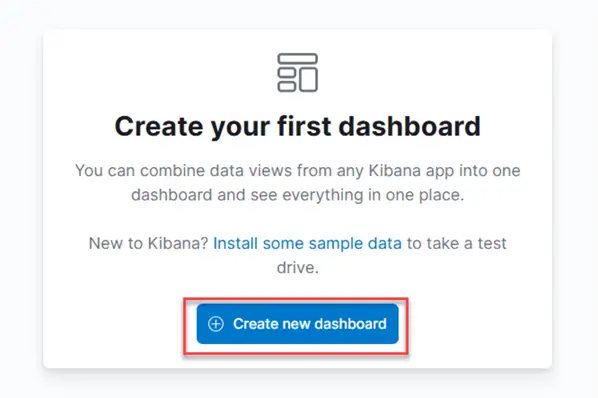
Dashboard
To create a dashboard, click on the Dashboard tab, and a new window will appear. Click on Create a new dashboard.
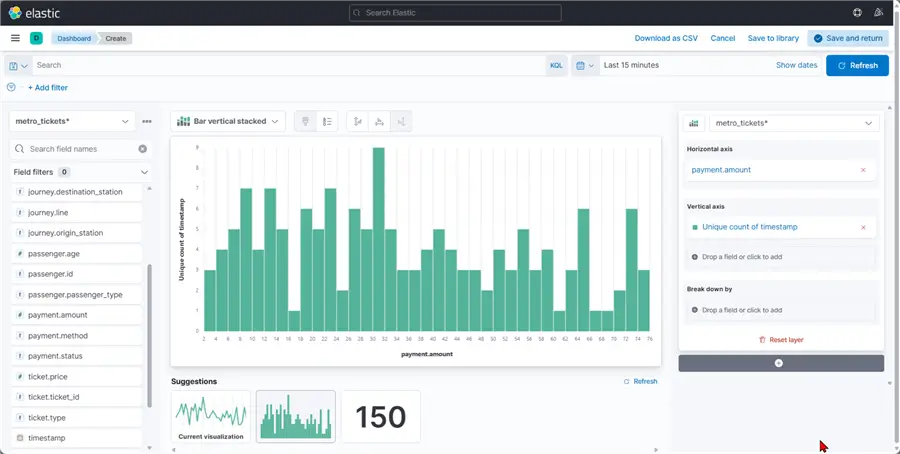
In the next window, you are allowed to add each field of the visual you want to create.
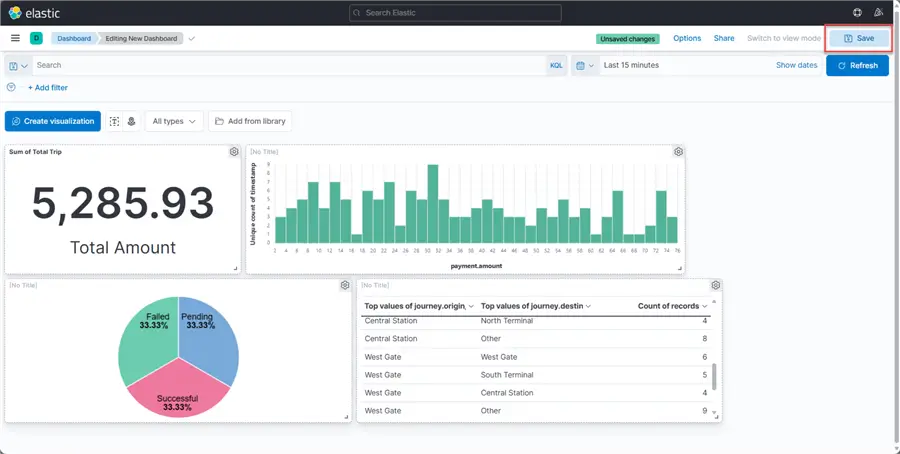
Click the Save icon at the top right to save the dashboard.
Create Consumer for ADLS
For data storage, we need to also consume the data from Redpanda Topic and save the file as a CSV in our Azure Data Lake Gen 2 we created earlier using PowerShell.
Generate SAS Token
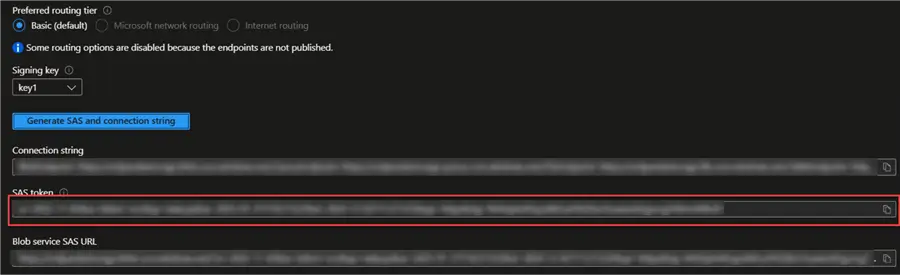
The Shared Access Signature (SAS) token is a URI that provides limited access to Azure Storage resources without disclosing your account key. It gives customers temporary, defined-permission access to resources in your storage account.
In your Azure Portal, open the Azure storage account created, then select Shared access signature. Select the allowed services and the start and end date.
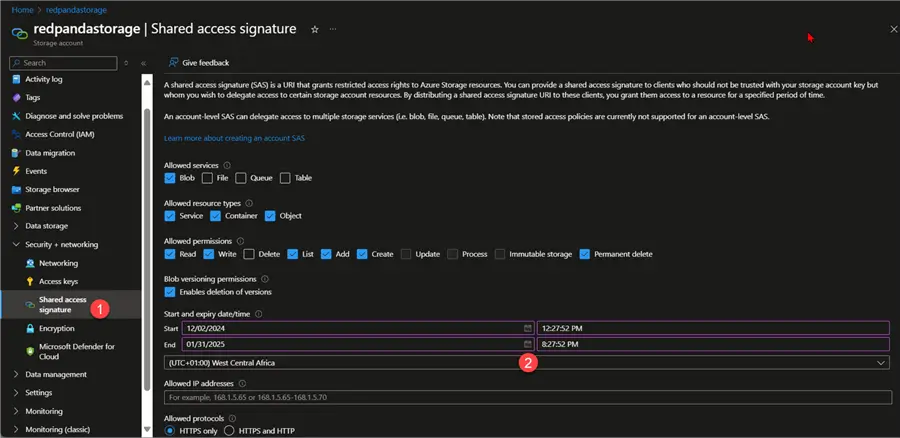
Click on Generate SAS and connection string. We need the SAS token from the list below.
Create Python Producer Script for ADLS
Let’s create a Python consumer script that takes the data from Redpanda topic, deserializes the data, and converts it to a CSV file. We will be consuming the data in a batch of 100 records/rows for each file in the Redpanda topic.
import json
import csv
import logging
import os
import signal
import sys
from datetime import datetime
import uuid
import threading

from confluent_kafka import Consumer, KafkaError
from dotenv import load_dotenv
from azure.storage.filedatalake import DataLakeServiceClient
from azure.core.exceptions import ResourceExistsError

# Configure logging
logging.basicConfig(
    level=logging.INFO,
    format='%(asctime)s - %(name)s - %(levelname)s - %(message)s'
)
logger = logging.getLogger(__name__)

# Load environment variables
load_dotenv()

class GracefulKiller:
    """
    A class to handle graceful shutdown of the application
    """
    def __init__(self):
        self.kill_now = False
        signal.signal(signal.SIGINT, self.exit_gracefully)
        signal.signal(signal.SIGTERM, self.exit_gracefully)

    def exit_gracefully(self, signum, frame):
        logger.info(f"Received signal {signum}. Preparing for graceful shutdown...")
        self.kill_now = True

class RedpandaToADLSConsumer:
    def __init__(self):
        # Graceful shutdown handler
        self.killer = GracefulKiller()

        # Synchronization primitive for thread-safe shutdown
        self.shutdown_lock = threading.Lock()
        self.is_shutting_down = False

        # Redpanda Consumer Configuration
        self.consumer_config = {
            'bootstrap.servers': os.getenv('REDPANDA_BOOTSTRAP_SERVER'),
            'security.protocol': "SASL_SSL",
            'sasl.mechanism': "SCRAM-SHA-256",
            'sasl.username': os.getenv('REDPANDA_USERNAME'),
            'sasl.password': os.getenv('REDPANDA_PASSWORD'),
            'group.id': 'metro-tickets-csv-consumer-group',
            'auto.offset.reset': 'earliest'
        }

        # Azure Data Lake Storage Configuration
        self.storage_account_name = os.getenv('AZURE_STORAGE_ACCOUNT_NAME')
        self.container_name = os.getenv('AZURE_CONTAINER_NAME')
        self.sas_token = os.getenv('AZURE_SAS_TOKEN')
        self.csv_folder = 'metro_csv'

        # Batch configuration
        self.batch_size = int(os.getenv('BATCH_SIZE', 100))
        self.current_batch = []

        # Initialize Kafka Consumer
        try:
            self.consumer = Consumer(self.consumer_config)
            self.consumer.subscribe([os.getenv('REDPANDA_TOPIC')])
            logger.info(f"Subscribed to topic: {os.getenv('REDPANDA_TOPIC')}")
        except Exception as e:
            logger.error(f"Failed to create Kafka consumer: {e}")
            raise

        # Initialize Azure Data Lake Client
        try:
            self.service_client = DataLakeServiceClient(
                account_url=f"https://{self.storage_account_name}.dfs.core.windows.net",
                credential=self.sas_token
            )
            self.file_system_client = self.service_client.get_file_system_client(self.container_name)
            logger.info("Azure Data Lake Storage client created successfully")
        except Exception as e:
            logger.error(f"Failed to create Azure Data Lake Storage client: {e}")
            raise

    def validate_message(self, message):
        """
        Validate the incoming message structure.
        """
        required_fields = [
            'passenger',
            'journey',
            'ticket',
            'payment',
            'timestamp'
        ]

        return all(field in message for field in required_fields)

    def flatten_message(self, message):
        """
        Flatten the nested message structure for CSV export.
        """
        try:
            flattened = {
                # Passenger details
                'passenger_id': message['passenger'].get('id', ''),
                'passenger_name': message['passenger'].get('name', ''),
                'passenger_type': message['passenger'].get('passenger_type', ''),
                'passenger_age': message['passenger'].get('age', ''),

                # Journey details
                'origin_station': message['journey'].get('origin_station', ''),
                'destination_station': message['journey'].get('destination_station', ''),
                'line': message['journey'].get('line', ''),

                # Ticket details
                'ticket_id': message['ticket'].get('ticket_id', ''),
                'ticket_type': message['ticket'].get('type', ''),
                'ticket_price': message['ticket'].get('price', ''),

                # Payment details
                'payment_amount': message['payment'].get('amount', ''),
                'payment_method': message['payment'].get('method', ''),
                'payment_status': message['payment'].get('status', ''),

                # Additional services
                'accessible_services_used': message.get('additional_services', {}).get('accessible_services_used', False),
                'bike_allowed': message.get('additional_services', {}).get('bike_allowed', False),
                'luggage_count': message.get('additional_services', {}).get('luggage_count', 0),

                # Timestamp
                'timestamp': message.get('timestamp', datetime.now().isoformat())
            }
            return flattened
        except Exception as e:
            logger.error(f"Error flattening message: {e}")
            return None

    def write_batch_to_csv(self):
        """
        Write the current batch to a CSV file in Azure Data Lake Storage.
        """
        if not self.current_batch:
            return

        try:
            # Generate unique filename with timestamp
            timestamp = datetime.now().strftime("%Y%m%d_%H%M%S")
            filename = f"metro_{timestamp}_{uuid.uuid4().hex[:8]}.csv"
            file_path = f"{self.csv_folder}/{filename}"

            # Create file client
            file_client = self.file_system_client.get_file_client(file_path)

            # Prepare CSV content
            output = []
            headers = self.current_batch[0].keys()
            output.append(','.join(headers))

            for row in self.current_batch:
                output.append(','.join(str(row.get(h, '')) for h in headers))

            # Upload CSV content
            file_content = '\n'.join(output).encode('utf-8')
            file_client.upload_data(file_content, overwrite=True)

            logger.info(f"CSV file uploaded: {file_path}")

            # Reset batch
            self.current_batch = []

        except Exception as e:
            logger.error(f"Error writing batch to CSV: {e}")

    def shutdown(self):
        """
        Perform a thread-safe, graceful shutdown of the consumer.
        """
        with self.shutdown_lock:
            # Prevent multiple shutdown attempts
            if self.is_shutting_down:
                return

            self.is_shutting_down = True

            logger.info("Initiating graceful shutdown...")

            # Write any remaining batch
            if self.current_batch:
                logger.info("Writing remaining batch before shutdown...")
                self.write_batch_to_csv()

            # Close Kafka consumer
            try:
                if self.consumer:
                    self.consumer.close()
                    logger.info("Kafka consumer closed successfully")
            except Exception as e:
                logger.error(f"Error closing Kafka consumer: {e}")

    def consume(self):
        """
        Main consumption loop to poll messages and process them.
        """
        try:
            logger.info("Starting Redpanda message consumption...")
            while not self.killer.kill_now:
                # Short timeout to allow checking for shutdown signal
                msg = self.consumer.poll(1.0)

                if msg is None:
                    # If no messages and we have a partial batch, write it
                    if self.current_batch:
                        self.write_batch_to_csv()
                    continue

                # Check for shutdown signal after each message
                if self.killer.kill_now:
                    break

                if msg.error():
                    if msg.error().code() == KafkaError._PARTITION_EOF:
                        logger.info('Reached end of partition')
                    else:
                        logger.error(f'Kafka error: {msg.error()}')
                    continue

                # Decode and process message
                try:
                    message_data = json.loads(msg.value().decode('utf-8'))

                    # Validate message
                    if not self.validate_message(message_data):
                        logger.warning("Message validation failed")
                        continue

                    # Flatten message
                    flattened_message = self.flatten_message(message_data)
                    if flattened_message is None:
                        continue

                    # Add to batch
                    self.current_batch.append(flattened_message)

                    # Write batch if size reached
                    if len(self.current_batch) >= self.batch_size:
                        self.write_batch_to_csv()

                except json.JSONDecodeError:
                    logger.error("Failed to decode JSON message")
                except Exception as e:
                    logger.error(f"Unexpected error processing message: {e}")

        except Exception as e:
            logger.error(f"Unexpected error in consume method: {e}")
        finally:
            # Ensure shutdown is called
            self.shutdown()
            logger.info("Consumer process completed")

def main():
    consumer = RedpandaToADLSConsumer()

    try:
        consumer.consume()
    except Exception as e:
        logger.error(f"Unhandled exception: {e}")
    finally:
        logger.info("Application exit")
        sys.exit(0)

if __name__ == "__main__":
    main()
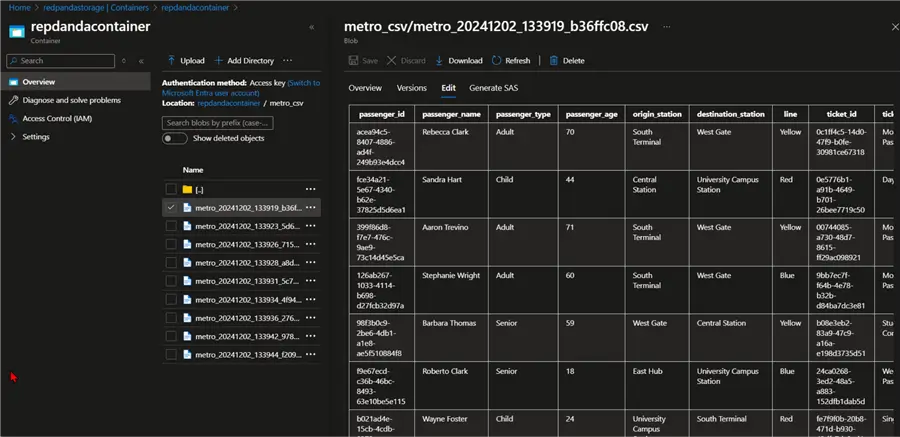
Confirm data load in the Azure Data Lake Gen 2 account. You will notice the CSV files are being stored in the storage account.
Connect Power BI to Azure Data Lake Gen 2
This is the final part of this project. The analytics team needs to read the data using Power BI desktop from Azure Storage account and create a visual representation of all information.
You can check out our previous article where we gave a detailed approach to achieving this: Connect Power BI to Azure Data Lake Gen2 Storage for Reporting.
Production Readiness for Docker Image
During production settings, pushing Docker images to Docker Hub serves an especially important role in enhancing development, deployment, and collaboration processes for developers and teams.
The idea is to push our Docker images to Docker hub where other members within our organization can access the image or image version.
The following step should be followed to push Docker image to Docker Hub:
Step 1: Create a Docker Hub Account
If you are doing this for the first time, log into Docker Hub and create a user account: https://hub.docker.com/.
Step 2: Create Docker Image Version
Let’s start by studying our Docker images and know which one we plan to use. First, let’s list out all the images in our Docker.
Docker Images. You will notice this script listed all the images in our Docker Desktop.
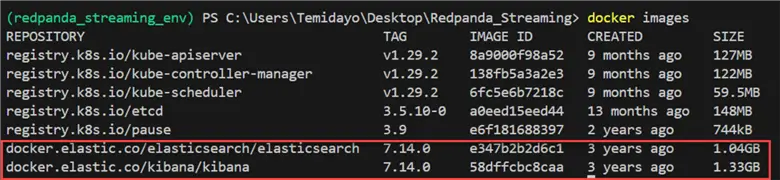
docker ps.Using the docker ps gives you more detailed information about the current running Docker images and their container name.

You will notice the ElasticSearch tag is docker.elastic.co/elasticsearch/elasticsearch:7.14.0. With this in the command prompt, we can write the command to create a new version called V1.0.
docker tag docker.elastic.co/elasticsearch/elasticsearch:7.14.0 kiddojazz/elasticsearch:v1.0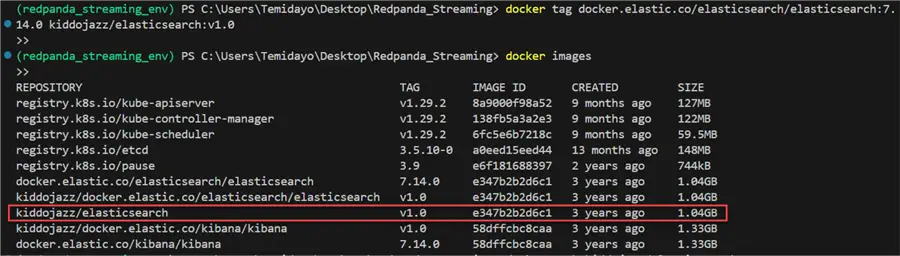
Do the same for Kibana and create a new tag for it.
docker tag docker.elastic.co/kibana/kibana:7.14.0 kiddojazz/kibana:v1.0 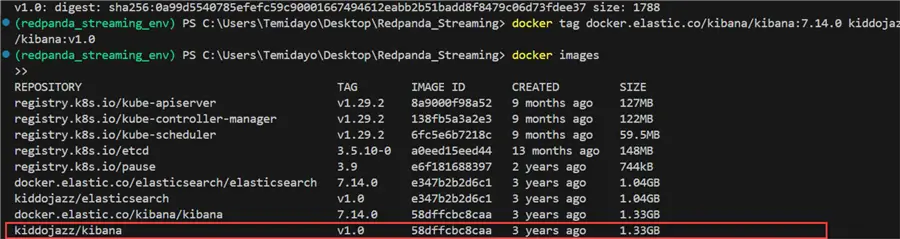
Step 3: Push New Images to Docker Hub Registry
Let’s start by logging in to the Docker Hub using the Docker logincommand below.

Use this command to push the new Docker image to Docker Hub registry.
docker push kiddojazz/elasticsearch:v1.0
Repeat the same process for Kibana by using the command below.
docker push kiddojazz/kibana:v1.0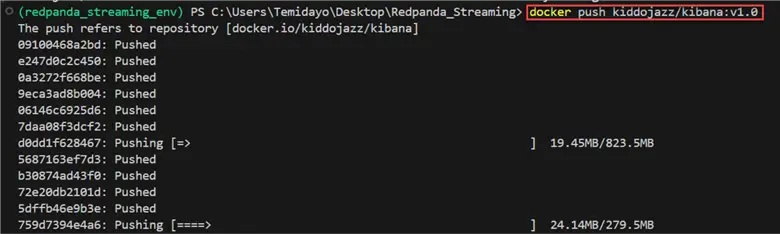
Step 4: Verify Docker Image in Registry
In your Docker Hub, you will see the new images in your repositories.

Sharing with Colleagues
Now that your images are in Docker Hub registry, other people in your organization can use the exact image by pulling the image from Docker Hub directly.
docker pull kiddojazz/elasticsearch:v1.0You can then run the image based on the container name you want to use.
docker run -d --name elasticsearch-container kiddojazz/elasticsearch:v1.0Conclusion
In this article, we introduced you to Redpanda, a good alternative to Confluence Kafka. We were able to set all the necessary configurations ranging from creating clusters and topics and setting ACL access. We created a streaming platform for a metro company in NYC. All resources used from virtual machine and storage account were provisioned using a PowerShell script.
A docker-compose.yml file was created having all the necessary services (Kibana and ElasticSearch) for storage and visualization. We had a producer script and two consumer scripts in Python that moved the data from Redpanda topic to ElasticSearch Index and ADLS storage account.
Lastly, we made the project production-ready by moving the images to Docker Hub registry where other members in the organization can use the exaction image version for other production use cases.
Next Steps
- Download the scripts
- Apache Kafka Quickstart
- Outputs from Azure Stream Analytics – Azure Stream Analytics | Microsoft Learn
- Apache Kafka Tutorials
- Check out related articles:

Temidayo Omoniyi is a Microsoft Certified Data Analyst, Microsoft Certified Trainer, Power Platform Developer, Azure Data Engineer, Content Creator, and Technical writer with over three years of experience.
Currently, he works as a data and business intelligence analyst for a training and consulting company in Lagos, Nigeria.
Temidayo enjoys creating educative content on YouTube, LinkedIn, Twitter, and other online platforms. He loves sharing his knowledge and writing about systems, applications, tools, and processes.
Apart from training, writing, and coding, you will find him watching and reading Anime. He is a big fan of DC Comics.
- MSSQLTips Awards: Trendsetter (25+ tips) – 2025 | Author of the Year – 2023, 2024