Problem
Have you ever waited for an eternity, waiting for either a query or SQL Agent Jobs to run? This is something most Data Warehouse Developers face daily.
Solution
As a Data Warehouse developer/engineer, it is essential to produce the best solution to monitor, provide quick fixes, and set time limits to long-running jobs or queries that might be causing lag in the server. Usually, organizations want smooth processes in their Data Warehouse, which might result in things like Vertical Scaling (Increasing the server’s compute capacity (CPU/RAM)).
Business Impact
- Operational Risk: Delayed data processing impacts downstream systems
- Resource Waste: Long-running jobs consume unnecessary server resources
- SLA Violations: Extended job runtimes may breach service level agreements
- Increased Downtime: Problems discovered late require urgent intervention
This article will be broken down into 3 major sections; in each section, users will understand multiple scenarios in managing and handling long running Jobs and queries using T-SQL and Python.
Table of contents
Section 1: Monitoring Long-Running Agent Jobs
Section 1A: Integrating Long-Running Agent Jobs with Email Notifications
For this section, we are going to create a real scenario where we can monitor long-running jobs using T-SQL and send out an email notification to the IT Department or other relevant stakeholders for rapid action.
Configure Gmail Notification
Due to more advanced security settings, you cannot directly use your email password with applications that have to do with your Gmail account.
Step 1: Create an App Password for Gmail
Google App Password is a 16-digit passcode that gives a less secure app or device permission to access your Google Account.
Consider it a “digital key” for older software that does not support contemporary sign-in standards such as OAuth (the pop-up window that prompts you to “Sign in with Google”).
In your Google Account or Workspace, go to Manage your Google Account, usually on your Profile at the top right corner. Click the Security & sign-in option in your Account Manager.
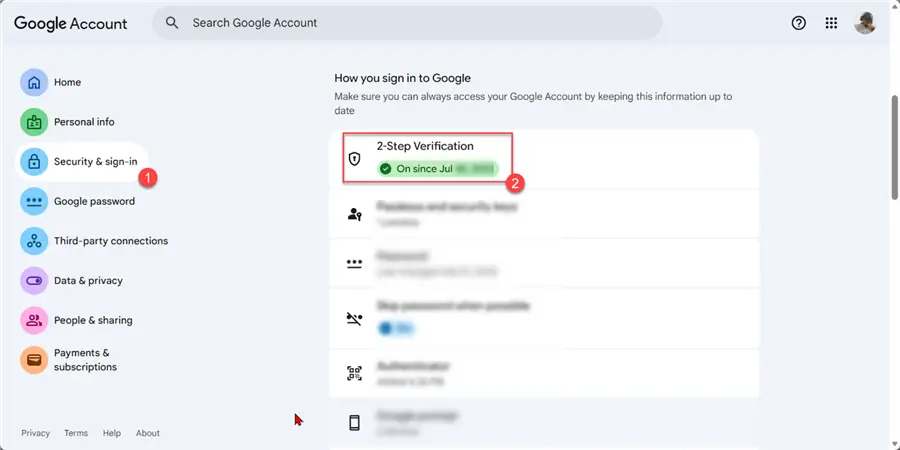
Before starting the process, ensure you have a 2-Step Verification set up, this is a crucial step.
Step 2: Create App
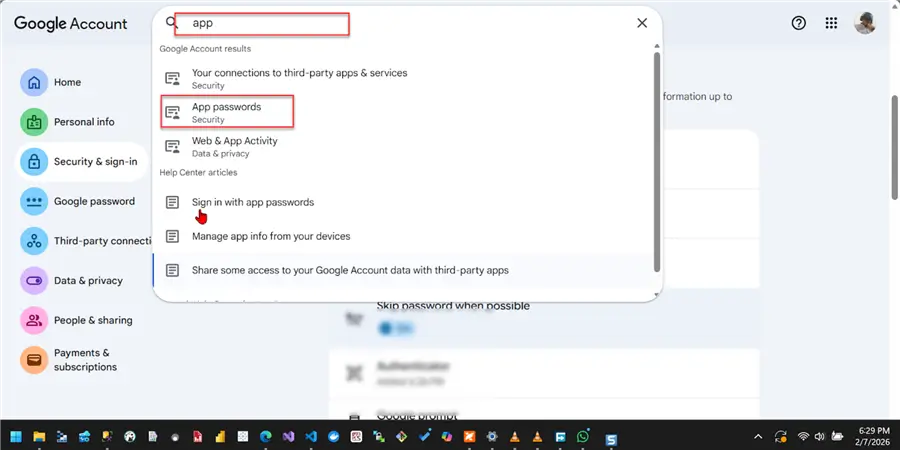
Now that the 2-Verification is activated, search for the App in your search bar for App the select the App Passwords.
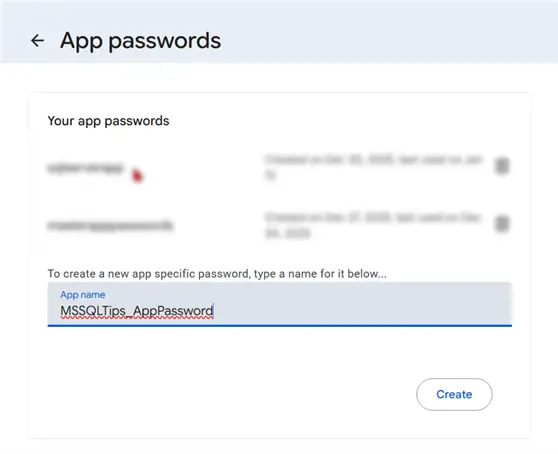
You are required to provide the name of the application in the new window and click “Create.” There will be a one-time password generated. Make sure you store it securely, ideally in AWS Secret Manager or Azure Key Vault.
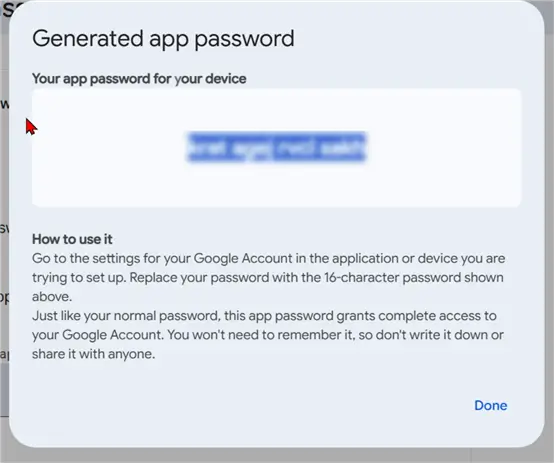
NOTE: This is for educational purposes. If you are doing this to learn, I would suggest deleting/deactivating the App Password after the entire process. For an enterprise, there is a more secure approach to using your organization’s network.
Configure SQL Server Database Mail
SQL Server Database Mail is an enterprise solution that allows your SQL Server Database Engine to send emails. Unlike older methods (like SQL Mail), Database Mail is built on standard SMTP (Simple Mail Transfer Protocol) and does not require an Outlook client to be installed on the server.
The SQL Server Database Mail is made up of 3 main components:
- Accounts: Credentials and server information (SMTP server, port, and authentication/app passwords) are stored
- Profile: A collection of one or more accounts. You send mail using a Profile name rather than an account name.
- The Database Mail Executable: To prevent the SQL Server from slowing down if the mail server is lagging, the Database Mail Executable is an external process that does the heavy lifting.
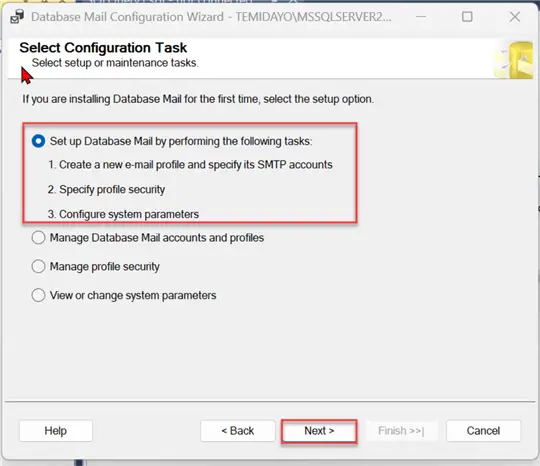
Step 1: Configure Database Mail
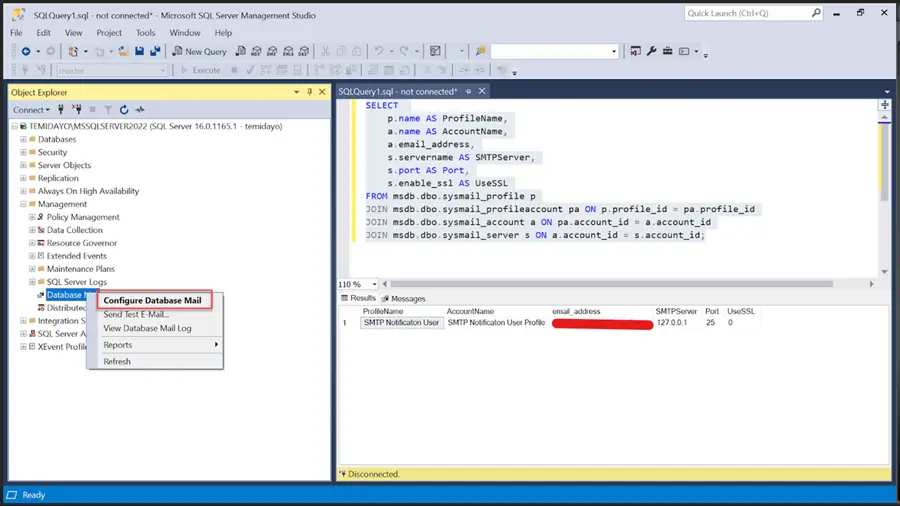
In SSMS, right-click on the Database Mail and select Configure Mail.
In the new window, we need to create a profile and user account. We then map the user to the profile account.
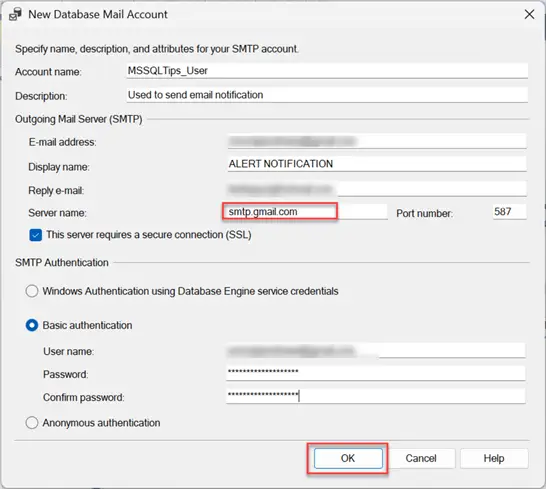
Step 2: User Account Configuration
You are expected to fill in the following:
- Email: The email address we created the App Password.
- Reply Email: This can be any email of your choice for testing, or you can use the same email as the App Password.
- Server Name: Since we are using Google Gmail, use smtp.gmail.com.
- Port: 587 Google port
- Username and Password: This should be your email and the app password.
In the new window, you will notice the user account is now created and mapped to the profile.
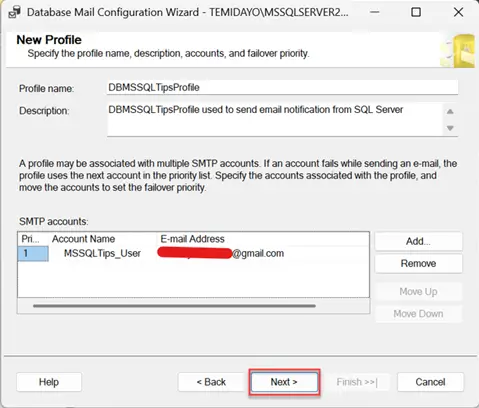
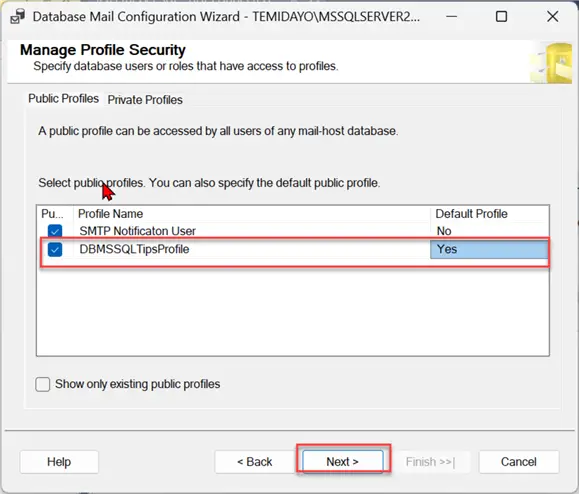
Step 3: Set Default Account
Ensure using the account we just created as your default account
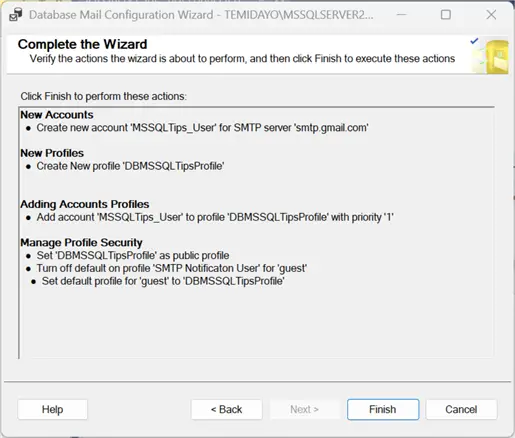
Verify the summary provided. If satisfied, click on Finished.
Step 4: Test Database Mail
You can run the query below to confirm that the Email Account and profile are created as expected.
SELECT
    p.name AS ProfileName,
    a.name AS AccountName,
    a.email_address,
    s.servername AS SMTPServer,
    s.port AS Port,
    s.enable_ssl AS UseSSL
FROM msdb.dbo.sysmail_profile p
JOIN msdb.dbo.sysmail_profileaccount pa ON p.profile_id = pa.profile_id
JOIN msdb.dbo.sysmail_account a ON pa.account_id = a.account_id
JOIN msdb.dbo.sysmail_server s ON a.account_id = s.account_id;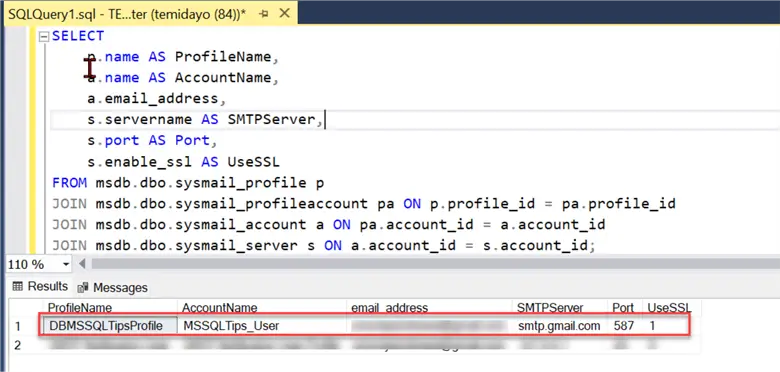
In SSMS, right-click on the Database Mail and select Send Test Email.
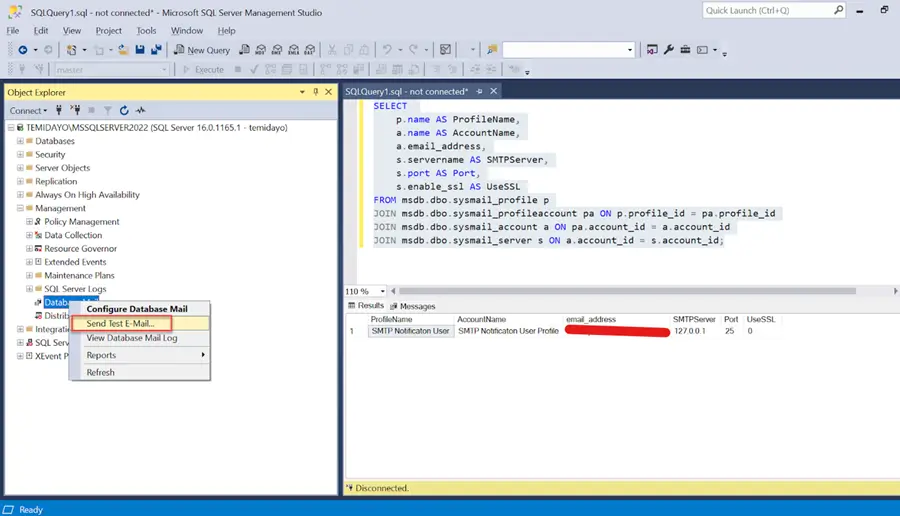
Fill in the necessary information and send it.
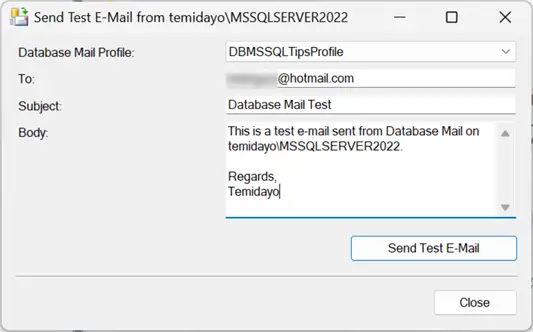
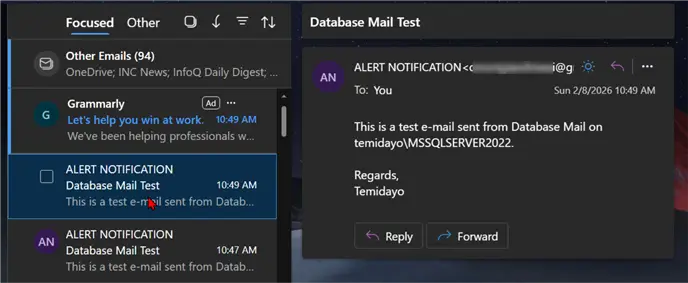
Using Outlook to confirm that the email is being sent, which works as expected.
Section 1B: Create a Long-Running Job in T-SQL
We need to create a real-world scenario of a long-running job so that we can test the different logic we want to achieve.
Assumptions
We have a particular critical production job that is completed within an hour daily, starting at 4:00 AM UTC + 1 and finishing before 5:00 AM UTC +. These are critical jobs as they are expected to be completed within the hour, so as not to affect other jobs that might need to start after.
For this blog, we will not be able to do 1 hour because of time, so we will be limited to 10 minutes just to test.
Step 1: Create Test Stored Procedure
Let us create a query that runs 5, 3, and 2 minutes each, using the query below to create a Stored Procedure.
USE dwhdb;
GO

IF OBJECT_ID('dbo.usp_TestLongRunningJob', 'P') IS NOT NULL
    DROP PROCEDURE dbo.usp_TestLongRunningJobMSSLQTips_5;
GO

CREATE PROCEDURE dbo.usp_TestLongRunningJobMSSLQTips_5
    @WaitMinutes INT = 5,
    @ShowProgress BIT = 1
AS
BEGIN
    SET NOCOUNT ON;

    DECLARE @StartTime DATETIME = GETDATE();
    DECLARE @EndTime DATETIME;
    DECLARE @WaitSeconds INT = @WaitMinutes * 60;
    DECLARE @ElapsedSeconds INT = 0;
    DECLARE @Message VARCHAR(500);

    SET @Message = 'Test job started at ' + CONVERT(VARCHAR, @StartTime, 120);
    RAISERROR(@Message, 0, 1) WITH NOWAIT;
    RAISERROR('---------------------------------------------', 0, 1) WITH NOWAIT;


    WHILE @ElapsedSeconds < @WaitSeconds
    BEGIN
        -- Wait 30 seconds
        WAITFOR DELAY '00:00:30';

        SET @ElapsedSeconds = @ElapsedSeconds + 30;

        -- Show progress if enabled
        IF @ShowProgress = 1
        BEGIN
            SET @Message = 'Progress: ' +
                          CAST(@ElapsedSeconds AS VARCHAR) + ' of ' +
                          CAST(@WaitSeconds AS VARCHAR) + ' seconds elapsed (' +
                          CAST((@ElapsedSeconds * 100 / @WaitSeconds) AS VARCHAR) + '%% complete)';
            RAISERROR(@Message, 0, 1) WITH NOWAIT;
        END
    END

    SET @EndTime = GETDATE();
    RAISERROR('---------------------------------------------', 0, 1) WITH NOWAIT;
    SET @Message = 'Test job completed at ' + CONVERT(VARCHAR, @EndTime, 120);
    RAISERROR(@Message, 0, 1) WITH NOWAIT;

    SET @Message = 'Total duration: ' +
                  CAST(DATEDIFF(SECOND, @StartTime, @EndTime) AS VARCHAR) + ' seconds';
    RAISERROR(@Message, 0, 1) WITH NOWAIT;

    RETURN 0;
END
GO
Test the SP by executing the SP with the command below.
EXEC dbo.usp_TestLongRunningJobMSSLQTips_5;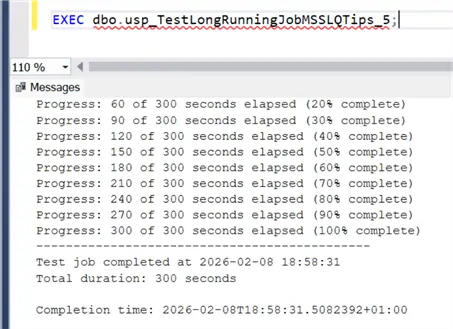
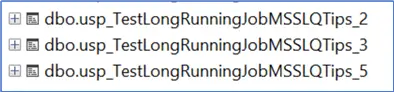
Repeat the process and create other stored procedures that would be used in this process.
Step 2: Create a Daily ETL Job Agent
To create a job, we can use a T-SQL script or the SSMS Interface. For this blog, we will be using the SSMS Job Agent interface. We will stack all 3 Stored Procedures together and see how it all runs.
Step 2.1: Create New Job
From the SSMS interface, right-click on Job Agent and select New. This should open a new window for you.
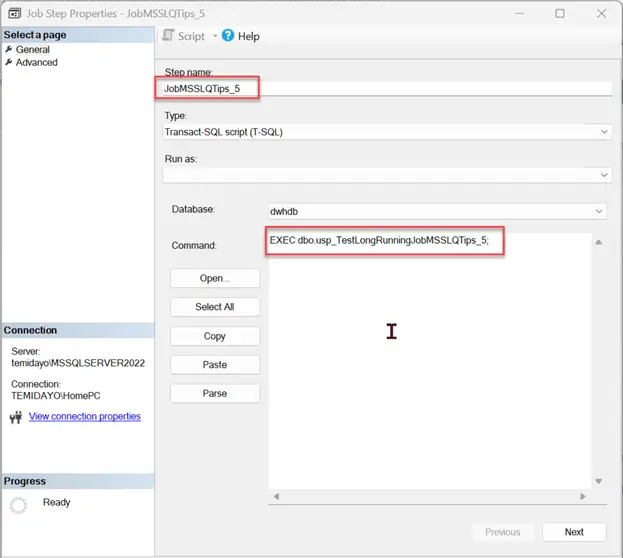
Select Step and put the name of the step and the command. The command will run a SP.
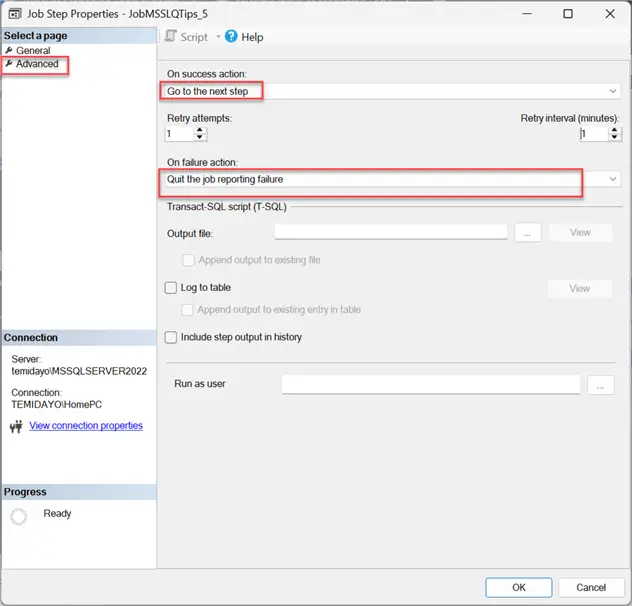
Step 2.1: Advanced Settings
In the advanced settings, ensure the on-success action is set to “Go to the next step.”
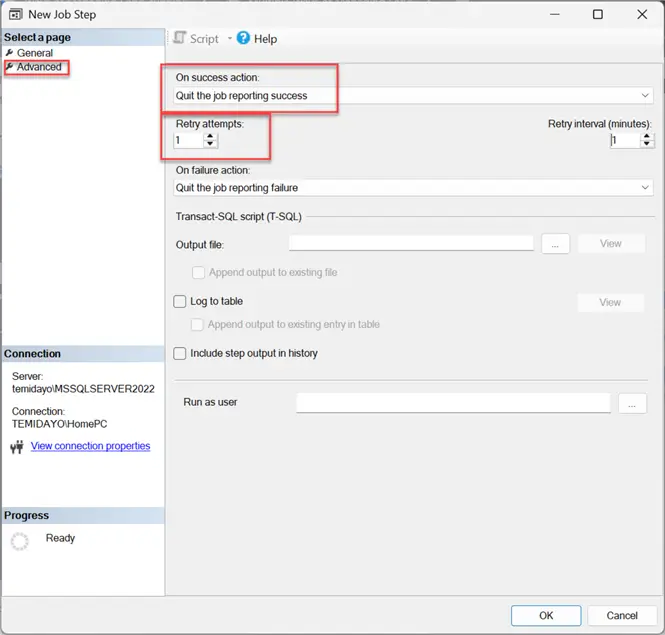
Step 2.2 Advanced Settings for the Last Step
Ensure it is set to quit the job reporting success.
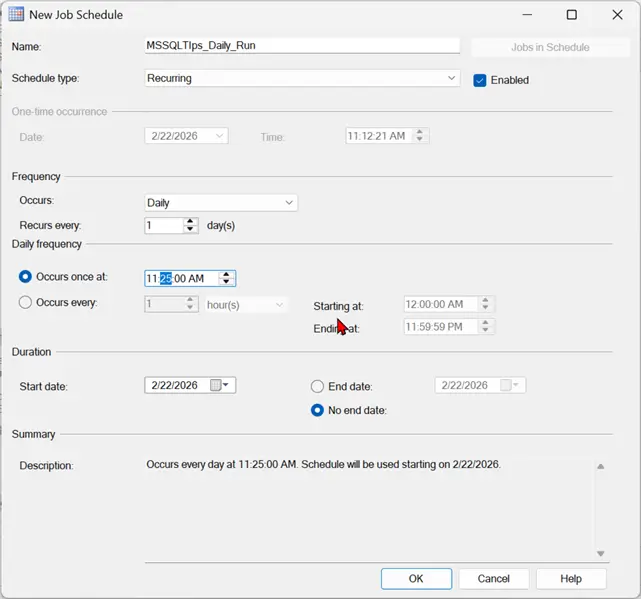
Step 2.3 Set Time Schedule
Set the schedule for the daily run you want your job to run.
Step 2.4 Run Job
Right-click on the Job and start the job by step, then pick step 1.
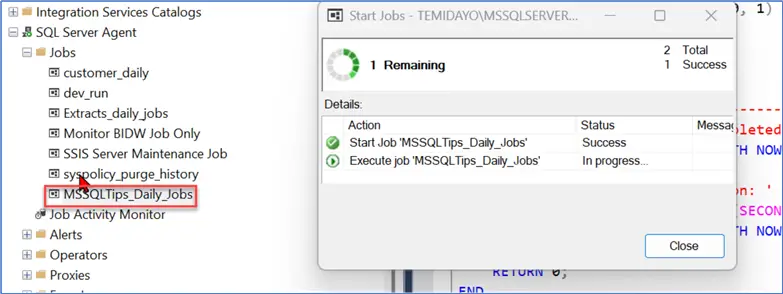
You can also monitor the job by right-clicking and selecting Job History

You can also check the status of your Job with the step monitoring command below
-- ============================================
-- Running Jobs with All Steps Status
-- ============================================
SELECT
    j.name AS JobName,
    js.step_id AS StepID,
    js.step_name AS StepName,
    CASE
        WHEN ja.last_executed_step_id = 0 THEN 'Starting...'
        WHEN ja.last_executed_step_id < js.step_id THEN 'Pending'
        WHEN ja.last_executed_step_id = js.step_id THEN '>>> RUNNING NOW <<<'
        WHEN ja.last_executed_step_id > js.step_id THEN 'Completed'
    END AS StepStatus,
    DATEDIFF(MINUTE, ja.start_execution_date, GETDATE()) AS TotalMinutesRunning,
    ja.start_execution_date AS JobStartTime
FROM msdb.dbo.sysjobs j
INNER JOIN msdb.dbo.sysjobsteps js ON j.job_id = js.job_id
LEFT JOIN msdb.dbo.sysjobactivity ja ON j.job_id = ja.job_id
    AND ja.session_id = (SELECT MAX(session_id) FROM msdb.dbo.syssessions)
WHERE ja.start_execution_date IS NOT NULL
    AND ja.stop_execution_date IS NULL
ORDER BY j.name, js.step_id;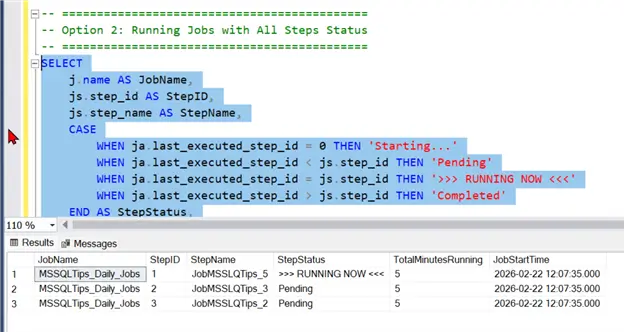
Section 2: Establish an Email-Based Long-Term Job Alert System
Scenario:
Let’s say we have a job that takes five minutes every day or every so often.
Note: In a real-world scenario, it should be more than this time set, but since this is for practical use, we will be using a shorter time of 10 minutes.
Stored Procedure Logic
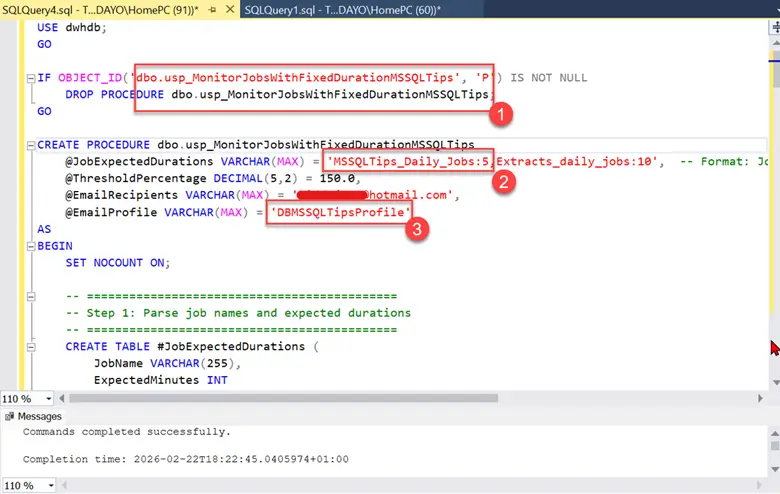
Create a stored Procedure that monitors our Jobs and sets a threshold percentage (default 150%). If it exceeds the expected duration, a notification is sent to the Admin via Gmail.
The Stored Procedure Script can be downloaded using the link at the end of this article.
This stored procedure works in four main steps:
- Parses configuration: Creates a temporary table from a comma-separated input string of task name/expected duration pairs (MSSQLTips_Daily_Jobs:5, Extracts_daily_jobs:10).
- Find running jobs: Identifies any monitored jobs that are executing now and have gone above the threshold percentage.
- Builds an HTML email: A prepared HTML email including a table displaying the job name, current runtime, expected runtime, threshold, percentage of expected, start time, and current step information.
- Sends the alert: Sends the alert to the designated recipients via sp_send_dbmail.
Test Monitoring Stored Procedure
To confirm that the Stored Procedure is working as expected, let us run our MSSQLTips_Daily_Jobs and run the Monitoring stored procedure after 7 minutes to confirm. Remember, the expected duration is 5 minutes with a threshold of 150%.
Run the step monitoring query to check what step the Job is at. You will notice it is still at a 5-minute run, which means it has not exceeded 150% Threshold percentage of 5 minutes
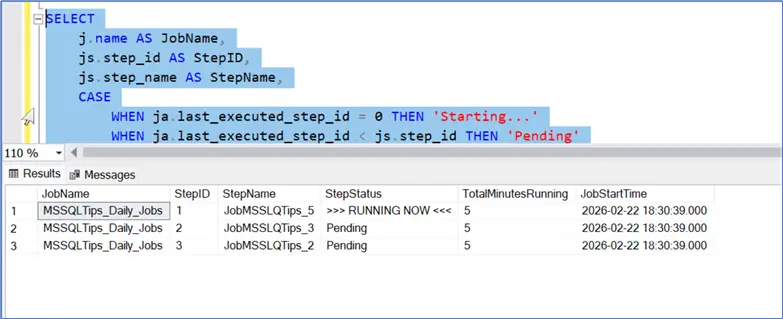
Execute the monitoring Stored Procedure, from the message below; this confirms the Job has not exceeded the threshold. Let us wait for a couple of minutes and rerun the SP again.
EXECUTE dbo.usp_MonitorJobsWithFixedDurationMSSQLTips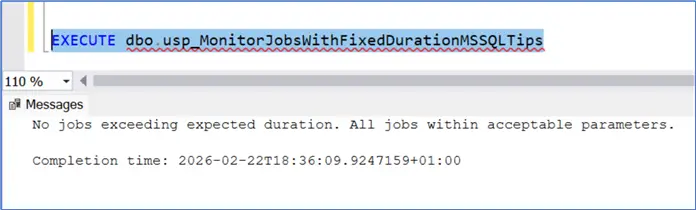
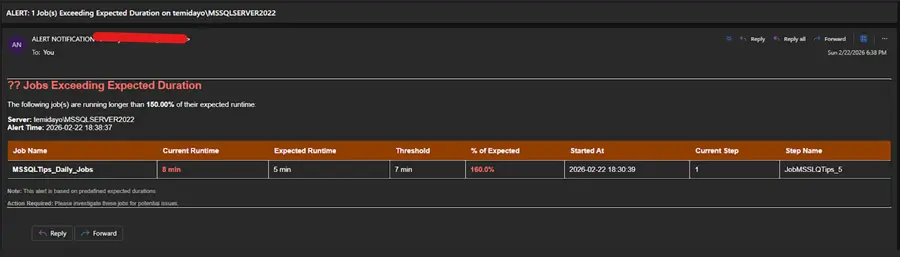
Re-run the process after a few minutes to confirm logic works as expected. From the image below, we can confirm that the Job run has exceeded 5 minutes, and an Email is being sent to the respective administrator.

Confirm Email
After running the SP, we will get an email notification about the Long-running Jobs with the information needed to treat them better.
Section 3: Create a Long-Running Using Python and Microsoft Power Automate
Project Scope
We are going to repeat the scenario for section two, but this time around, we will be sending out the notification to the Microsoft Teams Channel/Group through Power Automate and Python.
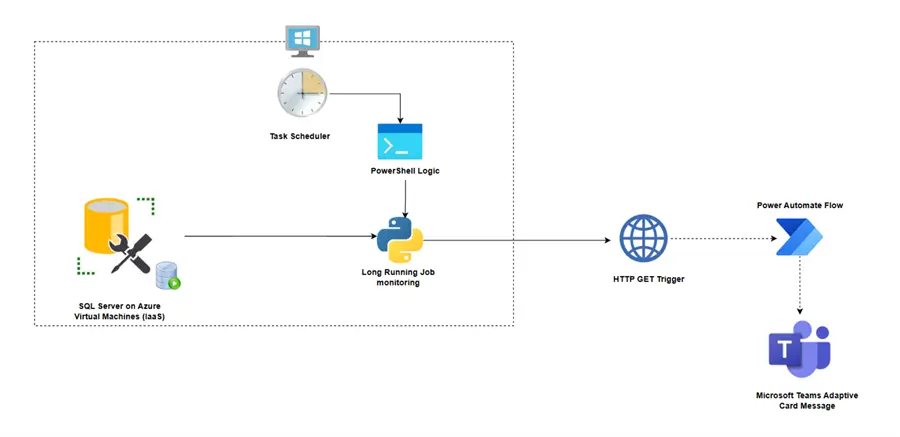
Solution Architecture
Step 1: Create an HTTP Trigger (GET REQUEST) in Power Automate
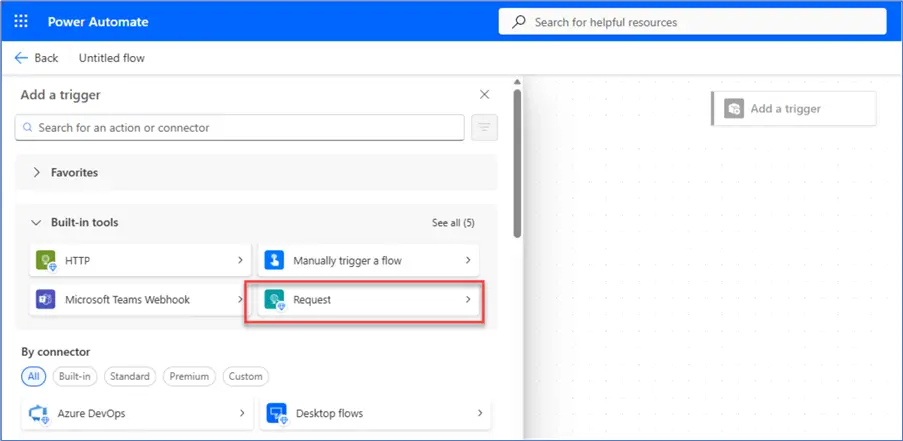
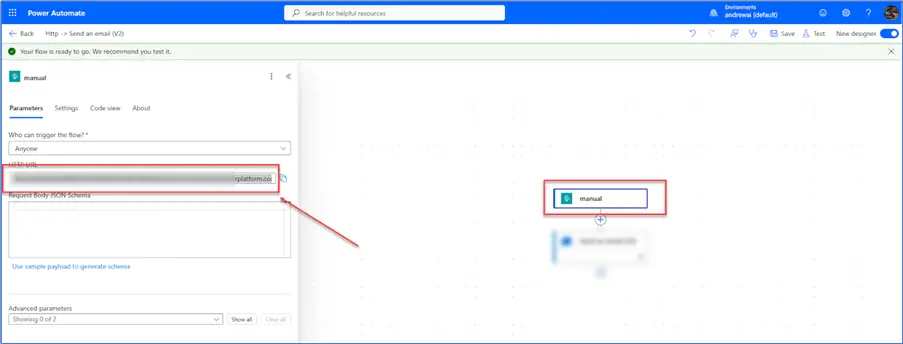
In your Power Automate Cloud Flow, you might not see an HTTP Trigger page; you might need to skip and create it directly from the canvas.

In the Flow Canva select the Request Trigger.
Step 2: GET HTTP URL
We need to generate the Get URL, which will be used as the endpoint for sending a POST request from Python containing all the necessary information.
Note: To be able to generate the URL code, we need to add another action to the Request Trigger before saving the flow. This automatically generates a new URL.
Step 3: Python Script for Sending HTTP POST REQUEST (MESSAGE)
Our Python script will focus on doing the following:
- Read Job Configs: Gets job names, expected durations, and thresholds from JOB_CONFIGS.
- Query Running Jobs: Checks msdb for jobs that are currently running.
- Compare Against Thresholds: Calculates if each running job exceeds its individual threshold.
- If Over Threshold: Builds an Adaptive Card with job details, sends an HTTP POST to Power Automate, and posts to Teams.
- If All Normal: Logs “no alert needed”, exits cleanly.
Note: The script will be made available.
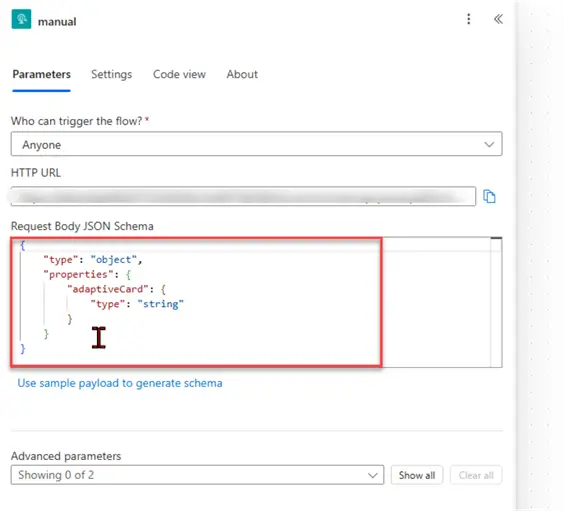
Step 4: Add HTTP Trigger Schema
With the Python script, we have made it easier by having a pre-built adaptive card before being sent out.
Expand your JSON Schema and paste this command.
{
    "type": "object",
    "properties": {
        "adaptiveCard": { "type": "string" }
    }
}
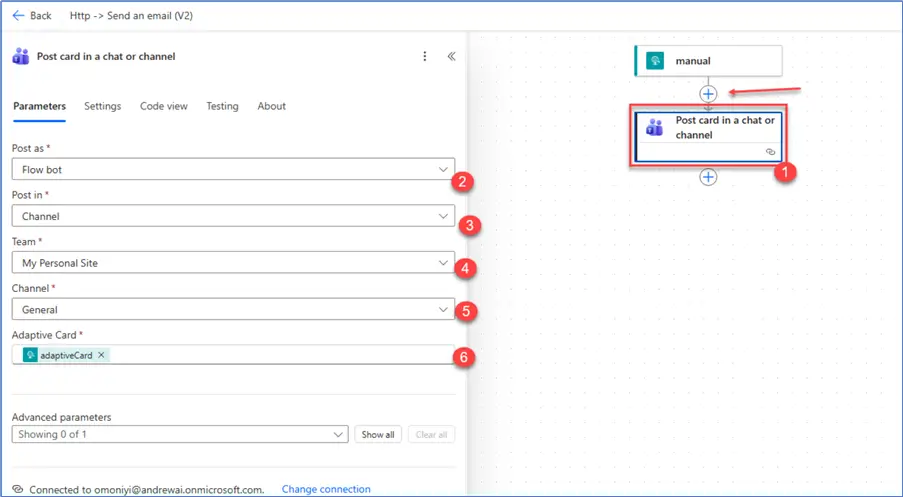
Step 5: Add a Post Card in a Chat or Channel Action
In the Post Card Action, paste the command in your Adaptive Card.
@{triggerBody()?['adaptiveCard']} This tells Power Automate to use the full card JSON that Python already built.
Test Long Running Job
In SSMS, trigger the daily Job Agent to run. This is expected to run above expected. For production, you should use a CRON job to run the Python script at a particular interval, but for this, we will just test our solution manually and see if all works as expected.
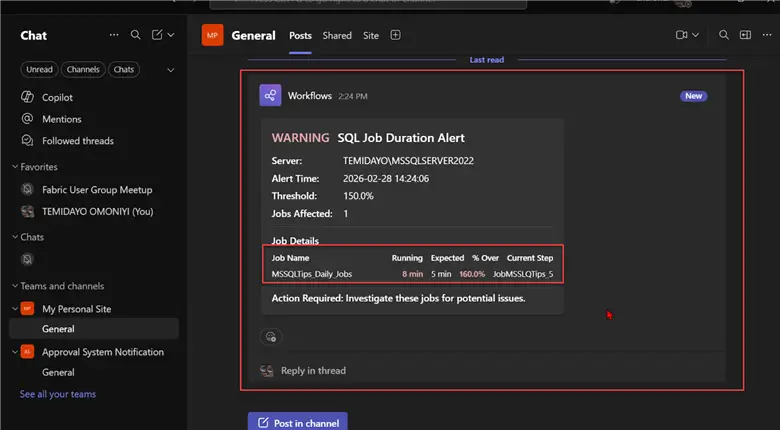
After 8 minutes, run the Python script, note that this should have exceeded the expected threshold.
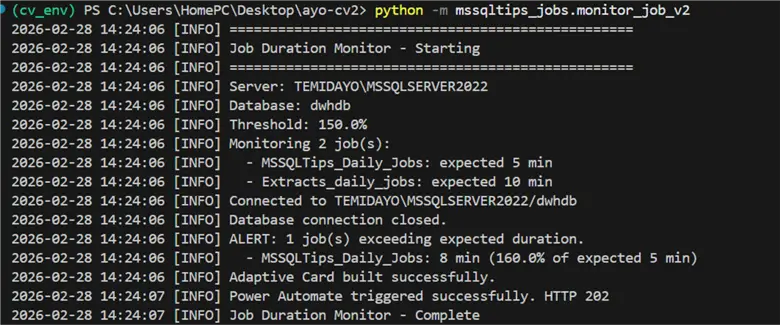
Confirm that the notification was sent to the respective Microsoft Teams Channel.
Conclusion
This article addresses the critical problem of long-running SQL Agent Jobs in Microsoft SQL Servers, which cause operational risk, resource waste, and SLA violations. It demonstrated two practical, scenario-based methods for Data Warehouse developers to create a robust alert system when jobs exceed a defined threshold (default 150%) of their expected duration.
The two primary alert systems covered were:
- T-SQL and Email Integration.
- Python and Microsoft Power Automate Integration.
Next Steps
- Alerts for Long Running SQL Server Agent Jobs
- How to Find Long Running Jobs in Microsoft SQL Server
- Long running Query in SQL Server || SQL Server Database long running query || Performance
- Download scripts for this article

Temidayo Omoniyi is a Microsoft Certified Data Analyst, Microsoft Certified Trainer, Power Platform Developer, Azure Data Engineer, Content Creator, and Technical writer with over three years of experience.
Currently, he works as a data and business intelligence analyst for a training and consulting company in Lagos, Nigeria.
Temidayo enjoys creating educative content on YouTube, LinkedIn, Twitter, and other online platforms. He loves sharing his knowledge and writing about systems, applications, tools, and processes.
Apart from training, writing, and coding, you will find him watching and reading Anime. He is a big fan of DC Comics.
- MSSQLTips Awards: Trendsetter (25+ tips) – 2025 | Author of the Year – 2023, 2024


Great article Temidayo