Problem
In a data warehousing scenario, it’s not rare to replicate data of a source table to multiple destination tables, sometimes it’s even required to distribute data of a source table to two or more tables depending on some condition. For example splitting data based on location. So how we can achieve this with SSIS?
Solution
SSIS provides several built-in transformation tasks to achieve these kinds of goals and in this tip I am going to discuss two of them:
- Multicast Transformation and
- Conditional Split Transformation and how they differ from each other.
Multicast Transformation
Sometimes it’s required to have multiple logical copies of source data of a single source table either for applying different transformation logic on each set or having each dataset for separate consumers, Multicast transformation helps to do this.
In nutshell, a Multicast transformation is used to create/distribute exact copies of the source dataset to one or more destination datasets. In this example I am going to distribute data from [HumanResources].[Employee] table to [HumanResources].[Employee1] and [HumanResources].[Employee2] tables, please note that the multicast transformation distributes the whole set of data to all outputs, it means if the [HumanResources].[Employee] table has 290 records then both [HumanResources].[Employee1] and [HumanResources].[Employee2] tables will have 290 records each as well.
Before creating the package, lets create some work tables which we will be using in this demonstration. These commands will just create empty tables based on the [HumanResources].[Employee] table structure in the AdventureWorks database.
-- Script #1 - Create work tables for demonstration
USE AdventureWorks
GO
SELECT * INTO [HumanResources].[Employee1] FROM [HumanResources].[Employee]
WHERE 1=2
GO
SELECT * INTO [HumanResources].[Employee2] FROM [HumanResources].[Employee]
WHERE 1=2
GO
SELECT * INTO [HumanResources].[MaleEmployee] FROM [HumanResources].[Employee]
WHERE 1=2
GO
SELECT * INTO [HumanResources].[FemaleEmployee] FROM [HumanResources].[Employee]
WHERE 1=2
GO
Launch SQL Server Business Intelligence Development Studio and create a new project.
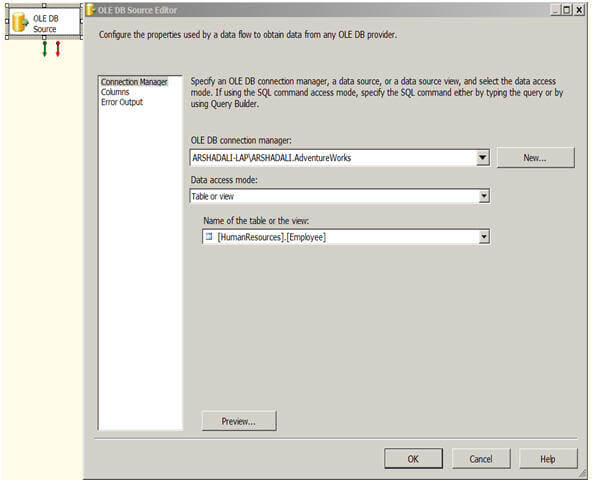
Let’s start with a “Data Flow Task”. Double click on it to open the Dataflow Pane and then drag an OLE DB Source on the working area and configure as shown below.
Then drag a Multicast Transformation and OLE DB Destination from the Toolbox as shown below and connect the tasks using the green arrow of OLE DB Source to the Multicast and then from the Multicast to the OLE DB Destination as shown below. Next right click on the OLE DB Destination and specify the destination connection manager and destination table as shown below. Please check the “Keep Identity” property on the OLE DB Destination editor to preserve the identity value coming from the source table we are using in this example.

Next drag another OLE DB Destination from the Toolbox, drag another green arrow from the Multicast to the new OLE DB Destination as shown below. Next right click on the second OLE DB Destination and specify the destination connection manager and destination table. Please check the “Keep Identity” property for this one as well.

Once you are done with all these configuration, just hit F5 or click on the Play icon on the IDE, then you can see the execution of the package.
Please note the below image, from the source there are 290 records and both destination tables have 290 records written as well as they should.

Multicast transformation was introduced in SSIS 2005 and further enhanced and optimized in SSIS 2008 to use multithreading while writing data to multiple destination.
Conditional Split Transformation
Conditional Split Transformation is used to categorize the incoming source data into multiple categories as per defined conditions. What I mean here is, very much like the SWITCH CASE statement of any programming language, the conditional split transformation tests each incoming row on those defined conditions and wherever it matches with any of them it directs the row to that destination.
For example, consider you have a customer table, you want data of this table to be categorized on the basis of Age into Juniors, Adults and Seniors, another example, which I will be demonstrating in this tip, is if you have an employee table and you want data to be divided into Male and Female based on the value in the Gender column.
Conditional split also provides a default output in the case that the incoming row does not match any of the defined conditions, the row goes to the default output. This default output is normally used to move erroneous rows to a separate table.
Let’s create another package and drag a Data Flow Task. Double click on it to open the Data Flow pane, now drag an OLE DB Source on the working area and configure it like this.
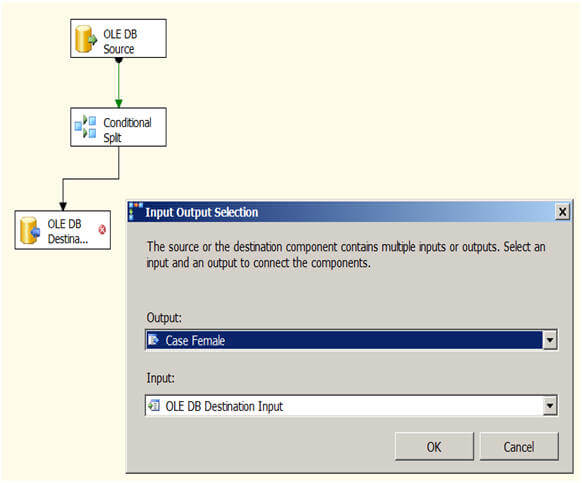
Then drag a Conditional Split Transformation from the Toolbox, drag the tiny green arrow of the OLE DB Source to the Conditional Split Transformation and configure it like this.

Next drag an OLE DB Destination and then drag the tiny green arrow from the Conditional Split Transformation to the OLE DB Destination. At this point it will ask you the condition to use which you just setup in the previous step. For the first one I selected “Case Female” and then I setup my OLE DB Destination as shown below. Once you are done with this OLE DB Destination configuration for Female, you need to repeat the same process for another OLE DB Destination configuration for Male.

After this has been setup you can execute the package and it should look like the below image. As you can see out of the 290 source records 84 are related to female and moved to the FemaleEmployee table and 206 records are related to male and hence moved to the MaleEmployee table.

So finally, the basic difference between Multicast Transformation and Conditional Split transformation is that Multicast Transformation generates exact copies of the source data, it means each recipient will have same number of records as the source whereas the Conditional Split Transformation divides the source data on the basis of defined conditions and if no rows match with this defined conditions those rows are put on default output.
Once you are done with these practical exercises, you can dropped all the objects which we created for these demonstration with this cleanup code provided below:
-- Script #2 - Cleanup script for work tables we created
USE AdventureWorks
GO
IF OBJECT_ID('AdventureWorks.HumanResources.Employee1') IS NOT NULL
   DROP TABLE [HumanResources].[Employee1]
GO
IF OBJECT_ID('AdventureWorks.HumanResources.Employee2') IS NOT NULL
   DROP TABLE [HumanResources].[Employee2]
GO
IF OBJECT_ID('AdventureWorks.HumanResources.MaleEmployee') IS NOT NULL
   DROP TABLE [HumanResources].[MaleEmployee]
GO
IF OBJECT_ID('AdventureWorks.HumanResources.FemaleEmployee') IS NOT NULL
   DROP TABLE [HumanResources].[FemaleEmployee]
GO
Next Steps
- Review Connection Managers in SQL Server 2005 Integration Services SSIS tip.
- Review SQL Server Integration Services tips.
- Review Multicast Transformation on MSDN.
- Review Conditional Split Transformation on MSDN.
- Review my previous tips.

Arshad specializes in Database, Data Warehousing and Business Intelligence application design, development and deployment, at enterprise level, with SQL Server, SSIS, SSRS, SSAS, Service Broker, MDS, DQS, SharePoint and PPS. He is a Microsoft Certified IT Professional in Microsoft SQL Server. He also has experience developing applications in VB/ASP/.NET/ASP.NET/C#, and is a Microsoft Certified Application Developer and Solution Developer for the .NET platform in Web/Windows/Enterprise. Arshad has Master’s degrees in Computer Applications and Business Administration in IT.
Disclaimer: Arshad worked for Microsoft and helped people and businesses make better use of technology to realize their full potential. The opinions mentioned in his tips and articles herein are solely his and do not reflect those of his current or previous employers.
- MSSQLTips Awards: Champion (100+ tips) – 2014