By: Aaron Bertrand | Comments | Related: > SQL Server Management Studio
Problem
Many development teams find it challenging to maintain consistent naming and coding conventions. In places I've worked, these can be enforced by having a "gatekeeper" who can accept, reject or modify all submitted code changes based on personal preferences, company policy, or a combination. This is tedious for the gatekeeper, and frustrating for the developers - especially if the conventions are controversial and/or not well documented. In some places, teams use the Template feature in Management Studio, which lets you set up commonly-used bits of code for re-use. The main problem with the Template solution is that the template files are stored locally; so, when conventions change or new templates are introduced, they must be distributed to all developers.
Solution
In SQL Server 2012, Management Studio has a new feature called Code Snippets, which closely match a similar feature long offered in Visual Studio. This new feature in SSMS was described in a previous tip, Getting started with Code Snippets feature of SQL Server 2012. One item from that tip that I'd like to explore further is the use of custom snippets. While Management Studio ships with a wide array of default snippets, you can also create your own; more importantly, a custom snippets folder can point at a network location. This means that you can store all of your code snippets in a central, network location, and simply have all of your developers get their snippets from that location. This means they can all be using the same source, and as soon as changes are made, they will all see the changes without any need to pass files around.
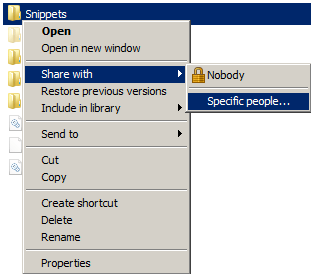
To get started, let's create a share on a network-accessible device. This may work slightly different depending on your operating system and network configuration. In my case, I'm creating a folder "Snippets" on a central device (running Windows Server 2008 R2), then sharing that folder with specific users. You will need to determine how best to configure permissions in your environment, so I'll leave those details out (including whether you want some users to be able to write to that share, in which case they will need write permissions).
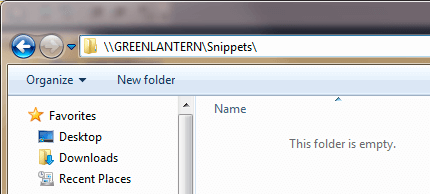
Once that share is accessible over the network, check that you can access it from the machine(s) where you're running Management Studio. You can do this by simply trying to connect to the path in Windows Explorer:
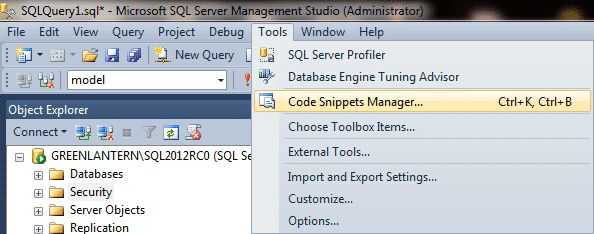
Now go to Tools > Code Snippets Manager, and click "Add...":
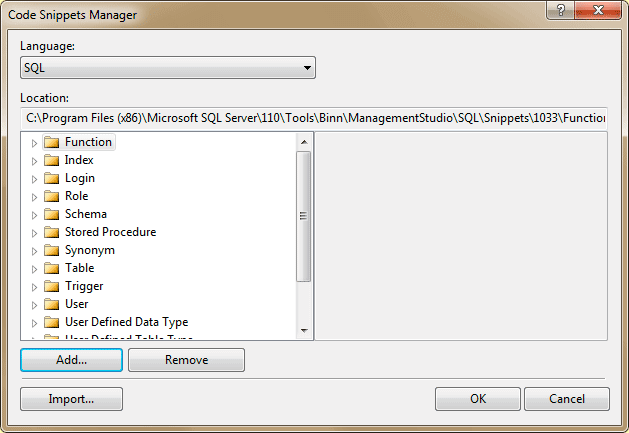
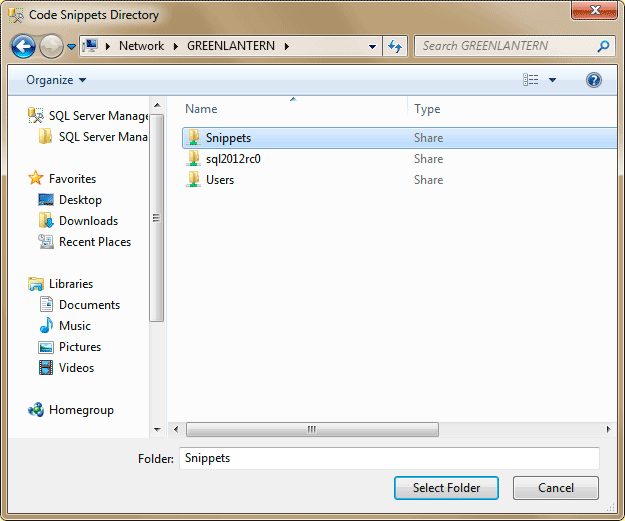
Then navigate to the share, highlight the folder, and click "Select Folder":
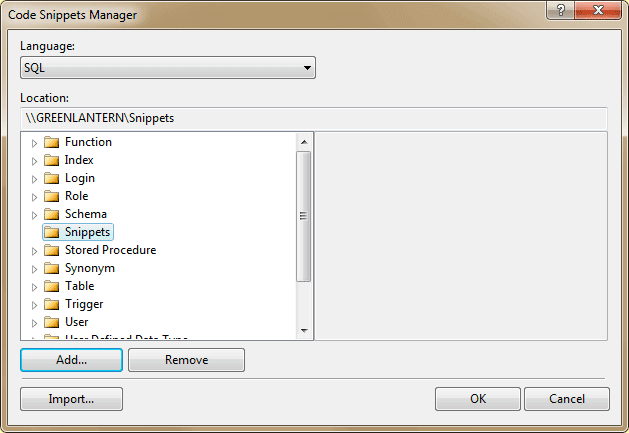
Now you'll have an empty folder here called Snippets, and you'll need to repeat this one step on each machine where you want to use this centralized snippet store:
As of SQL Server 2012 RC0, there is no automated way to add new snippets to this folder - you will be doing it manually. And I'll be quite honest, creating the snippets is not for the faint of heart. But once they're created, you're going to love the way they work.
To create a new snippet, let's look at one of the existing ones to see how they are constructed. One of the simplest examples to look at is the "Create Schema" snippet. Navigate to the following folder (change "Program Files (x86)" to "Program Files" if you are on an x86 machine):
C:\Program Files (x86)\Microsoft SQL Server\110\Tools\Binn\ManagementStudio\SQL\Snippets\1033\Schema\
Right-click the file Create Schema.snippet, and choose Open With > Notepad. You'll see this (I'm going to highlight the elements I'll talk about - the rest won't change for your custom snippets):
<?xml version="1.0" encoding="utf-8" ?>
<CodeSnippets xmlns="http://schemas.microsoft.com/VisualStudio/2005/CodeSnippet">
<_locDefinition xmlns="urn:locstudio">
    <_locDefault _loc="locNone" />
    <_locTag _loc="locData">Title</_locTag>
    <_locTag _loc="locData">Description</_locTag>
    <_locTag _loc="locData">Author</_locTag>
    <_locTag _loc="locData">ToolTip</_locTag>
</_locDefinition>
 <CodeSnippet Format="1.0.0">
 <Header>
 <Title>Create Schema</Title>
        <Shortcut></Shortcut>
 <Description>Creates a database schema.</Description>
 <Author>Microsoft Corporation</Author>
 <SnippetTypes>
  <SnippetType>Expansion</SnippetType>
 </SnippetTypes>
 </Header>
 <Snippet>
  <Declarations>
                    <Literal>
    <ID>SchemaName</ID>
    <ToolTip>Name of the schema</ToolTip>
    <Default>dbo</Default>
                    </Literal>
  </Declarations>
  <Code Language="SQL"> <![CDATA[
CREATE SCHEMA $SchemaName$
]]>
  </Code>
 </Snippet>
 </CodeSnippet>
</CodeSnippets>
There are main areas that will impact the appearance and use of the snippet (I'll leave others such as Author as an exercise for the reader):
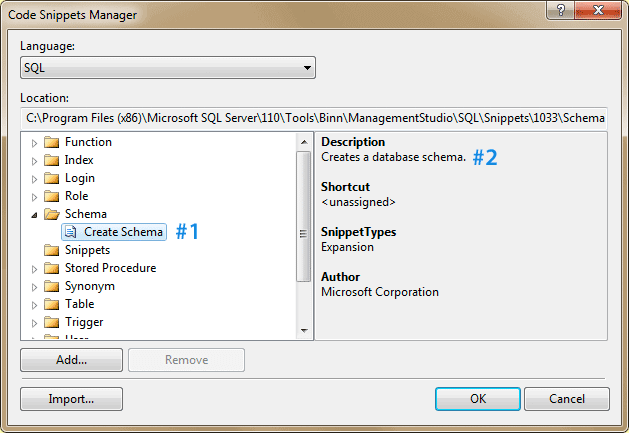
- Title - this is what shows up as the "name" of the snippet in both the Code Snippets Manager and the Insert Snippet context menu (marked as #1 in the diagrams below).
- Description - this is where you can write a lengthier explanation of the purpose of the snippet. It shows up in the Code Snippets Manager dialog when you've selected a specific snippet, and as a tooltip when you're about to insert a specific snippet (marked as #2 in the diagrams below).
- Literal - you will have one of these for each token you want to replace
in your snippet. The tokens are highlighted once you've inserted the snippet.
The three elements are:
- ID - this is how you will identify the token in the code (in the code,
you will surround this token with
$dollar signs$- note that it is case-sensitive). - ToolTip - this is what shows up if you hover on the token before you've replaced it.
- Default - this is the value that should be used if you tab past the token without replacing it.
- ID - this is how you will identify the token in the code (in the code,
you will surround this token with
- Code - pretty self-explanatory, this is the actual code, as is, that will be inserted into your query window when you select a specific snippet. Here are the diagrams showing #1 and #2; I'll illustrate #3 and #4 in the example below.

As a quick example, let's make changes to the above four areas, and save a new snippet. For this we'll use a slightly more complicated scenario: creating an optimized cursor. Change the XML to the following:
<?xml version="1.0" encoding="utf-8" ?>
<CodeSnippets xmlns="http://schemas.microsoft.com/VisualStudio/2005/CodeSnippet">
<_locDefinition xmlns="urn:locstudio">
    <_locDefault _loc="locNone" />
    <_locTag _loc="locData">Title</_locTag>
    <_locTag _loc="locData">Description</_locTag>
    <_locTag _loc="locData">Author</_locTag>
    <_locTag _loc="locData">ToolTip</_locTag>
</_locDefinition>
 <CodeSnippet Format="1.0.0">
 <Header>
 <Title>Create Optimized Cursor</Title>
        <Shortcut></Shortcut>
 <Description>Creates a non-default, optimized cursor for forward-only, read-only operations.</Description>
 <Author>Microsoft Corporation</Author>
 <SnippetTypes>
  <SnippetType>Expansion</SnippetType>
 </SnippetTypes>
 </Header>
 <Snippet>
  <Declarations>
                  <Literal>
   <ID>CursorName</ID>
   <ToolTip>Name of the cursor</ToolTip>
   <Default>c</Default>
    </Literal>
    <Literal>
   <ID>Query</ID>
   <ToolTip>Query text including ORDER BY</ToolTip>
   <Default>SELECT QUERY</Default>
    </Literal>
    <Literal>
   <ID>Variables</ID>
   <ToolTip>List of variables from query</ToolTip>
   <Default>@foo</Default>
    </Literal>
  </Declarations>
  <Code Language="SQL"> <![CDATA[
DECLARE $CursorName$ CURSOR LOCAL FAST_FORWARD FORWARD_ONLY
FOR
 $Query$
 FOR READ ONLY;
OPEN $CursorName$;
FETCH $CursorName$ INTO $Variables$;
WHILE @@FETCH_STATUS = 0
BEGIN
 FETCH $CursorName$ INTO $Variables$;
END
CLOSE $CursorName$;
DEALLOCATE $CursorName$;
]]>
  </Code>
 </Snippet>
 </CodeSnippet>
</CodeSnippets>
As you can see, tokens like CursorName are identified as
literals in the XML (<ID>), and then appear as $CursorName$
whenever they appear in the code.
Save this file in the central Snippets share you created earlier, as Create Optimized Cursor.snippet.
As an aside, I like to dig in and see how things work, but you don't have to. There are projects like the Snippets Generator for SQL Server 2012 to make this work easier. I haven't tried this specific one, but you can be sure that, until Microsoft provides an easier way to do this natively, you'll see more of these tools and utilities crop up.
Now you'll be able to right-click within a query window, choose "Insert Snippet..." and pick "Create Optimized Cursor" from the "Snippets" folder:

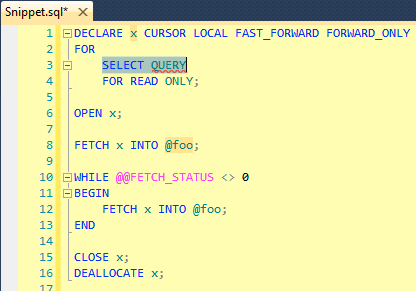
When you double-click on the specific snippet, your query window should be populated like this:
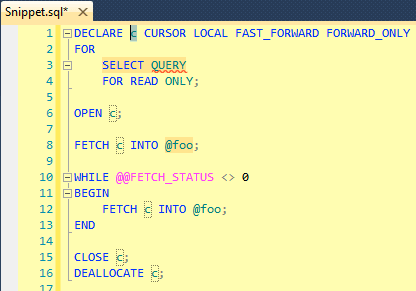
You can see that the first token ("c") is highlighted, and all the subsequent matching tokens are outlined with a dotted red line. If you type over the c and click tab, all the other instances of c will change to whatever you typed, and your cursor will move to the next token ("SELECT QUERY"). This is literally two keystrokes later:
I don't want to belabor the details about how snippets work, as that was covered quite well in the aforementioned tip. I just wanted to demonstrate how useful the custom snippets folder can be in helping your team to use the same code structure and adhere to the same standards.
One complication with this approach may be that if the network share is only accessible via the local network or over a VPN, your remote users will not be able to access the templates unless they are connected. So it's not a perfect solution for all team topographies.
Next Steps
- Download SQL Server 2012 from http://www.microsoft.com/sqlserver/
- Create a share on your network for storing a custom Code Snippets folder.
- Add the share to your users' Code Snippets Manager library.
- Create new snippets based on the existing XML files that ship with SQL Server.
- Review the following tips and other resources:
About the author
 Aaron Bertrand (@AaronBertrand) is a passionate technologist with industry experience dating back to Classic ASP and SQL Server 6.5. He is editor-in-chief of the performance-related blog, SQLPerformance.com, and also blogs at sqlblog.org.
This author pledges the content of this article is based on professional experience and not AI generated.
View all my tips


