Problem
Managing multiple SQL Servers has its challenges. One of the big challenges is having to collect data from each of the servers you manage and figure out which servers need attention. SQL Server has introduced a new feature called Central Management repository which can be used to manage multiple instances. One of the challenges to using CMS is that you have to register all the SQL Servers manually into CMS. The below article will guide you on how to register hundreds of servers in a second for SQL Server CMS.
Solution
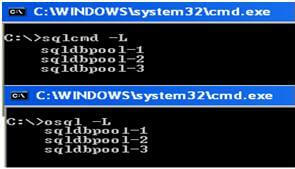
As a best practice, most organizations maintain the inventory of SQL Server instances so they now what is running where. To register multiple servers into CMS you will need to have this list of all SQL Server instances. If you don’t have an inventory you can create the database inventory using SQLCMD as shown below.
Run the SQLCMD -L to get a list of all SQL Server instances registered in the network and store them into a SQL table.
Minimum Requirement to register the multiple servers into CMS
- SQL Server Instance Inventory
- SQL Server 2008 Instance to act as the CMS
You can follow the below steps to register the SQL Instances into CMS.
Step 1: Copy and Paste the below PowerShell script into NotePad and save the file as “RegSvr.ps1” in “c:\myscripts\” folder. (Please note you can save the file at any location, but in the next step you will need to make that adjustment.)
$cmsservers = invoke-sqlcmd -serverinstance ‘Put SQL Instance name here’
-database ‘Put SQL Inventory DB Here’
-query “SELECT SERVERNAME FROM SERVERLISTTABLE”

cd ‘SQLSERVER:\sqlregistration\Central Management Server Group\CMSServerName\CMSGroupName\
CMSSubGroupName\’

foreach ($server in $cmsservers)

{

$svrname = $server.serverName

$regsvrname = $svrname

if ($regsvrname -like “*\*”)

{

$regsvrname = $regsvrname.replace(“\”, “%5C”)

}

$svrname

new-item $regsvrname -itemtype registration -value “server= $regsvrname;
integrated security=true”

}
Step 2: Modify the PowerShell script and put the SQL Instance Name, Inventory Database Name, Query to Retrieve the SQL Instance Names, and Central Management Server Name and the CMS Path where you want to register the SQL Server Instances. Once you update the script, save it again.
For example:
- SQL Instance Name is MSSQLCMDB
- Inventory Database Name is CMDB
- Table name where the SQL Instances name stored is TBLSERVERLIST
- and CMS server name and path is WIT\Production\SQL2008
Please take a look at the my CMS server and the path. I want to register the SQL instances into SQL2008 group.

You have to edit the powershell script as below.

Step 3: Go to object explorer and connect to the Central Management Server. Right click on the CMS Server Name and click on “Start PowerShell” as shown below.

Step 4: Once the PowerShell prompt opens, you have to enter the command SL “Location of PowerShell script file” as shown below.

Step 5: Now here is the last step that will execute the PowerShell script and it will register the servers into CMS. To execute the script you have to run “./regsvr.ps1”

Step 6: Go to the CMS server and expand the group to check the list of registered servers or you can query the CMS tables as shown below.
/* Servers and groups */

SELECT DISTINCT groups.name AS ‘Server Group Name’

     ,svr.server_name AS ‘Server Name’

FROM msdb.dbo.sysmanagement_shared_server_groups_internal groups

INNER JOIN msdb.dbo.sysmanagement_shared_registered_servers_internal svr

 ON groups.server_group_id = svr.server_group_id;

GO
Next Steps
- Create the different groups into CMS and register the SQL Servers into each group.
- Evaluate your Policies using the CMS registered servers.
- Maintain the CMS and add or remove SQL instances as needed.

Biography
Jugal Shah is the founder of SQLDBPool.com, where he is writes articles on SQL Server Administration and Development. Jugal has 8+ years of extensive experience in SQL Server Database administration and development. Jugal has worked on SQL Server 2000, 2005, 2008 and 2008 R2. In his current assignment, Jugal is managing large critical databases. His expertise is in database security, performance tuning and implementing high availability solutions. He can be contacted at jugal.shah@sqldbpool.com. He has been recognized as a SQL Server MVP since 2010.
- MSSQLTips Awards: Trendsetter (25+ tips) – 2013