By: Seth Delconte | Comments (29) | Related: > XML
Problem
What is the most efficient way to modify XML values? To allow for precise modification of XML nodes and values, the XQuery XML query language employs an extension known as the XML Data Modification Language (DML). The XML DML uses the XML modify() method, which makes use of three operational keyword sets: insert, replace value of, and delete. Let's take a closer look.
Solution
Inserting Nodes
The insert keyword uses the following structure:
- insert Expression1 ( {as first | as last} into | after | before Expression2 )
The insert operation can be used to insert nodes into, after, or before existing nodes. In order to demonstrate some examples, let's create a table with a record containing sample untyped XML:
CREATE TABLE HR_XML (ID INT IDENTITY, Salaries XML)
GO
INSERT HR_XML VALUES(
    '<Salaries>
      <Marketing>
        <Employee ID="1" tier="4">
          <Salary>42000</Salary>
        </Employee>
        <Employee ID="2" tier="1">
          <Salary>52000</Salary>
        </Employee>
        <Employee ID="3" tier="4">
          <Salary>48000</Salary>
        </Employee>
      </Marketing>
    </Salaries>
    '
)
GO
If we would like to create a new department node named ‘Accounting', we can do so using modify() and insert:
UPDATE HR_XML
SET Salaries.modify('insert <Accounting /> into (/Salaries)[1]')
GO
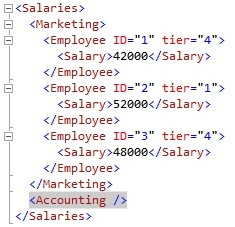
The Accounting node was added inside the Salaries node by simply using the insert...into format.
Singleton Designation
You may notice that we designated a singleton (single node value) representation of ‘[1]' for Expression 2 (the Salaries destination node). This is because the insert keyword requires that Expression 2 be a single node. Even though there is only one Salaries node, the singleton is still required. Attempting to run the query without the singleton will result in an error:
UPDATE HR_XML
SET Salaries.modify('insert <Accounting /> into (/Salaries)')
GO

Insert Node as First
We see that the node was placed after the only other existing node residing on the same level (the Marketing node) by default. Instead, we want the Accounting node to be the first node under the Salaries node. To make this change, we will use the format insert...as first:
UPDATE HR_XML
SET Salaries.modify('insert <Accounting /> as first into (/Salaries)[1]')
GO
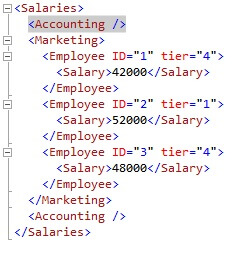
We now have one empty Accounting node at the top, and one at the bottom. We'll remove the bottom one later.
We are told that we have a new employee joining the Accounting department. Let's populate the Accounting node with a new Employee node, which should include node attributes (ID, tier):
UPDATE HR_XML
SET Salaries.modify('insert <Employee ID="4" tier="4" /> into (/Salaries/Accounting)[1]')
GO
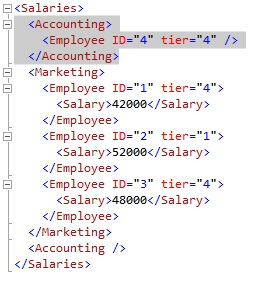
Going back for a moment to the subject of singletons; if we had used '[2]' as the singleton designation, the new Employee node would have been placed in the bottom Accounting node.
Insert by Identifying a Specific Node
What if we needed to insert a new node into a specific Employee node in the Marketing department? We can identify the correct employee by their ID attribute, using the ‘@ID' argument:
UPDATE HR_XML
SET Salaries.modify('insert <Projects /> into (/Salaries/Marketing/Employee[@ID=("2")])[1]')
GO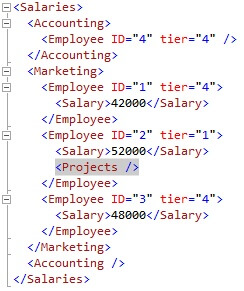
The Projects node has been inserted into the Employee node having ID #2.
Insert Nodes with Values
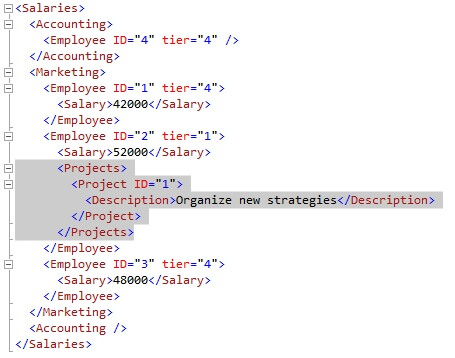
We can also insert any collection of nested nodes and values. If we want to designate a new project for employee ID #2, we can do the following:
UPDATE HR_XML
SET Salaries.modify('insert <Project ID="1"><Description>Organize new
    strategies</Description></Project> into
    (/Salaries/Marketing/Employee[@ID=("2")]/Projects)[1]')
GO
Insert Nodes with Values from Other Nodes
The newest employee now needs salary data. Employee #4 is at tier 4, like employee #1, and should be at the same salary range as employee #1. Let's insert a Salary node for employee #4, and populate it with the salary amount from employee #1's Salary node:
UPDATE HR_XML
SET Salaries.modify('insert
<Salary>{(/Salaries/Marketing/Employee[@ID=("1")]/Salary/text())}</Salary>
into (/Salaries/Accounting/Employee[@ID=("4")])[1]')
GO
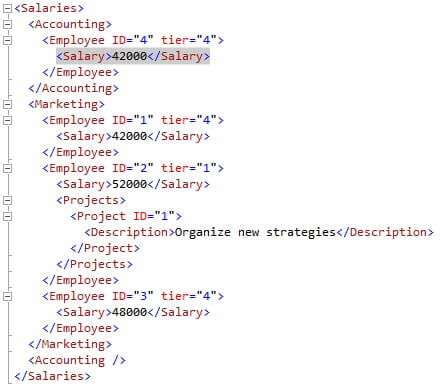
Notice that we've pulled the salary amount from employee #1 by using curly braces ({}) around the path, and then wrapped it all with explicitly depicted Salary node tags.
Deleting Nodes
The delete keyword is much simpler than insert. Its syntax structure looks like:
- delete Expression
Let's remove the redundant bottommost Accounting node from the Salaries node:
UPDATE HR_XML
SET Salaries.modify('delete (/Salaries/Accounting)[2]')
GO
We've deleted the empty node by indicating its singleton value (2).
Deleting Values
Node values can be deleted by employing the text() function to specify that a value, not a node, is to be removed.
The project description for project #1 has become outdated. We need to remove the description for the time being. Only employee #2 is working on this project, so we can run the following to remove the value:
UPDATE HR_XML
SET Salaries.modify('delete
(/Salaries/Marketing/Employee[@ID=("2")]/Projects/Project[@ID="1"]/Description/text())[1]')
GO
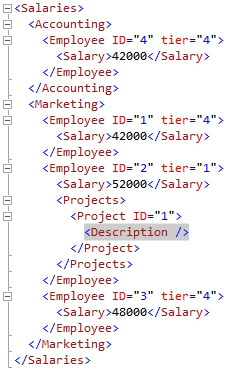
The Description node's value has been successfully removed.
Replacing Values
We can use replace value of to change node values. The syntax format for replace value of is as follows:
- replace value of Expression1 with Expression2
We realize that the salary amount for employee #2 is incorrect. We need to change it from 52000 to 60000. To update it to the new value, we'll run the following:
UPDATE HR_XML
SET Salaries.modify('replace value of
(/Salaries/Marketing/Employee[@ID=("2")]/Salary/text())[1] with ("60000")')
GO
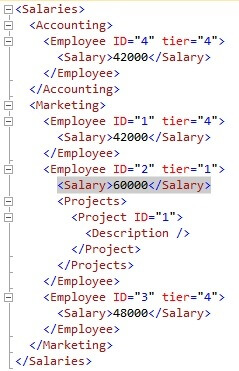
The salary amount has been updated.
Replace Values Using XQuery Arithmetic
We now find out that ALL employees in the Marketing department are to receive a 10% salary increase. We can use a script that iterates Employee nodes appropriately:
DECLARE @i INT = 1
WHILE @i <= 3
   BEGIN
 UPDATE HR_XML
 SET Salaries.modify('replace value of
 (/Salaries/Marketing/Employee[@ID=(sql:variable("@i"))]/Salary/text())[1]
 with (/Salaries/Marketing/Employee[@ID=(sql:variable("@i"))]/Salary)[1] * 1.01')
 SET @i+=1
   END
GO
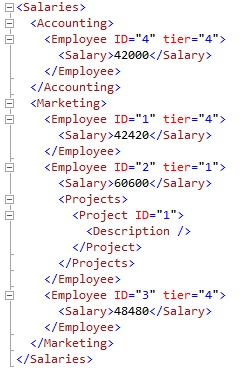
We've used the XQuery multiplication operator to increase the existing value of every Salary node in Marketing by 10%. We incorporated the SQL variable '@i' (inside of a sql:variable() extension function), which was used to iterate the Employee nodes. Notice that the salary amount for employee # 4 was not updated, since that employee is in the Accounting department.
Modify() Limitations
A couple of operations involving the modify() method will not work as may be expected:
Issue # 1
The modify() method cannot be used to select the results of the XQuery modify statement. The following will fail:
SELECT Salaries.modify('replace value of
(/Salaries/Marketing/Employee[@ID=("2")]/Salary/text())[1]
with ("60000")')
FROM HR_XML
GO

This is because modify() operates directly on the XML value, whether it is a column or variable, and cannot be used in an ad-hoc operation that does not update the underlying XML value. An alternative to the above operation would be to select the XML value into a new XML variable, make the change, and then select the variable value:
DECLARE @x XML
SELECT @x = Salaries FROM HR_XML
SET @x.modify('replace value of (/Salaries/Marketing/Employee[@ID=("2")]/Salary/text())[1] with ("60000")')
SELECT @x
GO
The above method can be used to check or test the modification script before actually applying it to the original XML value.
Issue # 2
Modify() also cannot be used more than once within the same UPDATE statement, on the same XML value. In other words, only one instance of modify() may be used at the same time on the XML value. For example, an operation that tries to update the salary amount of two different employees in the following manner will fail:
UPDATE HR_XML
SET Salaries.modify('replace value of
(/Salaries/Marketing/Employee[@ID=("2")]/Salary/text())[1] with ("60000")'),
Salaries.modify('replace value of
(/Salaries/Marketing/Employee[@ID=("1")]/Salary/text())[1] with ("60000")')
GO

Instead, multiple updates to the same XML value must be accomplished using entirely separate UPDATE statements.
Replace Value of one Node with Value of Another
Employee #1 has reached tier 1 status. We need to update the salary amount to match that of employee #2 (60600):
UPDATE HR_XML
SET Salaries.modify('replace value of
(/Salaries/Marketing/Employee[@ID=("1")]/Salary/text())[1]
with (/Salaries/Marketing/Employee[@ID=("2")]/Salary)')
GO
Replace Value of a Node Attribute
We also need to change the tier number for employee #1. To specify a node attribute in the XQuery path, use the ‘@' symbol:
UPDATE HR_XML
SET Salaries.modify('replace value of
(/Salaries/Marketing/Employee[@ID=("1")]/@tier)[1] with "1"')
GO
We've successfully changed the salary amount and tier number for employee #1. The results after running both statements are as follows:
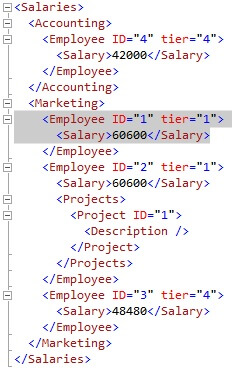
Notice that we had to perform two separate modify() operations in order to update the salary and tier data.
Conclusion
We've looked at examples of the XML DML extension, using the modify() XQuery method. We introduced all three operational keyword sets: insert, replace value of, and delete; and used them to perform some of the more common XML modification operations. We also pointed out some limitations and appropriate workarounds.
Next Steps
- In all of our examples here, we've used untyped XML. If you are interested in furthering your XML DML skills, I suggest becoming familiar with performing the operations we have covered in this article on typed XML. An excellent article by Robert Sheldon will get you started.
- Read these other tips related to XML
About the author
 Seth Delconte is a Microsoft Certified Trainer and Database Administrator, and works primarily on SQL Server development.
This author pledges the content of this article is based on professional experience and not AI generated.
View all my tips


