By: Scott Murray | Comments (5) | Related: > Analysis Services Administration
Problem
Now that I created several SSAS partitions, what do I need to do to process and maintain them? What options are available to improve my processing time?
Solution
Once a SSAS partition is created, there are specific operations and methods that you will need / want to perform to keep these partitions in an optimal state. To get you started, Ray Barley offers an excellent posting on creating a new partition. After you have planned for and created the initial partitions, you need to determine how these partitions will be maintained and at what point new partitions must be created or when a group of partitions will be merged together and ultimately when they will be deleted. Additionally, aggregations for each partition must be considered and maintained. Furthermore, partitions with cell writeback must be administered to allow SSAS the ability to perform calculations such as what-if scenarios. It might be best to consider the hierarchy of objects within a SSAS database. Within a SSAS database, we can have multiple cubes, and within a cube, multiple measure groups. Within a measure group, multiple partitions can be created. Further, one or more aggregations can be assigned to a partitions
Aggregations
After defining partitions, one of the first orders of business should be to define aggregation for the partition. Several options are available during and after partition creation to initialize aggregations for a partition. Using the defaults may seem like the best bet, however, like most everything else in the SQL Server world, it may be best to consider the actual usage of the measures within its measure group and partitions. Aggregation considerations include determining what values and calculations are going to be used most often, comparing the cost (space used) of an aggregation versus the space available on a server, measuring the time it takes to complete a query versus having the value already in the aggregation, and last measuring the time an aggregation takes to process during data refreshes versus the time it takes to query for the value without the aggregation. Keeping these considerations in mind, the below screen print displays the options available for adding aggregations to our partition.
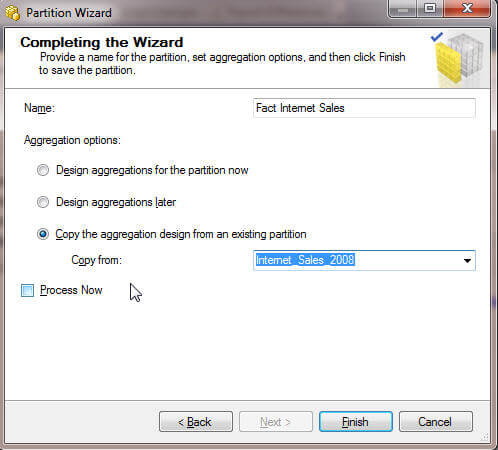
In the above case, we were making a new partition for 2009 and then copying the existing aggregation from 2008. Of course, another option would be to make new aggregations for this partition and design the aggregation later. If during the partition wizard, the Design aggregation later option was selected, either new aggregations could be created for this partitions or we can add the existing aggregations copied to this partition by going to SSDT (SQL Server Data Tools..aka Visual Studio for BI AKA the old BIDS), Opening a SSAS Project, Opening a cube, and navigating to the Aggregations tab, as noted below, and then clicking the aggregations, and selecting the desired aggregation.

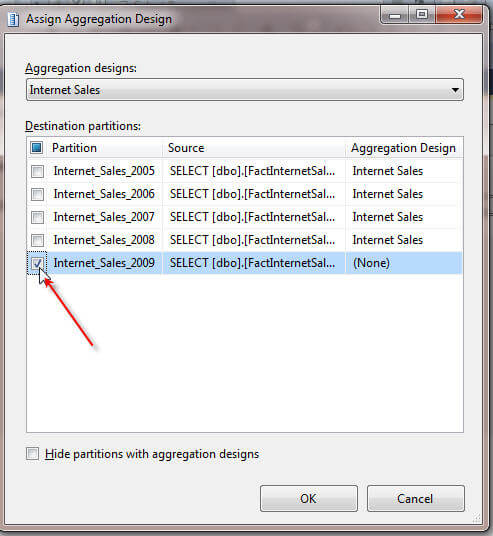
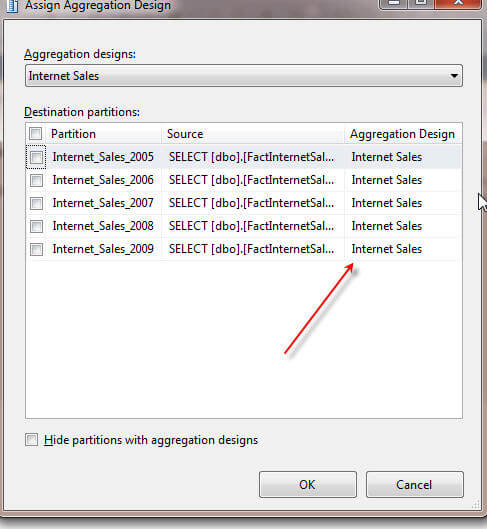
You will notice, that if a set of aggregations is attached to a partition, upon assigning it to another partition, the initial partition disappears as noted in the following illustration.

Again, just copying existing aggregation partitions may or may not be a good idea, depending fully on the usage of a partition. Older data tied to particular partition or partitions may only get used sporadically, which may result in a limited number of aggregations. To the contrary, usage based aggregation may need to be reviewed and created based on the OlapQueryLog which is beyond the scope of this particular article, but for which I hope to do another tip in the near future.
Merging and Deleting Partitions
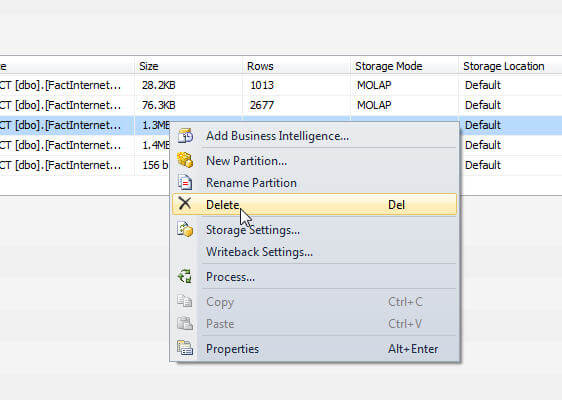
As more and more partitions (and data) get added to a cube, you will often want to merge and delete partitions. One of the main benefits of partitions center around the advantage of just having to process the affected partitions when new data is added and not all partitions are impacted. At some point the data in the partitions may no longer be queried very often or even need to be completely archived. Deleting a partition is as easy as Opening a Cube, Clicking on the Partition tab, and then right clicking on the partition to delete, and clicking Delete.
Merging partitions is an easy process too, but several criteria must be met to merge a partition. First both partitions to be merged must have the same aggregations, and second, both partitions must be in a processed state. Also, the merge process must be performed in Management Studio (SSMS) and not in SSDT. Take a look at the below screen prints to see this process in action.
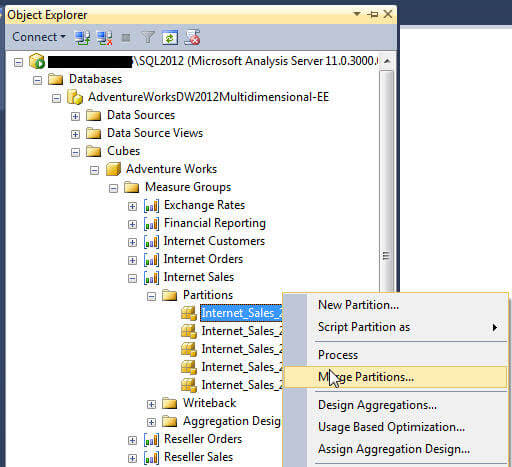
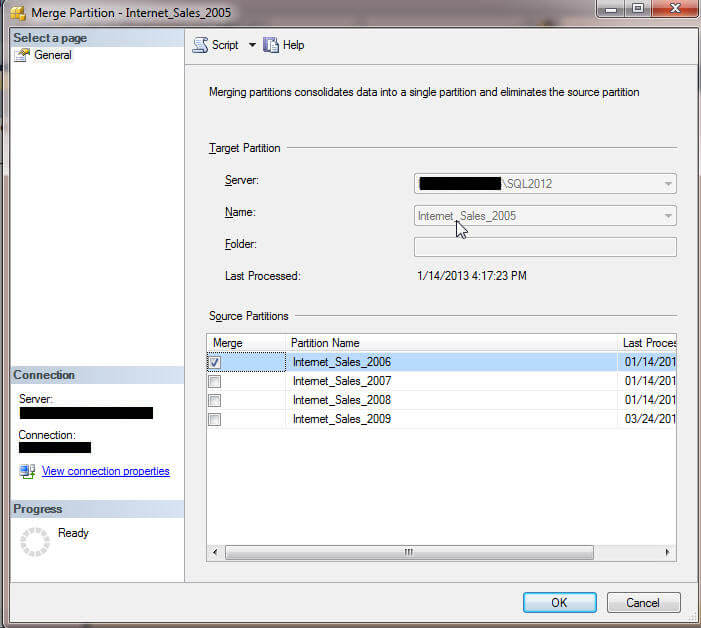
The merging of partitions is an easy process with minimal impact on the end users.
Remote vs. Local Partitions
In addition to maintaining partitions at the aggregation level, several considerations must be made concerning the location and processing of the partitions storage.
- Will the partitions be stored locally or remotely?
- Will the partitions be processed sequentially or in parallel?
- Will a single table or multiple tables (or views) be used as the source for a group of partitions?
The first considerations centers around the storage location of the partitions. With local partitions, the partitions are stored and processed all on a single server. To the contrary, remote partitions provide a method of distributing the processing and storing of partitions onto multiple machines. The remote option provides a method of using multiple machines to process large scale partitions in a distributed environment. Within both scenarios, partitions can actually be spread out across multiple disks, which of course could help with disk contention issues, although this scenario could potentially overwhelm a processor if done on a single server (local mode).
To alleviate the processor issue, spreading the processing of remote partitions on multiple machines allows the processing to occur on multiple machines. In order to garner these performance and processing gains, instead of processing the partition sequentially, they can be processed in parallel. For example, in order to process in parallel, select the various partitions to be processed, and then select change settings as noted below.
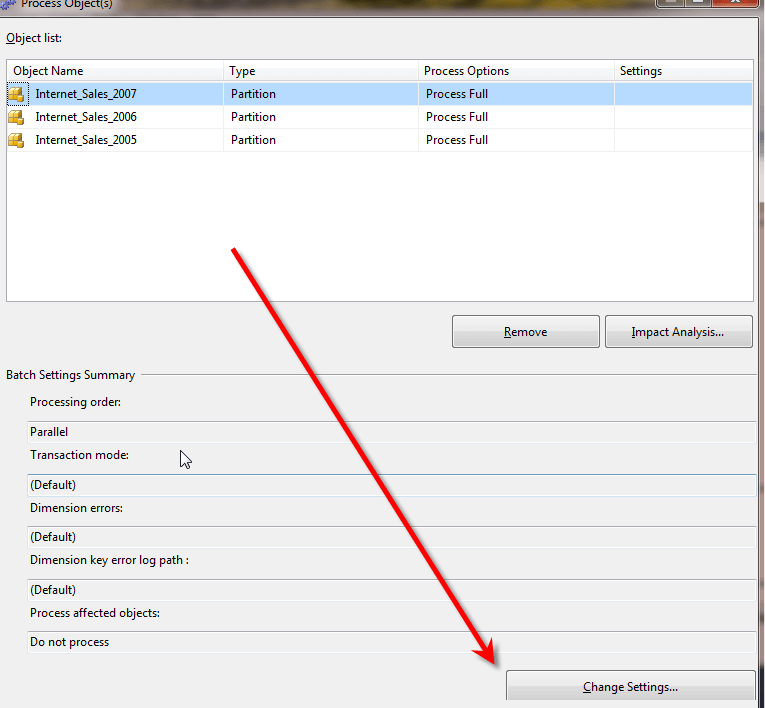
On the processing options screen, as shown below, you can decide whether to run either parallel or sequential for processing of the partitions selected.
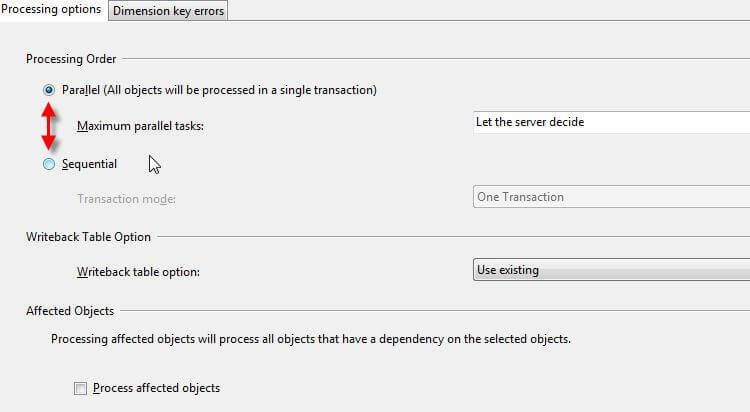
Running in parallel on multiple remote machines provides the ability to process large scale datasets divided into multiple partitions on multiple remote servers; this setup provides shorter downtime while cubes are being updated. Furthermore, with multiple partitions, even when run sequentially, allows for processing to only occur on the partitions which have new or updated data, while leaving the remaining partition in a processed state. These conditions allow for most of the data to remain online while also reducing processing time significantly. Last, this methodology can easily be integrated into a merge strategy as discussed earlier in this article.
Drilling down even further into the storage layer, any additional partitions can be based on the same original fact table in the relational datasource which is segmented out to prevent duplicates, such as by a date for instance. However, additional partitions can also be based on different fact tables as long as the table structure is exactly the same. Of course, using multiple tables provides the ability to break up the relational data onto multiple disks which again can potentially produce better performing cube processing. As you can see, multiple layers exist for improving partition measure group processing and availability.
Write Enable Partitions
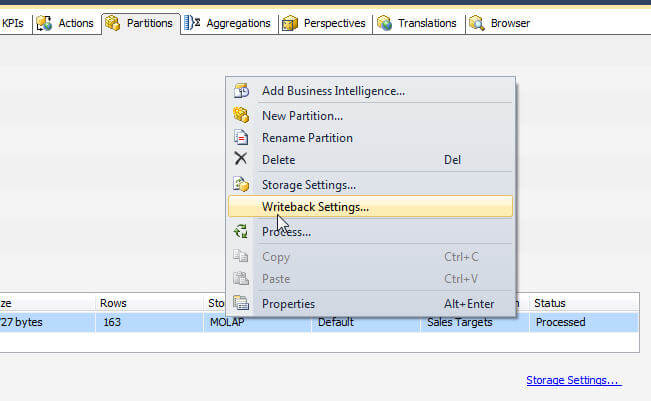
Partitions afford one last feature, Write Enabled Partitions, which are especially useful for creating what-if scenarios. Write enabling partitions is only allowed when the measures within that partition utilize only the Sum function. You can write enable a partition by right clicking on a partition and selecting Writeback Settings.
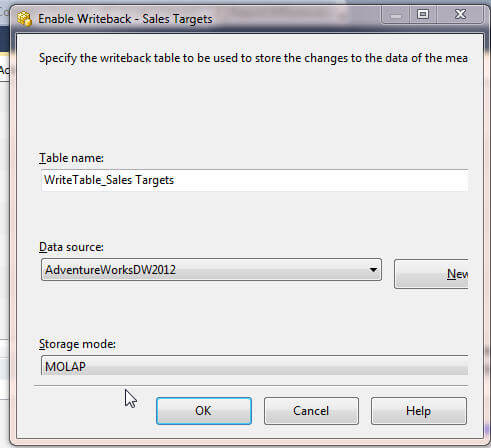
As illustrated in the next screen print, you must provide the Table name for the writeback data, what datasource is used and last what storage method will be used in the writeback partition. Once you click
OK, the new, write enabled, partition shows in the partition list.

Once you enable writeback, the writeback partition will need to be processed and then security setup to allow for read-write access for the roles needing write enable access, as shown below.

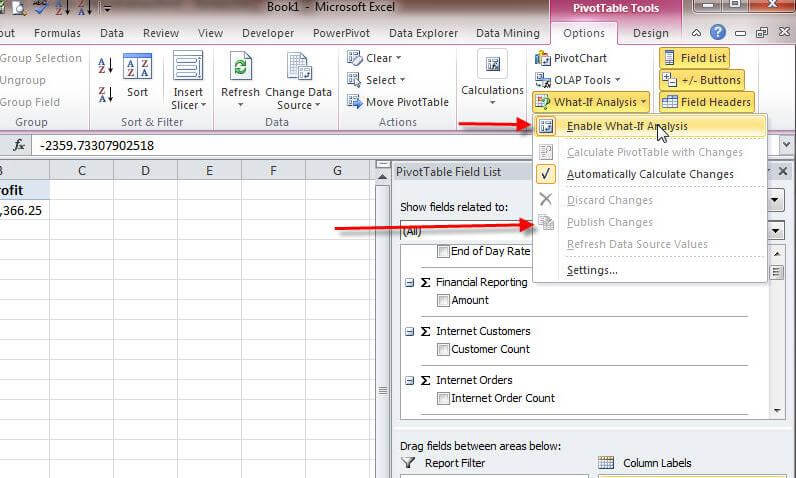
Now that the partition is write enabled, end users in Excel, as displayed below, can use the What-if button on the PivotTable Ribbon tab to enable write back access for this pivot. In order to utilize the writeback functionality, first click on the Pivot Table Tools-Options tab, then What-If Analysis, then Enable What-If Analysis. Now changes can be made to the values for the Sales Amount Quota field, in the below example. Last, to "commit" the changes to the partition, the Publish Changes option is selected.
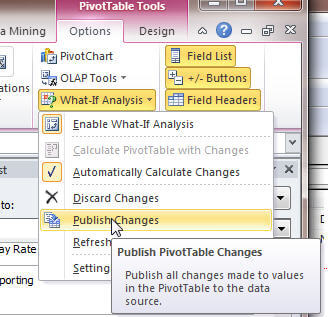
Enabling the write back function provides an excellent way to harness the power of partitions for various budget and scenario utilizations all within a familiar Excel pivot table.
Conclusion
In this tip, the processing and maintenance of SSAS partitions was covered; consideration was given for the planning, creation, processing, maintenance, deleting, and merging of partitions. Without this planning, duplicate or missing measure data could be introduced to your cube. To alleviate some of the long processing time, local and remote partitions were discussed, and, finally the use of write enabled partitions for what-if scenarios was conveyed.
Next Steps
- Partitions (Analysis Services - Multidimensional Data) -- http://technet.microsoft.com/en-us/library/ms175688.aspx
- SSAS Processing Option -- http://technet.microsoft.com/en-us/library/ms174774.aspx
- Converting Writeback Data to a Partition --http://technet.microsoft.com/en-us/library/ms174908.aspx
About the author
 Scott Murray has a passion for crafting BI Solutions with SharePoint, SSAS, OLAP and SSRS.
This author pledges the content of this article is based on professional experience and not AI generated.
View all my tips


