Problem
The tip, Prepare for an Upgrade with the SQL Server 2016 Upgrade Advisor, described the new SQL Server 2016 upgrade advisor. Can we use this new upgrade advisor to migrate to Azure SQL database?
Solution
You can download the latest SQL Server 2016 Upgrade Advisor from this link: https://www.microsoft.com/en-us/download/details.aspx?id=48119. This is still a preview version, so make sure you don’t install it directly on a production or important server as this product is subject to change. For more understanding regarding the terms like “beta” or “preview” version refer this link.
After you install, launch the SQL Server 2016 Upgrade Advisor.
Once you launch the Upgrade Advisor, you will see the below screen. The scenarios tab shows the options that are available. Note the options are named differently as compared to the ones described in this tip Prepare for an Upgrade with the SQL Server 2016 Upgrade Advisor.

In the “Active” tab, you can see active workflows that you initiated. As we haven’t started to use this tool yet, there are no workflows in this tab. See below screenshot.

Migrate to Azure SQL Database
In this tip, we will see how to use the “Migrate to Azure SQL Database” option. Use the below script to setup a test database on your local instance of SQL Server. Our goal in this tip is to migrate this newly created database “UpgradeNightmare” to Azure SQL Database.
USE master;
GO
CREATE DATABASE UpgradeNightmare;
GO
ALTER DATABASE UpgradeNightmare SET COMPATIBILITY_LEVEL = 100;
GO
USE UpgradeNightmare;
GO
CREATE TABLE dbo.BadTable
(
   x INT PRIMARY KEY,
   y NTEXT,
   ts TIMESTAMP
);
GO
CREATE INDEX ix1 ON dbo.BadTable(ts);
GO
CREATE PROCEDURE dbo.BadProcedure;1
@x IMAGE
AS
BEGIN
   SET ANSI_NULLS OFF;
   SELECT name FROM syscolumns;
   EXEC sp_addtype N'EMail', N'nvarchar(320)';
END
GO

CREATE PROCEDURE dbo.BadProcedure;2
AS
BEGIN
   SET FMTONLY ON;
   UPDATE b SET x += 1 FROM dbo.BadTable AS b WITH (NOLOCK);
   EXEC sp_configure 'allow updates', 1;
END
GO
CREATE PROCEDURE dbo.WorseProcedure
AS
BEGIN
   SET CONCAT_NULL_YIELDS_NULL OFF;
   SELECT 'string alias' = 1;
   DROP INDEX dbo.BadTable.ix1;
END
GO
Once the database “UpgradeNightmare” is created, as a first step click on the option “Migrate to Azure SQL Database”. Provide the SQL Server instance details where you created the “UpgradeNightmare” database and click on “Connect”.

Once the connection is successful, you will be able to view all the databases on the instance as shown below.

Click on the database “UpgradeNightmare” and click “Select”. You will see this option and then click “Run”.

Once you click on “Run”, the Upgrade Advisor analyses the selected database and presents the results as shown below. You can see there are no errors reported.

Click on the “Select Target” option where you need to provide the details of the Azure Server name. You can get a Azure server name if you already have a SQL Azure database. However, if you don’t have a Azure SQL Database already you can create a new server by following the steps on the Azure portal.

Once you click on “Select”, you will see this screen where you can create a test database. Enter the relevant details and click on “Create”.

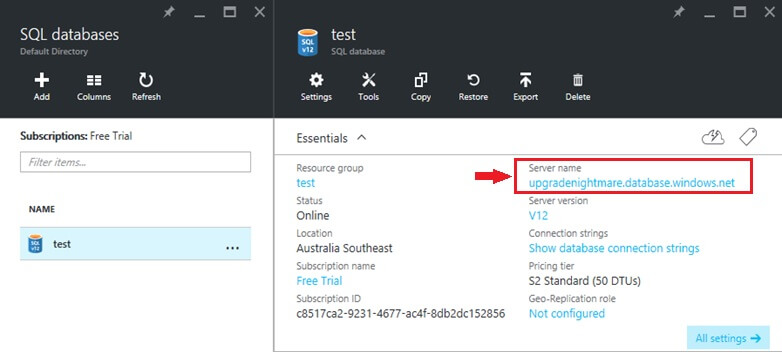
Once the Azure database is created, you can get the Azure Server name from the portal as shown below.
Now going back to our previous sequence of steps in the Upgrade Advisor, click on the option “Select Target” as shown above. Once you click on the “Select Target” option, you will see the below screen. Enter the credentials of the Azure SQL Server which you created earlier and click on “Connect”. Once done, click on the “Select” option.

You will then see this screen, where you will be able to select the option to “Migrate” the database.

Once migration is complete you can verify that the database is indeed migrated by connecting to the Azure SQL Server. I noticed that there is no confirmation or any type of message displayed on the Upgrade Advisor that the migration completed successfully.

If the migration was not successful, the Upgrade Advisor displays a message as “Failed” and there is another “Show Errors” option you can select to view the actual error messages. In this example, I tried to migrate the “UpgradeNightmare” database again to the same Azure SQL server.

With the new SQL Server Upgrade Advisor, we have a good tool to migrate to SQL Azure.
Next Steps
- Try testing this tip using your own test database
- Refer to these useful tips on SQL Server migration and upgrade: SQL Server Upgrades and Migrations Tips
- Refer to these tips on the Azure platform: SQL Server Azure Tips

Mohammed has been a SQL Server DBA since 2005 and has had the opportunity to work on different versions of SQL Server starting from SQL Server 2000 with exposure to Sybase as well. He is based in Wellington, New Zealand and works at Datacom Systems Ltd, as a SQL Database Administrator. He can be reached at: moinu@live.com.
- MSSQLTips Awards: Author of the Year Contender – 2016, 2018-2021 | Achiever (75+ tips) – 2021

