By: Mohammed Moinudheen | Updated: 2021-11-30 | Comments (2) | Related: 1 | 2 | 3 | 4 | > Azure SQL Database
Problem
I have a requirement to migrate my on-premises SQL Server databases to the Azure SQL Database platform. A few of the on-premises databases are resource intensive and I am not sure what database tier these databases need to be migrated to in Azure. Is there any way by which we can determine the correct or appropriate Azure SQL DB sizing for these on-premises databases based on current workloads?
Solution
As part of migration strategies to the cloud, there are a number of options available and if you have decided to migrate your on-premises SQL Server database to Azure SQL database, you may wonder as to what may be the correct purchase model, service tier, compute tier, etc.
If you check the pricing calculator for Azure SQL DB, you will notice the price difference even when we make a few changes to the database sizing. You may also feel the need to over allocate resources on Azure SQL DB fearing that the performance may not be optimum after the migration. At the same time, if you under estimate the current workloads and migrate to an under allocated Azure SQL DB, you will have unhappy customers complaining that the database is performing very slowly after migrating to the cloud. These issues can be overcome by making use of some tools available in the Data Migration Assistant also known as DMA. Using this tool, we can get Azure SQL DB SKU recommendation reports for the on-premises databases.
Performance data will be collected on the on-premises database servers over a period of time and using that baseline data, SKU recommendations reports can be generated. These reports can also be downloaded as a HTML file and can be shared with your IT management for approval purposes and another good thing is even a justification for the recommendation is available which will make the initial steps in the migration easier.
What are the pre-requisites for collecting baseline data on the on-premises servers?
As a first step, download and install the Data Migration Assistance (DMA). You do not need to install DMA directly on the on-premises server. This can be installed on a separate server like a common jump host from where you can connect to your on-premises servers. This may prevent any overheads or bottlenecks on your actual on-premises SQL Server.
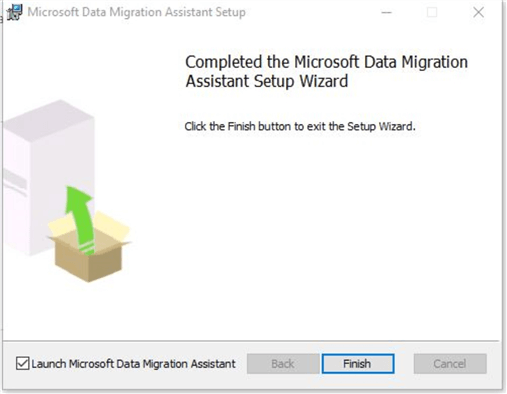
The installation is straight forward. You will get this screen in the end after a successful install. You can refer to this tip to learn more about DMA. Once the installation succeeds, you will be able to view the installation files in the C:\Program Files folder. In my case, the full path is C:\Program Files\Microsoft Data Migration Assistant\SqlAssessmentConsole
On checking the SqlAssessmentConsole folder, you should see a number of files like below.
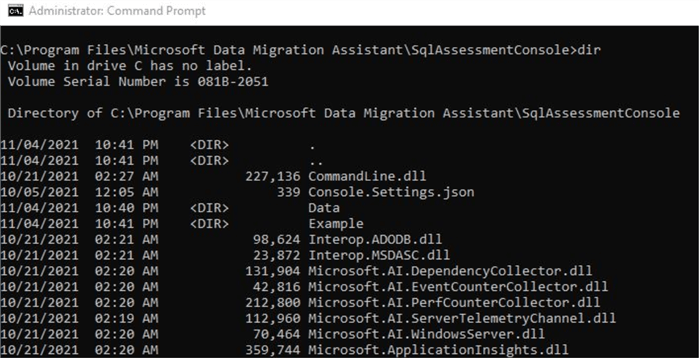
We will be making use of mainly SqlAssessment.exe available in this folder. Also, make sure that the account that will be used to connect to the on-premises SQL Server has sysadmin access.
Collect baseline data on the on-premises SQL Server
Once the pre-requisites are complete, we can start collecting baseline data. If you installed DMA on another server, you will need to perform these steps from that server. As the data collection process is light weight, it is recommended to leave the data collection running for a few days in order to get the correct database sizing recommendations. This will help us to collect data both during off peak and peak periods so correct estimation can be obtained from the Data Migration Assistant.
Run the below script at a command prompt on the correct DMA installation path to start the data collection process.
--Go to correct path-- Make sure to provide correct path for outputFolder (create a folder named SQL on C drive)
-- In my case, path is C:\Program Files\Microsoft Data Migration Assistant\SqlAssessmentConsole>
.\SqlAssessment.exe PerfDataCollection  --sqlConnectionStrings "Data Source=Your_On_Prem_Server;Initial Catalog=master;Integrated Security=True;"  --outputFolder C:\SQL
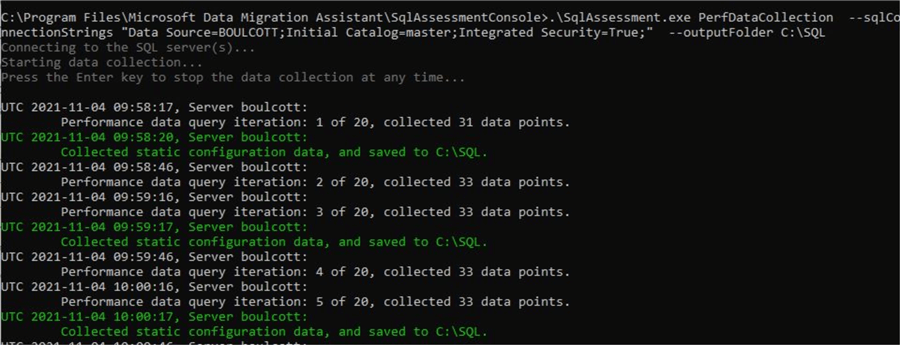
If the command is correct, you will see a screenshot as shown above and you can see that the data collection process has started.
In the output folder, in this case C:\SQL, you can see the new files created and growing in size as the process is running. There are 3 files generated on the output folder as shown.

How to schedule data collection?
In the previous section, you saw the steps to initiate the data collection process. We can schedule this process using a SQL job which may make the task easier if you plan to leave this running for a few days. As a first step, copy the below script and save it as a windows batch file (.bat) extension. Make sure to update the correct data source and output folder.
cd "C:\Program Files\Microsoft Data Migration Assistant\SqlAssessmentConsole\".\SqlAssessment.exe PerfDataCollection --sqlConnectionStrings "Data Source= Your_On_Prem_Server;Initial Catalog=master;Integrated Security=True;" --outputFolder C:\SQL
Next, this batch file can be called using a SQL job. I named this batch file testing.bat. Create a SQL job and in the job step properties, make sure the step has the below settings.
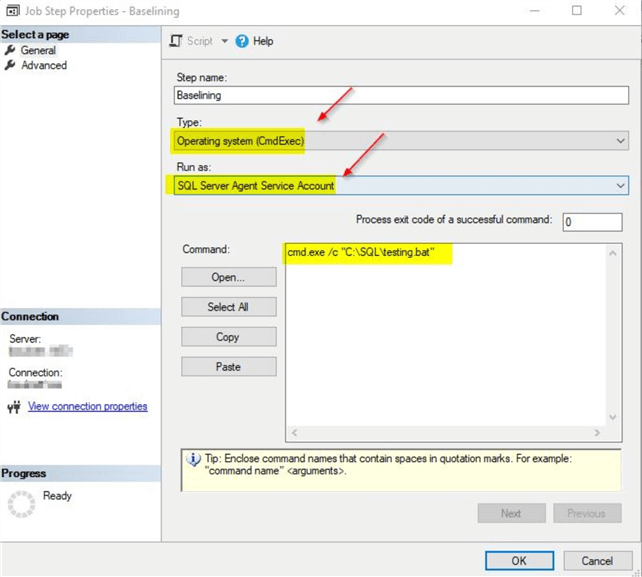
In the command section, use this script. Make sure to update the correct batch file name and path.
cmd.exe /c "C:\SQL\testing.bat"
Once this job is created, schedule or stop it as per your requirements and you will notice the files getting generated in the output folder and data getting collected.
Getting correct Azure SKU recommendation
After leaving the data collection process running for a few days, we can make use of the data collected to get Azure SQL DB SKU recommendations for the purpose of migrating to Azure.
First, navigate to the correct folder at a command prompt. The SqlAssessment.exe executable file is available at this location: C:\Program Files\Microsoft Data Migration Assistant\SqlAssessmentConsole
Run the below command to get the correct recommendation for Azure SQL DB.
.\SqlAssessment.exe GetSkuRecommendation --outputFolder C:\SQL --targetPlatform AzureSqlDatabase
The target platform refers to the Azure platform the database will be migrated to, in this example, we are referring to Azure SQL database.
The output will be as below.
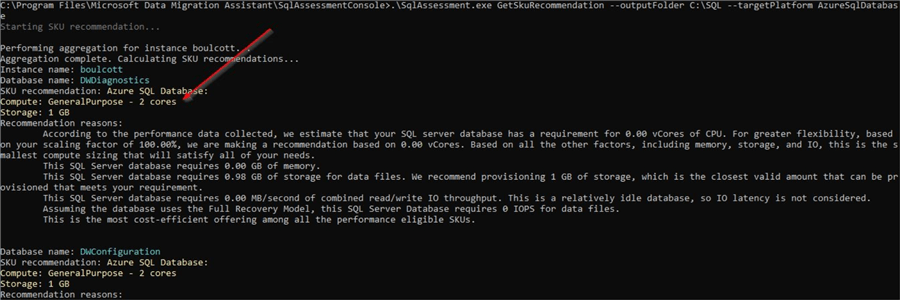
You can view details of the SKU recommendations. Also, the reason for the recommendation is provided.
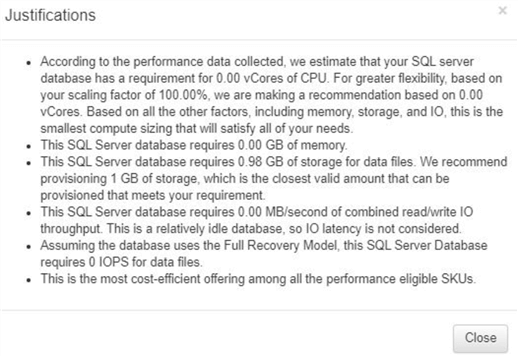
As per the justification, we can see the estimate is based on the performance data collected as part of the data collection which we did previously. And the recommendation is for the smallest compute sizing. This should be like the minimum configuration that will be required on the Azure side for your application to perform as per expectations after migration. The SKU recommendation will be for all the databases on the on-premises SQL Server.
If you are planning to get the SKU recommendation for just one database from the on-premises server, you can use additional parameters to get the recommendations only for specific databases. You can refer to this sample script.
.\SqlAssessment.exe GetSkuRecommendation --outputFolder C:\SQL --databaseAllowList YouronpremDB --targetPlatform AzureSqlDatabase
Make sure to provide the correct database name for the parameter databaseAllowList which will return SKU recommendations only for that specified database.
Getting the SKU recommendation as a HTML report
In the above section, you saw how SKU recommendation details can be collected at the command line. However, this is not really neat and cannot be easily shared with management especially for their approval. The recommendation utility generates reports in the output folder you provided. That is, without any additional steps, if you go to the output folder you provided in the previous step, you will see a HTML file that is generated. This HTML file is created once the SKUrecommendation command is run. This will contain all the SKU recommendation details that was in the output console on the command prompt but is neatly displayed as a report. This report can be copied and emailed to your IT management for their review and approval.
The HTML file is as shown.

If you click on this HTML file, the report will look like below. As you can see, the report is for all the databases on the on-premises server and you can click on the 'Justifications' and 'Requirements' option to see additional details.
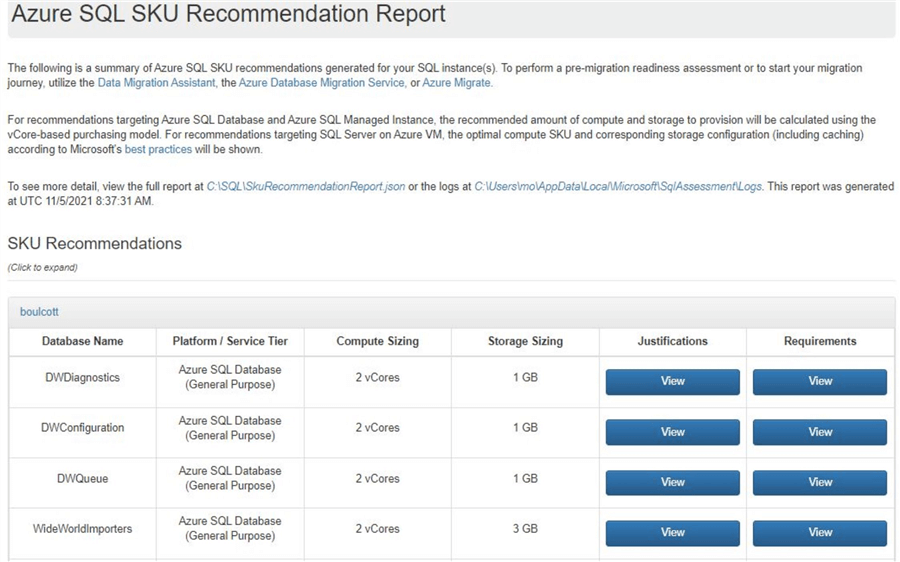
When you click on the 'View' option under justifications, you will see something like this.
And clicking the 'View' option under requirements, you will see something like this.
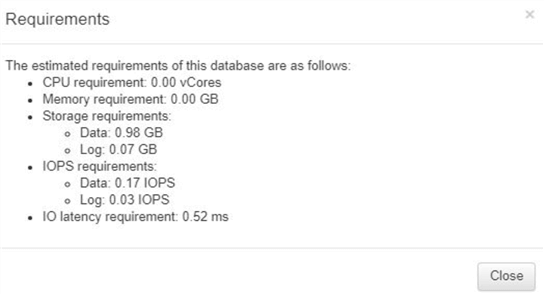
As you can see, the recommendations are from the on-premises server used only for this tip. The recommended SKU requirements are quite low as these databases are not used frequently and the data collection was done only for a few minutes. However, on a busy on-premises server, it is recommended to leave data collection running for a few days so the tool can generate correct SKU recommendations. In this tip, you can see how easy it is to make use of existing tools in order to make migrations easier to the cloud.
Next Steps
- You can try out this tip using the SQL Server instance locally on your laptop
- Download and install Data Migration Assistant (DMA) if not already installed
- Start the data collection process and leave it running for a few hours
- Get the SKU recommendation details using the data collected
- Review the HTML report on the output folder for the SKU recommendations
About the author
 Mohammed Moinudheen is a SQL Server DBA with over 6 years experience managing production databases for a few Fortune 500 companies.
This author pledges the content of this article is based on professional experience and not AI generated.
View all my tips
Article Last Updated: 2021-11-30


