By: Rick Dobson | Comments | Related: > SQL Server and Oracle Comparison
Problem
A prior MSSQLTips.com tip describes how to transfer table rows both ways between SQL Server 2014 and Oracle 11g. However, the transfer speed is about 35 times faster for transferring rows from Oracle to SQL Server than from SQL Server to Oracle. Can you provide a dramatically faster way of transferring table rows from SQL Server 2014 to Oracle 11g?
Solution
The prior tip, Transferring Data Between SQL Server 2014 and Oracle 11g Databases, used a Linked Server to demonstrate the bi-directional transfer of table rows between SQL Server and Oracle. That tip is particularly important because SSIS for SQL Server 2014 does not support 64-bit connectivity between SQL Server 2014 and Oracle 11g. Additionally, Oracle 11g is exclusively a 64-bit database; SQL Server 2014 can be installed in 32-bit and 64-bit versions. Another prior tip, Creating a SQL Server 2014 Linked Server for an Oracle 11g Database, introduces the basics of creating and configuring a Linked Server that enables connectivity between a 64-bit SQL Server 2014 database server and an Oracle 11g database server.
Linked Servers are a great SQL Server feature for ad hoc queries of a remote database from a SQL Server instance. Additionally, Linked Server technology enables both DML as well as DDL SQL statements for a remote server. However, the Linked Server interface for transferring rows from SQL Server 2014 to Oracle 11g is dramatically slower than for Oracle 11g to SQL Server.
This tip describes an alternative approach to transferring rows from SQL Server 2014 to Oracle 11g that is more than 17 times faster than using the previously described Linked Server approach. The new approach uses a mix of technologies, including Microsoft's SSIS as well as Oracle SQL Plus and Oracle SQL Loader utilities. This tip describes how to automate and configure the solution.
Download sample database and scripts.
Data for implementing and validating the new approach versus the old approach
The new approach described in this tip and the prior approach are compared with the same data sources, which include a custom 200,000 row table from a SQL Server 2014 database and the sample database that installs with Oracle 11g. You can download a backup file for the sample SQL Server database from the folder of resources associated with this article. Use a script like the following one to restore the database on your 64-bit SQL Server 2014 server presuming you do not already have a database named SSandOracleDataExchange on the server.
-- Restore source database with data for copying
-- between SQL Server and Oracle database servers
USE [master]
RESTORE DATABASE [SSandOracleDataExchange] FROM
DISK = N'C:\SSandOracleDataExchange\SSandOracleDataExchange.
The prior tip created a table named NAMESANDBIRTHDATES in the hr schema of the Oracle 11g sample database to hold the 200,000 rows from the SQL_SERVER_DATA_FOR_ORACLE table in the SSandOracleDataExchange database. As a preparatory step for this tip, the previously populated NAMESANDBIRTHDATES table from the prior tip was renamed to NAMESANDBIRTHDATES_bkup in the hr schema of the Oracle 11g sample database. See the Verifying the Output section towards the end of this tip for one use of the NAMESANDBIRTHDATES_bkup table.
Architecture for the new approach
There are three steps to the solution implemented by the new approach.
- Instead of attempting to directly connect SQL Server 2014 to Oracle 11g, the new approach writes out a file from a SQL Server table that is configured for easy input to Oracle. The particular file format used in this tip is a csv file.
- Then, a table is created in Oracle 11g to hold the file's contents.
- Next, the contents of the file created in the first step is loaded into the table created in the second step. Any required column value transformations are implemented during the loading process.
Each solution step is initiated by a Windows batch file. All three batch files are called from a master level batch file so that invoking the master file successively launches the batch file for each of the three steps. The master level batch file has the name OverallExportforOracleSolution.bat. The three call statements displayed next successively launch each of the steps in the overall solution.
Call CreateAndPopulateSSExportforOracle.bat
Call CreateOracleNAMESANDBIRTHDATES.bat
Call ExportforOracle.bat
The CreateAndPopulateSSExportforOracle.bat file
The CreateAndPopulateSSExportforOracle.bat file uses the dtexec command-line utility to launch a SSIS dtsx package file. The dtsx package has two primary roles.
- First, it creates a modified version of the SQL_SERVER_DATA_FOR_ORACLE table that includes a modified birth date representation that is well suited for input to an Oracle date column via an Oracle string-to-date conversion function.
- Second, it copies the new table with the modified date format representation to a csv file where each column has a string data type (DTR_STR).
The batch file has a single line of code. The /f switch takes an argument which is a path and file for the dtsx package. The following value in quotes is the path and file for the package. The home folder for the this demonstration is c:\SSandOracleDataExchange, and the folder for the ExportforOracle.dtsx package is ..\FromSStoOracleviacsv\FromSStoOracleviacsv\.
dtexec /f "c:\SSandOracleDataExchange\FromSStoOracleviacsv\FromSStoOracleviacsv\ExportforOracle.dtsx"
SQL Server and Oracle have subtly distinct ways of representing date values and converting date strings with YY versus YYYY for representing a year. Therefore, this tip formats SQL SERVER date strings to Oracle dates using an Oracle string-to-date conversion function. The use of the specially formatted string for a date and the Oracle date string-to-date conversion function guarantees SQL Server dates are properly represented in Oracle.
The modified date value representation for this demonstration is a YYYYMMDD string format where all values in the string are numeric. A YYYYMMDD string value can be readily converted to an Oracle date value with the Oracle TO_DATE function.
You can learn more about the function and Oracle versus SQL Server string/date representations at these links:
- http://stackoverflow.com/questions/19058/what-is-the-difference-between-oracles-yy-and-rr-date-mask
- https://technet.microsoft.com/en-us/library/ms191004(v=sql.110).aspx
- http://www.dba-oracle.com/f_to_date.htm
- http://www.techonthenet.com/oracle/functions/to_date.php
The ExportforOracle.dtsx package consists of two tasks: an Execute SQL task followed by a Data Flow task. The following excerpt from the SSIS project for the ExportforOracle.dtsx package displays graphically the two tasks in the package along with their names.
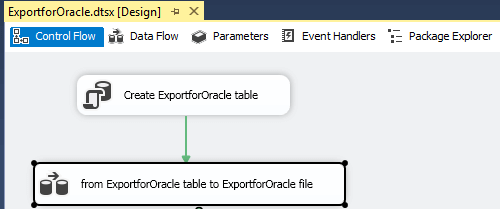
As the name for the Execute SQL task implies, this task creates a new table (ExportforOracle). The FIRST_NAME and LAST_NAME column values are identical to those in the SQL_SERVER_FOR_ORACLE table. The BIRTH_DATE column has a varchar(8) data type with YYYYMMDD values corresponding to the BIRTH_DATE date field values in the SQL_SERVER_FOR_ORACLE table. The following T-SQL code transforms SQL Server date values to YYYYMMDD values for ultimate representation as varchar(8) values.
IF EXISTS (SELECT * FROM INFORMATION_SCHEMA.TABLES WHERE TABLE_NAME = 'ExportforOracle' AND TABLE_SCHEMA = 'dbo')
DROP TABLE dbo.ExportforOracle;


SELECT
    [FIRST_NAME]
          ,[LAST_NAME]
   ,
    (
     CAST(YEAR(BIRTH_DATE) as char(4)) +
     CASE
      WHEN MONTH(BIRTH_DATE) <=9 THEN '0' + CAST(MONTH(BIRTH_DATE) as char(1))
      ELSE CAST(MONTH(BIRTH_DATE) as char(2))
     END +
     CASE
      WHEN DAY(BIRTH_DATE) <=9 THEN '0' + CAST(DAY(BIRTH_DATE) as char(1))
      ELSE CAST(DAY(BIRTH_DATE) as char(2))
     END
    ) BIRTH_DATE
INTO dbo.ExportforOracle
FROM [SSandOracleDataExchange].[dbo].[SQL_SERVER_DATA_FOR_ORACLE]
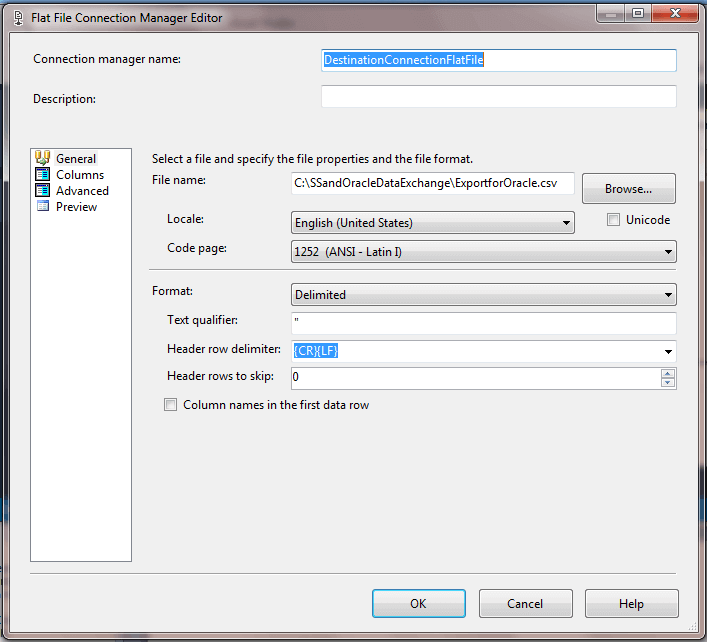
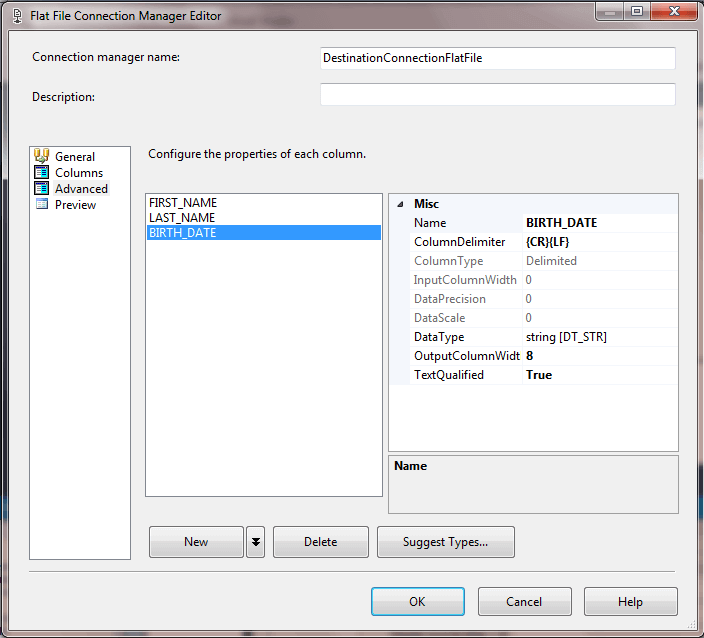
The following two screen shots display the General tab and the Advanced tab from the flat file connection dialog of the Data Flow task.
- The General tab shows four critical settings
- The output filename and path.
- The output file has field delimiters (the Columns tab, which is not shown, specifies a comma as the delimiter)
- A double quote (") is the qualifier for text fields; this is especially critical for the third column with birth date values that could be interpreted as numbers instead of strings
- The output file does not include as its first row column names
- The Advanced tab shows the data type for the third column in the data file has a DT_STR type with a length of up to 8 characters; this setting corresponds to the 8-character length for the third column in the output data file.
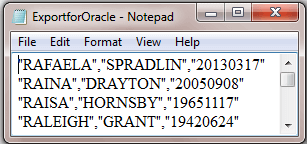
This last screen shot for the first step of the solution displays four rows from the output file named ExportforOracle.csv. There are comma delimiters between fields. Also, observe how each field value is embedded in double-quote marks to denote that it is a text value - whether or not the field value consists entirely of numeric values.
The CreateOracleNAMESANDBIRTHDATES.bat file
Now that we have created a file with SQL Server data from a dtsx package, we need a table in Oracle to serve as a receptacle for the file's contents. There are several tools that allow the creation of a new table in Oracle. The one used in this solution is the SQL Plus command-line utility, which installs along with an Oracle database server. This utility lets you log into the Oracle database server. With Oracle 11g and earlier versions of Oracle, there is just one database per database server installation.
This solution uses the Oracle sample database that ships with Oracle 11g. The sample database has several built-in user accounts. An Oracle 11g server installs with its hr account for the hr schema locked so that the account cannot be used. The process for installing the Oracle 11g client software is referenced in this prior tip Creating a SQL Server 2014 Linked Server for an Oracle 11g Database. Additionally, the same tip explains how to unlock with SQL Plus the hr account for the Oracle 11g sample database.
After installing Oracle 11g and unlocking the hr user account, you can use the account to run query statements, such as for dropping a table and creating a table in the hr schema. The current solution takes advantage of both of these capabilities.
The CreateOracleNAMESANDBIRTHDATES.bat file has just three lines.
- The first line changes the current directory to the SSandOracleDataExchange folder on the c: drive.
- The second line logs into the SQL environment as the hr user and invokes the commands in the ConditionallyDropNAMESANDBIRTHDATES.sql file within the SSandOracleDataExchange folder. There are two commands in the sql file
- The first command attempts to drop the NAMESANDBIRTHDATES table; the command succeeds if the table exists or fails otherwise
- In any event, the second command exits the SQL environment
- The third command creates a new table named NAMESANDBIRTHDATES; this empty table can receive values from the ExportforOracle.csv file. The values will be pumped into the table in the solution's third step.
cd c:\SSandOracleDataExchange
sqlplus hr/hr @ConditionallyDropNAMESANDBIRTHDATES
sqlplus hr/hr @CreateNAMESANDBIRTHDATES
Here are the command lines in the ConditionallyDropNAMESANDBIRTHDATES.sql file.
DROP TABLE NAMESANDBIRTHDATES;
EXIT
Here are the commands in the CreateNAMESANDBIRTHDATES.sql file. As you can see, the commands consist of a standard CREATE TABLE statement followed by an instruction to exit the SQL environment.
CREATE TABLE NamesAndBirthDates(
First_Name varchar2(50)
,Last_Name VARCHAR2(50)
,Birth_Date DATE
);
EXIT
The ExportforOracle.bat file
The final step of the solution is to load the file created in the first step of the solution into the table created in second step of the solution. The Oracle SQL Loader command-line utility is especially tailored for this kind of task. Just like SQL Plus, the SQL Loader utility installs as part of the Oracle 11g client software. The SQL Loader is an exceptionally rich tool, and even a superficial discussion of how to manage it is well beyond the scope of this tip. Happily, you just need a few features and parameters to make the tool copy a csv file like the one created in step 1 to the Oracle table created in step 2. If you want to learn more generally about SQL Loader, you can find good introductory material at these links (https://docs.oracle.com/cd/B19306_01/server.102/b14215/ldr_concepts.htm and http://www.oracle.com/technetwork/testcontent/sql-loader-overview-095816.html).
The SQL Loader utility for Oracle 11g requires a login and enters a special environment after the login. For the purposes of this demonstration, three files are needed to manage the functionality of the SQL Loader utility. Of course, you also need data, which is to be loaded. In our case, the data to be loaded resides in a fourth file (the csv file output from step 1).
- First, a command-line instruction invokes SQL Loader.
- This line starts with the sqlldr command followed by the user account and password for the database into which you will load data
- Then, add additional parameters to point at other files that control how sqlldr operates and where and how it loads data as well as how it logs its operation
- The control file (.ctl) can specify
- Where the data to load is coming from
- Into what table to load the data
- How to transform the data during the loading process
- A log file with a .txt file type provides diagnostic and performance information about what happened during the attempt to load the data; the performance information, such as elapsed time for the load, is particularly important for our demonstration because we want to compare the time to load data with this tip versus the linked server approach in the prior tip.
The following line invokes the SQL Loader utility in the ExportforOracle.bat file. The command logs into the Oracle 11g database with the hr account using its default password (of hr). The control parameter points to the control file (ExportforOracle.ctl). The log parameter specifies the .txt file name into which SQL Loader logs events during the load as well as the elapsed time for the load.
sqlldr hr/hr control=ExportforOracle.ctl log=ExportforOracle.txt
The ExportforOracle.ctl file's contents appear below. In this control file there are two main sections.
- The first section is the first two lines. These lines are an instruction to load data from the ExportforOracle.csv file in the c:\SSandOracleDataExchange path.
- The second section starts with the INTO TABLE specification indicating to where to load the data as well as any transformation specification to accommodate data formatting. For example,
- The table name into which to load data is NAMESANDBIRTHDATES
- The FIELDS TERMINATED BY specification indicates each column in the source file is delimited by a comma
- The OPTIONALLY ENCLOSED BY specification notes that column values are optionally enclosed by double quote marks; recall that our source file has all column values enclosed in double quote marks
- Within the parentheses, table column names are enumerated along with corresponding source file specifications; additionally,
- The ENCLOSED BY specification after FIRST_NAME and LAST_NAME column names indicates that the values for these two columns in the source file are enclosed in double quote marks
- The specification following the BIRTH_DATE column name indicates that values from the third column in the source file are in double quote marks and how the values should be transformed while converting them from a string value to an Oracle date value
LOAD DATA
INFILE 'c:\SSandOracleDataExchange\ExportforOracle.csv'

INTO TABLE "NAMESANDBIRTHDATES"
INSERT
FIELDS TERMINATED BY "," OPTIONALLY ENCLOSED BY '"'
(
FIRST_NAME ENCLOSED by '"'
,
LAST_NAME ENCLOSED by '"'
,
BIRTH_DATE "TO_DATE(:BIRTH_DATE, 'yyyymmdd')"
)
The ExportforOracle.bat file in the OverallExportforOracleSolution.bat file creates the log file when the load starts and finishes populating the log file (ExportforOracle.txt) as the last step before it completes.
Verifying the Output
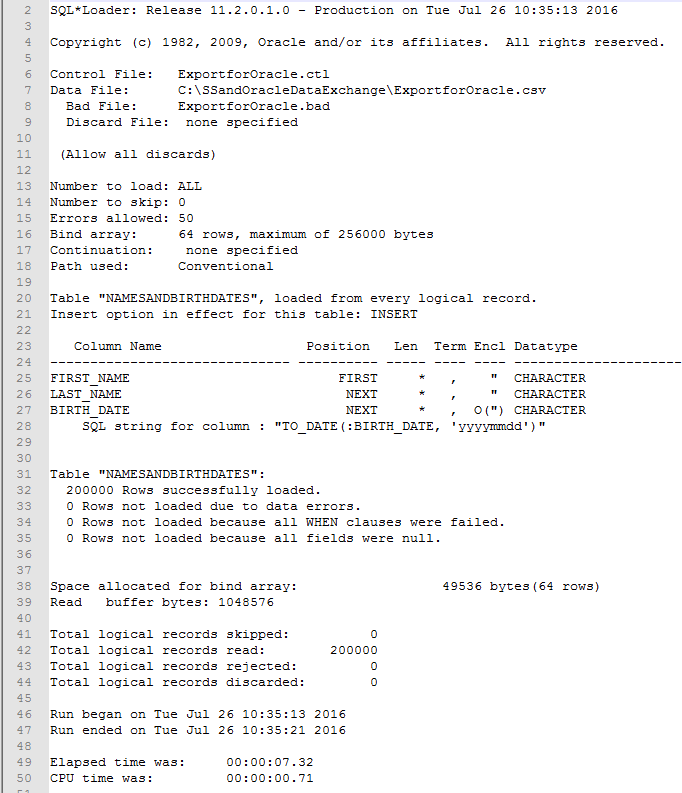
Examining the log file is one way of verifying whether the import of the ExportforOracle.csv file to the NAMESANDBIRTHDATES table was successful at a top line level. The following screen shot displays the log file with line numbers added by a text editor for easy reference of specific lines. Here are selected key points.
- Line 7 displays the path and file name of the source data file
- Line 20 indicates the table name into which rows from the source file are loaded
- Lines 23-28 map table column names to column positions in the source file; for example,
- the first source column maps to the FIRST_NAME column in the table
- the next source file column maps to the LAST_NAME column in the table
- the next source file column transformed by the TO_DATE function maps the BIRTH_DATE column in the table
- Lines 31-32 indicate that 200000 rows were successfully copied into the NAMESANDBIRTHDATES table; this is the same number of rows as in the SQL Server source table
- Line 49 reports that 7.32 seconds elapsed while the lines were copied from the source file to the table
A more detailed way to verify specific values loaded to the NAMESANDBIRTHDATES table is to compare its contents relative to the contents of the NAMESANDBIRTHDATES_bkup table. Recall that the contents of the linked server approach to transferring 200,000 rows from SQL Server were copied to the NAMESANDBIRTHDATES_bkup table before starting the approach described in this tip. In addition, the transferred rows from the linked server approach were previously verified relative to the source data in the SQL_SERVER_FOR_ORACLE table from within SQL Server. Therefore, a query that confirms all rows in the NAMESANDBIRTHDATES table are also in the NAMESANDBIRTHDATES_bkup table confirms that the approach successfully loaded all data from the original table in SQL Server. If you are so inclined, you can freshly generate the NAMESANDBIRTHDATES table from the linked server approach by performing the steps described in the prior tip Transferring Data Between SQL Server 2014 and Oracle 11g Databases.
The following query counts the rows in the NAMESANDBIRTHDATES table with identical column values to rows in the NAMESANDBIRTHDATES_bkup table. All rows in the tables are distinct by the combination of FIRST_NAME, LAST_NAME, and BIRTH_DATE column values. As a consequence, a result of 200,000 confirms that all rows in NAMESANDBIRTHDATES table are also in the NAMESANDBIRTHDATES_bkup table. I confirmed this outcome in my run of the query.
-- verify loaded values script
SELECT COUNT(*)
FROM
(
SELECT *  FROM NAMESANDBIRTHDATES

INTERSECT

SELECT *  FROM NAMESANDBIRTHDATES_bkup
) foo;
Next Steps
Your key take away from this tip should be that it is dramatically faster to transfer rows from SQL Server 2014 to Oracle 11g by using a dtsx package along with the Oracle SQL Plus and SQL Loader utilities than by creating a SQL Server linked server which points at an Oracle 11g database.
- The prior tip reports that it takes 2 minutes and 55 seconds (or 175 seconds) to load 200,000 rows from SQL Server to Oracle with a linked server approach
- With this tip, the same task completes in about 10 seconds (3 seconds to compile the source file and create the Oracle destination table and 7 more seconds to load the data into the table)
- Therefore, the approach in this tip is about 17 times faster than the prior tip!
In many real-world contexts, the difference between 10 seconds and 2 minutes and 55 seconds will not be important. On the other hand, 200,000 rows of 3 column values each is not an enterprise scale data set. Enterprise scale conversion projects could easily involve transferring millions of rows with a hundred or more column values for each row. The savings for these kinds of conversion undertakings could be very significant, such as an elapsed time of hours versus days.
Therefore, if you have an enterprise scale conversion project in your future, it may well be worth your while to consider a solution like the one presented here. You can download all the files discussed in the tip from the zipped resource file associated with this tip. Be sure to examine the readme.txt file for critical instructions about setup and configuration instructions before using the files in the zipped folder.
Download sample database and scripts.


About the author
 Rick Dobson is an author and an individual trader. He is also a SQL Server professional with decades of T-SQL experience that includes authoring books, running a national seminar practice, working for businesses on finance and healthcare development projects, and serving as a regular contributor to MSSQLTips.com. He has been growing his Python skills for more than the past half decade -- especially for data visualization and ETL tasks with JSON and CSV files. His most recent professional passions include financial time series data and analyses, AI models, and statistics. He believes the proper application of these skills can help traders and investors to make more profitable decisions.
This author pledges the content of this article is based on professional experience and not AI generated.
View all my tips
