Problem
In this tip I will show the installation process of SQL Server vNext on a SUSE Linux server.
Solution
The SQL Server on SUSE Linux will include all the standard SQL Server management features that come with the Windows version. These include advanced features like always-encrypted, row-level security and columnstore indexes, but there are still a lot of features that are not supported like SQL Server Agent, Replication, AlwaysON, etc. You can get the full list of features from this Microsoft link: SQL Server on Linux Release Notes.
SQL Server Installation on SUSE Linux Server
Before going forward, you need to have a box running SUSE Linux Enterprise Server version 12 with SP2 on which you will install SQL Server vNext. I have downloaded the free version of SUSE Linux Server from their official website to install it on a virtual machine on my lab server which is running Windows Server 2012 R2. I have not mentioned the steps of SUSE Linux server installation as it is not in scope of this article.
Step 1: First, connect to the SUSE Linux Server either using PuTTY or directly login to the SUSE Linux server using a valid username and password. I used PuTTY to connect to this server. Once you get the login prompt, enter the login and password to establish the connection. Once you establish the connection let’s validate the operating system details on which we are going to install SQL Server. Run the below command to get the details.
#Get the installed OS details.
lsb_release -a
You can see I have successfully connected to the SUSE Linux Server and executed the command to get the installed operating system version details in the below image.

Step 2: Let’s validate whether SQL Server is running on this machine. We will check for the SQL Server service by running the below command.
#Check SQL Server Service
systemctl status mssql-server
We can see that the SQL Server service is not found on this machine as shown in the below image. That means SQL Server is not installed and we are good to go ahead and install SQL Server.

Step 3: The actual installation process will start from this step. We will be using the Zypper command line tool which is used for package management in OpenSUSE and SUSE Enterprise Linux platforms. Zypper is for SUSE Linux, which is similar to yum for Redhat and apt-get for Ubuntu.
Zipper is used to manage packages as well as repositories, so here we will download the SQL Server SUSE Linux repository configuration file by running the below command.
#Downloading SQL Server SUSE Linux repository configuration file. Enter the sudo password once you get prompt.
sudo zypper addrepo -fc https://packages.microsoft.com/config/sles/12/mssql-server.repo
We can see the SUSE Linux repository has been added by this command as shown in the below image.

Step 4: The next step is to import the keys which are required for the repository by running the below command.
#import the GPG keys
sudo zypper --gpg-auto-import-keys refresh
We can see the command executed successfully with the key details in the below picture, so now let’s go ahead with next step to install SQL Server.

Once the above command executes successfully we can check and validate the downloaded repository configuration file by running the below command. Run the zypper lr command to display all the repository files present on this server.
#Check the downloaded files.
zypper lr
We can see the file as shown below, so we can go ahead to the next step.

Step 5: The next step is to install SQL Server vNext on the SUSE Linux server. Run the below command to kick off the SQL Server installation on this machine.
#Install SQL Server vNext on SUSE Linux server
sudo zypper install mssql-server

Once you press enter to execute the above command, the execution process will start to show the details about the package. Execution will ask you to enter a y to proceed with the installation or an n to abort the installation. I entered y to proceed with this installation and pressed Enter. The package download process will start as shown in the below screen.

You can see the download percentage is increasing which shows the process is running. Installation of this package will start automatically just after the download process completes. You can see the installation completed successfully in the below screenshot.

Now we will check the SQL Server service again as we did in Step 2. We can see the SQL Server service has been created, but it is not running as shown in the below image. We need to run the mssql-conf setup file to accept the license terms and assign an sa password to SQL Server.

Step 6: This is the last step to install and configure SQL Server on SUSE Linux. Here we will run a configuration script file as a post install process to configure SQL Server settings like the sa password, accepting the license agreement and starting the SQL Server service.
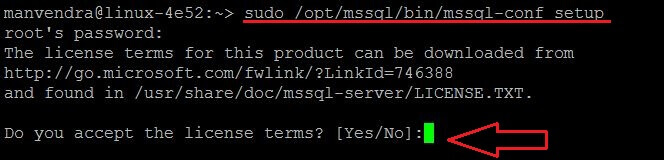
sudo /opt/mssql/bin/mssql-conf setup
Once you execute the above command, it will ask you to accept the license terms and conditions by typing YES at the prompt. You can see this progress in the below screenshot.
Once you type YES to accept the license terms and press Enter to proceed, it will ask you to enter a strong password for the sa account. Enter the sa password and then re-enter as shown below.

Once the sa password has been set, the configuration file will start the SQL Server service to bring SQL Server online and ready for use.

We can see the above setup has executed successfully which means SQL Server is ready for use.
Step 7: Now check the SQL Server service mssql-server to verify that SQL Server is up and running.
#check the status of mssql-server service.
systemctl status mssql-server
We can see below that the SQL Server service is enabled and active (running) which is highlighted in green below.

Now you are done with your SQL Server installation on your SUSE Linux server. You need the sqlcmd utility to connect to SQL Server from your SUSE Linux server, but you can also make successful database connections using SSMS from your Windows machine or some other server where the SQL Server tools (sqlcmd) are installed. I will explain how to install SQL Server tools like SQLCMD to access databases from SUSE Linux in another tip.
Step 8: We have installed SQL Server on SUSE Linux and the server’s IP is 192.168.209.130, which we will use to connect to the server.
I don’t have sqlcmd on this server yet, so I will use sqlcmd installed on a Red Hat Linux server that has IP address 192.168.209.128.
Now we will enter the below commands and enter the sa password when prompted and then check the version of SQL Server.
--Connect to SQL Server. Enter the password once you get password prompt.
sqlcmd -S192.168.209.130 -Usa
--check SQL Server Version.
SELECT @@VERSION
We can see we have connected to this SQL Server instance from a remote server. Now we will check the installed version of SQL Server to verify our installation. We can see the SQL Server version is SQL Server VNext CTP 1.3 installed on SUSE Linux as shown below.

Next Steps
- Check out these other tips about running SQL Server on Linux

Manvendra is a passionate database lover currently working as a Technical Architect at one of the top MNCs. He has extensive experience on all versions of SQL Server since 2000 and has built Big Data skills. He has lead projects on the following database features: Database Mirroring, Always ON, Replication, Log Shipping, Geo-Clustering and Performance Tuning and delivered many SQL Server projects on consolidation, upgrades, heterogeneous replication, HA / DR solutions, automation and major performance tuning projects. You can also follow Manvendra on his blog, Twitter, LinkedIn and Facebook.
- MSSQLTips Awards: Champion (100+ tips) – 2018 | Author Contender – 2015-2018, 2021-2022
