By: K. Brian Kelley | Comments (1) | Related: > Database Configurations
Problem
I'm having trouble verifying that an application server has connectivity to the SQL Server. We're not seeing anything in the SQL Server error log. I assume the application is configured correctly and so we suspect that there is something else preventing the connection. What can I do to check to see if we can connect from the application's system to the SQL Server?
Solution
As a DBA, we get this issue more often than we'd like. If we can quickly demonstrate that there is connectivity between the application server and the SQL Server, it rules that out from our troubleshooting efforts. Likewise, though, if we can't connect, then we need to correct that first before proceeding further. So let's look at how to do this.
Auditing Failed Logins
Before we can begin troubleshooting, we need to make sure that we see failed logins on our SQL Server. We do this by ensuring that we are logging failed logins for the SQL Server configuration.
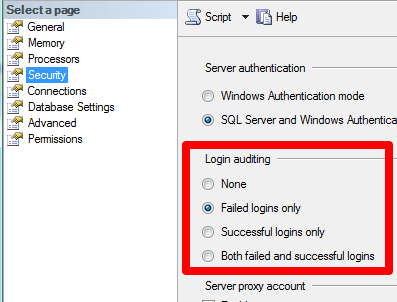
If you have to change this setting, realize that it doesn't take effect until SQL Server is restarted. If that's not possible, then you'll need to fire up Profiler and set up the correct event to audit failed logins. Ideally, though, you want to audit failed logins because not only does this information get written to SQL Server's log, but it's also placed in Windows' Application event log, meaning it can be picked up by a log collector and processed by your security monitoring systems.
We'll verify the auditing in a later step.
Name Resolution
With auditing configured, we move on to the actual troubleshooting steps. The first thing we'll want to do is verify that the application server can resolve the name we use for SQL Server. Here we're looking for the server name or friendly name. If you're dealing with a named instance, don't worry about the instance part. Just as verifying connectivity outside of the application is the first step in troubleshooting, the first part of verifying outside of the application is ensuring name resolution is happening properly.
We can do this by using ping from the Command Prompt or the PowerShell interface. You'll want to run this test on the application server. Simply ping the server/friendly name. We're looking for the response to come back "Pinging ..." and the name we specified followed by the IP address. Don't get caught up if the ping fails. At this point we're just testing name resolution.
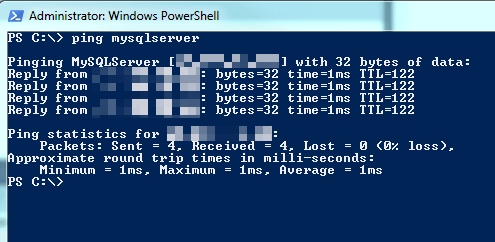
What we don't want to see is something like this:

If you get "could not find host," then the name you're using can be connected with an IP. If that's the case, that has to be fixed before you can proceed any further. Verify that you have the correct name. If you do, then server and network folks need to investigate why name resolution isn't happening properly.
Before moving on, let's go back to the results of the ping. If you get successful name resolution, but you're not getting the replies like above, that may not indicate an issue. Some networks are configured where you can't ping. Any attempts will meet with failure. If, however, that's not the case with your network and you are getting the failures, then that's typically indicative of a network or server firewall issue.
Verifying the Failed Login Auditing
We've determined that auditing is turned on and we can get proper name resolution. Now we attempt to make a connection to the SQL Server from a location we know has connectivity. For instance, if you used SSMS from your workstation to connect and verify the audit settings, you can start a new Database Engine Query. You'll want to specify a SQL Server login. For the login name, choose something obvious that you can find easily in the SQL Server log and which others will be able to easily identify as you testing the system. For instance:
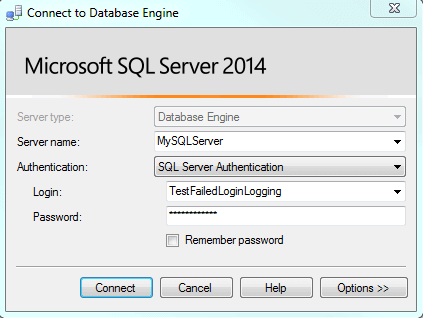
Try to connect and then verify you see the failed login in the SQL Server error log.

If you don't, fire up Profiler, set up the security event for failed logins and test again.
Testing from the Application Server
Most application servers won't have SQL Server Management Studio installed. Therefore, we'll need a different tool to perform the test. We have such a tool: Data Sources (ODBC). You can find it under Administrative Tools. You can always find Administrative Tools under Control Panel so this particular tool is always available.

Go through the process of adding a DSN. We're not saving it, so starting the process to create a User DSN is fine. Choose the SQL Server driver (or the SQL Native Client appropriate for that version of SQL Server if it's installed on the application server). Specify the name you're using to connect to the SQL Server. In this case, if you're using a named instance, make sure to specify the instance name, too. Then you'll get to the screen where it prompts you if you want to connect to SQL Server to gather more information. You do. And you want to do so using SQL Server authentication. Specify a login you'll recognize immediately in the log.
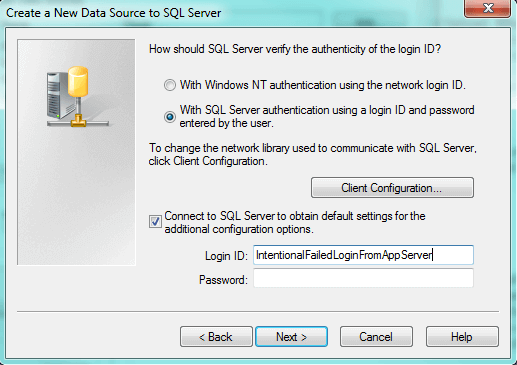
When you specify a password and click Next, a login will be attempted to the SQL Server. Now you should be able to go back to SQL Server, look in the log and see if you have a failed login. If you do, you've verified connectivity between the application server and the SQL Server and the issue likely lies in the application configuration.
If you don't see the failed login attempt, then you may be facing a network or server firewall issue. It's entirely possible to be able to resolve the name, to even ping the name, but not be able to connect to the SQL Server. A networking or firewall configuration could be blocking the traffic. For that, you'll need to get the appropriate people involved.
Testing Using the Telnet Client
If you have the luxury of having the Telnet client (not the server) installed, you can use it to attempt a connection. You won't see the failed login in the SQL Server error log, but the behavior difference with a successful versus unsuccessful connection is clear. If it's not installed, there's no need to request for it to be installed, as the Data Sources (ODBC) tool should be sufficient. However, for those who are familiar with telnet, this is often a quicker method of verification.
Start a command prompt / PowerShell prompt and then enter telnet <name> <port>. This means you will need to know the port SQL Server is listening on. For a default instance, the default port is 1433, but it's trivial to change so verify what the port is by checking out the TCP network library in SQL Server Configuration Manager. You'll definitely need to do this if you're using a named instance. Here's an example of the command to enter. Note the name and port after telnet. The port is important. If you leave it off, the telnet client will attempt to make a connection to port 23, the default port for a telnet server and likely not the port your SQL Server is listening on.

Once you hit enter, if the screen goes blank, you've verified connectivity:
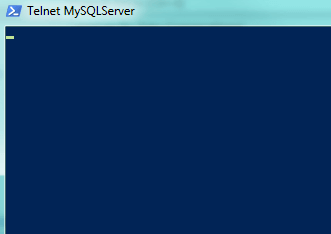
If, on the other hand, you get the following, you can't connect. If you've specified the right name and the right port, you have a connectivity issue.

Final Thoughts
Obviously, if these connectivity tests fail, then it's time to look elsewhere, as I mentioned multiple times in the article. These methods are quick ways that connectivity can be checked without pouring over network configurations and firewall settings. However, if you don't get a successful connection, those other places will have to be looked at.
Next Steps
- Read about some other places to check if you can't connect to SQL Server at all.
- Learn how to connect to SQL Server using SQLCMD.
- Understand how we can create friendly names to connect to SQL Server via DNS.
About the author
 K. Brian Kelley is a SQL Server author and columnist focusing primarily on SQL Server security.
This author pledges the content of this article is based on professional experience and not AI generated.
View all my tips


