By: Mohammed Moinudheen | Comments (3) | Related: > Azure Backup and Restore
Problem
We are experiencing disk space shortage for our on-premises SQL Server. Is there way we can perform database backups directly to Azure storage using SQL Server maintenance plans? Also, can we automate deletions of the old backup files from Azure storage using maintenance plan clean up tasks?
Solution
You can use Azure storage to perform SQL Server database backups directly using maintenance plans. If you are new to Azure and to try it out, you can use this https://azure.microsoft.com/en-us/free/ which will give you $200 USD credit for a month. Otherwise, logon to your Azure portal: https://portal.azure.com.
Create an Azure Storage Account
The first step is to create an Azure storage account, if you don't already have one.
On the Azure portal, refer to this screenshot to start the creation of the storage account.

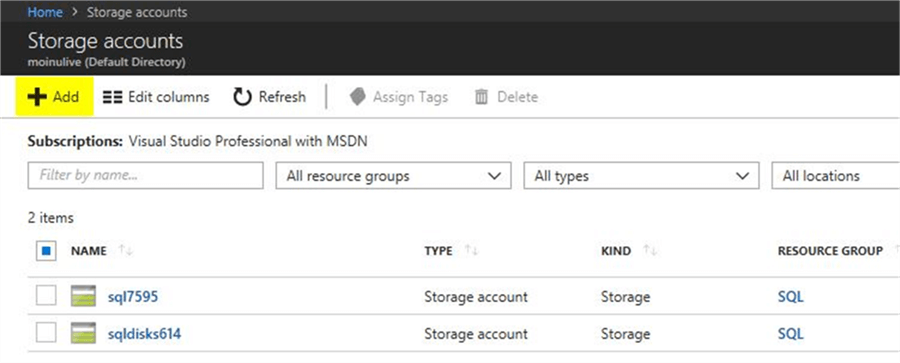
Once you click on “Storage accounts”, you will get this screen where you can create the new storage account. Click Add as shown.
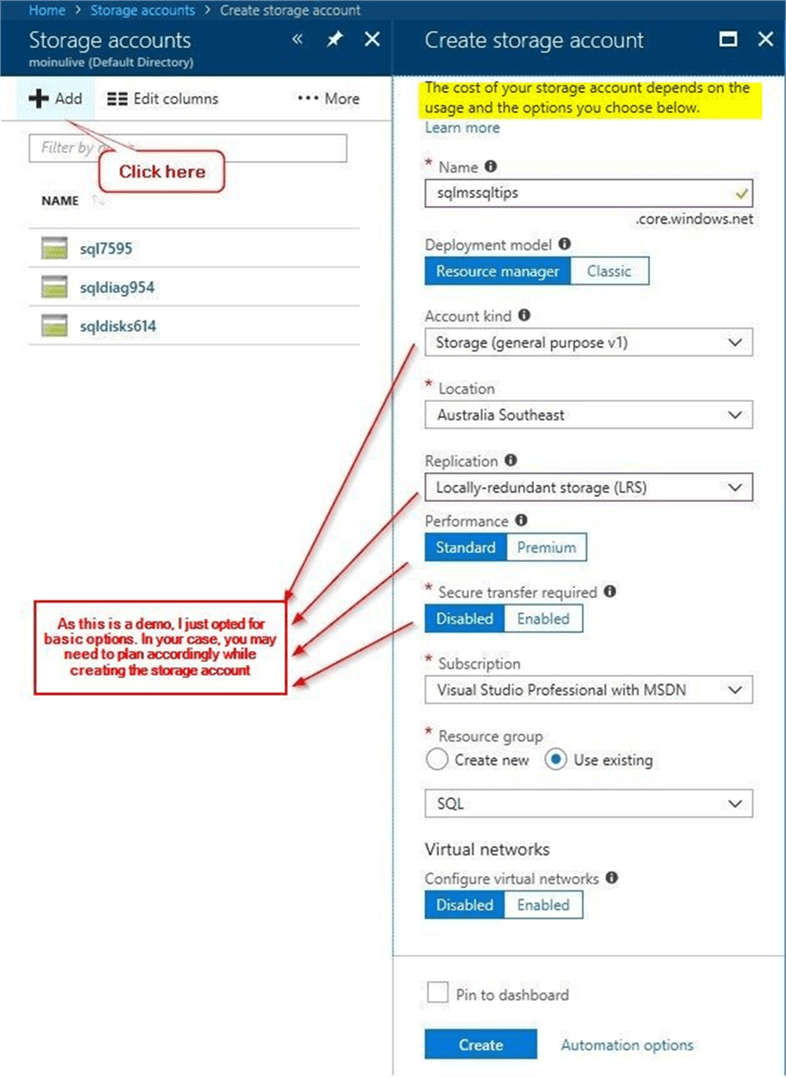
Once you click Add, you will see the below screen. You can enter the details as shown. I have opted for the basic options. In your case, based on your requirements, select the plan that suites your needs. You can refer to the highlighted section on the screen below regarding cost. Once you have selected the correct options, click Create.
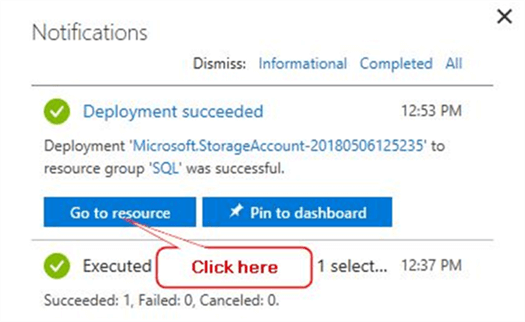
The storage account creation completes in a few minutes. Once created, click on the Go to resource option as shown.
Steps to create the Azure Blob Storage Container
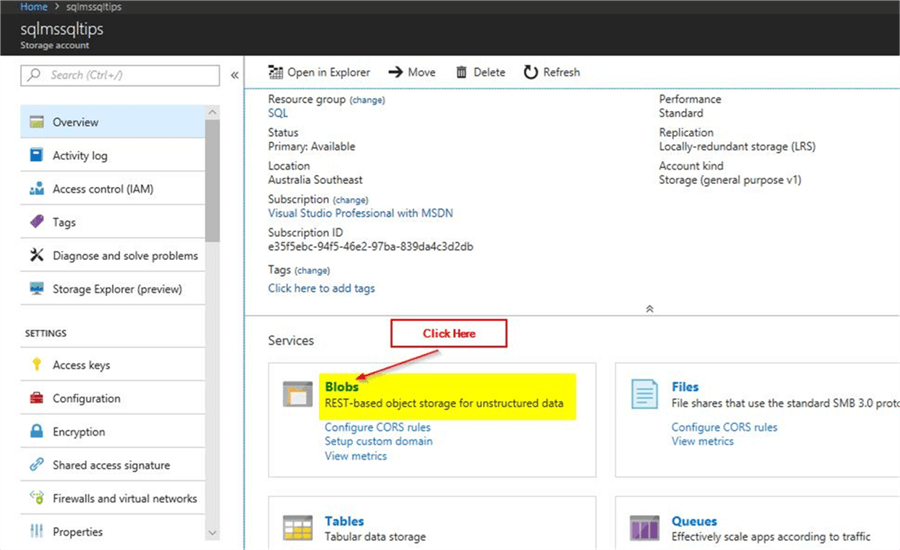
Once you click on the Go to resource option, you will see this screen. On this screen, click on Blobs to create a new storage container.
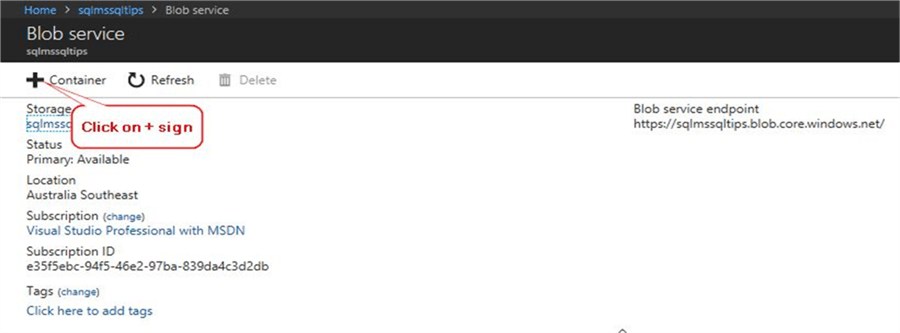
Once you click on Blobs, you will see this screen. Click on the +Container option to create the new container.
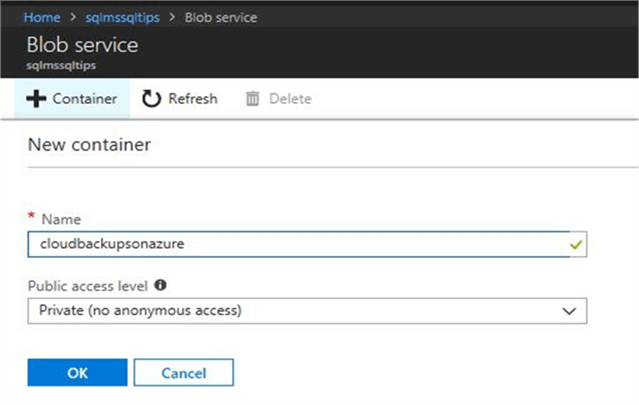
Once you click on the +Container option, you will see this option to enter the details for the new container. I selected the option – Private (no anonymous access) as shown. Click OK to create the new container.
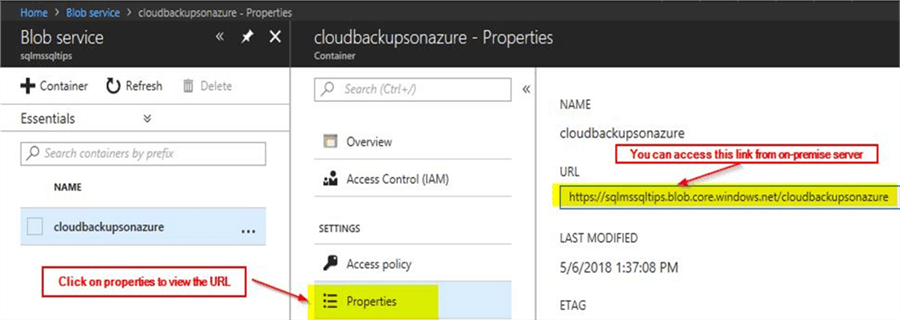
The new container gets created almost instantly. Click on the newly created container Properties as shown to get the full URL for the container. This can be used across the internet to perform the database backups.
Steps to get your Access Keys
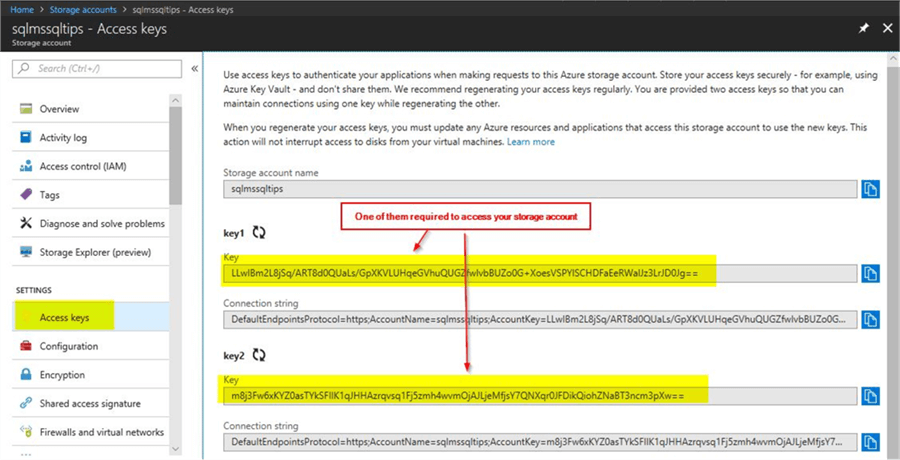
Now, you have the storage URL which you can use from anywhere. In order to get the access keys for your storage, you can click on the Access keys section of your storage account as shown. You need one of the keys to access your storage account from your on-premises SQL Server.
Steps to perform on your on-premises SQL Server – Create Credential
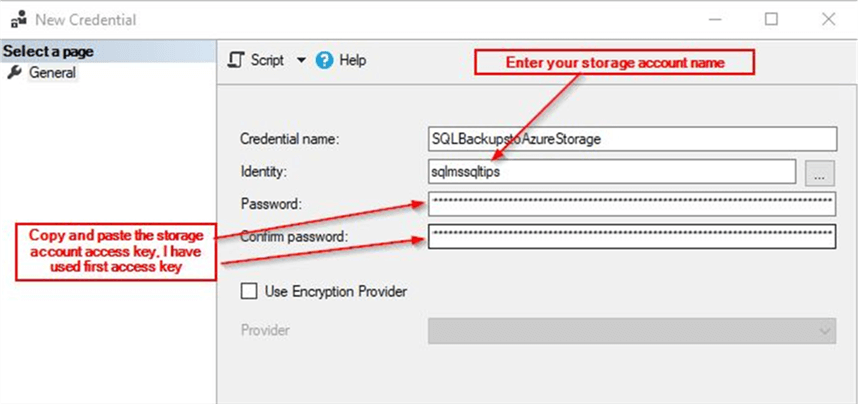
Now you have both the Access keys and the storage URL. In this section, we will set up the on-premises SQL Server to use the Azure storage. First, you need to create a credential using the storage account details. Get the details of your storage account and the associated access key. You can use one of the keys above. In this demo, I am using the first access key shown above. Create the credential as shown.
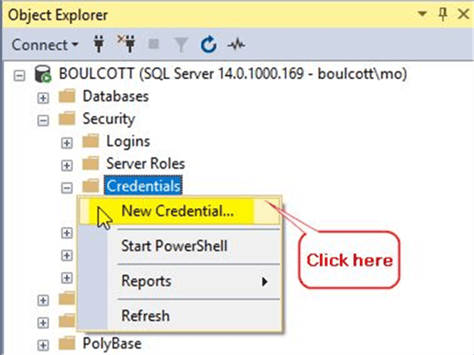
Once you click on New Credential, you will get this window where you need to enter the details as shown. Once done, click OK to create the credential.
Setup SQL Server Maintenance Plan to use the Azure Storage
With the credential configured, you can now use the Azure URL in the maintenance plan. This tip assumes that you are already familiar with the configuration of maintenance plans. On your maintenance plan under the Back Up Database Task, ensure to select the URL option.
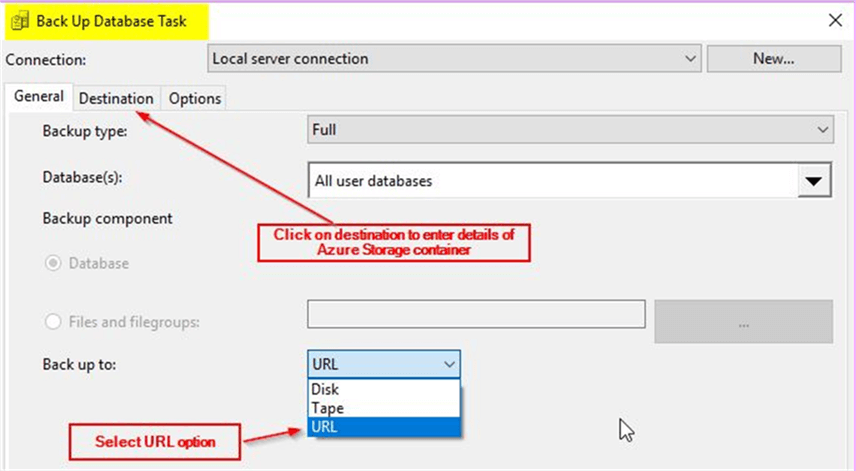
Once done, click on the Destination tab and enter details of the Azure storage container. You just have to select the credential that you created earlier and the URL gets auto filled. The only other task for you is to enter the name of the Azure storage container. Once done, click OK.
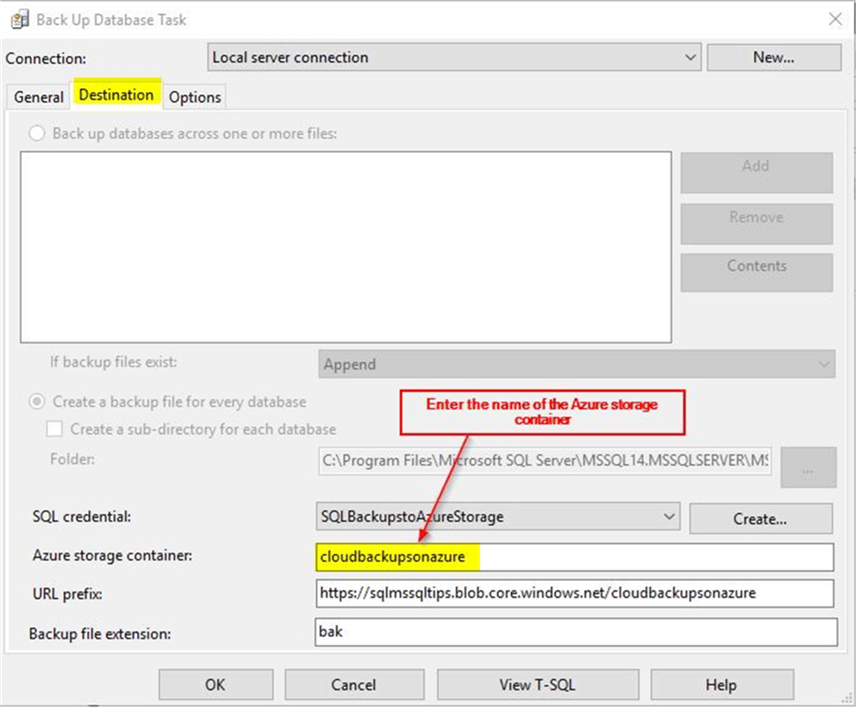
Now, you can review the maintenance plan and schedule the backup task based on your requirements.
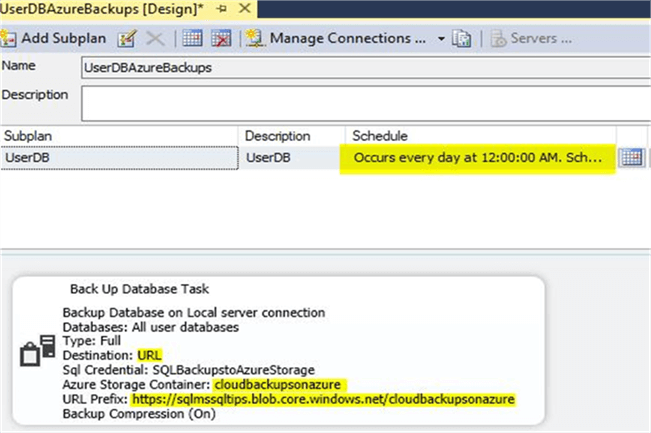
You can start the maintenance job manually to confirm that the backups are happening on the Azure Blob storage.
Check Azure container for backup files
Once the maintenance plan task completes successfully, you can go to the Azure portal to check that the .bak files have been created. Go to the Azure Blob container as shown and click on Refresh to view the newly created backup files.
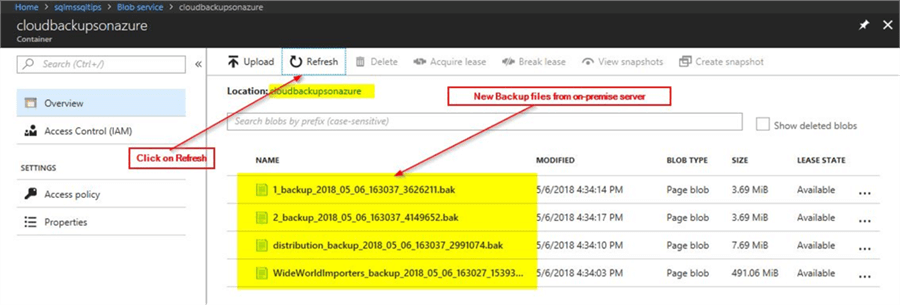
With this, you have successfully set up your on-premises SQL Server to use the Azure storage container for performing database backups.
Perform clean up tasks of old files on the Azure storage container
With the database backups happening on Azure storage, you may want to maintain the storage by periodically cleaning up old backup files. When you use the Maintenance Cleanup Task in the maintenance plans, you will notice that there is no option to include a URL, but you can still enter a URL as shown below.
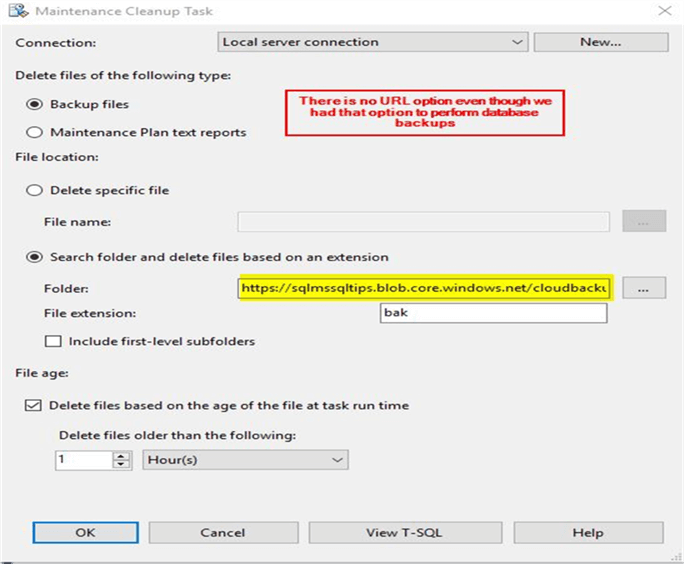
Once you click on OK, a SQL Server Agent clean up job gets created and when you run that job you will get this error message.
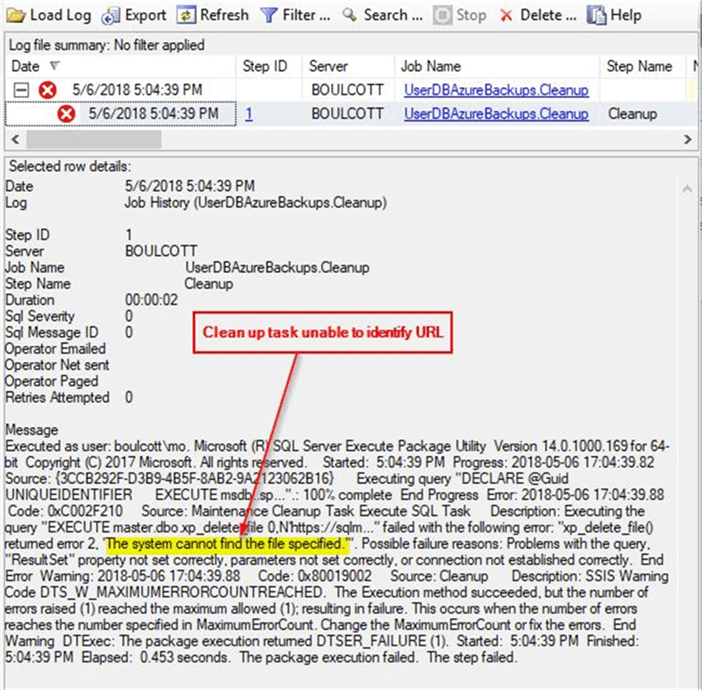
The clean up task is not able to identify the URL location and this is a limitation when we use the maintenance clean up task for cleaning up old backup files on Azure.
However, Microsoft knows about this issue and has released a PowerShell script for this purpose. Due to the limitation in the maintenance clean up task, we can use the Microsoft script to create a SQL agent job and schedule it periodically. Refer this link for the Microsoft script. The Microsoft PowerShell script is modified slightly below and created as a SQL Agent job. This script deletes files that are older than a day in the Azure Blob container. You can adjust the number of days for deletion based on your requirements.
Ensure to provide the correct details for these parameters: container, StorageAccountName and StorageAccountKey.
import-module AzureRM
#Script to delete backup files
$bacs = Get-ChildItem $location # use "-Filter *.bak" or "-Filter *.trn" for deleting bak or trn files specifically
$container="cloudbackupsonazure"
$StorageAccountName="sqlmssqltips"
$StorageAccountKey="LLwIBm2L8jSq/ART8d0QUaLs/GpXKVLUHqeGVhuQUGZfwIvbBUZo0G+XoesVSPYlSCHDFaEeRWalJz3LrJD0Jg=="
$context = New-AzureStorageContext -StorageAccountName $StorageAccountName -StorageAccountKey $StorageAccountKey
$filelist = Get-AzureStorageBlob -Container $container -Context $context
foreach ($file in $filelist | Where-Object {$_.LastModified.DateTime -lt ((Get-Date).AddDays(-1))})
{
$removefile = $file.Name
if ($removefile -ne $null)
{
Write-Host "Removing file $removefile"
Remove-AzureStorageBlob -Blob $removeFile -Container $container -Context $context
}
}
Sometimes, you may face issues while running this PowerShell script from your on-premises server as SQL Server may not be able to identify the Azure PowerShell cmdlets. In that case, check that the Azure PowerShell cmdlets are loaded correctly. If the Azure PowerShell modules are not recognized, refer to this link to install the Azure PowerShell modules. While creating the SQL Agent job for the cleanup on your server, ensure to select these options when creating the job step.
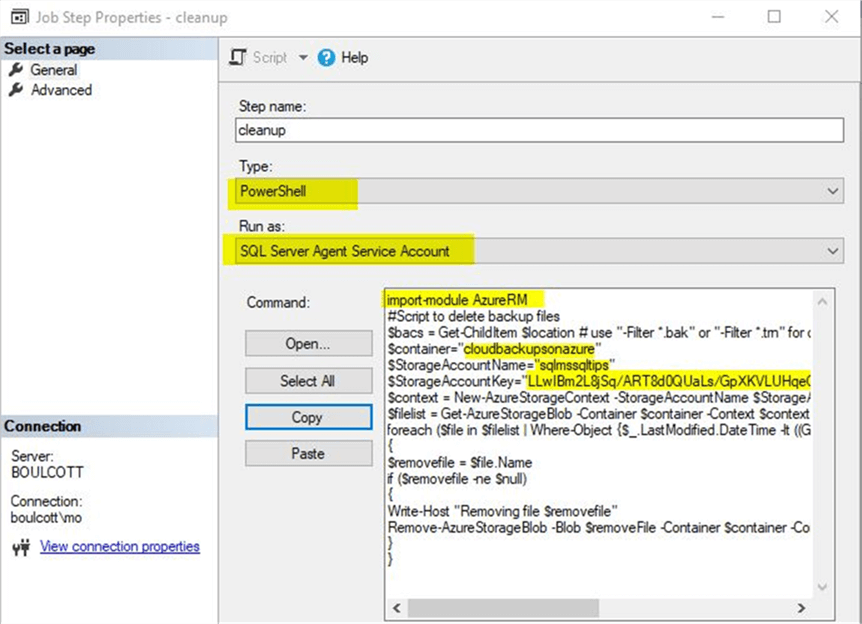
Schedule this task based on your requirements to perform the clean-up of the Azure storage. Hopefully, in future releases of SQL Server, we may be able to perform the clean-up tasks using a maintenance plan task.
Next Steps
- With this tip, we were able to use Azure Blob storage containers to perform backups of a database
- Try this tip on your own on-premises SQL Server databases
- Once you have configured backups to Azure storage, try to automate the process of deleting old backups from the storage container using the scripts provided
- To get familiar with Azure, refer to these tips available at this link
About the author
 Mohammed Moinudheen is a SQL Server DBA with over 6 years experience managing production databases for a few Fortune 500 companies.
This author pledges the content of this article is based on professional experience and not AI generated.
View all my tips


