Problem
A prior tip demonstrated a proof of concept for how a small team of advanced developers can run Python scripts from within SQL Server Management Studio (SSMS). Can you update the prior tip in two ways: first, give more specific advice on how to run Python scripts from SSMS – with particular emphasis on security issues and second, give an example of using a Python script to collect data from the web that populates a table in SQL Server.
Solution
One of the most flexible ways to run Python scripts from SSMS is via the xp_cmdshell extended stored procedure. This approach lets you invoke a Windows batch file that runs a Python script so that the output returns to SSMS. In this tip, we’ll review the elements of the proof of concept for running Python scripts in SSMS from an earlier tip. We will also build on the proof of concept by offering an approach that allows a DBA to control who can enable/disable and run the xp_cmdshell extended stored procedure without granting logins membership in the sysadmin role. Additionally, you will learn how to create a Windows standard user account to operate on behalf of the xp_cmdshell extended stored procedure. In coordination with a Windows systems administrator, permissions for this standard Windows account can be set to restrict its ability to delete files from selected folders or even selected files within a folder.
The earlier Python script tip used a simple Python program that merely assessed if each of a set of numbers was odd or even. The new Python script introduced here covers more advanced functionality that pulls stock price data from Google Finance to populate a table within a SQL Server instance. The new Python script also illustrates an approach to parsing results returned by Python to SSMS. This more advanced application involves adding an external code library to the core Python code to implement a task. Adding libraries is an easy way of extending core Python capabilities, and this tip presents step-by-step instructions for installing custom libraries to a Python installation.
In case you do not have Python installed for your development team, please refer to the prior Python script tip. That tip presents a series of screen shots illustrating a best practice on how to download Python for use by a team of developers on a development SQL Server instance.
The elements of running the xp_cmdshell extended stored procedure
The xp_cmdshell extended stored procedure from within SSMS opens a Windows shell and can launch a Windows batch file. For the purposes of this tip, the batch file runs a Python program. Two key issues associated with invoking the xp_cmdshell extended stored procedure involve enabling/disabling it and specifying a Windows account from which to invoke batch file instructions within the Windows shell. The xp_cmdshell extended stored procedure is disabled by default for SQL Server installations to reduce the targets readily available for attackers. Therefore, the extended stored procedure needs to be enabled before you can use it, and it should be disabled immediately after there is no longer a need to use it.
While it is not required, it is easy to enable/disable the xp_cmdshell extended stored procedure from a SQL Server login belonging to the sysadmin role. Furthermore, it may simplify running a Windows batch file by specifying a Windows account that belongs to a Windows administration group (or even the Built-in Administrator account). Neither of these practices are desirable from a security perspective because they expose high level Windows accounts and SQL Server logins that can be used for bad purposes by attackers.
The xp_cmdshell extended stored procedure cannot be invoked until it is enabled by a user from the master database. Additionally, the login for the user account must have permission to invoke the xp_cmdshell extended stored procedure. The prior Python script tip illustrated how to use membership in the sysadmin role to enable the xp_cmdshell extended stored procedure. It was recommended that security be managed with this approach by enabling the extended stored procedure for the briefest amount of time possible.
However, there is another approach to managing secure access to the xp_cmdshell stored procedure. This follow-up tip merely grants control server permission and execute permission for the xp_cmdshell extended stored procedure to the dev team member logins. These two grants allow the Python developer team members to enable/disable the xp_cmdshell extended stored procedure and invoke the extended stored procedure without empowering their logins with the broad powers of a sysadmin role membership.
The following script shows T-SQL code to grant the two permissions for enabling/disabling and invoking the xp_cmdshell extended stored procedure. The grants are for two logins ([SQL Server Computer Name\python_user1] and [SQL Server Computer Name\python_user2]) for developer team members. You can add additional pairs of grants for as many other developer team members needing the permissions. A DBA can drop the privileges conveyed by the grant statements for a login by replacing the grant keyword with the revoke keyword. The following script is meant to be run and maintained exclusively by a DBA.
 -- code to setup grants for xp_cmdshell
-- to Python dev team logins
-- for exclusive use of sql server dba
USE MASTER
GO
grant execute on xp_cmdshell to [SQL Server Computer Name\python_user1]
grant control server to [SQL Server Computer Name\python_user1]
grant execute on xp_cmdshell to [SQL Server Computer Name\python_user2]
grant control server to [SQL Server Computer Name\python_user2]
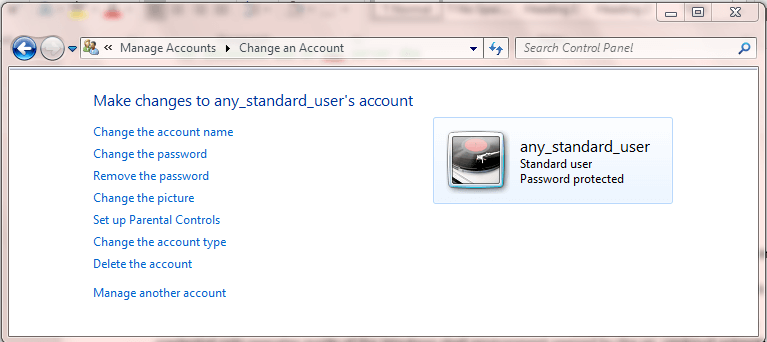
In addition to these grants, it is also necessary to setup a proxy credential for running Python scripts. Again, the goal is to setup the proxy account with minimal permissions. The strategy recommended by this tip is to use a standard Windows user account, such as one named any_standard_user for the Windows server. A related good practice is for the Windows system administrator to deny the standard Windows account permission to delete files in selected folders. Additionally, the Windows user account does not even need to be able to login to SQL Server. After all, the Windows account for the ##xp_cmdshell_proxy_account## credential only operates inside of the Windows shell environment opened by the xp_cmdshell extended stored procedure. The following screen shot shows a User Accounts view of the account from Control Panel. Notice it is password protected.
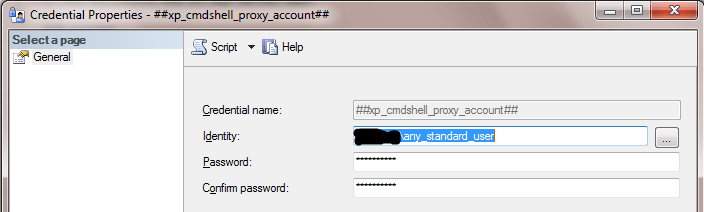
Here’s how the any_standard_user Windows user account is referenced inside of SQL Server for the proxy credential. It is only necessary for the DBA (or someone the DBA designates) to know and manage the password for the any_standard_user account to reply to password revision requests.
After the grants for dev team member logins and the proper setup of the proxy credential for the xp_cmdshell extended stored procedure, any dev team member can run the following code to invoke an xp_cmdshell extended stored procedure that, in turn, opens a Windows shell, from which a batch file is launched to run a Python script. The following code is for the run_find_odd_even_nums.bat file that invokes the find_odd_even_nums.py Python script file.
The Python script file and its Windows batch file were covered extensively in a prior tip. The prior tip used a T-SQL script for invoking the xp_cmdshell extended stored procedure that relied on login impersonation. The major point of showing the following T-SQL script is to indicate that the Windows batch file for invoking the Python program can run without the need for impersonating another login when used with the security practices described in this tip.
At no point other than when the DBA is administering grant statements is a sysadmin account required. However, the team members still need to enable and disable the xp_cmdshell extended stored procedure before and after invoking it. For example, if the dev team member does not reconfigure a SQL Server so the extended stored procedure is enabled, then an attempt to run the extended stored procedure will fail. It is also critical for security reasons that dev team members disable the xp_cmdshell extended stored procedure after their Python script returns its output to SSMS.
 -- for use by Python dev team members
-- enable the xp_cmdshell stored procedure
EXEC sp_configure 'xp_cmdshell', 1
RECONFIGURE
-- run python script and return result set to SSMS
EXEC xp_cmdshell 'C:\python_programs\run_find_odd_even_nums.bat'
-- disable the xp_cmdshell stored procedure
EXEC sp_configure 'xp_cmdshell', 0
RECONFIGURE
For your easy reference, here’s a screen shot with the preceding code sample and its output appearing in SSMS.

Readying Python to use a code library
External code libraries for Python provide pre-built sets of functions that facilitate the development of solutions. The pandas_datareader library expedites tasks dealing with rows and columns of data. You can use this library for many purposes, including downloading historical stock price data for transfer to a SQL Server table. This tip will present a demonstration of how to use the pandas_datareader library to download the data for a stock over nearly a 2-year period.
Before you use a library, you need to install it. I found that the following steps worked for adding a Python code library to the all-users Python install on a Windows 7 computer. Recall that a prior tip listed the step-by-step installation screens for an all-users Python installation; the same prior tip indicated that the default installation was for a single user. Here are steps you can follow to install the pandas_datareader library.
- Open a cmd window with Run as administrator
- Then, type python -m pip install followed by the name of the library that you want to install
- For example, you can type pandas_datareader so the batch instruction reads as: python -m pip install pandas_datareader
Installing the pandas_datareader library took several minutes or less.
Using the pandas_datareader library to download stock prices from Google Finance
There are lots of code samples around the web illustrating how to use Python code libraries. Here is a link that you may find a helpful starting point for using the pandas_datareader library for downloading historical stock price data and other economic data.
I developed the code samples in this section by successively modifying a code sample within the previously referenced linked article and examining the output of various tweaks in IDLE, the Python integrated development language environment that installs with Python. The pandas_datareader library has pre-set interfaces for programmatically extracting historical stock price data from popular sources, such as Google Finance and Yahoo Finance. I arbitrarily selected Google Finance for this demonstration. This functionality is convenient over non-Python approaches because you do not have to download csv files manually through a browser and then subsequently read and load the downloaded csv files into a SQL Server table with a tool like SSIS.
Here’s a first try at getting historical prices for a stock with the ticker symbol of nvda; the ticker symbol is for Nvidia, a fast-growing game processor and system chip designer/manufacturer.
- The code starts with a reference to the pandas_datareader library
- The datetime library is one of many built-in Python libraries that does not require a separate install
- The pandas_datareader library lets you set four parameters for getting historical stock price and volume data
- Stock symbol, such as nvda
- Google for designating Google Finance as the source for the data; you can specify other providers for historical price and volume data
- Starting and ending dates for the output from your code
- The print instruction displays the output (f) from the datareader
import pandas_datareader.data as web
import datetime
start = datetime.datetime(2017, 1, 1)
end = datetime.datetime(2017, 8, 31)
f = web.DataReader("nvda", 'google', start, end)
f.ix
print(f)
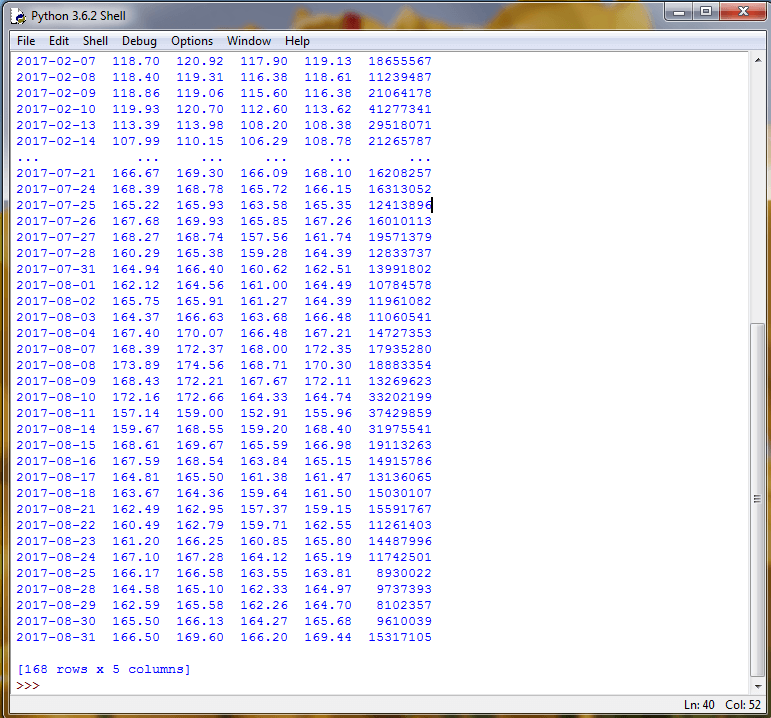
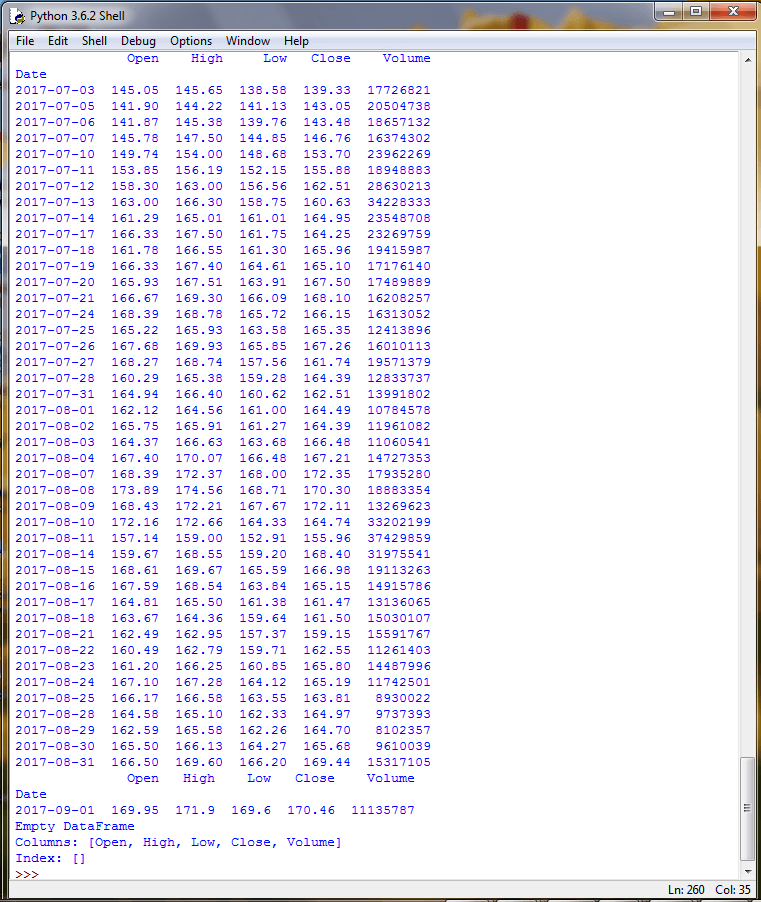
The following two screen shots show the beginning and ending of the output from the preceding script. One especially important point to observe is that not all the historical data from the start date through the end date appears in the output from the print statement. For example, the first set of rows are for the first trading day in January 2017 through around the middle of February 2017. Then, a set of markers (. . .) denote missing data from the output display. These missing data markers are followed by the final block of data from July 21, 2017 going through August 31, 2017. There are many intervening historical prices after the middle of February 2017 and before July 21, 2017 that do not appear in the output.

After several rounds of experimentation with the code, I finally ended up with the following code for listing all nvda prices in 2016 and 2017 through the last day of available trading stock price data in 2017. The code extracts nvda stock price data in two-month blocks for 2016 and 2017. Each two-month block corresponds to a distinct pandas dataframe. A two-month block was selected because this duration did not result in any missing rows within the print output for a block. It is likely that there are other solutions for getting no missing rows; this tip settled for this one because it was easy to specify within the context of the code sample for outputting historical stock prices.
The code starts with two import statements – one for the pandas_datareader library and a second for the built-in datetime library. There is a separate block of code to display each two-month block within a year. Comment lines starting with a hash sign (#) denote, respectively, the code blocks for 2016 and 2017. Within the code block for each two-month interval, these actions take place:
- Start and end dates are specified
- The DataReader is passed four parameters, and its output is assigned to a dataframe (f)
- A print statement displays the dataframe object contents
import pandas_datareader.data as web
import datetime
#nvda data for 2016
start = datetime.datetime(2016, 1, 1)
end = datetime.datetime(2016, 2, 28)
f = web.DataReader("nvda", 'google', start, end)
print(f)
start = datetime.datetime(2016, 3, 1)
end = datetime.datetime(2016, 4, 30)
f = web.DataReader("nvda", 'google', start, end)
print(f)
start = datetime.datetime(2016, 5, 1)
end = datetime.datetime(2016, 6, 30)
f = web.DataReader("nvda", 'google', start, end)
print(f)
start = datetime.datetime(2016, 7, 1)
end = datetime.datetime(2016, 8, 31)
f = web.DataReader("nvda", 'google', start, end)
print(f)
start = datetime.datetime(2016, 9, 1)
end = datetime.datetime(2016, 10, 31)
f = web.DataReader("nvda", 'google', start, end)
print(f)
start = datetime.datetime(2016, 11, 1)
end = datetime.datetime(2016, 12, 31)
f = web.DataReader("nvda", 'google', start, end)
print(f)
#nvda data for 2017
start = datetime.datetime(2017, 1, 1)
end = datetime.datetime(2017, 2, 28)
f = web.DataReader("nvda", 'google', start, end)
print(f)
start = datetime.datetime(2017, 3, 1)
end = datetime.datetime(2017, 4, 30)
f = web.DataReader("nvda", 'google', start, end)
print(f)
start = datetime.datetime(2017, 5, 1)
end = datetime.datetime(2017, 6, 30)
f = web.DataReader("nvda", 'google', start, end)
print(f)
start = datetime.datetime(2017, 7, 1)
end = datetime.datetime(2017, 8, 31)
f = web.DataReader("nvda", 'google', start, end)
print(f)
start = datetime.datetime(2017, 9, 1)
end = datetime.datetime(2017, 10, 31)
f = web.DataReader("nvda", 'google', start, end)
print(f)
start = datetime.datetime(2017, 11, 1)
end = datetime.datetime(2017, 12, 31)
f = web.DataReader("nvda", 'google', start, end)
print(f)
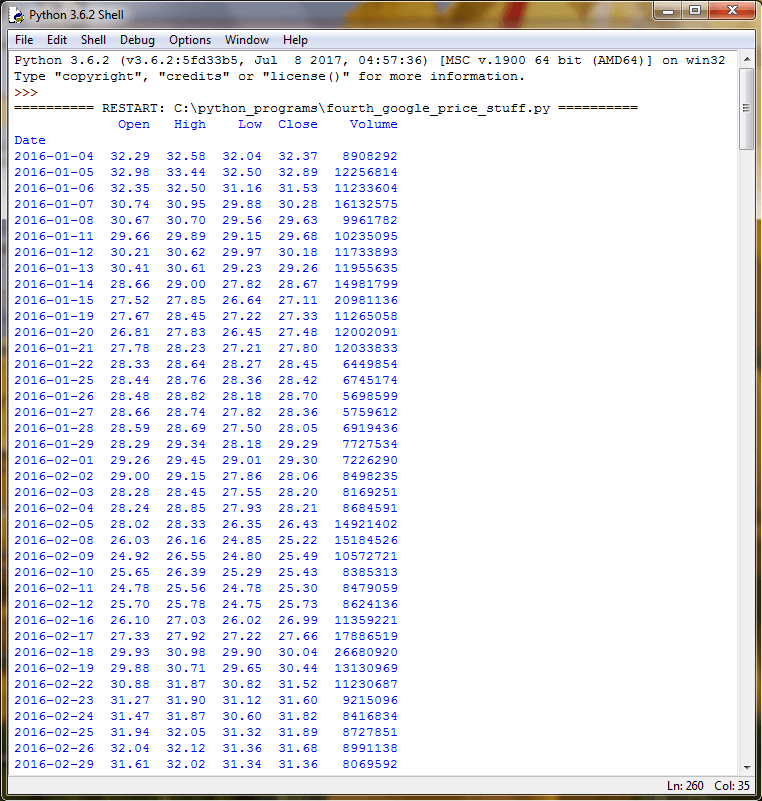
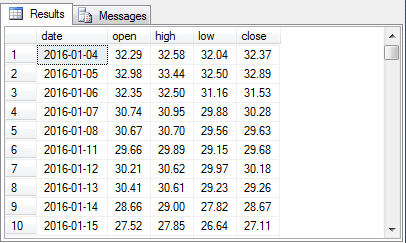
The next screen shot shows the output for the first two-month block. Notice that data is displayed only for trading days during which the stock market is open. For example, there is no data for January 1-3, 2016 because January 1 is a holiday for which stock market is closed and January 2-3 are weekend days for which the market is also closed.
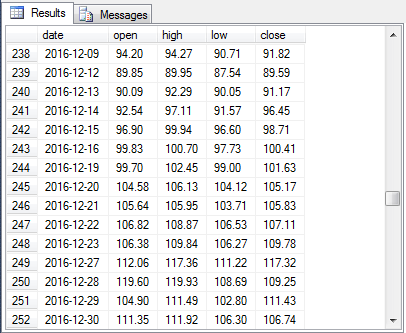
The next screen shot shows the last full two-month block of data, a partial block of data, and empty block of data for then end of 2017. The results were generated on September 3, 2017.
- The last full two-month block is for July-August 2017.
- The partial block of data is for September-October 2017. This block has one row of data for September 1, 2017; September 2-3, 2017 are weekend days for which there is no trading data.
- The first output line after the one row of data for the September-Ocotober 2017 block denotes an empty dataframe; this dataframe is for the November-December 2017 block which has no trading data as of September 3, 2017.
Populating a table in SQL Server with stock prices downloaded with Python
After you get a Python script generating some output that includes results you want in a SQL Server table, you need to run the script using the xp_cmdshell extended stored procedure as illustrated in “The Elements of Running the xp_cmdshell Extended Stored Procedure” section above. However, the tip for running a Python script from that section just displayed results in the SSMS Results tab. The example for this section pushes the raw output lines from the Python program into a temp table (#Result). Recall that the output from Python through the xp_cmdshell extended stored procedure is just a series of string row values in a single column. The output values, such as the date and the four types of prices (open, high, low, close), are grouped together into a single string value for each row. If you want to work with the values for each column in the Python output separately, you need to process the string values for each row in a couple of ways. The two operations performed on the imported Python output include:
- Removing rows of output that do not contain valid data for the table in SQL Server
- Parsing selected values from output rows that do have valid data for the table
The following T-SQL script includes the complete sample code for running the Python program to output historical stock prices for the nvda symbol for all trading days in 2016 and 2017. There are five key segments to the T-SQL script. Segments are divided from one another by dashed lines, and comment lines within each segment further clarify the role of code within a segment.
- The first and last segments, respectively, enable and disable the xp_cmdshell extended stored procedure.
- The second segment creates a temp table named #Result. If the #Result temp table already exists, the prior version is dropped before creating a fresh #Result temp table. This segment also conditionally drops a second temp table named #Resultprocessed.
- The third segment invokes via the xp_cmdshell extended stored procedure a Windows batch file arbitrarily named fourth_google_price_stuff.bat. This Windows batch file, in turn, invokes the Python script for downloading nvda historical stock prices for trading days in 2016 and 2017. The downloaded raw data are pushed into the #Result temp table.
- The fourth segment filters and parses raw output from the #Result temp table into another SQL Server temp table (#Resultprocessed).
 -- for use by Python dev team members

-- enable the xp_cmdshell stored procedure
EXEC sp_configure 'xp_cmdshell', 1
RECONFIGURE
--------------------------------------------------------------------------------------
-- create a fresh temp table (#Result) for storing unprocessed result set from
-- running xp_cmdshell for Windows batch that invokes
-- python script
if exists (
 select * from tempdb.dbo.sysobjects o
 where o.xtype in ('U')
 and o.id = object_id(N'tempdb..#Result')
)
BEGIN
  DROP TABLE #Result;
END
CREATE TABLE #Result
(
  line varchar(500)
)
-- conditionally drop a temp table (#Resultprocessed) for storing processed
-- result set from running xp_cmdshell for Windows batch that invokes
-- python script
if exists (
 select * from tempdb.dbo.sysobjects o
 where o.xtype in ('U')
 and o.id = object_id(N'tempdb..#Resultprocessed')
)
BEGIN
  DROP TABLE #Resultprocessed;
END
--------------------------------------------------------------------------------------
-- insert python script output into #Result temp table
INSERT #Result exec xp_cmdshell 'C:\python_programs\fourth_google_price_stuff.bat'
--------------------------------------------------------------------------------------
-- filter out rows without a date index value and parse
-- string rows from #Result into columns of a second
-- temp table (#Resultprocessed)
select
cast((SUBSTRING(line,1,10)) as date) [date]
,
cast(
(
 substring
 (
 line
 ,charindex('  ',line,1)
  + patindex
    ('%[0-9]%',substring(line,11,500)
 ) -1
 ,6
 )
)
as money) as [open]
,
cast(
(
 substring
 (
 line
 ,charindex('  ',line,charindex('  ',line,1)+2)
  + patindex
    ('%[0-9]%'
     ,substring
      (
       line
    ,charindex('  ',line,charindex('  ',line,1)+2)
    ,500
   )
    ) -1
 ,6
 )
)
as money) as [high]
,
cast(
(
 substring
 (
 line
 ,charindex('  ',line,charindex('  ',line,charindex('  ',line,1)+2)+7)
  + patindex
    ('%[0-9]%'
  ,substring
  (
   line
   ,charindex('  ',line,charindex('  ',line,charindex('  ',line,1)+2)+7)
   ,500
  )
 ) - 1
 ,6
 )
)
as money) as [low]
,
cast(
(
 substring
  (line
   ,charindex('  ',line,charindex('  ',line,charindex('  ',line,charindex('  ',line,1)+2)+7)+7)
    + 2
 + patindex
   ('%[0-9]%'
    ,substring(line,charindex('  ',line,charindex('  ',line,charindex('  ',line,charindex('  ',line,1)+2)+7)+7)+2
    ,500)
   ) -1
   ,6
  )
 )
as money) as [close]
into #Resultprocessed
from #Result
where isdate(SUBSTRING(line,1,10)) = 1
--display processed Python output
select * from #Resultprocessed
--------------------------------------------------------------------------------------
-- disable the xp_cmdshell stored procedure
EXEC sp_configure 'xp_cmdshell', 0
RECONFIGURE
GO
The filtering and parsing code in the fourth segment of the preceding script may best be understood by examining three excerpts from the raw output of the base Python code from the #Result temp table. The three excerpts appear in the following exhibit:
- The first excerpt is from the top of the #Result temp table.
- The second excerpt is from a block of rows towards the middle of the #Result temp table.
- The last excerpt is from a block of rows at the end of the #Result temp table.
The output in the #Result table contains a mix of rows some with stock price data and others with no stock price data. Only rows that start with a date value are followed by stock price values. The where clause at the end of the fourth segment in the preceding script extracts just these rows for transfer to #Resultprocessed. The into clause, which is two lines before the where clause, pushes the filtered and cleaned data from #Result to #Resultprocessed.
After the date value, there are price values for the open, high, low, and close stock prices on a trading day. The prices do not always start in the same position from one row to the next. Furthermore, there is no standard delimiter, such as a comma or vertical bar, to mark the end of one price or the start of another price. It is the inconsistent placement of prices on a row without value delimiters which mandates the use of string expressions to extract the successive prices on a row. Some examples of inconsistent price placement are as follows.
- The close price values for the first and last blocks are uniformly aligned within a block, but the start of the close price values in the last block are displaced by more positions from the end of their date values than the start of the close price values in the first block.
- Within the second block of rows, the open price value for 2016-12-19 has three blanks between its first character and last character of the date column. On the other hand, the open price value for 2016-12-20 has just two blanks between its first character and the last character of the date column.
- Also in the second block of rows, the close price values for dates from 2016-12-16 through 2016-12-30 start one position to the left of close price values for dates from 2016-12-09 through 2016-12-15.
NULL
C:\Windows\system32>cd C:\Program Files\Python36\
NULL
C:\Program Files\Python36>python.exe C:\python_programs\fourth_google_price_stuff.py
             Open    High    Low     Close   Volume
Date
2016-01-04   32.29   32.58   32.04   32.37   8908292
2016-01-05   32.98   33.44   32.50   32.89  12256814
2016-01-06   32.35   32.50   31.16   31.53  11233604
2016-01-07   30.74   30.95   29.88   30.28  16132575
2016-01-08   30.67   30.70   29.56   29.63   9961782
2016-01-11   29.66   29.89   29.15   29.68  10235095
2016-01-12   30.21   30.62   29.97   30.18  11733893
2016-01-13   30.41   30.61   29.23   29.26  11955635
2016-01-14   28.66   29.00   27.82   28.67  14981799
2016-01-15   27.52   27.85   26.64   27.11  20981136
2016-12-09   94.20   94.27   90.71   91.82   9557799
2016-12-12   89.85   89.95   87.54   89.59  15033300
2016-12-13   90.09   92.29   90.05   91.17   9694874
2016-12-14   92.54   97.11   91.57   96.45  24599538
2016-12-15   96.90   99.94   96.60   98.71  18663653
2016-12-16   99.83  100.70   97.73  100.41  27238183
2016-12-19   99.70  102.45   99.00  101.63  18616431
2016-12-20  104.58  106.13  104.12  105.17  21201433
2016-12-21  105.64  105.95  103.71  105.83  14403361
2016-12-22  106.82  108.87  106.53  107.11  17965259
2016-12-23  106.38  109.84  106.27  109.78  16192331
2016-12-27  112.06  117.36  111.22  117.32  29856842
2016-12-28  119.60  119.93  108.69  109.25  57394116
2016-12-29  104.90  111.49  102.80  111.43  54384182
2016-12-30  111.35  111.92  106.30  106.74  30323259
2017-08-22  160.49  162.79  159.71  162.55  11261403
2017-08-23  161.20  166.25  160.85  165.80  14487996
2017-08-24  167.10  167.28  164.12  165.19  11742501
2017-08-25  166.17  166.58  163.55  163.81   8930022
2017-08-28  164.58  165.10  162.33  164.97   9737393
2017-08-29  162.59  165.58  162.26  164.70   8102357
2017-08-30  165.50  166.13  164.27  165.68   9610039
2017-08-31  166.50  169.60  166.20  169.44  15317105
              Open   High    Low   Close    Volume
Date
2017-09-01  169.95  171.9  169.6  170.46  11135787
Empty DataFrame
Columns: [Open, High, Low, Close, Volume]
Index: []
NULL
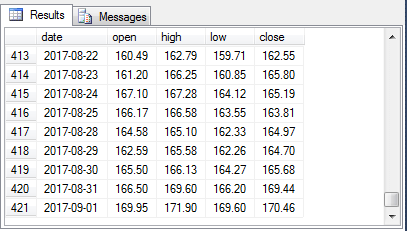
To confirm the successful operation of the row filtering and string expression processing, the following three screen shots show the values in the #Resultprocessed table for the same three date ranges in the preceding exhibit from the #Result table. Notice that all price values in the #Resultprocessed table are properly converted to money values no matter which set of positions they occupy on a row of output. Additionally, only rows with prices appear in the #Resultprocessed table while the #Result table contains some rows without any price values.
Next Steps
- Re-construct the sample in “The Elements of Running the xp_cmdshell Extended Stored Procedure” section above. This section is especially important because it includes a very easy-to-follow example of how to invoke the xp_cmdshell extended stored procedure without using sysadmin privileges and/or a Windows administrator account. The security measures illustrated in this section can be valuable even if you plan to use the xp_cmdshell extended stored procedure for some other purpose than running Python scripts.
- Next, re-examine the Readying Python to use a code library section and the Using the pandas_datareader library to download stock prices from Google Finance section to start growing your understanding of how to expand Python programming functionality with external custom code libraries. One especially easy tweak will be to use a different stock symbol than nvda; for example, try msft for Microsoft.
- Then, study and run the T-SQL script in the Populating a table in SQL Server with stock prices downloaded with Python section. This script demonstrates some processing techniques for extracting individual column values generated by Python programs but initially imported to SSMS as a single-column set of string row values.
- Finally, experiment with tweaking the string parsing code in the tip’s last section. For example, the code works well for stock prices values through 999.99, but what if you are working with a stock which has some prices that are greater than 999.99? It is likely some revisions to the string parsing expressions may be necessary. Alternatively, you may care to modify the Python code to delimit column values by a standard value, such as a vertical bar or comma.
- Check out these tips:
- SQL Server Management Studio
- Can I stop a System Admin from enabling SQL Server xp_cmdshell?
- Creating a SQL Server proxy account to run xp_cmdshell
- Is disabling xp_cmdshell in SQL Server really secure?
- Replace xp_cmdshell command line use with SQL Server Agent
- How to execute a DOS command when xp_cmdshell is disabled in SQL Server

Rick Dobson is a SQL Server professional with decades of T-SQL experience that includes authoring books, running a national seminar practice, working for businesses on finance and healthcare development projects, and serving as a regular contributor to MSSQLTips.com. He has been a practicing Python developer for more than the past half decade – with a special emphasis for data visualization and ETL tasks with JSON and CSV files. His most recent professional passions include financial time series data and analyses, AI models, and statistics. If you are interested in growing your skills in any of these areas especially as they relate to financial securities, consider visiting his blog at https://securitytradinganalytics.blogspot.com/2023/12/.
- MSSQLTips Awards: Leadership (200+ tips) – 2025 | Author of the Year Contender – 2017-2024