Problem
You want to use Linux for some of your SQL Server instances, but you are worried about the administrative overhead related to using SQL Server authentication on those new Linux servers. In this tip I will explain how to use Windows Authentication for your SQL Server instances running on Linux.
Solution
One of the responsibilities for a Database Administrator (DBA) is to ensure the security of our databases. It is pointless to comply with the Least Privilege Principle (https://www.us-cert.gov/bsi/articles/knowledge/principles/least-privilege) if you have your password written on a Post It at your monitor or below your keyboard. We all know that our capability to remember passwords is limited; nowadays people have lots of passwords to remember like email, ATM code, social networks, etc. just to mention a few.
If you ever had a chance to work at a company with more than 60 servers it will be impossible to remember each server password for the sa user account, especially if we must comply with a password policy regarding complexity and expiration.
Fortunately we can use Windows Authentication on our servers and just remember our Windows login account password to administer all the servers in our infrastructure; even the Linux database servers.
Using Active Directory Authentication with SQL Server on Linux
In order to use Active Directory Authentication for an SQL Server running on Linux we must configure the Linux server network and join it to our domain controller realm. Since most of us as SQL Server administrators are new to Linux I am explaining the very basics.
Checking Network Interface and Host Name
This is the very first step. We must make sure that our Linux server is on the same network of the Domain Controller and the server can resolve the Domain Controller name. So we must check the network interface, the domain controller and our server’s host name. If you are very new on Linux, you should know that on Linux all configurations are kept in text files. To change the network configuration of our Linux server we must edit the file /etc/network/interfaces as root.
nano /etc/network/interfaces
On the following image you can get an idea of what you will see. Notice that I marked with different colors the loopback device configuration and the Ethernet configuration, which is the one we have to modify.

The first line of the LAN Configuration is to instruct the operating system to bring the eth0 interface up at boot time. On the next lines we must enter the parameters for the network adapter configuration. In my case I am not using a DHCP server, so I have set the interface as static. Otherwise my eth0 interface will be as it follows:
auth eth0
iface eth0 inet dhcp
   dns-nameserver 10.10.10.1
   dns-search atlas.com
After modifying that file you should restart the network interface to see the changes.
ifdown eth0 && sudo ifup eth0
Now check that you are using the right DNS server. This file should not be edited by hand
cat /etc/resolv.conf
If you need to change your Linux server name you have to edit the file /etc/hostname and restart the computer.

Installing Required Packages and Joining to Active Directory
There are a few packages needed to join a Linux Server to Active Directory. In order to install them we use apt-get command as follows.
apt-get install realmd krb5-user software-properties-common python-software-properties packagekit sssd-ad samba-common-bin samba-libs sssd-tools krb5-user adcli

After you confirm the installation of these packages you will be asked to set your Default Kerberos version 5 realm. You must enter your domain controller in uppercase.

Although it is not strictly required, it is a good practice to install and configure the NTP (Network Time Protocol) service to get the server’s time synchronized with the domain controller. To install this service we use our package manager.
apt-get install ntp
Then edit the /etc/ntp.conf file and comment out the preset timeservers and add your Domain Controller.
nano /etc/ntp.conf

Finally we must restart the ntp service.
systemctl restart ntp
Configuring realmd
We must create a file named /etc/realmd.conf. This file will hold the configurations that will allow our Linux server to properly register into our Domain Controller. To create this file I am using the nano editor as shown before.
nano /etc/realmd.conf
When the editor opens paste the following configuration, but change the values as needed, especially the domain name.
[users]
default-home = /home/%D/%U
default-shell = /bin/bash
[active-directory]
default-client = sssd
os-name = Ubuntu Linux
os-version = 16.04
[service]
automatic-install = no
[atlas.com]
fully-qualified-names = no
automatic-id-mapping = yes
user-principal = yes
manage-system = no

After saving the file we must restart the realmd service.
systemctl restart realmd
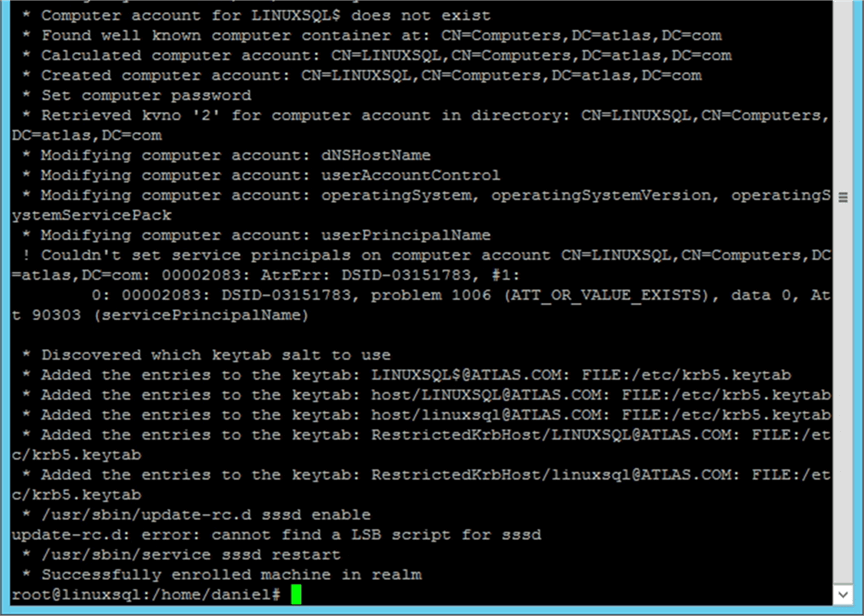
Joining the Linux Server to Active Directory
Now finally we are ready to join our Linux server into Active Directory. To do so we have to use the realm command:
realm join [your_domain.com] -U '[user_with_rights_to_add_computer_to_domain@YOUR_DOMAIN.COM]' -v
On the previous command, I enclosed with brackets the parameter’s values you need to change according to your environment. Notice the fact that I used capitalized letters for the domain, this is required. In my case the previous command is as follows:
realm join atlas.com -U 'administrator@ATLAS.COM' -v
You will be asked for the password of the domain account used to join the server into Active Directory. In my case it is the password for the administrator@ATLAS.COM account.
The following images shows screen capture of what you may expect to see.

Creating a SQL Server Service Account
We need to create an Active Directory account for our SQL Server service. Just to remind you, using an account with domain admin rights is a very bad practice. Remember that the account must have the “Logon as a Service” permission enabled. In order to grant this permission to an account you should open the Group Policy Management console and select to edit the default domain policy as shown on the following image.
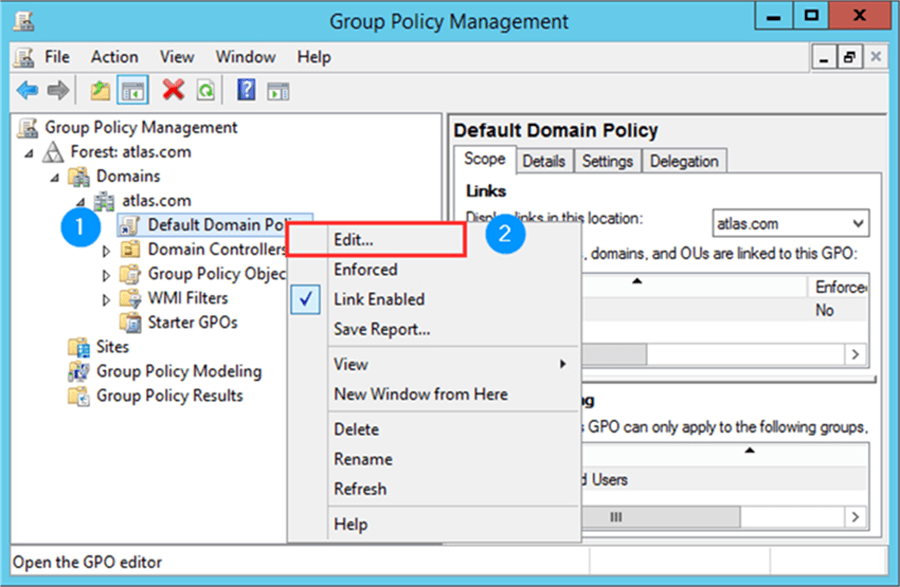
When the GPO Editor opens, in the console tree follow this path: Computer Configuration > Windows Settings > Security Settings > Local Policies > User Rights Assignment. Then in the right panel browse for the Logon as a Service policy and add your service account.

Creating the Service Principal Name
Now we must create the Service Principal Name (SPN) to associate our SQL Server instance with the service logon account. In Windows this is done automatically, but in Linux we have to do this by hand. If you want more information about SPN’s you can take a look at the following MSDN page: https://msdn.microsoft.com/en-us/library/ms677949.aspx.
Service Principal Names have the following syntax:
Service_Type_Identifier/Fully_Qualified_Domain_Name:Listening_Port
In order to create the SPN we must use the setspn utility with the A switch (we want to add an SPN) on our Domain Controller. Also you can use any workstation who has this utility installed.
setspn -A MSSQLSvc/linuxsql.atlas.com:1433 usrSQLUbuntu
The image below is a screen capture of the previous command execution.

Creating the Keytab File for the SQL Server Service
A keytab file contains pairs of Kerberos principals and encrypted keys. We have to use a keytab file to authenticate into Active Directory using Kerberos without entering a password. Something that is worth mentioning is that if you change the password you will need to recreate the keytab file again.
Our first step is to check and take note of the Key Version Number (kvno) for the Active Directory account we aim to use as the SQL Server service account. To do so we must use the kinit tool first to obtain a Kerberos ticket for our service account. Of course you will be prompted for the account’s password.
kinit usrSQLUbuntu@ATLAS.COM
After entering the password and back into the prompt we are able to use the kvno tool passing our Service Principal Name as a parameter. Just in case, this is the same value we have registered on Windows.
kvno MSSQLSvc/linuxsql.atlas.com:1433
The following is a screen capture of the previous command execution in my test environment. If everything is ok you should see something similar. Remember to keep note of the kvno, in my case it is 2.

Now with that done, we are ready to use the ktutil utility to create the keytab file.
ktutil
This utility will open a prompt displaying “ktutil:” in which we have to enter the following commands. You will be prompted for the account’s password.
addent -password -p MSSQLSvc/linuxsql.ATLAS.COM:1433@ATLAS.COM -k 2 -e aes256-cts-hmac-sha1-96
addent -password -p MSSQLSvc/linuxsql.ATLAS.COM:1433@ATLAS.COM -k 2 -e rc4-hmac
write_kt /var/opt/mssql/secrets/mssql.keytab
quit
Now I will proceed to explain what those commands mean:
- Addent: Adds a principal to keylist using a key or a password. As you can guess, since we are using the -password switch, we are adding the principal with a password and you will be prompted for the principal’s password. The -p, -k and -e switches are used to specify the principal, the key version number and the encryption type respectively. That being said, you may have to modify the value after the -k switch for the one you received with the kvno utility.
- Write_kt: Writes the current keylist into a Kerberos keytab file.
- Quit: Exits the ktutil utility.
Securing the Keytab File
Anyone who has access to the keytab file can impersonate the service account, so it is a good practice to restrict the access to keytab file for the Linux account on which our service runs which by default is the mssql user.
chown mssql:mssql /var/opt/mssql/secrets/mssql.keytab
chmod 400 /var/opt/mssql/secrets/mssql.keytab
With the chown command we are changing the ownership of the keytab file to the mssql user which is in the group mssql.
The chmod 400 sets the keytab file permissions as read only for the owner, which in this case is the mssql user. Needless is to say that no other user will be able to read this file other than mssql user or any other user with root rights.
Setting up Active Directory Authentication for SQL Server
Finally we must set our Linux SQL Server instance to use the previously created keytab file to authenticate into Active Directory. To do so, we use the mssql-conf utility as follows.
/opt/mssql/bin/mssql-conf set network.kerberoskeytabfile /var/opt/mssql/secrets/mssql.keytab
systemctl restart mssql-server

Assigning Permissions to an Active Directory Account
Now that we have our Linux SQL Server instance joined into Active Directory we have to connect to our instance and add a domain account or group. I am doing so with the administrator account for simplicity, but you shouldn’t use this account in production.
CREATE LOGIN [ATLASCOM\Administrator] FROM WINDOWS;
ALTER SERVER ROLE [sysadmin] ADD MEMBER [ATLASCOM\Administrator];
GO

Next Steps
- If you don’t have SQL Server on Linux already installed check out the following tip that shows you how to install SQL Server on Ubuntu: Installing SQL Server vNext on Ubuntu.
- For more information about mssql-conf utility you can review this tip: Configure SQL Server on Linux.
- There are cases on Windows on which you also have to register the SPN by hand. If that is your case I suggest that you take a look at the following two tips: Register a SPN for SQL Server Authentication with Kerberos and Get SQL Server SPN information for all servers using PowerShell.
- On the last screen capture I was using sqlcmd to connect to SQL Server. if you need to refresh concepts about sqlcmd you can take a look at /sqlservertip/4923/introduction-to-sql-servers-sqlcmd-utility/.

Daniel Farina was born in Buenos Aires, Argentina. Self-educated, since childhood he showed a passion for learning. He studied at Universidad de Buenos Aires. Daniel started working as a programmer at a young age. Over the years he specialized in databases, particularly SQL Server and Oracle. Now with 30 years of age, his work experience includes working with various technologies like VB, C, .NET, web development, Windows and Linux systems. He likes to read about science, psychology, philosophy and many other things. In his spare time, he trains powerlifting aiming to compete.
- MSSQLTips Awards: Author of the Year – 2018 | Champion (100+ tips) – 2018 | Author Contender – 2015-2017, 2019

Wonderful post, though I’m not DB Admin I wanted to know the basics of the Keytab part which this article explains very well.
Thanks a lot,
Shafeeq
Wonderful guide Daniel, thank you so much!
Nevertheless, even if everything is apparently working properly, in my specific case adding the windows user fails:
+ + + + + +
CREATE LOGIN [MYDOM.LOCAL\sqluser] FROM WINDOWS;
Msg 15401, Level 16, State 1, Line 1
Windows NT user or group ‘MYDOM.LOCAL\sqluser’ not found. Check the name again.
+ + + + + +
I tend to believe that the domain join is working properly and that the SQL server can enumerate AD users, because from the sqlserver console commands like
# wbinfo -u
# wbinfo -g
enumerate domain users and groups properly.
Also
# getent passwd | grep sqluser
gives a positive feedback (I am using the same technique for some samba based file servers, and AD authentication works properly)
Any hint on where the problem could be?
My SQLserver is on Ubuntu 18.04 properly joined to AD