Problem
SQL Server 2017 has just been released and with most releases there are changes that you need to be aware of. One of the changes in SQL Server 2017 is that the SQL Server Reporting Services (SSRS) installation is not part of the regular SQL Server installation. In this tip, we will explore how to install and configure SSRS in SQL Server 2017.
Solution
SQL Server 2017 was released in October and contains many new enhancements over previous SQL Server versions. Up until SQL Server 2016, SSRS installation was part of the regular SQL Server installation where we have to select Reporting Services from the feature pane, and then install and configure SSRS.
With SQL Server 2017, when we launch the SQL Server setup from the media, the SQL Server Installation Center provides a separate option: Install SQL Server Reporting Services. This is basically a hyperlink that launches a download page that provides a link to install SQL Server Reporting Services.

If we go through the normal SQL Server installation by clicking on New SQL Server stand-alone installation or add features to an existing installation, we can see below that Reporting Services is not included in the list of instance features. But there is a link above the Instance Features Looking for Reporting Services? Download it from the web.

Once we click on the link, it takes us to the download page for SQL Server Reporting Services as shown below.

This downloads SQLServerReportingServices.exe which is a very small installation setup for SSRS.

This SSRS 2017 installer is small and easier to complete than previous SQL Server versions. If we already have a SQL Server database engine installed, we can simply download and install Reporting Services in just a few minutes. This installer is specific to Reporting Services, so it allows you to install the latest version of Reporting Services without impacting other SQL Server database features.
Installation of SQL Server 2017 Reporting Services
Once we have downloaded SQLServerReportingServices.exe, begin the install process by clicking on the setup file. This launches the setup process as shown below.

This setup shows the release version of SQL Server Reporting Services. For example, above you can see Microsoft SQL Server Reporting Services (October 2017).
When the install starts, we have an option to choose an edition to install from the drop down list.

From this list, we can select the edition as:
- Evaluation (expires in 180 days)
- Developer
- Express
To run SSRS 2017 in production, we need to enter the SQL Server 2017 product key during setup. To do so, click on Enter the product key.

For my installation, I have selected the evaluation edition. Clicking on Next takes you to review and accept the license terms.

Click on Next after accepting the license terms. The next screen shows that you will need a database engine instance on this or separate server for the report server database. Since this is lightweight installation for SSRS only, it will only install Reporting Services.

It also contains a link to check supported database engine versions and editions. Click on Next to specify an install location. By default, it will be in C:\Program Files\Microsoft SQL Server Reporting Services.

Click on Next to start the SQL Server Reporting Services installation, this is very quick.

Once setup is complete, it installs all the necessary installation files for Reporting Services and gives the option to configure the report server manually. This basically launches the Report Server Configuration Manager.
SQL Server Reporting Services 2017 Configuration
Once we have installed SQL Server Reporting Services, we need to configure the report server. Clicking on configure report server, launches the Report Server Configuration Manager to connect to a specific SSRS instance. One thing to note is that the Report Server instance name shows as SSRS while in the previous version it shows as RSServer.

Once we have connected to SSRS instance, we can see a basic summary page that shows the Reporting Service Instance ID, Edition, Product Version, Report Service Status, etc. The Report Server database name and Report server mode show as blank since no configuration has been completed yet.

To configure the report server database, click on Database from the left.
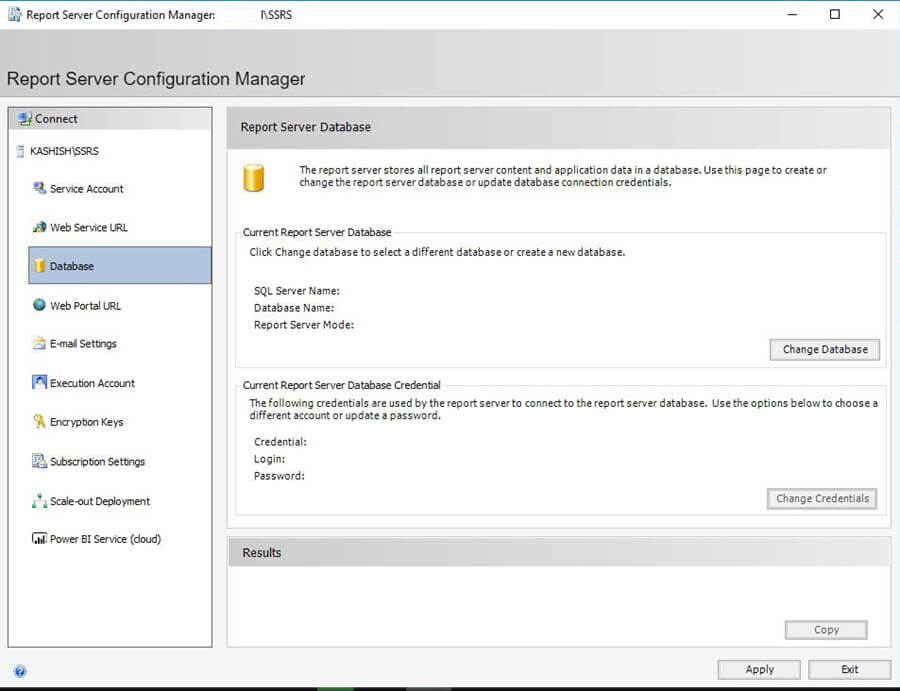
Click on Change Database to configure it. It opens the Report Server Database Configuration Wizard.

I want to setup a new report server database, so click on create a new report server database. If we want to use an existing database, select choose an existing report server database.
We need to provide the Server Name, Authentication Type (Windows/SQL) and credentials in case of SQL authentication and then click on Test Connection to check the connection status.

Click on Next and enter a database name and select the language to use for running SQL scripts.

On the next page, specify the credentials of an existing account that the report server will use to connect to the report server database.

The next page shows the summary of the Report Server Database Configuration Wizard. Verify the configuration and click on Next to start the configuration.

Once all steps are completed successfully, it restarts the Reporting Service.

This is what the Report Server Configuration Manager looks like after configuration.

Now that the database configuration is complete, we need to configure a URL used to access the report server. To do so, click on Web Service URL from the left menu.

Specify the Report Server Web Service Virtual Directory name and click on Apply. By default, the Report Server web service virtual directory name is ReportServer.

This applies the configuration by creating a virtual directory and restarts Reporting Services as shown in the results section above.
Similarly, we need to configure a URL to access Web Portal URL. To do so, click on Web Portal URL from the left hand menu and specify the virtual directory name and click Apply to accept the changes.

Now SQL Server Reporting Service configuration is complete and we can configure and publish SSRS reports.
Facts about SQL Server Reporting Services 2017
The SQL Server Configuration Manager is used to manage services related to SQL Server (i.e. Database Engine, Analysis Services, Integration Services, etc.). Prior to SQL Server 2016, Reporting Services also used to be managed from here as well as from the Reporting Services Configuration Manager. In SQL Server 2017, Reporting Services is not part of the SQL Server Configuration Manager.
However, we can find it in the Services if we run services.msc.
SSRS 2017 is now completely separate from the SQL Server directory as well. Previously, the Reporting Services directory used to be in C:\Program Files\Microsoft SQL Server\MSRS13.SQL2016\Reporting Services. Now it is C:\Program Files\Microsoft SQL Server Reporting Services.

Next Steps
- Download and install SQL Server Management Studio v17.3
- SQL Server 2017 officially launched on October 2, 2017. Check out the SQL Server 2017 Release notes
- Explore What’s new in SQL Server 2017
- Read more SQL Server 2017 tips
- Explore Business intelligent tips
- Read more about the Report Server Database

Hi! I am Rajendra Gupta, Database Specialist and Architect, helping organizations implement Microsoft SQL Server, Azure, Couchbase, AWS solutions fast and efficiently, fix related issues, and Performance Tuning with over 14 years of experience.
I am the author of the book “DP-300 Administering Relational Database on Microsoft Azure.” I can be reached at: Rajendra.gupta16@gmail.com for any consulting help.
- MSSQLTips Awards:
- Author of the Year – 2022 | Author Contender – 2021/2023/2024 | Champion Award (100+ tips) – 2020

How can you install report server on a domain server?